At this time, there is no fully reliable indoor navigation app that works in all buildings without special equipment such as QR codes, Bluetooth beacons, or professional indoor mapping. GPS does not function accurately indoors, and current mobile apps cannot provide turn‑by‑turn indoor directions. Indoor Navigation for Blind Users remains a significant technical challenge due to these limitations.
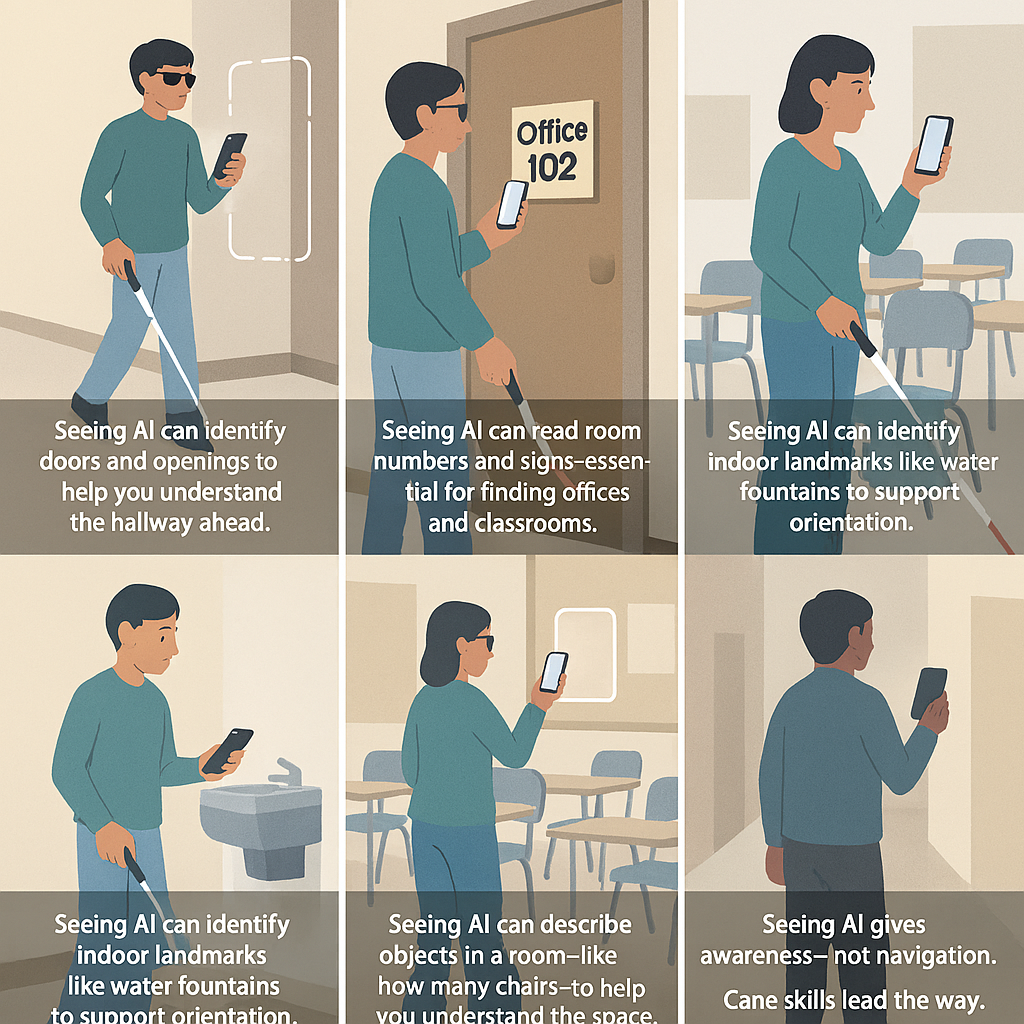
However, Seeing AI is the closest tool we have for indoor orientation that you can use immediately. It can describe rooms, identify doors, read signs, and recognize objects. When combined with strong cane skills, Seeing AI gives blind travelers meaningful visual feedback that supports safe and confident movement inside any home, school, or building. AND most importantly, can use anywhere and immediately.
Lesson: Indoor Navigation for Blind Users Using Seeing AI – (iPhone)
Skills: Indoor navigation, route following, spatial awareness, tech + cane integration Tools: iPhone with Seeing AI, long cane, school hallway or building
Lesson: Indoor Orientation Using Seeing AI
What it CAN do, what it CANNOT do, and how blind travelers can use it safely and effectively.
Strong cane travel skills are the foundation of safe and independent mobility. Great cane training will always take you where you need to go. Seeing AI can add helpful information about the environment, but it is the cane that provides the reliable, real‑time feedback a blind traveler depends on.
Skills: Indoor orientation, environmental awareness, object identification, sign reading, cane + tech integration Tools: iPhone with Seeing AI, long cane, any indoor environment
Lesson Overview
Seeing AI is not an indoor navigation app. It does not map buildings, create routes, or give turn‑by‑turn directions.
But it is the most powerful indoor visual feedback tool available today for blind travelers — and when paired with strong cane skills, it becomes a reliable way to:
identify rooms
confirm locations
understand layout
detect doors and openings
recognize objects
read signs
build mental maps
This lesson teaches students how to use Seeing AI as an indoor orientation partner, not a navigation system.
Learning Objectives
By the end of this lesson, the student will be able to:
Use Seeing AI to identify doors, signs, and room numbers
Use the World and Scene channels to understand layout
Use Short Text to read labels, signs, and posted information
Use object recognition to identify furniture and landmarks
Combine cane skills + Seeing AI feedback to move safely
Understand the limits of Seeing AI indoors
Use Seeing AI as a supplement, not a replacement, for O&M skills
What Seeing AI CAN Do Indoors
Describe what the camera sees
furniture
doors
hallways
people
objects
appliances
stairs
obstacles
Read signs and room numbers
classroom numbers
office signs
restroom labels
posted instructions
bulletin boards
✔ Identify objects and landmarks
tables
chairs
vending machines
water fountains
cabinets
shelves
✔ Help build a mental map
By scanning left, right, and ahead, the student can understand:
where openings are
where walls are
where intersections are
where furniture is located
✔ Confirm they’ve reached the correct room
Short Text + Scene = “Yes, this is Room 214.”
✔ Support safe indoor travel when paired with cane skills
Seeing AI gives visual information. The cane gives tactile information. Together, they create a complete picture.
What Seeing AI CANNOT Do Indoors
❌ It cannot navigate
turn‑by‑turn directions or indoor routes. Nor give hallway guidance.
❌ It cannot map a building
No saved indoor locations, or indoor POIs. No floor detection.
❌ It cannot guide you back to a room
Markers and audio beacons are GPS‑based and only work outdoors.
❌ It cannot detect exact indoor positions
GPS accuracy indoors is too poor.
❌ It cannot replace cane skills
It supplements orientation — it does not provide mobility.
“Seeing AI helps you understand what’s around you indoors. It can describe rooms, read signs, and identify objects. It cannot guide you like a GPS, but it gives visual information that supports your cane skills.”
Explore the World Channel
Explore
hold the phone at chest level
slowly scan left to right
listen to descriptions
Listen for:
“What openings do you hear?”
“What objects are in front of you?”
“What does it say about the hallway?”
Identify Doors and Openings
Use the camera to:
find doorways
detect open vs closed doors
identify intersections
confirm hallway direction
Think about:
“Where is the door located?”
“Is it open or closed?”
“What does your cane confirm?”
Read Room Numbers and Signs
Switch to Short Text.
Now
locate room numbers which should have braille
read office signs
read restroom labels
read posted instructions
This builds literacy + orientation.
Object Identification
Use the Describe to identify:
tables
chairs
cabinets
appliances
vending machines
water fountains
anything
Think about
“What object did it identify?”
“How does that help you understand the space?”
Build a Mental Map
Walk a hallway or room.
scan ahead
scan left
scan right
use cane to confirm
describe the layout
Then combine:
visual feedback
tactile feedback
spatial reasoning
Reflection
“What did Seeing AI help you understand?”
“What did your cane tell you that Seeing AI didn’t?”
“How did the two work together?”
“What can Seeing AI NOT do indoors?”
This reinforces realistic expectations.
If you are teaching this here is an Assessment Checklist
Student demonstrates mastery when they can:
Identify doors and openings using Seeing AI
Read room numbers and signs
Identify objects and landmarks
Build a mental map of a hallway or room
Use Seeing AI + cane skills together
Explain what Seeing AI cannot do indoors
Teacher Notes
Seeing AI is the best indoor orientation tool available today
It is NOT indoor navigation
It gives visual information, not directions
It works in any building
It supports independence when paired with cane skills
Blind Teens See a World That Rarely Sees Them Back-They scroll social media with braille display and
The Silent Exhaustion Teens Carry Into the Classroom
The bell rang at 7:05 AM, but most of the class did not look up. At the front of the room, Ms. Sage watched them, really watched them and saw something most adults miss. In moments like this, it becomes clear why so many people are talking about Today’s Teens Feeling Overwhelmed. Twenty‑seven juniors sat in rows; faces washed in the cold glow of their screens. Their thumbs moved faster than their eyes. Notifications popped like fireworks. Someone laughed at a meme. Someone posted a photo… then deleted only minutes later because of fear someone judging the image.
Ms. Sage stood with sadness and concern.
The Hidden Weight Social Media Places on Today’s Teens
She had taught for thirty‑two years, but this generation was different. Not worse, just heavier. According to the latest national data, 57% of teen girls and 29% of teen boys now report persistent sadness or hopelessness, the highest levels ever recorded. And teens who spend more than three hours a day on social media which is nearly all of them, are twice as likely to experience symptoms of anxiety and depression.
She saw those numbers every day in their faces: tired, anxious, overwhelmed, disconnected, and fragile.
“Phones away,” she said gently. “All the way away.”
A few groaned. One boy rolled his eyes. But they obeyed.
On her desk sat a plain cardboard box. Nothing special. But today, it mattered.
“I want you to write down one thing,” she said, handing out slips of paper. “Not your name. Not a joke. Just the truth.
Then she turned to Suzy and John, her blind students. “You two can text me using SendAnonymousSMS,” she said. “I’ll copy your message onto a paper slip and drop it in the box with the others.” “That way no one will know who it’s from.”
She looked back at the room. “Everyone Write down the thought that runs through your mind — your heart — whenever you scroll your accounts. The one you never say out loud.”
The room stilled. Eyes wide.
When Comparison Becomes a Daily Battle for Teens
A cheerleader in the back, Lila, known for her perfect Instagram feed, stared at her blank paper under crushing pressure to “look” perfect. Her hands trembled. Just last week, she had confessed to the counselor that she spent over eight hours a day comparing herself to girls she did not even know, staying up late and scrolling into the early morning hours. And she was not alone. National surveys show that 46 percent of teens say social media makes them feel worse about their bodies and their families, and one in three teen girls say they feel “ugly” because of what they see online.
Every day, they scroll past smiling faces, perfect vacations, flawless skin, and filtered happiness and somewhere deep inside, they start believing everyone else is living a better life. They compare those highlight reels to their own quiet struggles and convince themselves they’re the only ones who feel sad, lonely, or left out.
Lila finally wrote something down and continued to move her pencil across the paper.
The Loneliness Behind the Laughs
Next to her, Jordan, the class clown tapped his pencil. He had 12,000 followers on TikTok. People loved him. But last month, he told a friend he felt “fake.” Research shows that teens who curate a “perfect” online persona are three times more likely to report loneliness, even when surrounded by people.
Jordan knew that feeling too well. He had one friend he could joke around with, someone he could confide in on the surface, but no one he trusted deeply. His parents had split two years ago, and his mom now worked two jobs just to keep the lights on. Most nights, he ate dinner alone while his sister stayed in her room, scrolling and picking at her food. They did homework alone. They fell asleep alone. The silence in the house made the loneliness louder, and the more he scrolled through everyone else’s “happy” lives, the more he believed he was the only one who felt this empty even though he saw the same despondent look on his sister’s face. So, he posted constantly, leaning into his class‑clown persona, trying to joke the loneliness away.
Blind Teens See a World That Rarely Sees Them Back
In the front of the room, Suzy and John knew what it felt like to be outsiders. Being blind set them apart before they even opened their mouths, and the feeling only sharpened when they scrolled through social media. With apps that read pictures aloud, the isolation deepened because no matter how many posts they explored, they rarely found people who were like them, lived like them, succeeded like them. They searched for blind mentors who could show them what was possible, yet they found few and sometimes none. Each empty search pressed the loneliness deeper. Students rarely talked with them because their blindness created a barrier built from difference and fear. Still, they kept scrolling, because that’s what teens did, even when it hurt.
Most of the class was not made up of kids like Lila, Jordan, or the school’s sports heroes. It was kids like Joe and Sue, the ones who sat in the back or middle rows, who blended in, who were never chosen first for anything. They weren’t popular, not even close, and they felt it every day. Students like Joe and Sue were the ones pushed aside in hallways, called hurtful names, talked over in group projects, laughed at for clothes their families could afford or hobbies no one else understood. They watched the popular kids climb the social ladder while they stayed invisible on the bottom rung, and the invisibility hurt almost as much as the teasing and social media scrolling. Being unseen didn’t protect them; it only made the loneliness sharper.
Brilliance and Secrets
Then, there were the two brilliant minds in the room: Jessica and James. The kind of students who competed at everything, from test scores to running for class president to who could finish the assignment first. They seemed happier than most, partly because they checked their social media feeds far less often than everyone else. They still used it — they were teens, after all — but they’d learned that too much scrolling made them feel worse, so they kept their distance when they could.
Even so, that choice, along with their drive, set them apart in a different way. They were the outliers, the only two who cared more about academics and future goals than trends or popularity. And because of that, some kids picked on them, calling them “perfectionists” or “teacher’s pets,” never understanding that Jessica and James weren’t trying to outshine anyone — they were just trying to build a future shaped by the dreams their parents had poured into them. That came with its own kind of pressure. When they fell short of what their parents expected, it hit their hearts harder than anything they could ever read online.
The Emotional Pressure Today’s Teens Feel but Rarely Share
Across the room, Tyler, the star running back with the big smile, the one everyone assumed had it all together leaned back in his chair, spinning his pen between his fingers. On the field, he was unstoppable. In the hallways, he walked with the kind of confidence people mistook for certainty. But inside, he was unraveling. Athletes are often seen as the “strong ones,” yet studies show they experience depression at the same rates as their peers; they just do not talk about it. Tyler lived that statistic.
He had teammates he joked with, guys he could talk football with, but no one he trusted with the truth. He had one friend he could confide in superficially, but no one who knew him deeply; no one who understood the pressure he carried. His parents had split last year, and his dad moved two states away. His mom worked double shifts at the hospital, leaving before sunrise and coming home long after he’d gone to bed. Most nights, the house was dark and quiet, and Tyler ate dinner alone at the counter, scrolling through highlight reels of other athletes who seemed stronger, faster, happier.
Online, he saw boys his age posting scholarship offers, perfect bodies, perfect lives. He compared their victories to his private fears and convinced himself he was falling behind. Research shows that nearly 1 in 3 teen boys feel pressure to appear “strong” online, and many hide their stress behind humor, sports, or silence. Tyler was no different. The louder the crowd cheered on Friday nights, the more alone he felt walking off the field.
He tapped his pencil harder. Then, slowly, he picked up his paper and began to write.
The Truth Teens Admit Only When They Feel Safe
One by one, they walked up and dropped their slips inside.
Ms. Sage waited until the last student sat down. Then she opened the box.
She pulled the first slip…and read.
“I feel invisible unless someone likes my posts.”
Another.
“I delete every picture of myself. I hate how I look.”
Another.
“I check my phone 200 times a day because I’m scared I’ll miss something and people will forget me.”
Another.
“I pretend I’m confident online. I’m not.”
Another.
“I don’t know who I am without my phone and my likes.”
She paused. The room was silent. No one moved.
Then she read the one that made her throat tighten.
“I don’t want to be here anymore… Everyone else looks happy, and I feel lost, hurting, and completely alone.”
The Centers for Disease Control and Prevention (CDC) reports that 22% of teens have seriously considered suicide, and the rates are rising fastest among those who spend the most time online. Ms. Sage knew that statistic. But hearing it in her classroom, in a child’s handwriting was different.
She folded the paper gently and stifled her tears.
Breaking the Lies Teens Believe About Themselves
“This,” she said, resting her hand on the box, “is what you’re carrying; this heavy, invisible weight.”
Her voice softened.
“And you need to know something. You are not the only one. Everyone who scrolls feels this pressure in some way, even adults. Loneliness is quietly shaping all of us, more than we admit.”
She looked up, steady and kind.
“You’re not strange for feeling overwhelmed. You are not weak for feeling the ache. You’re human. And you’re not carrying this alone.”
Seeing Through the Lies of Social Media
What you see online is not real life. What you feel is real, but it is not the end of your story.” Talk with each other about truth and make a friend, knowing that what is online, is a persona, something false pretending to be real. Your “likes” should come from right here in this room or at home.
Many students wiped their eyes.
Lila reached over and squeezed another cheerleader’s hand as she began to weep uncontrollably.
For the first time all year, they weren’t scrolling. They were listening. They were human again and looking around at each other.
Ms. Sage closed the box slowly, her hands resting on the cardboard as if it were something alive. Then she looked up.
“We’re not leaving this here,” she said quietly. “Come with me.”
The students exchanged confused glances, but no one argued. She picked up the box, hugged it to her chest, and led them out of the classroom, down the hallway, and through the back doors of the school.
The winter air hit them first; sharp, clean, honest.
Behind the building, near the maintenance shed, the old janitor, Mr. Alden, stood beside a metal burn barrel. Flames licked the rim, crackling softly. He nodded at Ms. Sage. They had arranged this.
“This,” she said, holding the box tightly to her chest, “is where we let go of what we were never meant to carry alone.”
The students formed a loose circle around the barrel. No one spoke. The only sound was the fire breathing.
Letting Go of What Teens Were Never Meant to Carry Alone
Ms. Sage opened the box. The folded slips of paper, their secrets, their fears, their midnight thoughts, rustled in the wind.
“Every one of you wrote something real,” she said. “Something heavy. Something you’ve been holding in the dark. Today, we burn the lies that told you were alone and not seen.”
She lifted the box and tipped it gently. One by one, the papers slid into the flames. They curled, blackened, and disappeared.
A hush fell over the group. Some students stepped closer. Others wiped their eyes. Jordan and several boys shoved their hands into their pockets, blinking hard as they fought the ache. Lila and the cheerleader teammate mirrored each other without meaning to, arms wrapped tightly around their own bodies, heads bowed as tears were blinked back and slipping free. They stood in a protective posture girls slip into when they don’t want anyone to see them break, watching the fire as if it were rewriting their stories.
Suzy pressed her head into her cane as rocked back and forth trying to comfort her pain. John stood next to her like a statue, gripping his cane so tightly his knuckles turned white, as he fought back tears.
Burning Lies
Because as the papers burned, they weren’t just burning confessions, they were burning the lies they had believed about themselves. The lie that they weren’t enough. Continued lie that everyone else was happier. The lie that they were alone. The lie that their worth depended on likes, followers, or filters.
Tyler stepped forward. He reached out and waved the ashes and said “goodbye”, a quiet, aching release. Then another hand lifted beside him with “goodbye”. And another. And another. Soon the whole group stood around the barrel, their hands rising over the heat, each wave a soft, brave goodbye to the weight they had carried… and a trembling welcome to the freedom they were finally claiming.
No one rushed or joked or hid.
When the last ember died, Ms. Sage spoke again, her voice steady.
“You don’t walk alone,” she said. “And the lies you waved goodbye to… they’re gone. You don’t have to carry them anymore.”
Returning to the Classroom with a New Strength and Solidarity
They stood there a moment longer, breathing in the cold air, feeling lighter than they had in years.
Then, slowly, they walked back inside; not as strangers scattered across rows, but as a group bound by the truth that they were more alike than different.
They were not alone.
Learning to Use Social Media Without Losing Yourself
Quitting social media isn’t really an option in this day and age; it’s about learning how to use it differently, in ways that lift you instead of draining you. You can follow people who inspire you, mute the accounts that make you compare yourself or feel worse about who you are, set smaller time limits (even a simple timer on your phone helps), and remind yourself that real connection happens in real conversations.
And when you look up from your screen, you’ll start to notice the people around you, classmates who hurt too, who could use a friend, who might become real friends if you gave them a chance. Speak to someone at school, or give someone a call after school, invite them over for pizza and a movie, make popcorn, hang out, or get a couple of people together just to laugh and talk. You don’t need perfection to feel better, just a healthier rhythm, a middle ground where your screen doesn’t get to decide your worth or your friendships.
Faith Reflection: The God Who Sees the Overwhelmed and Brokenhearted
When life feels heavy and everyone else online looks happier, God sees what you’re carrying — the real you, not the filtered version. In Scripture, Hagar calls Him “El Roi — the God who sees me.” He sees your hurt, your questions, your loneliness, and He doesn’t look away.
Psalm 34:18 says, “The Lord is close to the brokenhearted.” Not just the strong. Not just the confident. The brokenhearted.
The thoughts you wrote down — the lies you’ve believed — don’t define you. God’s truth does.
You are loved. And chosen. You are enough. And you are not alone.
Even on the days you feel invisible, God whispers: “I see you. I’m with you. I’m not letting go.
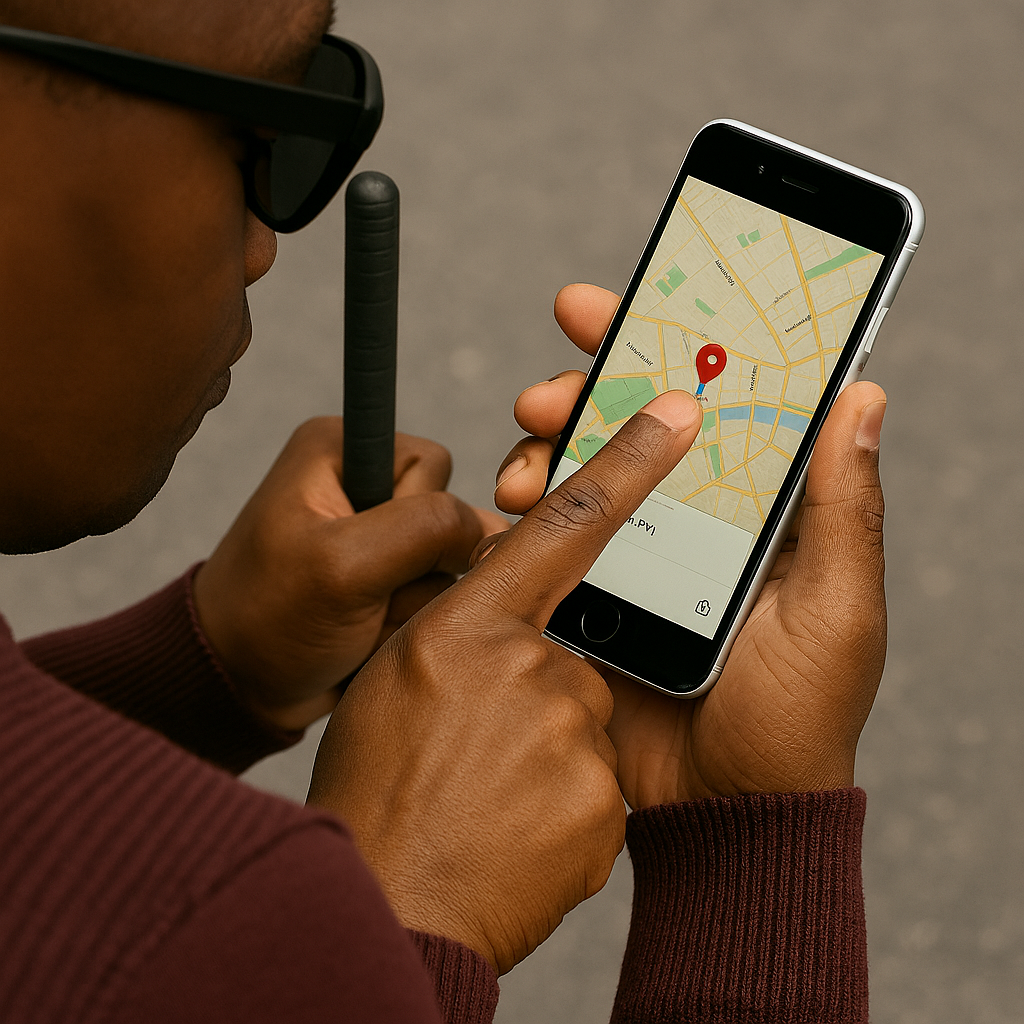
Outdoor Navigation for Blind Travelers Using iPhone App
Using Siri • VoiceOver • Apple Maps • Compass • O&M Skills: 7 & 8 of 9 Lessons
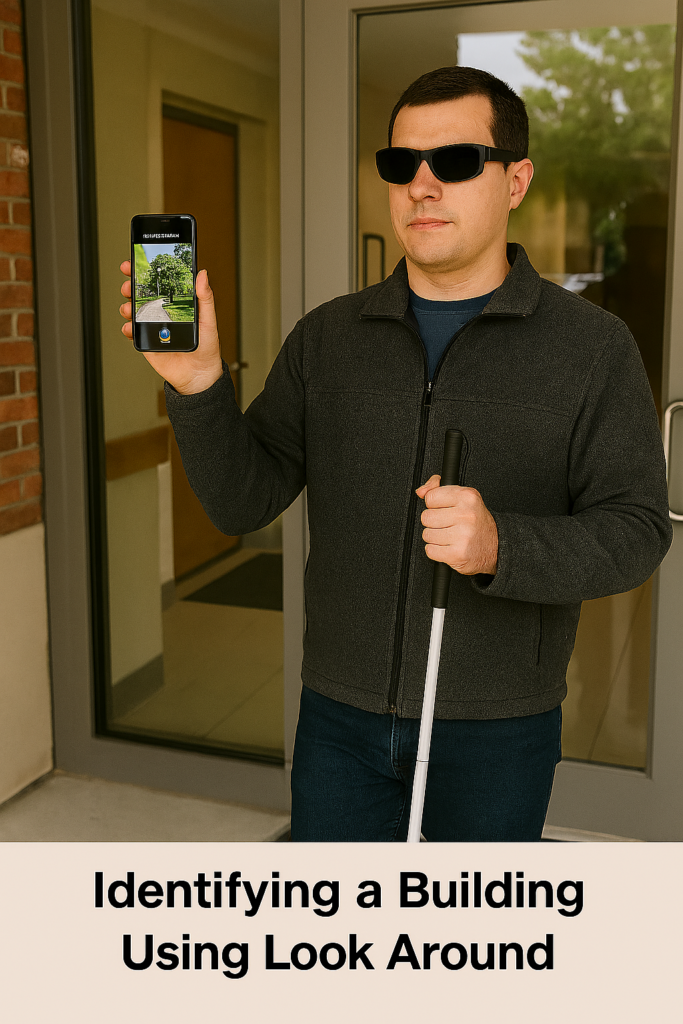
Complete Indoor & Outdoor iPhone Navigation for Blind People- Look around with iPhone
Look Around APP for outdoor iPhone Navigation for Blind People is now easier than ever. Blind travelers can navigate confidently inside and outside buildings when they combine iPhone tools with strong O&M skills. Siri gives quick commands, VoiceOver announces headings and distance, and Apple Maps provides direction cues that still work indoors. The Compass keeps travelers aligned in hallways, while Look Around describes the outside layout before they enter any building. Using these tools together allows blind people to build complete routes, drop reliable indoor pins, and understand their environment with far greater independence.
LESSON 7— Complete Navigation Routine
Purpose: Combine all skills into one independent travel system.
Indoor Navigation for Blind Travelers Using iPhone Apps
Using Siri • VoiceOver • Apple Maps • Compass • O&M Skills: 9 of 9 Lessons
Indoor Navigation for Blind People with the Seeing AI App-Using seeing AI to identify what is in lobby
LESSON 9 — Use Seeing AI for Indoor Orientation and Room Identification
Once inside, Seeing AI becomes the key tool for identifying interior features—room signs, doors, and visual clues—while Lesson 8 combines all navigation skills into a complete routine. Students use Look Around outside, drop pins inside, follow Siri’s directions, align with Compass, walk straight, count steps, identify landmarks, and use Seeing AI to confirm locations. Indoor Navigation for Blind People with the Seeing AI App is made possible as together, these tools empower blind travelers to navigate independently with confidence.
Purpose: Help blind travelers identify hallways, doors, signs, objects, and surroundings inside buildings where Apple Maps cannot provide indoor guidance.**
Seeing AI gives fast, accurate orientation information through-download app in app Store:
Scene description
Door detection
Short Text reading
Object identification
Direction of sounds (“in front of you,” “to your left,” etc.)
It becomes the traveler’s “eyes” inside the building. Fantastic for Home also.
A. Open Seeing AI Quickly
The user says: “Hey Siri, open Seeing AI.”
VoiceOver opens the app instantly.
B. Use Scene Mode for Fast Orientation
Scene mode gives an overview of the space.
Steps:
User holds the phone at chest level.
User points the camera forward.
VoiceOver speaks what Seeing AI detects.
Examples of descriptions:
“A hallway with doors on each side.”
“A desk and chairs in front of you.”
“A person standing near the door.”
“A staircase ahead.”
Scene mode helps the user confirm:
They are in the correct hallway
The hallway has doors leading to nearby rooms
They are close to the bathroom or office area
They are approaching an intersection
Vision teachers can integrate this during O&M lessons to reinforce environmental understanding.
C. Use Door Detection (in Scene or Preview)
Door Detection helps blind travelers find rooms and entrances.
Steps:
User opens Scene or Door Detection.
User sweeps the camera left to right.
VoiceOver announces:
“Door ahead.”
“Door three feet to your right.”
“Door with sign: Room 112.”
This replaces visual scanning and gives very precise orientation inside schools or offices.
D. Use Short Text to Read Room Signs and Labels
Blind travelers use Short Text to read anything instantly.
Steps:
User flicks to “Short Text.”
User holds the phone up while walking past doorframes.
Seeing AI reads text automatically without taking a photo.
Examples:
“Main Office.”
“Restroom.”
“Room 203.”
“Science Lab.”
This helps confirm the correct room and supports independent route practice.
E. Use Object Recognition to Confirm Landmarks
Object mode helps locate:
Trash cans
Desks
Water fountains
Elevators
Stairs
Classroom equipment
Steps:
User flicks to “Objects.”
User scans the room slowly.
VoiceOver announces detected objects with direction cues.
This helps the traveler understand interior layout.
F. Use Person Detection for Safety and Social Navigation
Seeing AI identifies:
People
Their location
Their distance
Their movement
This helps the user:
Sense if someone is near the bathroom
Detect crowds or busy hallways
Avoid walking into people
Know when someone is approaching
G. Combine Seeing AI with Dropped Pins and Compass
This is the strongest indoor navigation system for blind travelers.
Flow Example:
Siri → “Walking directions to Bathroom.”
User aligns with Compass → Heading West.
User walks along hallway.
Seeing AI Short Text → Reads door signs to confirm progress.
Seeing AI Scene → Confirms hallway shape and intersections.
Seeing AI Door Detection → Confirms bathroom door location.
User drops a new pin at the bathroom.
This creates a full multisensory navigation loop.
H. Where Seeing AI Helps Most
Seeing AI is extremely helpful in:
Home
Schools
Offices
Hospitals
Hotels
University buildings
Community centers
Dorms
Airports (inside terminals)
Whenever GPS fails inside buildings, Seeing AI fills the gap.
I. When Seeing AI Should Be Used Instead of Apple Maps
Inside buildings:
Apple Maps gives heading + distance only
Seeing AI gives visual environmental detail
Use Seeing AI to:
Confirm correct hallway
Locate doors or signs
Detect intersections
Understand room layout
Identify objects
Get general scene context
Together: Pins = direction Compass = orientation Seeing AI = environment detail
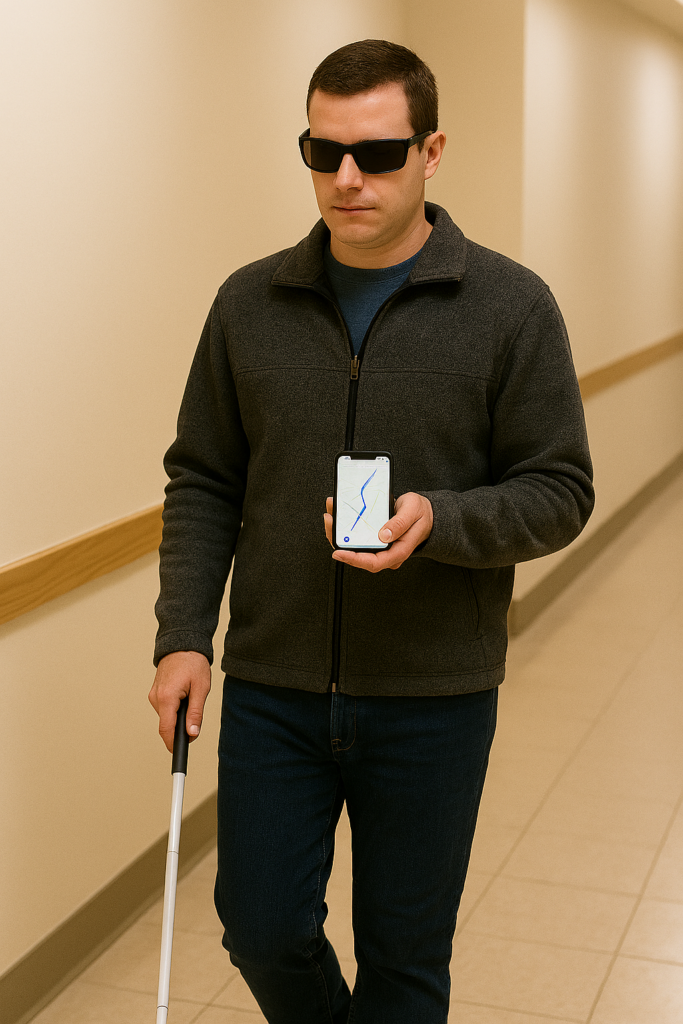
Indoor Navigation for Blind Travelers Using iPhone Apps
Using Siri • VoiceOver • Apple Maps • Compass • O&M Skills: 5 & 6 of 9 Lessons
Indoor negation using saved pins and labels when using the compass and route memory
Teaching indoor orientation requires blending technology with classic O&M strategies, and Lessons 5 and 6 bring those pieces together. Students first learn to use the iPhone Compass to understand headings, turns, and directional changes inside a building—skills that strengthen spatial awareness and support non-visual navigation. Once they can align their body to a heading and follow Siri’s cues, they begin building route memory through landmarks, step counting, repetition, and reverse travel. Together, these lessons give blind travelers the tools to form accurate mental maps and move confidently between indoor locations using both technology and traditional mobility techniques.
LESSON 5 — Teach the Compass for Indoor Orientation
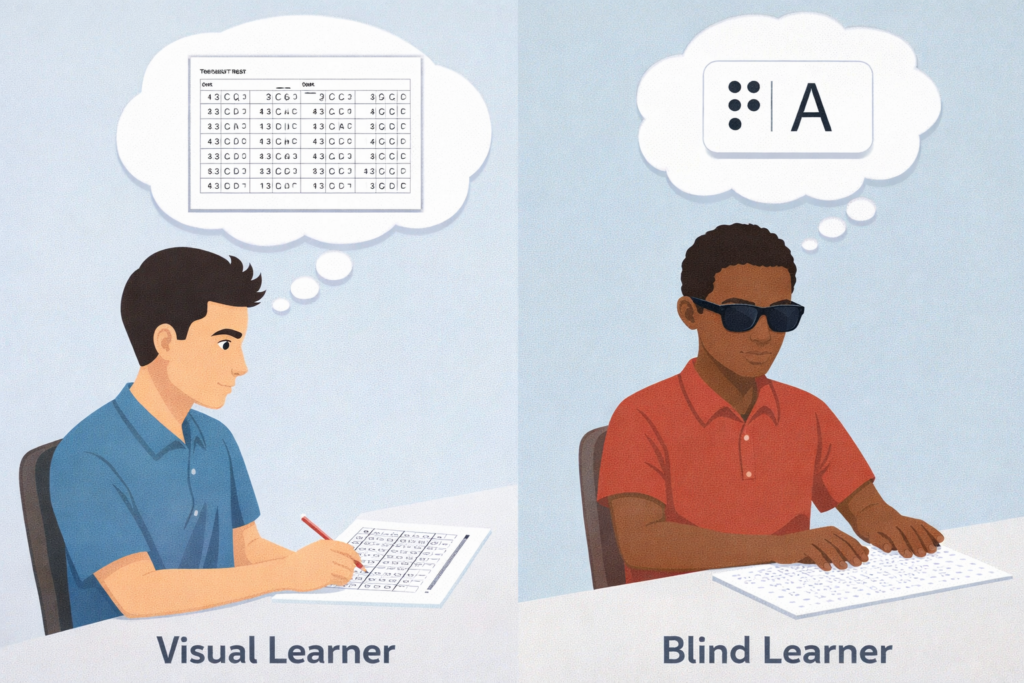
Access Barriers in Testing for Blind Students- Difference between blind (1 item at a time) and sighted learners (see all in 1 look)
All Test-Taking Challenges and Access Barriers for Blind and Low-Vision Students in Standardized and Classroom Testing
I. Barriers in Refer‑Back Test Questions for Screen Reader Users
Purpose of This Report
Blind and visually impaired test takers who rely on screen readers such as JAWS or NVDA, with or without a braille display, face significant barriers when assessments require rapid reference to earlier paragraphs or statements. These formats are inherently visual and not accessible in their current design.
1. Description of the Test Format
Many standardized test items require students to:
Read a question
Refer back to a paragraph, statement, or numbered section
Return to the question and select the correct answer
Sighted test takers can visually scan and relocate information instantly. Screen reader users cannot.
2. Why This Format Is Not Accessible to Screen Reader Users
2.1 Loss of Visual Proximity
Screen readers present content linearly, not spatially. Sighted students see the question and referenced paragraph in the same visual field; blind students do not.
2.2 Excessive Navigation Required
To “refer back,” a blind student must navigate backward through multiple elements, locate the correct paragraph, reread it, then navigate forward again to find the question. This process is slow, cognitively demanding, and fundamentally different from the visual experience the test assumes.
2.3 Increased Cognitive Load
Screen reader users must retain the paragraph in memory, relocate the question, and answer while juggling both sets of information. This creates a dual cognitive burden sighted students never encounter.
2.4 Timing Disadvantage
Linear navigation takes significantly longer than visual scanning. This is a structural access barrier, not a skill issue.
3. Why a Sighted Reader Restores Equal Access
A trained sighted reader allows the blind test taker to:
Hear the question and referenced paragraph immediately
Avoid unnecessary navigation delays
Demonstrate knowledge rather than screen reader navigation skills
This restores equal access, not an advantage.
4. Recommended Solutions
4.1 Immediate Access Support
Provide a human reader for all refer‑back items so blind test takers can access referenced material at the same speed as sighted peers.
4.2 Long‑Term Accessible Test Design
To make future tests independently accessible:
Place referenced paragraphs directly above the question
Provide a “Repeat Paragraph” button or link
Use collapsible sections operable with a single keystroke
Label paragraphs with headings or landmarks
Avoid long‑distance navigation requirements
These practices align with WCAG 2.2 and accessible assessment standards.
II. Barriers Created by Inadequate Image Descriptions for Blind Test Takers
Purpose of This Section
Image‑based test items—charts, diagrams, maps, graphs, illustrations, and labeled pictures—are inaccessible when alt text is incomplete. Blind students require accurate descriptions and, when appropriate, tactile materials to access visual information equitably.
1. Description of the Test Format
Many test questions require students to:
View an image
Interpret visual details
Answer questions based on those details
Sighted students can scan images instantly. Blind students rely entirely on alt text and screen reader output.
2. Why Inadequate Alt Text Makes the Test Inaccessible
2.1 Alt Text Lacks Critical Details
Alt text often reflects limited understanding of what blind users need. Vague descriptions such as “a chart” or “a diagram of a cell” do not provide the information required to answer test questions.
2.2 Screen Readers Cannot Interpret Images
A screen reader only reads the alt text provided. If the alt text is incomplete:
The student receives no meaningful information
The student cannot analyze the image
The student cannot answer the question
2.3 Visual Information Is Spatial
Images rely on position, direction, size, patterns, color coding, and labeled locations—details that require a complete verbal description or tactile representation.
3. Impact on Blind Test Takers
3.1 Severe Information Loss
Incomplete or vague alt text omits key data, relationships, labels, and overall structure. When test questions rely on images, the assessment no longer measures the student’s knowledge—it measures the limitations of the format. A trained sighted human describer who works directly with the blind student can provide the detailed visual information necessary for equal access and valid assessment.
3.2 Increased Cognitive Load
Blind test takers must infer missing details, hold incomplete information in memory, and attempt to answer without full access. This creates an inequitable cognitive burden.
3.3 Timing Disadvantage
Blind students rely on detailed descriptions, trial‑and‑error navigation, and tactile graphics, resulting in significant time loss.
4. Why a Sighted Human Describer Is Essential for Equal Access
A trained describer can:
Verbally explain the image in full detail
Identify labels, relationships, and spatial layout
Provide tactile graphics when appropriate
Answer clarifying questions about structure (not content)
This ensures blind test takers understand the image at the same conceptual level as sighted peers.
5. Recommended Solutions
5.1 Immediate Access Support
Provide a trained sighted describer who can deliver complete visual information and support understanding of image‑based content.
5.2 Long‑Term Accessible Test Design
To make image‑based items independently accessible:
Provide complete, descriptive alt text
Include long descriptions for complex graphics
Offer tactile graphics
Use clear, structured metadata
Follow WCAG 2.2 and accessible assessment guidelines
Final Summary
Refer‑back questions and image‑based test items create significant access barriers for blind students who rely on screen readers or braille displays. These barriers stem from visual assumptions built into test design—assumptions that do not translate to linear, audio‑based navigation or incomplete alt text. Equal access requires redesigning assessments to remove visual dependencies and, when necessary, providing trained human support such as readers or describers. When tests are built with accessibility in mind, they measure what students know—not how well they can navigate inaccessible formats.
This applies to all types of testing, so teachers must stay aware and provide full support for the blind or low-vision student in their classroom.
Finding high-quality tactile graphics for advanced math often feels overwhelming, especially when you support blind students who want deeper conceptual understanding. However, you can simplify the process with a clear list of reliable sources. To begin, you can explore this curated collection of teacher-vetted tactile math libraries. These sites cover algebra and pre-calculus through Calculus I–III. In addition, they include limits, derivatives, integrals, function behavior, curves, and coordinate systems. As a result, you gain ready-to-use tactiles that strengthen conceptual learning for all students. For example, many of these graphics support problem-solving, graph analysis, and multi-step reasoning. Though the focus leans toward higher-level math, these sites still offer tactile graphics for every math level. Finally, you can review them in order, moving from the most comprehensive to excellent, knowing each one provides strong and dependable options.
The information below is in order of the most comprehensive to excellent so all options are great for finding anything you need. On the European site, just remember to select English
STPT = Science, Technology, Physics, and Tactile It’s one of the major content categories inside the Tactile Inclusion Project (TIP) collection.
TIP created a huge set of tactile graphics across:
Math
Science
Physics
Technology
Geometry
Calculus
Data & graphs
Best source for calculus‑level tactile graphics. This project includes audio‑tactile and swell‑paper‑ready graphics for algebra → calculus, created by math teachers for blind students.
Calculus‑related tactiles available
Limits (approaching values, left/right limits)
Derivative concepts (slopes, tangent lines)
Curve behavior (increasing/decreasing, concavity)
Graphs of functions (polynomials, exponential, trig)
Area under curves (Riemann rectangles)
Integrals (definite/indefinite visualizations)
Coordinate planes, axes, quadrants
Piecewise functions
Parametric curves
Sequences & series visuals
Optimization diagrams
Why it’s ideal for blind students:
Graphics are simplified to core mathematical meaning
Includes audio explanations
Translatable into 29 languages
Free to download
2. ProBlind — Global Database of 1,250+ Tactile Math Graphics- make sure you choose your language preference:
Calculus‑level graphics include:
Function families
Derivative slope diagrams
Concavity & inflection points
Trig function curves
Exponential/logarithmic curves
Limits & asymptotes
Area under curves
3D surfaces (simplified for tactile use)
Calculus
Limits
Derivatives (slopes, tangent lines)
Integrals (area under curves)
Concavity & inflection points
Function families
Riemann sums
Asymptotes & behavior at infinity
Pre‑Calculus & Algebra
Trig functions
Exponential/logarithmic curves
Coordinate planes
Piecewise functions
Parametric curves
Geometry & STEM
Shapes
Graphs
Data displays
3D surfaces (simplified)
All graphics are:
Swell‑paper ready
Embosser friendly
Audio‑described
Designed specifically for blind learners
Where TIP Lives Now
Because the original TIP website has a broken SSL certificate, the safe, active home for all TIP graphics is:
The TGIL was established in 2007 by the American Printing House for the Blind (APH) to support transcribers by providing free, customizable tactile graphics templates for images that are commonly used in K-12 education. The goal of the TGIL was to help speed up textbook transcription by providing a good starting point for creating high-quality tactile graphics.
While supporting transcribers remains an important part of the TGIL’s mission, we have recently expanded the scope and purpose of the TGIL to provide graphics that have been “optimized for the Monarch.” These graphics support direct-to-student delivery of graphics for use in a digital format with the Monarch multi-line tactile display.
The metadata for each graphic in TGIL will indicate whether the graphic was created for embossing and/or whether it has been optimized to display on the Monarch. We also invite users to request graphics for use on the Monarch — or request remediation of an existing graphic — when an “optimized for Monarch” alternative is not yet available.
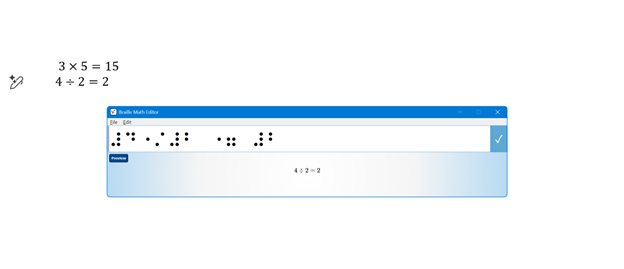
JAWS UEB MATHS/Nemeth Settings-Word and Braille Math Editor
If you’ve ever struggled to get JAWS to read math correctly on your computer, this walk-through will make your life much easier. In this video, I demonstrate how to set JAWS for either UEB Maths or Nemeth math using the JAWS UEB/Nemeth Settings, then show you how to create accessible math using Word’s Math Editor and the Braille Math Editor. Whether you’re a TVI (Teacher of the Blind), a student, or an AT (Access Technology) specialist, these steps will help you produce clear, accurate, and accessible math every time.
WORD MATH EDITOR Setup
1. Open the Math Editor
Alt + =
2. Open the Equation Tools tab
Alt + J, E
3. Open Math Options (Settings)
T, 1 (This opens the Math Options dialog.)
4. Set Alignment to Left Inside the Math Options dialog:
Alt + J → moves to Justification
L → Left alignment
Alt + D → Set as Default
Tab, Tab → to OK
Enter
When asked to save as default, choose Yes (This saves the settings to the Normal template.)
5. Check Conversion (if math looks wrong)
While inside a math zone:
Alt + =
Alt + J, E
C → Convert
Make sure it is set to Professional
WORD MATH EDITOR — Command Sequence (JAWS + Keyboard)
Open the Math Editor
Press Alt + = This inserts a new math zone and opens the Word Math Editor.
Move in and out of the math zone
Right Arrow → move into the math zone
Right Arrow again → move through elements
Left Arrow → move backward
Esc → exit the math zone and return to normal text
Insert common structures
Fraction → Ctrl + /
Exponent → Ctrl + Shift + =
Subscript → Ctrl + =
Square root → type \sqrt then press Space
Matrix → type \matrix then press Space
Parentheses → type ( then ) (Word auto‑sizes them)
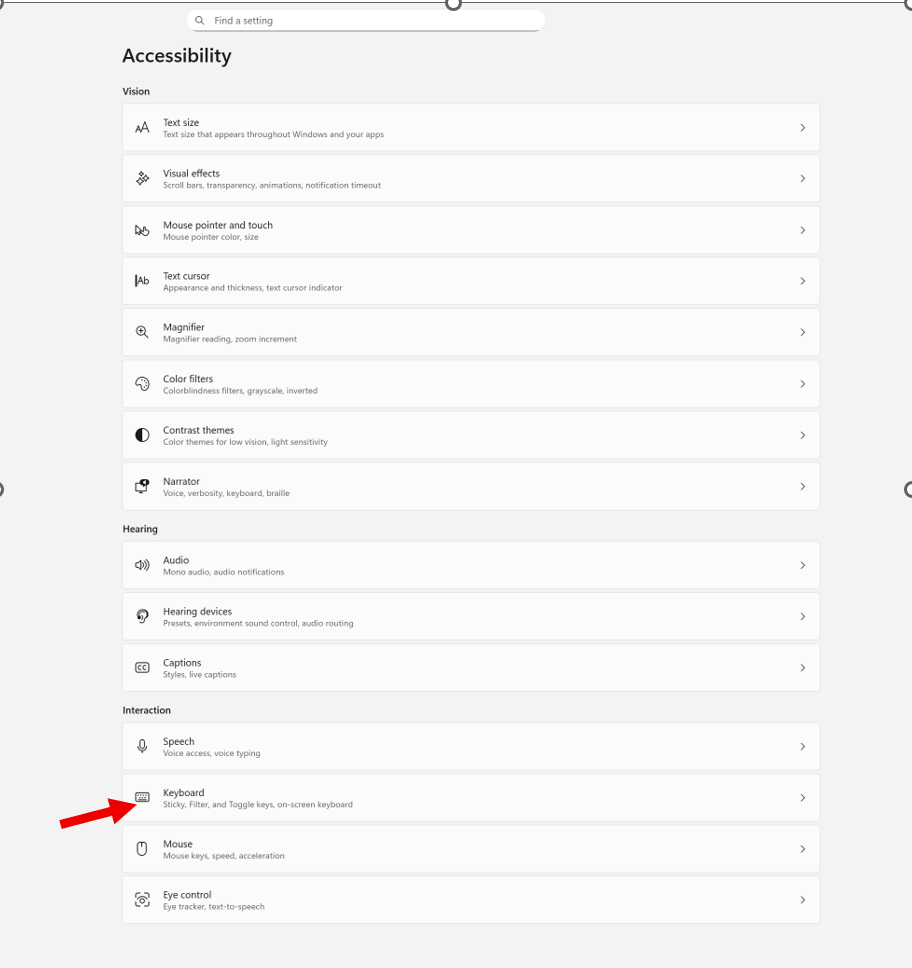
Windows + I to settings and find Accessibility on the far left column and open then open keyboard. If you want to stop annoying ding sounds on Windows, the following steps will help you do that.
If your computer keeps chiming, dinging, or beeping at the worst possible moments, or when you press a particular key, you can silence or customize every system sound in just a few steps.
How to check whether Filter Keys or Toggle Keys are turned on
How to turn them off if you don’t need them
How to adjust them properly if you do use them
How to prevent Windows from enabling them by mistake
How to silence or customize the sounds they make
Commands & Navigation Steps
Open Windows Accessibility Settings (Keyboard Section)
Windows + I → opens Settings
down arrow to Accessibility, press Enter, then tab down to Keyboard
or press windows (start menu) or using keyboard type Accessibility in the search box
Check all these Features
Turn Sticky Keys, Filter Keys, or Toggle Keys On/Off
Tab to the setting you want
Press Space bar to toggle it on or off
Hear What Toggle Keys Sounds Like
Turn on Toggle Keys → Windows plays a beep when pressing Caps Lock, Num Lock, or Scroll Lock
Turn it off again → sound stops immediately
Notification Preferences for Accessibility Keys
Windows will play a sound when:
Sticky Keys is turned on
Filter Keys is turned on
Toggle Keys is turned on
This helps you know when you’ve activated something by accident.
On‑Screen Keyboard (for mouse users or one‑handed typing)
Turn on On‑screen keyboard in the Keyboard settings
Click keys with your mouse if typing is difficult
Underline Access Keys
Turn on Underline access keys
This shows keyboard shortcuts even when you’re not holding Alt
Print Screen Behavior (Updated in Windows 11)
While you are here adjust Print Screen
Arrow to Print Screen and enter → opens the Snipping Tool options at the top of the screen
Screen reader users:
Tab through options
Go to the last one
Press Spacebar, then Down Arrow to choose screenshot type-then you have options
When you cannot do something: Take a Screenshot & Send It to your help person
Take screenshot- which literally is copy
Press Ctrl + V to paste into an email
Send to your tech instructor or support person
Whether you’re troubleshooting your own device or helping someone else, this quick fix will bring instant peace and quiet — and give you full control over your keyboard behavior.