Many students with low vision are not struggling because of ability. They are struggling because of access: and, in many cases, the way instruction is delivered reinforces that.
When educators rely on visual tools such as iPads, enlarged print, or limit instruction to opening Word for basic keyboarding, students are left without a true way to access their work or hope for their future. This unintentionally sends a powerful message: that they cannot function independently. Over time, this leads to discouragement, depression, and a growing belief that they have no way to navigate the world on their own.
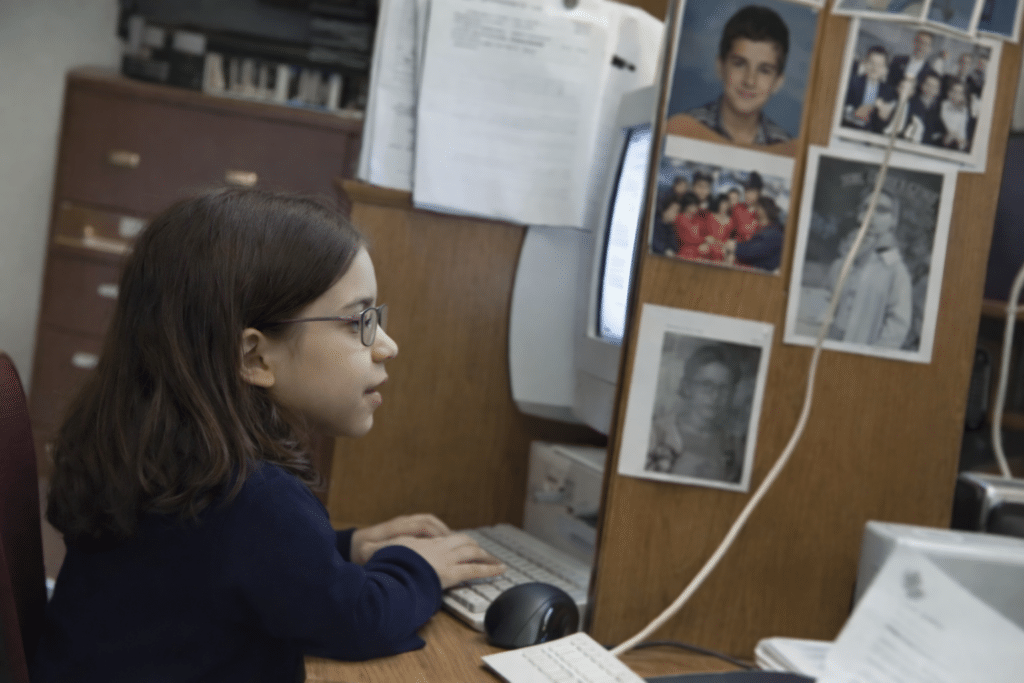
Students then push themselves to use vision that is no longer efficient. They lean in, work inches from the task, and can only read small portions at a time. This is not access—it is strain and frustration.
When students are taught true access—using a computer, screen reader, and strong keyboarding skills, supported by instructors who use these tools daily—everything changes. They begin to work independently, keep pace with peers, and see a future that once felt out of reach.
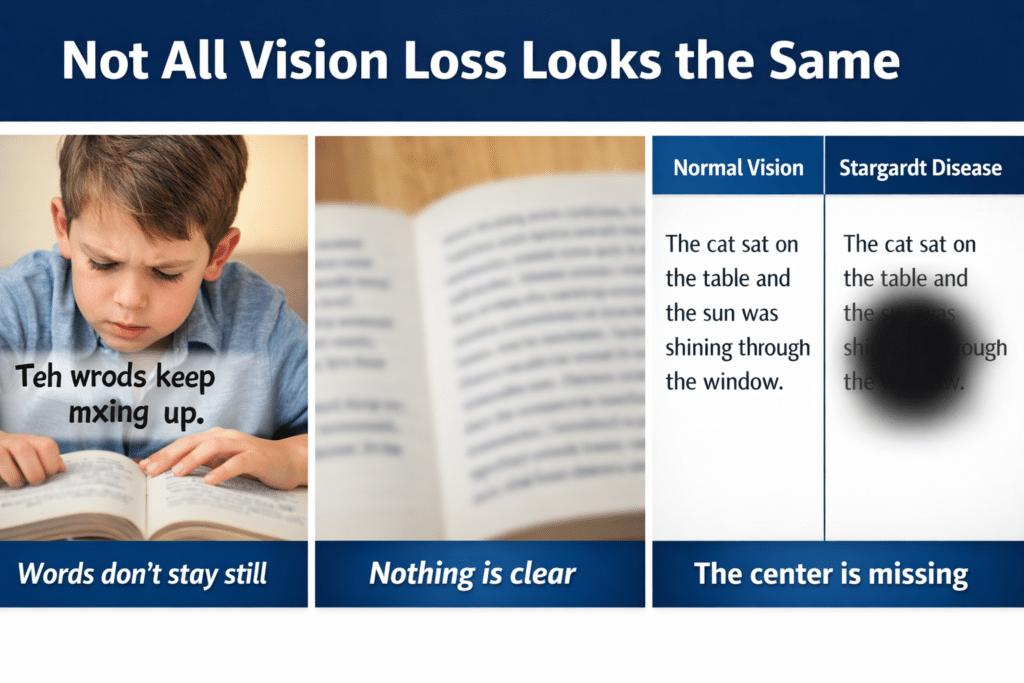
How to Read, Write, and Learn with Low Vision: How vision loss can appear
2.2 Billion People Live With Vision Impairment
Vision loss is one of the most common disabilities on earth, and it’s growing fast. If you work in healthcare, tech, education, or policy, these numbers matter for accessibility, product design, and funding.
Over 51.9 million adults in the U.S. report some level of vision difficulty. About 6–7 million Americans have significant vision loss or blindness. Globally, 2.2 billion people have vision impairment.
But those top-line numbers hide urgent trends. Here’s the breakdown with the latest 2024-2026 data, what’s driving it, and what to do about it.
Tools + Techniques That Build Real Independence
Students and adults with vision challenges do not learn one way. They require the right tools, combined with direct, targeted training.
Success happens when tools match the vision need and instruction builds efficiency
Tools + Training by Vision Need
1. Dyslexia (Processing and Decoding)
Dyslexia affects how the brain processes text. It often overlaps with vision-related challenges.
Tools
Text-to-speech: JAWS, NVDA
Speech-to-text (dictation)
Immersive Reader
Audiobooks: Bookshare, Learning Ally
Training Focus
Pair listening with reading
Build strong keyboarding for writing
Navigate digital text efficiently
Goal Improve comprehension while reducing reading fatigue
2. Blurred or Reduced Vision (Low Vision)
Tools
Magnification: ZoomText, Windows Magnifier
High contrast and color filters
Enlarged text and screen scaling
Screen readers: JAWS, NVDA
Training Focus
Use magnification efficiently without losing place
Strengthen visual tracking
Transition smoothly to audio when needed
Master keyboard navigation
Goal Maximize usable vision while increasing speed and accuracy
3. Central Vision Loss
(Stargardt, macular degeneration)
Tools
Screen reader (primary): JAWS, NVDA
Refreshable braille display
Audio + braille combination
OCR tools for printed content
Training Focus
Full keyboard control
Braille literacy (UEB and Nemeth)
Strong auditory processing
Goal Achieve full independence through non-visual access
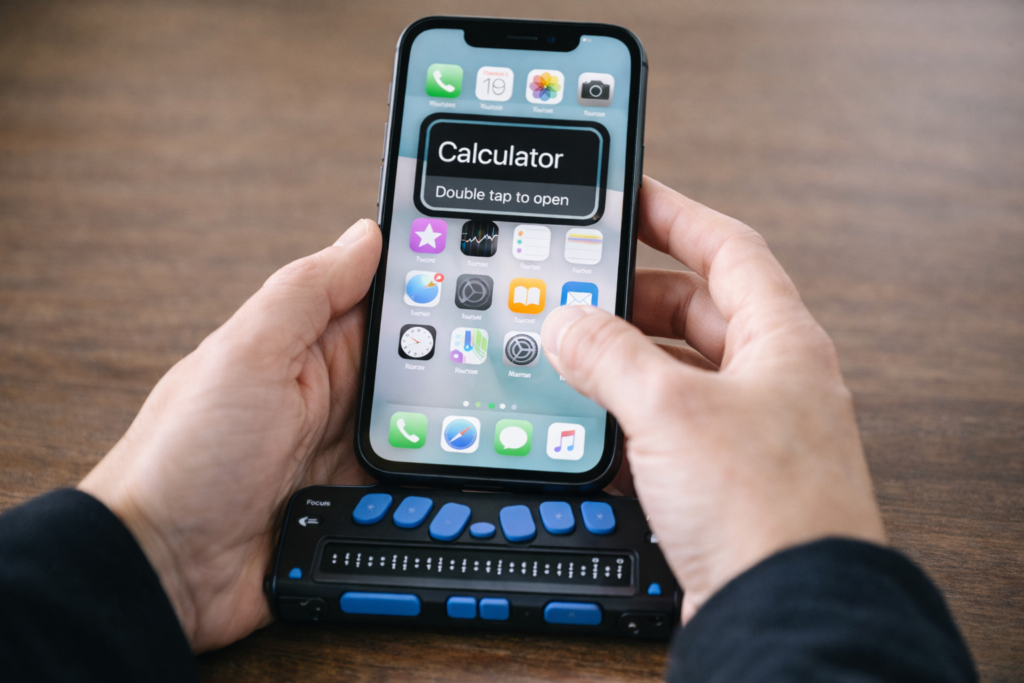
The iPhone is the most powerful accessibility tool available to blind and low‑vision students today. With the right skills, it becomes a map, a magnifier, a reader, a communication device, a travel tool, and a pathway to independence.
This guide gives students, parents, teachers, and O&M instructors everything needed to build real-world iPhone skills from basic Siri commands and VoiceOver gestures to advanced navigation and daily-living tools. Use it as a curriculum, a quick reference, or a step-by-step learning path.
A TechVision Core Resource
The iPhone gives blind and low-vision students real independence. With the right skills, it becomes a map, a reader, a magnifier, a travel tool, and a partner for daily life. This guide helps students, parents, and teachers build strong iPhone skills one clear step at a time.
Lessons- follow these steps
1. Getting Started
The guide begins with simple setup steps that build confidence fast.
Accessibility Shortcut–You can press home button at any time and just say: “Siri open Accessibility” or wherever you need to go for what you need to do
Where to find it: Settings → Accessibility → Accessibility Shortcut Students turn features on and off with a quick triple-click.
Key tasks:
Set VoiceOver, Zoom, or Magnifier
Set up Siri for hands-free support
Add emergency contacts
Customize Control Center
Organize the Home Screen
Core Access Features
VoiceOver
Zoom
Magnifier
Display and text adjustments
First Skills to Teach
Turn VoiceOver on or off
Learn basic gestures
Use Siri for fast tasks
Adjust speech rate
Open and close apps
2. VoiceOver Skills
Students grow from simple gestures to full digital literacy.
Beginner
Where to find it: Settings → Accessibility → VoiceOver
Explore the screen
Activate items
Use basic Rotor options
Start typing with VoiceOver
Intermediate
Edit text
Use the App Switcher
Navigate long pages
Move by headings or links
Use dictation
Advanced
Where to find it: Settings → Accessibility → VoiceOver → Activities / Braille / Rotor Actions
Customize the Rotor
Use Activity profiles
Use Braille Screen Input
Work in complex apps
3. Navigation & O&M with iPhone
Orientation Tools
Look Around-outside navigation
Compass
Landmarks
Spatial audio
Seeing AI
Clew-inside navigation Where to find them: Maps and Compass apps
Dropping Pins
Drop a pin with VoiceOver: Maps → Current Location → Rotor → Drop Pin
Drop a pin with Siri: “Drop a pin.”
Label and save locations
Add Favorites
Create walking routes
Real-World Travel Skills
Walking directions
Bus stop navigation
Checking surroundings
Soundscape-style apps
Safe campus routines
Safety Tools
Where to find them: Settings → Emergency SOS, Find My, Messages
Emergency SOS
Location sharing
Device tracking
Safe communication practices
4. Apps for Daily Living
Vision Support Apps
Where to find them: App Store
Seeing AI
Be My Eyes
Envision
Magnifier
Productivity Tools
Reminders
Calendar
Notes
Shortcuts
Timer and alarms
School & Work
Files
Email
Safari
Reading apps
Document scanning
5. Low Vision Tools & Strategies
Visual Settings
Where to find them: Settings → Accessibility → Display & Text Size
Contrast
Bold text
Reduce transparency
Color filters
Invert colors
Magnification Tools
Where to find them: Settings → Accessibility → Zoom Control Center → Magnifier
Zoom
Magnifier
Camera zoom
Flashlight for clarity
Reduce Fatigue
When to switch from Zoom to VoiceOver
When audio improves endurance
How stands and holders help
6. Parent Guide
Parents help skills grow through simple routines.
Focus areas:
What to teach at each age
How to practice safely
How to reduce frustration
When to add new apps
How to build daily habits
Where to find key tools: Settings → Screen Time, Settings → Emergency SOS
7. Teacher Guide
Teachers integrate iPhone skills into daily instruction.
Teach VoiceOver
Skill progression
Gesture modeling
Rotor instruction
Text-editing practice
Then Navigation
Classroom → hallway → campus
Pinning school locations
Safe movement routines
Teach Organization
Where to find it: Press and hold any app → Edit Home Screen
Folder creation
Notifications
Calendar and reminders
Assessment
Define mastery
Measure progress
Write goals and objectives
8. Learning Paths
Beginner Path
Activate Accessibility Shortcut
Learn basic gestures
Practice the Rotor
Use Siri for quick tasks
Drop a first pin
Intermediate Path
Edit text
Navigate long pages
Use Maps
Use Seeing AI
Organize the Home Screen
Advanced Path
Braille Screen Input
Custom Rotor
Advanced Maps skills
Shortcuts automation
Real-world travel practice
9. Lesson Index
This section lists all iPhone lessons. Each item includes:
A clear title
A short description
A consistent layout
This turns the page into a complete curriculum hub.
Signs of Low Vision in Children: Cannot see board work
Many children pass school vision screenings but still struggle to see clearly. Screenings check distance blur, not functional vision. Parents and teachers should watch closely for signs of low vision in children, because children may look fine on paper, yet daily tasks reveal hidden challenges. They squint at the board, lose place in text, miss expressions, and tire quickly. These behaviors reflect low vision, not lack of effort.
Many children pass school vision screenings but still struggle to see clearly. Screenings check distance blur, not functional vision. Children may look fine on paper, yet daily tasks reveal hidden challenges. They squint at the board, lose place in text, miss expressions, and tire quickly. These behaviors reflect low vision, not lack of effort.
Short Attention Span Optimized
1. They squint at the board even from the front row
Squinting signals effort, not attitude. The student works harder to sharpen distant detail.
Strategy:Increase contrast, use bold markers, and provide digital access. Squinting means they’re working hard, not misbehaving.
2. They move reading material close to their face
Children may hold books only inches away. They are trying to capture clarity, not misbehaving.
Strategy: Allow close viewing without correction. Offer magnification, larger print, or digital zoom. This is a strategy, not a problem.
3. They lose place or skip lines while reading
Low contrast and visual strain make tracking difficult. This shows visual fatigue, not poor skills.
Strategy: Use line guides, high‑contrast text, and uncluttered layouts. Tracking improves when visual strain decreases. Use immersive reader on laptop in WORD. Teach Screen reader to listen to content versus all visual.
4. They avoid worksheets with dense text
Heavy print strains the eyes. Students may stall, fidget, or rush because the task hurts.
Strategy:Break text into smaller chunks, increase spacing, and reduce clutter. Avoidance is often about discomfort, not motivation. Teach screen reader Access technology.
5. They miss facial expressions and social cues
Low vision reduces detail in faces. Children may misunderstand reactions, jokes, or emotions.
Strategy: Pair spoken cues with visual ones. Teach peers to use clear gestures and verbal confirmation. Low vision makes faces low‑contrast.
6. They trip or bump into objects others avoid easily
Low detail and reduced depth perception affect safe movement. These students need clear pathways.
Strategy: Keep pathways clear, reduce visual clutter, and ensure consistent classroom layouts. This is an access issue, not coordination.
7. They tire long before they complain
Visual fatigue builds fast. A child may appear distracted after lunch simply because their eyes are tired.
Strategy: Build in visual breaks, rotate tasks, and allow alternative formats. Visual fatigue shows up as “inattention.”
8. They improve dramatically with better contrast or lighting
When small changes help instantly, the issue is vision, not motivation.
Strategy:Adjust lighting, reduce glare, and use bold, high‑contrast materials. Quick improvement means the issue is vision, not effort.
Low Vision Issues
A child can pass a screening yet still experience low vision daily. These signs reflect access needs, not ability. With early support and the right tools, children learn confidently and keep pace with peers.
Understanding Vision in Children: What Visual Acuity Really Means
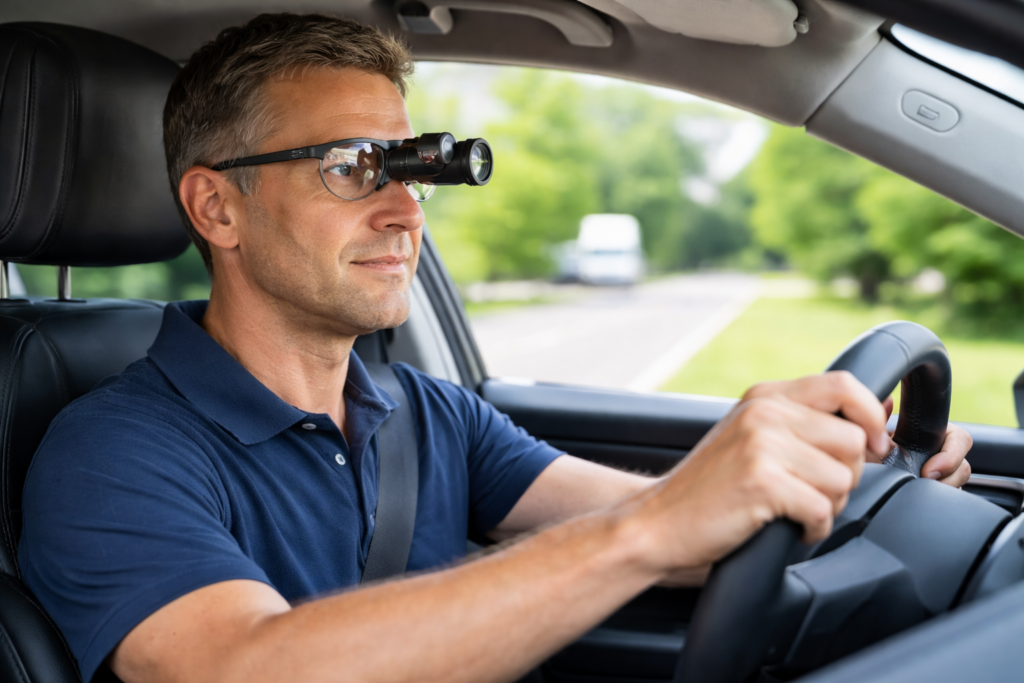
Low Vision Driving Aids: Man driving with Bioptic glasses
Many students with low vision can increase independence through safe and well-designed optical tools. Low Vision Driving Aids such as bioptic telescopes, prism glasses, and adaptive driving technology help students identify road signs, lane markings, and distant objects with greater clarity. These devices do not replace safe driving skills, but they support eligible students who meet vision requirements and receive proper training. Teachers and parents play a central role by learning these options early, guiding students toward evaluations, and helping them build strong visual skills long before driving becomes possible.
Bioptic Telescopic Lenses
Bioptic telescopes are small telescopes mounted on glasses. They magnify distant objects such as road signs and traffic signals. The driver uses normal vision for steering but briefly glances through the telescope for critical details.
How bioptics work: A small telescope at the top of the lenses increases clarity for distant targets.
How drivers use them: Drivers use natural vision for general driving and glance through the telescope to read signs or detect details.
Safety: Research shows bioptic drivers succeed with training. Proper instruction remains essential for safety and confidence.
Adaptive Driving Technology (ADAS)
Many students benefit from modern vehicle safety systems such as:
Lane-keeping assist
Blind-spot detection
Adaptive cruise control
Automatic emergency braking
These systems improve awareness and support safe driving decisions. They do not replace skill, but they strengthen safety for drivers with visual limitations.
Vision Enhancement Devices
Some students use electronic eyewear or enhanced optical devices to support mobility. Tools like eSight improve clarity for reading street names, viewing dashboards, or spotting road markers. These devices help with general visual access rather than driving tasks themselves.
Prism Glasses for Low Vision
What Prism Glasses Do
Prism glasses bend light to move an image into a student’s stronger visual field. They help the student locate print and objects more quickly. They do not change the eye, but they make vision tasks easier and less tiring.
Who Benefits
Prism glasses help students who:
Miss objects on one side
Lose their place when reading
Experience double vision
Have trouble tracking words
Struggle with visual focus
Have CVI or field loss
Prisms reduce searching and help the brain find information faster.
How Prism Glasses Help in School
Prisms can:
Improve tracking
Reduce eye strain
Support board-to-desk copying
Increase reading stamina
Strengthen early print recognition
Teachers often see smoother reading, fewer errors, and better endurance.
Types of Prism Glasses
Students may use:
Reading prisms for near work
Field-shifting prisms to move images into better visual fields
Yoked prisms to shift the entire image
Non-yoked prisms for specific alignment issues
A low vision optometrist chooses the correct type.
Legal and Clinical Requirements
State Laws and Bioptics
Thirty-seven states permit some form of bioptic driving. Each state sets different rules about visual acuity, visual field, telescope power, and required training. Some states allow drivers to meet acuity standards through the bioptic if they reach a level such as 20/40 through the telescope.
DMV -Department of Motor Vehicles- Vision Standards
Most state DMVs require:
Minimum acuity (often 20/40 for unrestricted licenses)
A certain visual field range
Medical reports from a low-vision specialist
Where to Go for Evaluations and Training
Low Vision Optometrists
Families should begin with a low vision optometrist who can:
Test remaining vision
Evaluate driving potential
Determine whether bioptics or prism glasses will help
Prescribe optical devices
Search using IALVS or regional low vision centers.
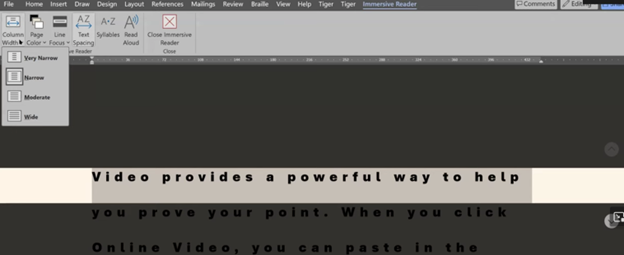
Low-vision users enhance visibility and accessibility using tech tricks for screen scaling, mouse visibility, and reading tools. Immersive Reader in Microsoft Word, accessible from the View tab, adjusts text spacing, column width, and background color. UsersThese Low Vision Computer Tricks improve readability by customizing these settings to suit their visual needs efficiently. In Microsoft Edge, Immersive Reader activates on supported pages to simplify reading and navigation. These tools combine to provide low-vision users with a personalized, accessible digital experience.
Dr. Robinson teaches strategies to enhance accessibility using low-visionLow toolsVision Computer Tricks in Microsoft Word, Edge, and system settings. First, she demonstrates how to adjust display settings for optimized visibility using the Windows key. By typing “display,” users can access scaling options, which enlarge screen content for better readability. Additionally, increasing mouse pointer size and inverting its color improves navigation while reducing eye strain.
Next, in Microsoft Word, Dr. Robinson highlights Immersive Reader, available in the View tab, to enhance readability and adjust text settings. For instance, users can change font styles and sizes with Ctrl+A and Ctrl+Shift+> or Ctrl+Shift+< for better clarity. These Low Vision Computer Tricks include changing font styles and sizes with Ctrl+A and Ctrl+Shift+> or Ctrl+Shift+< for better clarity. Furthermore, the Line Focus feature reduces clutter by focusing on one or a few lines, aiding users with dyslexia. Moreover, Read Aloud, activated with Alt+Ctrl+Space, provides text-to-speech support with adjustable speed and voice options.
In Edge, pressing F9 activates Immersive Reader, which simplifies web pages by removing clutter for a cleaner reading experience. Users can also customize text preferences or enable Read Aloud for auditory assistance. These Low Vision Computer Tricks also include customizing text preferences or enabling Read Aloud for auditory assistance. Notably, Dr. Robinson recommends Edge for its built-in accessibility commands, though Chrome and Firefox offer similar tools.
Immersive reader for low vision
Finally, she emphasizes using Night Light mode to reduce blue light exposure and protect long-term eye health. These tools, combined with her strategies, empower low-vision users to navigate technology effectively.
Decrease Eye Strain and See Your Computer More Easily
Blue light emitted from computer screens can be harmful to your eyes over time, contributing to digital eye strain, disrupted sleep patterns, and even long-term vision damage. For those with low vision, the strain caused by blue light can make using a computer even more challenging. In this post, I will guide you through simple adjustments to your computer settings that will not only help reduce blue light exposure but also make your screen and browser easier to view, enhancing your overall comfort and visual experience with Blue Light Low Vision Tech Tricks.
Blue light from electronic devices can cause a number of issues, including:
Eye strain
Blue light from screens can reduce contrast, leading to eye strain, dry eyes, and fatigue.
Retinal damage
Long-term exposure to blue light can damage retinal cells, which can lead to vision problems like age-related macular degeneration.
Sleep disruption
Exposure to blue light before bed can affect the body’s production of melatonin, which can disrupt sleep patterns.
Other health issues
Research suggests that exposure to blue light may contribute to cancer, diabetes, heart disease, and obesity.
Blue light gone for easy reading with low vision Tech Tricks in a Browser
Use blue light-blocking glasses or filters on your devices
Adjust your display settings
Follow the 20/20/20 rule: every 20 minutes, focus on an object about 20 feet away for at least 20 seconds
Get regular eye exams
Constant exposure to blue light over time could damage retinal cells and cause vision problems such as age-related macular degeneration. It can also contribute to cataracts, eye cancer and growths on the clear covering over the white part of the eye.
Change the setup of your computer and save your VISION!
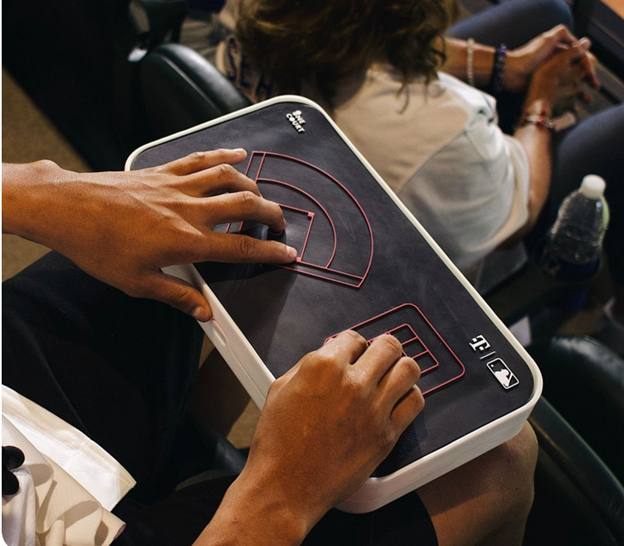
Jared Mace, from One Court Technologies Incorporated, works to enhance accessibility in sports for blind people. The Seattle-based startup develops innovative technology that translates live sports gameplay into vibrations. This allows visually impaired individuals to experience the game through touch. Today, Jared demonstrates this technology with Gina, a blind woman eager to participate in the action.
The demonstration starts with Jared running a play on his laptop. Meanwhile, Gina experiences the game through vibrations at the 20-yard line. The vibrations begin on her thumb and move to her left thumb, perfectly matching the gameplay. This technology introduces a new level of accuracy and excitement to sports for blind people, enabling them to engage in the game in unprecedented ways.
As the play progresses, Gina feels the vibrations shift to her left index finger, signaling a change in direction. The vibrations intensify, mimicking the game’s rising tension. Gina expresses her excitement, noting how this technology allows blind individuals to fully participate in sports. They can now discuss the game with friends and enjoy the experience just like sighted fans.
Touch Down in Many Ways
The play ends with a touchdown, marked by a strong vibration, and Gina celebrates the moment, fully immersed in the action. She then quickly wants to “see” the baseball game using another tactile overlay on the device. This device is not just about following the game; it’s about inclusion and participation. It makes sports for blind people a shared experience with their sighted peers.
Jared highlights that this technology revolutionizes how blind people experience sports. It breaks down barriers and creates new opportunities for engagement. The ability to feel the game in real-time through vibrations represents a significant advancement in making live sports accessible and enjoyable for everyone, especially those with visual impairments. There are online games also for people to play on computers when an actual one is NOT in play, but if you want to learn yourself, here is one young man giving basketball a try.
Strong touch typing skills create independence, speed, and confidence for blind and low vision students using screen readers, braille displays, or electronic braillers. Early instruction helps students build muscle memory, accuracy, and efficient keyboarding habits that support reading, writing, research, and future employment.
Students should:
Learn correct finger placement
Keep wrists relaxed and posture aligned
Use all fingers consistently
Focus on accuracy before speed
Practice daily using structured lessons
Websites such as TypingClub.com can support additional practice, but direct instruction and proper technique remain critical for long-term success.
Mikaela’s Story
Mikaela moved to my district in 2nd grade when I was Miss Mehlenbacher. My students always enjoyed racing to spell my last name the fastest, and Mikaela always won.
We immediately began intensive technology instruction, including touch typing and keyboarding skills. The video above shows Mikaela typing on her laptop just five months later.
Many of the photos and videos on this website were taken between 2000–2010, so image quality may appear blurry due to older camera technology.
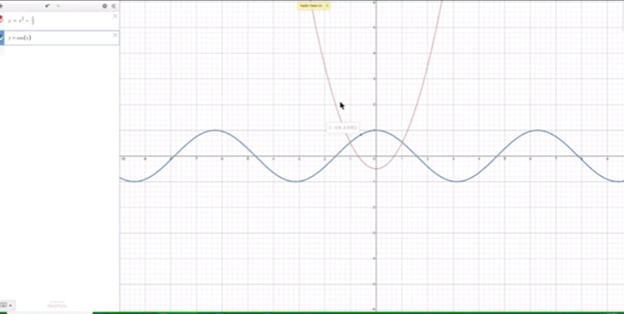
In this Video lesson, Dr. Denise Robinson demonstrates the Desmos calculator, an online tool used in schools for graphing solution for even Geometry. She highlights its fun and accessible nature, noting that while she can’t cover all its features in 1 video, she will guide through the basics of using the Desmos.
First, she instructs users to press Control + O for 1 option for a new graph. Using JAWS screen reader. But any screen reader will work. After pressing Control + O, users hit Enter to create a new blank graph. They can navigate through options using the down arrow also for many other types of graphs. Dr. Robinson then guides users to type in formulas to create parabolas and lines, making use of various functionalities in the Desmos Graphing Calculator Solution.
A keyboard appears at the bottom of the screen, which is manageable for low vision children. For low vision children, she recommends using Control + Plus to zoom in, allowing them to adjust the size as needed. Control + Zero returns the display to normal size. Blind students will use the PC built in calculator for full access, ensuring the best use of the Desmos Graphing Calculator Solution.
Desmos Calculator Graphing Solutions- picture of parabola and formulas
Next, Dr. Robinson explains how to open the field dialogues or share or export to emboss a graph by pressing Insert + F5. She mentions Desmos works well in Chrome, Edge and sometimes in Firefox based on updates. She advises users to label their graph. Insert + F5 also assists in many other JAWS screen reader functionalities, enhancing the use of the Desmos Graphing Calculator Solution.
Dr. Robinson then demonstrates typing formulas, such as X superscript 2 minus 1/2. She shows how the graph forms visually and explains using Shift + 6 for superscript. Users can listen to the graph’s details by using H and the arrow keys, with the right arrow moving right and the left arrow moving left, providing detailed information about the graph’s points. Desmos Keyboard Shortcuts and other Math Lessons further elaborate on how to effectively use the Desmos Graphing Calculator Solution.