Many people wonder what does legally blind look like? In the United States, a person meets the definition of legal blindness when the best corrected visual acuity in the better eye is 20/200 or worse, meaning the vision remains at or below that level even with glasses or contact lenses. A person may also be considered legally blind if the visual field in the better eye is limited to 20 degrees or less, often described as tunnel vision. These criteria are commonly used to determine eligibility for services, supports, and certain benefits for individuals with significant vision loss.
“Legally blind” is a measurement of vision—not an appearance.
It includes a wide range of eye conditions, levels of clarity, contrast sensitivity, and visual fields. Two people with the same diagnosis may function very differently.
Understanding this helps us support students, coworkers, and community members with respect and accuracy. Vision loss is diverse, and so are the people who live with it.
Educational Definition for Services
Under the new criteria, if a person’s visual acuity is measured with one of the newer charts, and they cannot read any of the letters on the 20/100 line, they will qualify as legally blind, based on a visual acuity of 20/200 or less. Based on acuity Work will need to be adapted.
These images as examples used in presentations.
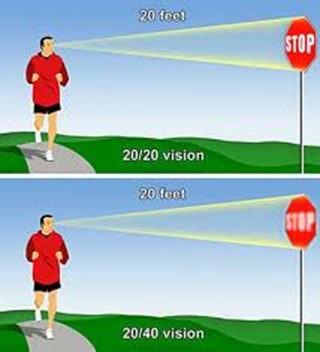
20/20 and 20/40
Low Vision Options can adjust how ones sees the computer or even access the use of a mouse.
20/70 is not legally blind

This vision means that a person sees at 20 feet what someone with normal vision sees at 70 feet. It is a form of visual impairment classified as mild low vision. Here’s a breakdown of what this means and its implications: Based on diagnosis, this acuity can get worse throughout the day.
1. Definition of 20/70 Vision
- In a standard eye exam, the results are written as a fraction, with 20/20 being considered normal vision.
- The first number (20) refers to the distance (in feet) from which a person views an object.
- The second number (70) indicates the distance at which a person with normal vision can see the same object with clarity.
- Thus, someone with 20/70 vision must be closer to an object (20 feet away) to see it as clearly as a person with 20/20 vision can from 70 feet.
2. Implications of 20/70 Vision
- Legally Not Blind: This level of vision does not qualify as legal blindness, which is defined as 20/200 or worse with corrective lenses.
- Difficulty with Certain Tasks: Individuals with 20/70 vision may struggle with tasks requiring clear distance vision, such as reading road signs, recognizing faces from a distance, or seeing objects clearly in low-light conditions.
- Daily Life Adjustments: Depending on the person’s environment, they may need glasses or contact lenses to enhance their vision for specific tasks. However, vision aids may not fully restore perfect clarity.
3. Corrective Measures
- Eyeglasses or Contact Lenses: Many individuals with 20/70 vision wear corrective lenses to improve visual acuity.
- Low Vision Aids: Some people might benefit from magnifying devices, large-print materials, or enhanced lighting to assist with reading or other close-up tasks.
- Adaptive Technology: Screen magnifiers, larger fonts on digital devices, and software that enhances visual contrast can also help improve accessibility for people with 20/70 vision.
4. Potential Causes
- Refractive Errors: Conditions like myopia (nearsightedness), hyperopia (farsightedness), or astigmatism can result in 20/70 vision if not corrected.
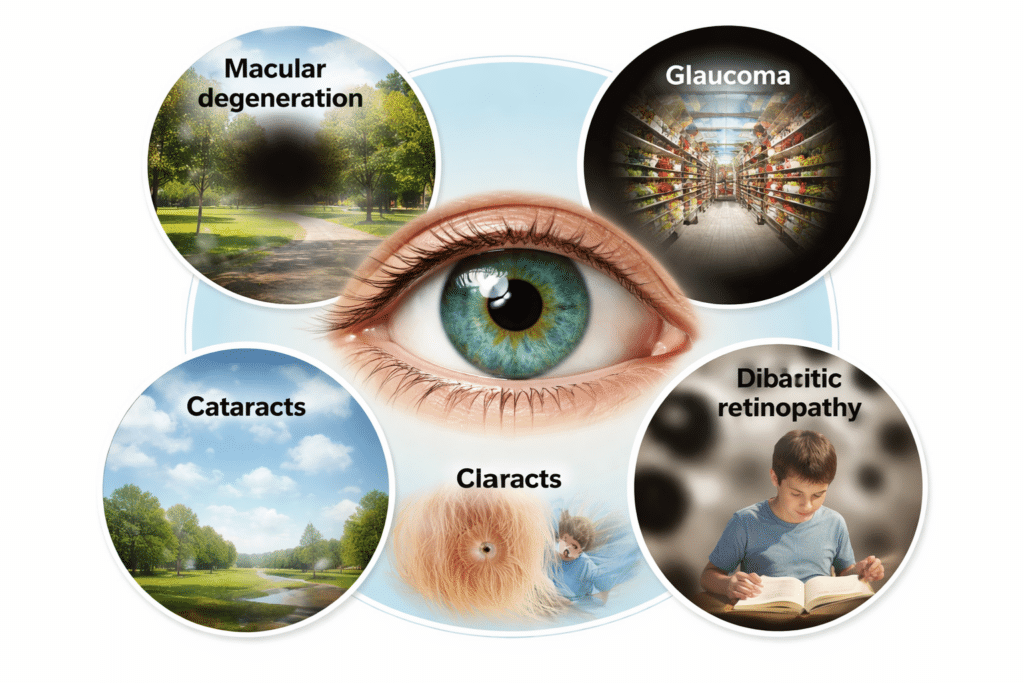
- Eye Diseases: Conditions like cataracts, macular degeneration, glaucoma, or diabetic retinopathy may cause a person’s vision to deteriorate to 20/70.
- Age-Related Changes: Vision often declines naturally with age, and some individuals may experience 20/70 vision due to presbyopia or other age-related conditions.
5. Treatment and Management
- Regular eye exams are essential to monitor vision changes.
- Wearing prescribed corrective lenses and using adaptive aids can help individuals maintain independence and improve their quality of life.
- Early detection of underlying conditions (e.g., glaucoma or cataracts) through eye exams can prevent further vision loss.
In summary, 20/70 vision reflects a moderate visual impairment. While it can pose challenges for certain activities, corrective measures and assistive technologies can significantly enhance visual functioning and quality of life.

20/100 vision means that a person sees at 20 feet what someone with normal vision can see clearly at 100 feet. This level of visual acuity is considered moderate low vision. Here’s a detailed explanation of what 20/100 vision means and its implications:
1. Definition of 20/100 Vision
- Visual Acuity Measurement: Vision is typically measured using a Snellen eye chart, and the result is expressed as a fraction. The first number (20) represents the distance at which the person is standing from the chart. The second number (100) indicates the distance at which a person with normal vision (20/20) can see the same object clearly.
- Therefore, a person with 20/100 vision must be much closer to an object (20 feet away) to see it clearly, while someone with normal vision can see it clearly from 100 feet away.
2. Implications of 20/100 Vision
- People with 20/100 vision are considered legally visually impaired. However, this does not meet the definition of legal blindness, which is 20/200 or worse. Even with corrective lenses, they fall under the low vision category. This means normal vision remains unattainable.
- When it comes to daily tasks, they often struggle with seeing distant objects clearly. For instance, they may have trouble reading signs from far away. Recognizing faces across a room or on the street is also challenging. Watching TV or presentations requires sitting close. Driving presents challenges, as they may not clearly see signs or signals from a safe distance.
- Close-up tasks can be easier for those with 20/100 vision. Reading or using a computer may not be as difficult. However, many still require magnification or adaptive tools to assist with these activities.
3. Impact on Daily Life
Technology has changed everything toward independence, including AI apps that will read to you what you cannot see.
- Driving: In many regions, individuals with 20/100 vision may not meet the vision requirements for driving. Driving may be possible with special accommodations or vision aids, but restrictions usually apply.
- Work and Education: Individuals with 20/100 vision may need accommodations in the workplace or classroom, such as enlarged print materials, magnifiers, or assistive software. Special seating or devices may also be necessary to ensure they can participate fully.
- Mobility: While 20/100 vision allows for some independent movement, it can still make navigating unfamiliar environments more challenging. Some individuals may benefit from mobility aids like a cane or guide dog in certain situations. Based on diagnosis, 20/100 can change to 20/200 or worse during any day at school or work based on eye fatigue.
Different levels of Vision Loss to easily compare:


What legally blind looks like and is:
20/200 vision is a severe level of visual impairment and is often classified as legal blindness in many regions. It means that a person with this level of vision can see at 20 feet what a person with normal vision can see clearly at 200 feet. Here’s an overview of 20/200 vision and its implications: Technology has changed everything toward independence, including AI apps that will transcribe the inaccessible to accessible for you what you cannot see
1. Definition of 20/200 Vision
- In an eye exam, vision is expressed as a fraction. The first number (20) refers to the distance (in feet) from which the person views an object. The second number (200) indicates the distance at which a person with normal vision can see the same object clearly.
- Therefore, someone with 20/200 vision must be much closer to an object (20 feet away) to see it with clarity, while a person with normal vision can see it clearly from 200 feet away.
2. Legal Blindness
- Legally Blind: A person with 20/200 vision is considered legally blind. Legal blindness is defined as having a visual acuity of 20/200 or worse in the better eye with the best possible corrective lenses.
- Low Vision Category: While legally blind, individuals with 20/200 vision may still have some functional sight. They fall under the category of low vision, meaning that although their vision is severely impaired, they can still benefit from visual aids.
3. Impact on Daily Life
- Challenges with Distance Vision: Individuals with 20/200 vision have significant difficulty seeing objects, signs, or faces at a distance. Recognizing faces across a room, reading road signs while driving, or watching TV from a typical distance can be very challenging or impossible.
- Mobility and Orientation: Moving through unfamiliar environments may require assistance or adaptations. People with 20/200 vision often need to use mobility aids, such as a white cane or guide dog, to navigate safely.
- Reading and Close-Up Work: Although close-up vision may be better, people with 20/200 vision often require magnifiers or other visual aids for reading or detailed work.
4. Corrective Measures
- Eyeglasses or Contact Lenses: In some cases, corrective lenses may slightly improve vision. However, they often cannot bring a person’s vision to normal (20/20) levels when the vision loss is significant.
- Low Vision Aids: Various devices can assist people with 20/200 vision in their daily lives, including:
- Magnifiers: Handheld or electronic magnifiers for reading and detailed work.
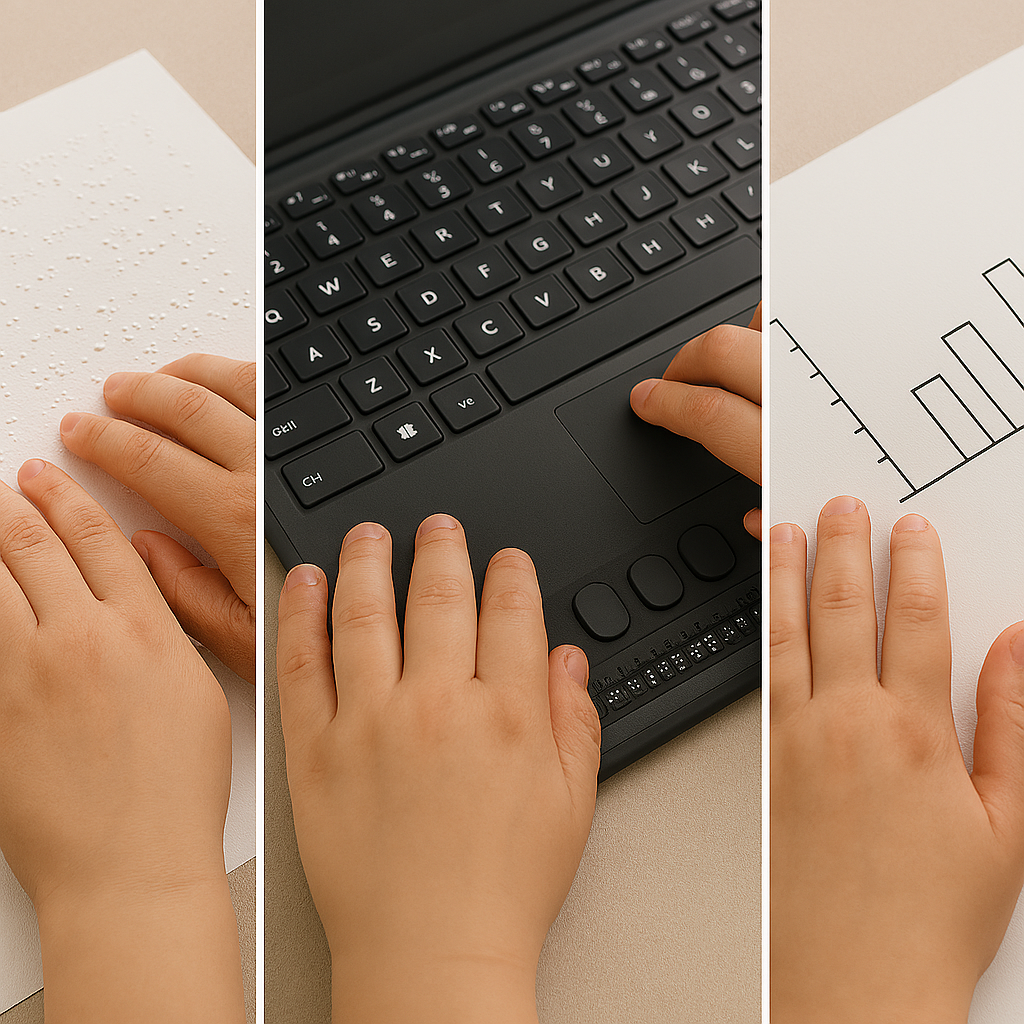
- Screen Readers: Digital devices or computers with screen readers that convert text to speech.
- CCTV Systems: Closed-circuit television systems that enlarge printed text or images onto a screen.
- Large-Print Materials: Books and materials with large text can make reading easier.
5. Driving Restrictions
- Not Eligible for Driving: In most countries and regions, individuals with 20/200 vision are not permitted to drive. Driving requires a higher level of visual acuity to safely recognize signs, signals, and hazards.
6. Assistive Technology and Adaptations
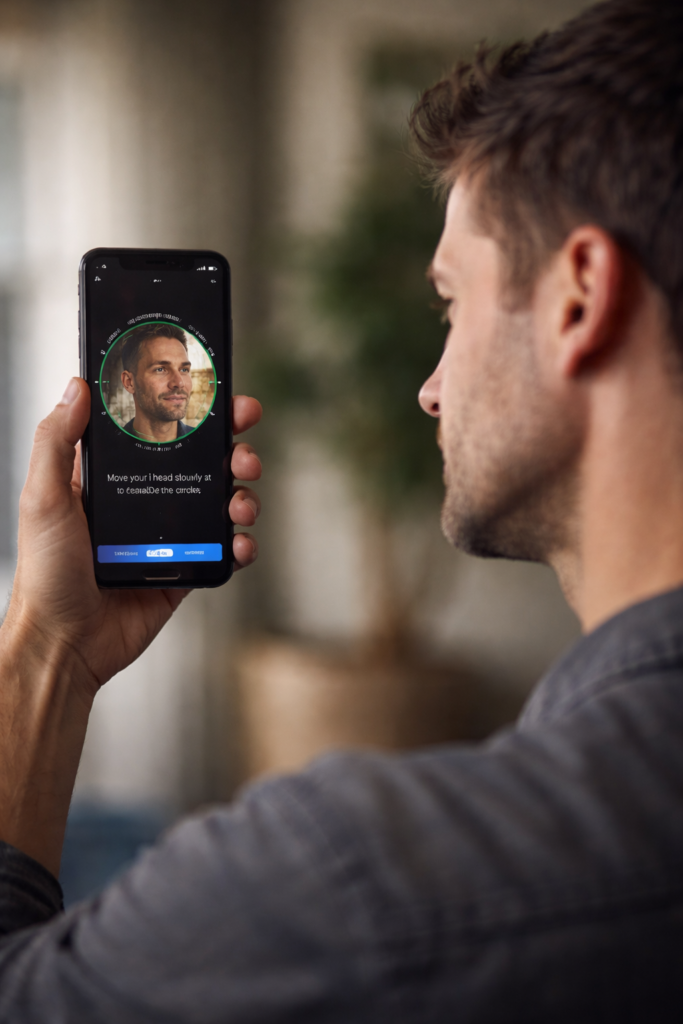
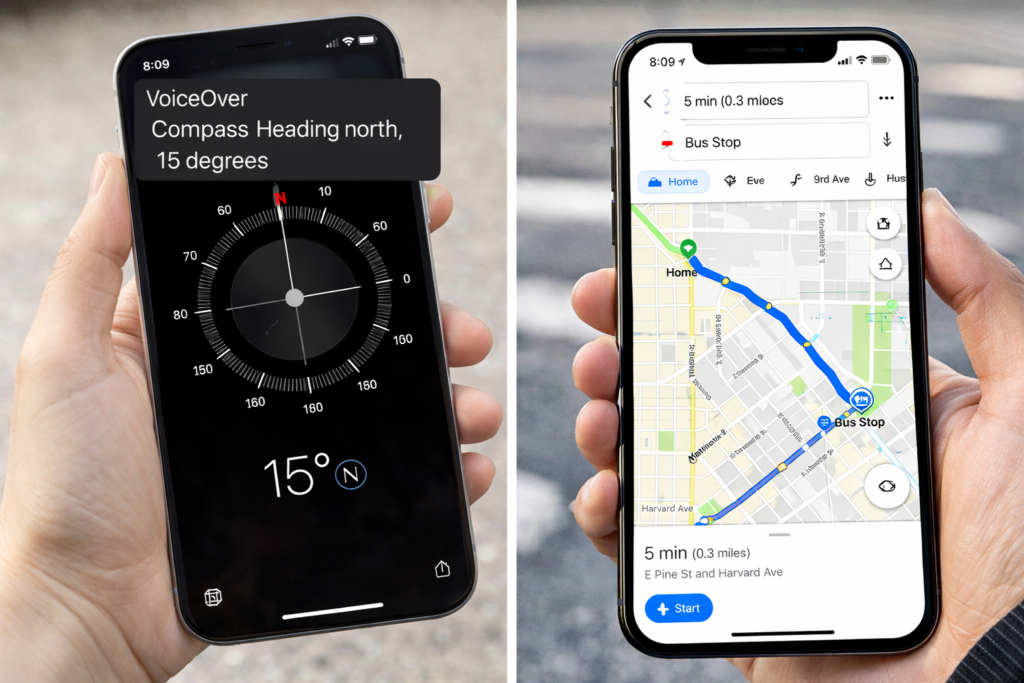
- Adaptive Technologies: Screen readers, screen magnifiers, and voice commands on computers and smartphones help individuals with 20/200 vision engage with digital content.
- Environmental Modifications: Enhanced lighting, contrast modifications, and large-text displays make daily tasks like reading, working, and navigating spaces easier.
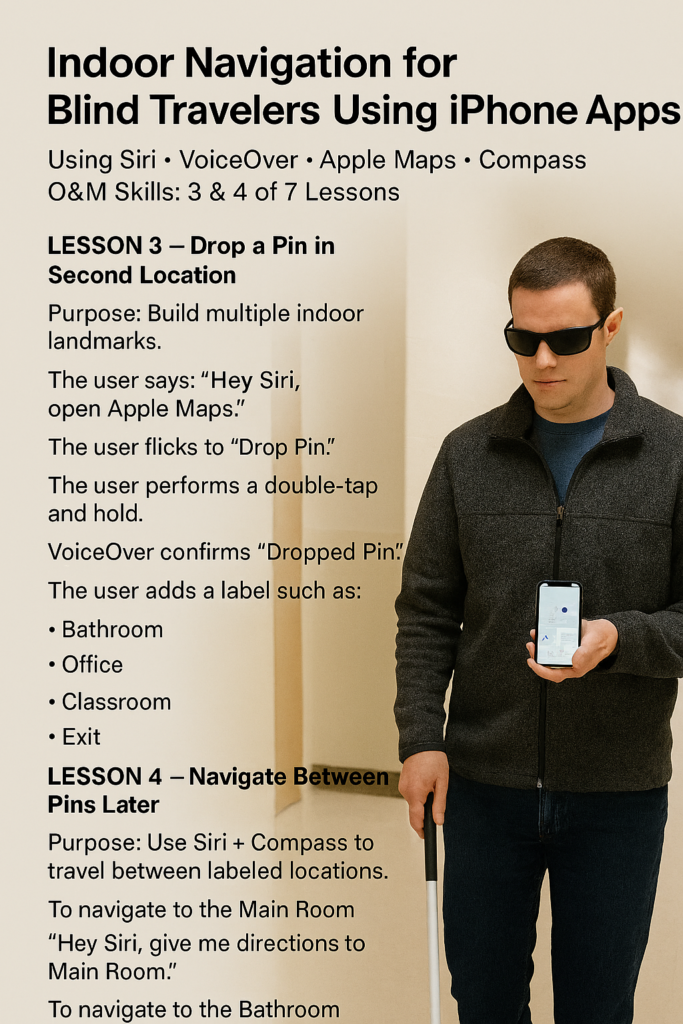
- Orientation and Mobility Training: People with 20/200 vision need O&M (orientation and mobility) training to help them navigate safely and independently using mobility aids or techniques.
Results
20/200 vision signifies severe visual impairment and is categorized as legal blindness. When in School, immediately acquire services so students can learn independence. Access lessons to acquire those needed computer skills with screen readers.
20/800 or More

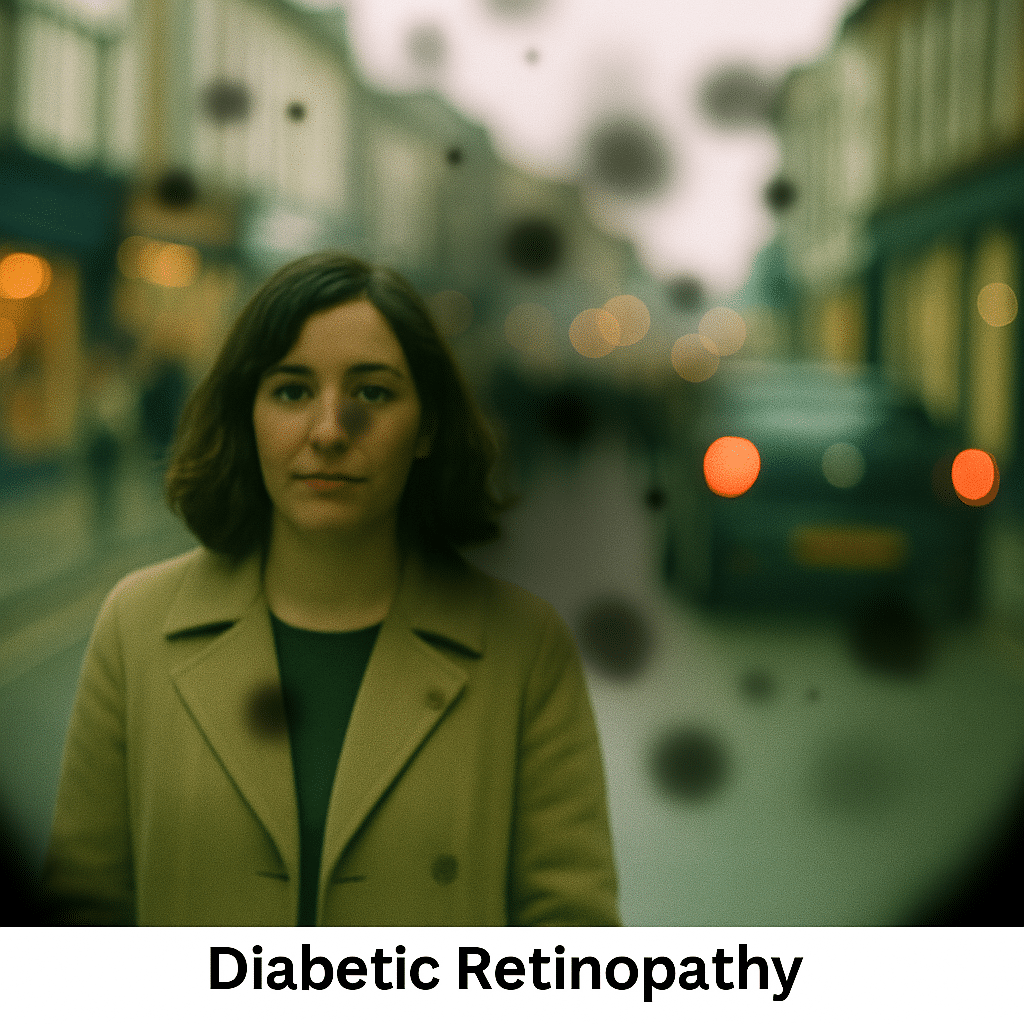
20/800 vision is a severe visual impairment often classified as profound low vision or near-total blindness. This means a person with 20/800 vision can see at 20 feet what someone with normal vision sees at 800 feet. Consequently, this level of impairment presents significant challenges for daily functioning. Even with corrective lenses, the limitations remain.
1. Definition of 20/800 Vision
A person with 20/800 vision must be 20 feet away to see something that a person with normal vision can see clearly from 800 feet. This substantial loss of visual acuity severely limits the ability to see details at any distance.
2. Legal Blindness and Classification
Individuals with 20/800 vision fall under the category of profound low vision. Although some residual vision may remain, it is limited. People with 20/800 vision are legally blind. Legal blindness is defined as having a visual acuity of 20/200 or worse in the better eye, even with corrective lenses.
3. Impact on Daily Life
People with 20/800 vision face significant visual challenges in everyday tasks. They may struggle with activities such as reading, recognizing faces, or navigating unfamiliar environments. Even simple tasks like watching TV or identifying objects across a room are often inaccessible. As a result, they must rely on non-visual cues such as tactile or auditory information. This helps them navigate their surroundings and accomplish tasks.
4. Corrective Measures
Although corrective lenses offer limited improvement for individuals with 20/800 vision, magnifiers or other visual aids may enhance any remaining vision for specific tasks. However, many people with this level of impairment depend on advanced assistive technologies. Screen readers, braille displays, and text magnifiers help them access information. Voice-controlled devices enable hands-free interaction with technology. Additionally, orientation and mobility aids, such as white canes or guide dogs, help individuals move safely.
5. Causes of 20/800 Vision
Congenital conditions, like Retinitis Pigmentosa or Optic Nerve Hypoplasia, often lead to severe vision loss. Progressive eye diseases such as Glaucoma, Macular Degeneration, or Diabetic Retinopathy can also cause vision to deteriorate to 20/800. Additionally, trauma or injury to the eye may result in permanent vision impairment.
6. Mobility and Independence
People with 20/800 vision rely on white canes, guide dogs, or assistance to travel safely. Orientation and mobility training teaches them how to use these aids effectively. This training also helps them develop strategies for moving confidently through public spaces. Some individuals also use adaptive techniques like echolocation to supplement their remaining vision.
7. Driving Restrictions
Due to the severity of the impairment, individuals with 20/800 vision are not permitted to drive.
8. Support and Resources
Low vision rehabilitation programs provide essential training in daily living skills, technology use, and mobility techniques. These programs enable individuals with 20/800 vision to maximize their remaining vision. Various organizations offer services such as guide dog training, braille literacy, and mobility aid instruction. Vision loss support groups also offer emotional and practical support for those facing similar challenges.
Result
20/800 vision represents profound visual impairment, often resulting in near-total blindness. People with this condition face substantial challenges in daily life. However, they can rely on assistive technology, mobility aids, and rehabilitation services to maintain independence. While corrective lenses may offer limited improvement, adaptive tools and strategies help individuals with 20/800 vision engage in work, education, and social activities successfully.
Now, you can get an idea of what a visual impairment actually looks like. Educational Services starting at youngest age possible but no later than age 3 years old is crucial.
Understanding Vision in Children: What Visual Acuity Really Means
- How Different Eye Conditions Affect the Way People See
- 20/70 Vision Explained: What It Really Means and How It Affects Daily Life
- What does 20/100 vision look like?
- 20/200 Vision Explained: What Everyone Gets Wrong About “Legal Blindness”
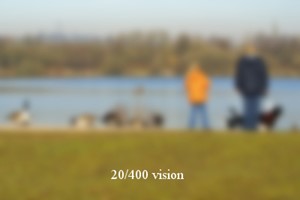
- What Does 20/400 Vision Look Like?
- What does 20/800 vision look like?
- When Vision Problems Look Like Misbehavior: What Parents and Teachers Miss
- Vision with Macular Degeneration and Stargardts
- Low Vision Students Face Depression and Despair When Forced to Learn Visually
- 2.2 Billion People Have Vision Loss: U.S. Statistics, Causes, and What It Means
- How to Read, Write, and Learn with Low Vision (Tools + Techniques)
- What Does Legally Blind Look Like?
- Signs of Low Vision in Children Even when they Pass Screening “Almost Normal” Still Matters
- Low Vision Driving Aids: Bioptics, Prism Glasses, Adaptive Devices, and Safe Driving Options Explained