In this lesson, you’ll learn how to teach and practice Unified English Braille (UEB) math using a Focus or Brailliant Braille display with JAWS. Start by setting up the correct Braille settings in JAWS, ensuring your Braille display and cursor follow each other for accurate feedback. Adjust your language profiles and choose UEB Grade 2 for output and input. Navigate through basic arithmetic and algebra problems using JAWS’ Braille Math Editor, making corrections easily. This step-by-step method will help both new and experienced teachers guide students in learning UEB math effectively.
First, set up JAWS properly by accessing the JAWS Settings Center Insert + 6 followed by (Ctrl+Shift+D) to set default. Type out and Navigate to “Braille mode” and ensure your display is set to “Structured” mode. Enable the settings that allow the active cursor to follow the Braille display and vice versa. This ensures that wherever your student is on the screen, you can follow along on your display. Turn on the Braille Viewer also to see the braille at the top of your monitor if you have sight.
Next, Alt + F to Language profiles then Alt + D to details and open and confirm UEB Grade 2 and Unicode by default. You can continue to Tab or Alt + M for math and select the UEB Math option in JAWS settings. Enter to close then Alt A to apply and enter to close. You are ready to go.
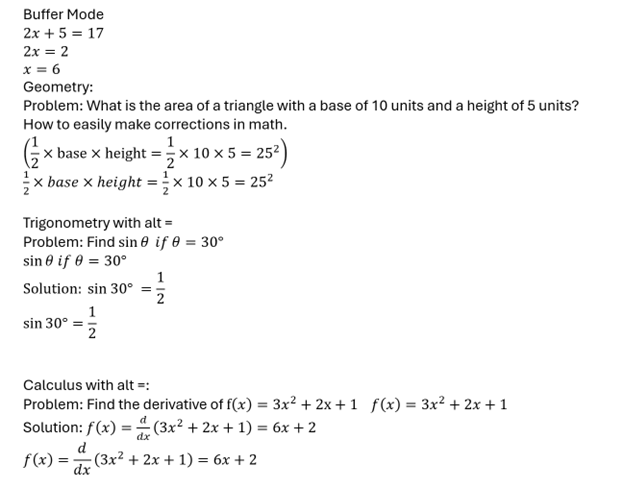
Practice using the Braille Math Editor
For practicing, you’ll use JAWS Braille Math Editor to create and edit math expressions as 1 option. Other options are WORD Math editor and LaTex as another as you become more advanced. Start with basic arithmetic, typing out equations such as “1+2=3,” and use the Braille display to feel the corresponding Braille output. This method works for both teaching and self-learning. As you advance to algebra, geometry, Trigonometry and calculus, use the WORD Math editor or Braille Math Editor to navigate complex equations. The editor allows easy error correction, reinforcing concepts as students work through problems.
Teach Math with Jaws and braille display-Basic to advanced math formulas
This method also helps auditory learners who can listen to JAWS while simultaneously feeling the Braille on the display. Practicing consistently with both the Braille Math Editor and JAWS will solidify UEB math skills and improve teaching efficacy.
Creating Geometry tables in Desmos provides a structured way to input and explore data, especially for users who rely on screen readers or keyboard navigation. Desmos is designed to be accessible, allowing blind and visually impaired users to create tables and input values using simple keyboard commands. By using the table function, users can input x- and y-values and navigate through cells seamlessly. This accessibility enables full participation in mathematical exploration and data visualization, making Desmos a valuable tool for both students and professionals. Through keyboard shortcuts and screen reader compatibility, creating and managing tables in Desmos becomes an intuitive and efficient process: even creating 2 or more shapes.
To create a table in Desmos, follow these steps, especially if you’re using a screen reader or keyboard navigation:
Creating Geometry Tables in Desmos Using Keyboard:
Open Desmos Graphing Calculator:
Go to the Desmos website and open the graphing calculator interface.
Activate the Add Expression Button:
If you’re using a screen reader, navigate to the “Add Expression” field by pressing Tab until you hear the option.
Enter the Table Command:
Type table() and hit Enter. This will create an empty table. The screen reader will announce that a table has been created, and it will move you into the table input fields.
Fill in Table Values:
To fill in the values for your table, use the arrow keys to navigate between cells.
Input the x-values in the left column and the y-values in the right column.
After typing each value, press Enter to move to the next cell. The screen reader will confirm each input.
Navigation Commands (for Screen Readers):
Move to the Next Cell: Press the Right Arrow or Down Arrow to move between cells.
Move Back: Press the Left Arrow or Up Arrow to go back to previous cells.
Delete an Entry: Use Backspace to delete the contents of a cell.
Add More Rows: Navigate to the last row and press Enter. This will automatically add a new row for more data points.
Keyboard Shortcuts in Desmos:
Navigate between expressions/tables: Use the Up and Down Arrow keys.
Create a new table: Type table() in the expression line.
Results
By typing table() into the Desmos expression field, users can create tables and populate them with x- and y-values. Or just create a Table from menu. Screen readers will provide auditory feedback, helping users navigate through the cells and input values. Desmos’ intuitive keyboard commands make this process efficient for users relying on screen readers or those who prefer keyboard navigation.
Optimizing Windows 11 Efficiency for Screen Reader with Key Settings and Configurations takes an hour most often 2 or so to complete. Longer if you are new to screen reader and how Windows 11 works. It is different than other OS systems so give yourself grace as you learn all there is to know about this system. As you move through your keyboard and discover you would like a particular key somewhere, like the applications key, you can remap a key to create that yourself. AND, you MUST have Local Admin on School Computers.
How to setup Computer for Optimizing Windows 11 Efficiency
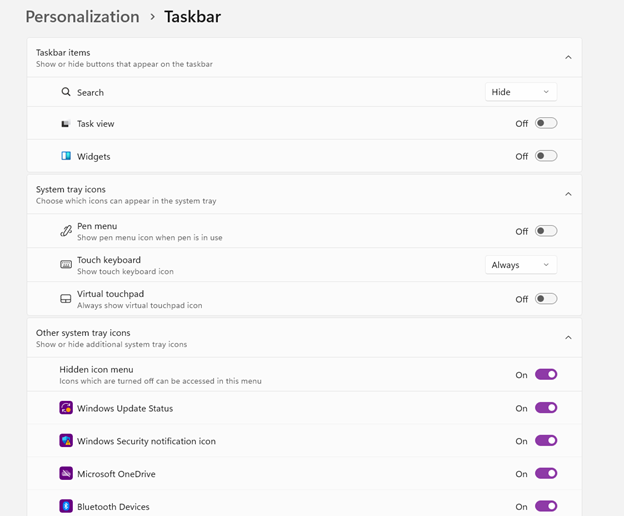
Change Taskbar Settings
Update Computer every day
Go to task manager and disable anything you do not need at start up
Go to Power Options and change from Sleep to Shut Down when you press Shut down button
take off sleep options in general unless you are advanced user
Keep in mind that your screen reader cannot reset or the RAM clear if you computer is in sleep mode or hibernate mode
Turn off Touch pad- if you do not your palm will touch the mouse pad and auto activate items or move your cursor on your computer. This equals huge frustration to a screen reader user.
Windows T and clear that taskbar–this is million dollar real-estate to access programs fast
Setup WORD
Go to control panel and setup Sound card options
Windows and adjust other sound options using sndvol.exe
Setup Gmail and Drive and learn new commands
Setup Outlook
Taskbar setting for Windows 11 setup
Efficiency for Screen Readers and other Setup Skills
Proper Set up Windows 11 to work with screen readers and braille displays is crucial for visually impaired users. This configuration ensures smooth interaction with the system, giving users full access to information and applications such as Gmail for optimizing access..
1. Accessibility and Independence
Configuring Windows 11 for screen readers like JAWS, NVDA, or Narrator, and integrating braille displays, provides full independence. Without proper setup, tasks such as reading documents, browsing, or using software become challenging. A well-configured system ensures all functions are accessible.
2. Productivity and Efficiency
Screen readers and braille displays let users interact quickly with the system. Setting up Windows 11 for compatibility speeds up responses to commands. It also ensures smoother transitions between applications, making multitasking more efficient. Proper configuration prevents lag or software conflicts, which increases productivity in school and work settings.
3. Customization for Personalized Needs
Each user has different needs. Windows 11 allows users to customize screen reader settings (e.g., speech rate, verbosity, and key commands) and braille displays (e.g., output type and formatting). These adjustments create a personalized experience, improving comfort and reducing frustration.
4. Enhanced Braille Support
Windows 11 offers enhanced braille support when paired with leading screen readers. Proper setup lets users access seamless braille input and output for text and math. It also allows advanced navigation of documents. Correct braille display configuration ensures accurate reading and editing of both simple text and more complex content.
5. Compatibility with Updates
As Windows 11 updates, keeping screen readers and braille displays integrated is essential. A well-maintained setup ensures new features or security updates don’t disrupt accessibility tools. This is vital for maintaining ongoing access such as the new Google Commands for navigation.
Key Setup Steps for Optimizing Windows 11 for Accessibility:
Ensure Compatibility: Install the latest versions of screen readers and braille display drivers compatible with Windows 11.
Enable and Configure Narrator: Windows 11 includes Narrator, which can be set up for basic tasks if needed.
Customize Keyboard Shortcuts: Set up shortcuts for easier navigation and quicker interaction.
Adjust Accessibility Settings: Go to “Accessibility” in the Settings app to adjust visual and audio cues like contrast and text size.
Test with Braille Displays: Pair and calibrate braille displays for reading and input in UEB or Nemeth, depending on preferences.
With proper set up, Windows 11 for screen readers and braille displays furthers accessibility. This setup enhances independence, productivity, and ease of use in the digital world.
Embossing graphics for Blind Students: Dr. Robinson offers this video for families and transcribers needing to adapt images for blind students to “see.” This video offers a straightforward approach to creating accessible Venn diagrams using the technique to emboss graphics with Tiger.
Dr. Robinson begins by explaining how to handle a Venn Diagram or any graphic. She demonstrates using a Venn diagram with two large, intertwined circles, where all parts are shaded. Such images blur when transferred into Tiger Designer, a common tool for producing tactile graphics. She recommends redrawing the diagram for clarity, ease, and speed. This approach is more effective than fixing the shaded areas when you emboss graphics with Tiger.
How to Emboss the Tiger Graphic
To show blur issues, she creates a new diagram, by opening Tiger Designer and pressing Control + N to start a new document. After ensuring the default settings are correct, pasting an image using Control + V will result in a blurry output due to the shading. In this case, Dr. Robinson suggests redrawing the Venn diagram. Ctrl + N for new again and Alt+O or click on Tools. Select a line width of 2.5 or 3, as thicker lines are easier for students to feel when you emboss graphics with Tiger.
Dr. Robinson then demonstrates how to draw two circles from the tool’s menu, representing the basic structure of the Venn diagram. She emphasizes the importance of labeling the sections and typing in uncontracted Braille works fine. She notes that while parents may not be familiar with contractions, students are accustomed to reading uncontracted Braille. It’s crucial to use these steps to emboss graphics with Tiger accurately.
Finally, Dr. Robinson shows how to emboss the Tiger graphic with Ctrl + P to emboss. Ensure the correct printer model and settings are applied. The final result will be a clear and accessible tactile diagram that the student can easily interpret.
Learning Spanish Braille involves understanding the unique characteristics of the Braille system used for the Spanish language. Then build on the foundational skills of Braille reading and writing. Here’s how to approach it:
1. Understand the Braille Alphabet in Spanish
Spanish Braille follows the same 6-dot system as English Braille.
Extra characters are included to represent letters with accents and special characters used in Spanish.
Key additions include:
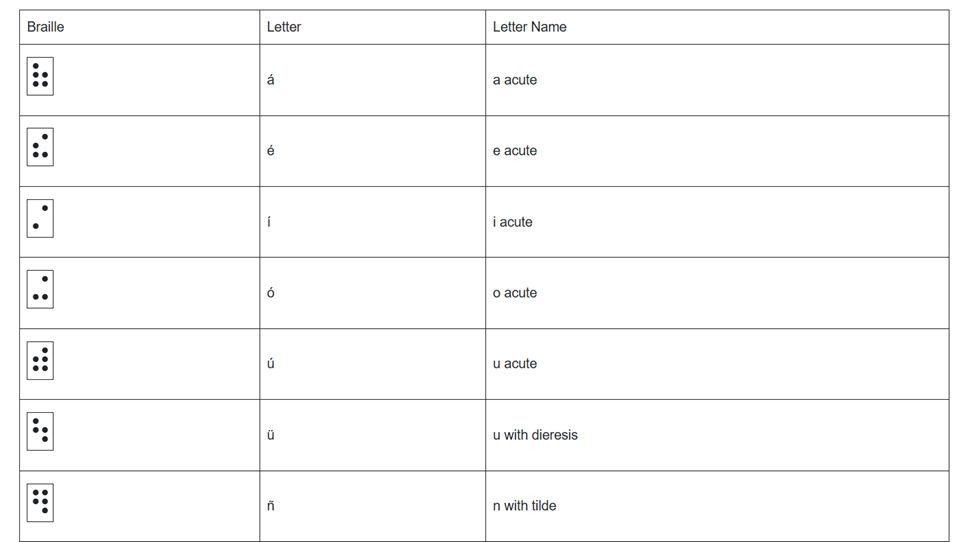
Ñ: Represented by a unique Braille symbol.
Accented vowels: Á, É, Í, Ó, Ú have distinct Braille symbols.
Punctuation: Spanish uses inverted question marks (¿) and exclamation marks (¡), and these have their own symbols in Spanish Braille.
2. Start with the Basics
– Begin by learning the standard Braille alphabet for unaccented letters, numbers, and common punctuation marks.
– Practice reading and writing these basic symbols to build fluency.
3. Familiarize Yourself with the Extra Characters
– Learn the Braille symbols for accented vowels (á, é, í, ó, ú) and ñ.
– Read and practice with materials specifically written in Spanish Braille to develop fluency.
– You can find books, articles, or educational materials written in Spanish Braille to improve your reading skills online.
5. Engage with Digital Tools
– Tools like Braille displays and screen readers can be set to Spanish to help reinforce learning. See below list of all Spanish symbols
– Software like JAWS or NVDA can be configured to support Braille output in Spanish. This allows for real-time practice with written content.
6. Practice Writing Spanish Braille
– Use a Braille writer to practice writing in Spanish Braille. Focus on mastering punctuation and special characters.
– The fastest and easiest to edit option will be to practice typing or brailling on a display. The FOCUS 40 Braille Display or Brailliant Braille Display to write out Spanish words and sentences.
7. Learn through Immersive Activities
– Reinforce learning, engage in practical activities like labeling objects in Spanish Braille. Work with bilingual Braille texts (Spanish and English).
8. Find a Teacher or Tutor
– If possible, work with an instructor who is fluent in Spanish Braille and the language. They can guide you through the nuances of the language and provide feedback on your progress.
– Organizations specializing in Braille education, like TechVision, can help offer resources or tutors for Spanish Braille.
8. Go to a Spanish Speaking Country
-Totally immerse yourself within a culture that will speak the language you want to learn well.
Spanish-Española Symbols
Spanish-Española 1. Jaws settings: Set up braille profile – insert 6 (ctrl shift D) for default. After completing the steps, open settings again to ensure they apply only to Word settings. Next, type “braille mode” twice, press F6, and use Alt+G to access languages and set your preferences. For those requiring a Spanish Braille display or keyboard, ensure your device is compatible with your software settings. More Video lessons can help.
This lesson is Spain (international) Input and Output are Spanish Grade 1
2. Tab to profile languages and set those up and enter to close Jaws settings
3. Alt 8 to make sure dots 7,8 show on display-accept and close settings
1. Set up Voice profile in Jaws-open context menu, options, voices, add a profile
1. In Word-change voice quickly: 2 options: on keyboard- ctrl shift window L to change profile or on Focus -2,3,4,5,7, space to change languages)
2. Insert+ctrl+S to change to Spanish profile or to other language
3. G+7+space on Focus to computer braille (which will output Spanish grade 1)– capital is dot 7 under capital letter on display
For Braille with Braille Display on Computer
Práctica:
á 1,2,3,5,6
é 2,3,4,6
í 3,4
ó 3,4,6
ú 2,3,4,5,6
ü 1,2,5,6,8
ñ 1,2,4,5,6, 8
Punctuation for Spanish Braille using Braille Display
! 2,3,5, 7 is exclamation mark
inverted ! is 2,3,5, 7, 8 is upside down exclamation mark
Period is . is dot 3
Comma is , is dot 2 for comma
question mark is ? is dot 2, 6
upside down question mark or inverted ? is 2,6,7
Spanish Braille for Keyboard and JAWS
Lower Case Letters
á (lower case a, acute accent) = Press Ctrl + ‘ (apostrophe), then the letter a é (lower case e, acute accent) = Press Ctrl + ‘ (apostrophe), then the letter e í (lower case i, acute accent) = Press Ctrl + ‘ (apostrophe), then the letter i ó (lower case o, acute accent) = Press Ctrl + ‘ (apostrophe), then the letter o ú (lower case u, acute accent) = Press Ctrl + ‘ (apostrophe), then the letter u ñ (lower case n, tilde accent) = Press Ctrl + Shift + ~ (tilde), then the letter n ü (lower case u, diaeresis accent) = Press Ctrl + Shift + : (colon), then the letter u
Upper Case Letters
Á (upper case A, acute accent) = Press Ctrl + ‘ (apostrophe), then Shift + a É (upper case E, acute accent) = Press Ctrl + ‘ (apostrophe), then Shift + e Í (upper case I, acute accent) = Press Ctrl + ‘ (apostrophe), then Shift + i Ó (upper case O, acute accent) = Press Ctrl + ‘ (apostrophe), then Shift + o Ú (upper case U, acute accent) = Press Ctrl + ‘ (apostrophe), then Shift + u Ñ (upper case N, tilde accent) = Press Ctrl + Shift + ~ (tilde), then Shift + n Ü (upper case U, diaeresis accent) = Press Ctrl + Shift + : (colon), then Shift + u
Hasta la vista / Hasta luego. See you / See you later.
Hasta pronto. See you soon.
Hasta mañana. See you tomorrow.
(Muchas) Gracias.
Thank you (very much).
De nada. You’re welcome.
Bienvenidos Welcome
Lo siento I’m sorry
Con permiso / Perdón / Disculpe Excuse me / Pardon me
¡Vamos! Let’s go!
¿Cómo está usted? How are you? (formal)
¿Cómo estás? How are you? (informal)
Insert+4 for eacute in
¿Qué tal? How’s it going?
Bien / Muy bien Good / Very good
Insert+4 for acute in Más below
Mal / Muy mal / Más o menos Bad / Very bad / OK
Sí / No Yes / No
¿Cómo?
¿Cómo se llama usted? What is your name? (formal)
¿Cómo te llamas? What is your name? (informal)
Me llamo… / Mi nombre es… My name is…
Mucho gusto. / Encantado. Nice to meet you.
Immersion in Language
Here is the sequence of learning in order to learn any language well:
The time it takes to learn a new language, like Spanish, while living in a country where it is the only language spoken, depends on several factors. However, here are general timelines and considerations:
1. Immersion Benefits
Living in a Spanish-speaking country accelerates learning because you’re constantly exposed to the language in real-life situations like:
Listening: Conversations, TV, radio, and announcements.
Speaking: Daily interactions with locals, from shopping to asking for directions.
Reading and Writing: Street signs, menus, newspapers, and more.
2. Language Learning Proficiency Levels
The Common European Framework of Reference for Languages (CEFR) breaks language learning into six levels:
A1 (Beginner): Basic phrases and conversations (3–6 months).
A2 (Elementary): Can understand simple texts and conversations (6–12 months).
B1 (Intermediate): Hold conversations on familiar topics and function in everyday life (12–18 months).
B2 (Upper Intermediate): Fluent in most situations, including work and travel (18 months–2 years).
C1 (Advanced): Understand complex topics and engage in nuanced conversation (2–3 years).
C2 (Proficient): Full mastery of the language, similar to a native speaker (3+ years).
Factors that will Determine Speed
3. Factors That Affect Learning Speed
Motivation and Attitude: Strong motivation and a positive mindset can accelerate your progress.
Practice Consistency: Daily practice, speaking, listening, and reading in Spanish speeds up learning.
Prior Language Experience: If you’re already familiar with Romance languages (e.g., Italian or French), learning Spanish might be faster due to similarities in vocabulary and grammar.
Formal Education: Taking classes, whether in person or online, and using language apps like Duolingo or Babbel can help structure your learning and improve your skills more quickly.
Social Interaction: Making friends who are native speakers or joining local groups can enhance your conversational abilities.
4. Realistic Expectations
– For basic conversational fluency (A2-B1), expect about 6 months to 1 year of immersion if you’re dedicated and practicing regularly.
– To reach an advanced level (C1), you might need 2 to 3 years of living and interacting in the language full-time.
5. Cultural Immersion
Your understanding of Spanish will deepen faster if you immerse yourself in the local culture, customs, and idiomatic expressions. Engaging in local activities, reading newspapers, and watching TV shows will all help you learn the language more organically.
Summary:
On average, 6 months to 1 year of immersion in a Spanish-speaking country should allow you to gain conversational fluency, with full mastery taking about 2–3 years, depending on your dedication and resources.
Adult Learning Speed
Sequence of learning for an adult
For adults, learning a new language like Spanish while living in a country where it’s the only language spoken can still be highly effective, but several factors can influence the timeline. Here’s what an adult learner can expect:
1. General Time frames for Adult Learners
Conversational fluency (A2-B1 level): Typically achievable in 6 months to 1 year of immersion.
Advanced proficiency (B2-C1 level): May take 1.5 to 2.5 years of consistent use and practice.
Full fluency (C2 level): Can take 3 years or more, depending on factors like exposure, practice, and language complexity.
2. Factors Affecting Adult Learning Speed
Cognitive Flexibility: Adults tend to be more methodical learners than children, but they can sometimes struggle with retaining new vocabulary and adapting to different grammar structures.
Prior Experience: If the adult already speaks a Romance language (like Italian or French), they will likely learn Spanish more quickly because of the structural similarities.
Learning Environment: The more opportunities for immersion—such as interacting with native speakers, engaging in cultural activities, and using Spanish in daily tasks—the faster the progress.
Language Learning Methods: Adults often benefit from a combination of formal learning (e.g., classes, tutors) and informal learning (e.g., conversations, media consumption).
Motivation and Consistency: Adults with clear goals and regular practice (even just 30 minutes a day) tend to progress faster. Maintaining consistent practice is key to long-term retention.
Challenges for Adult Learners
3. Challenges for Adult Learners
Accent and Pronunciation: Adults might find it harder to develop a native-like accent, though this doesn’t prevent them from becoming highly fluent.
Work and Life Responsibilities: Adults often juggle work and personal responsibilities, which can limit the time available for focused language learning.
Grammar: Grasping grammatical structures, verb conjugations, and nuances may take longer for adults compared to younger learners, who tend to absorb new patterns more intuitively.
4. Accelerating Adult Learning
Use Daily Immersion: Engage in conversations, read signs, watch TV shows, and use apps like Duolingo or Babbel to reinforce lessons in real-life situations.
Structured Learning: Enroll in Spanish classes or hire a tutor to build a strong foundation in vocabulary and grammar.
Use Technology: Utilize language-learning apps, podcasts, or online lessons. Watching Spanish media with subtitles can help you pick up common phrases and pronunciation.
– Join Social Circles: Engage with locals, participate in group activities, and use Spanish in daily interactions. This practical experience will help reinforce what you’ve learned.
– Set Realistic Goals: Adults benefit from having clear, incremental goals (e.g., mastering a certain level of vocabulary or holding a 10-minute conversation) to track progress and stay motivated.
Adult Experience
5. Common Experiences for Adults
After 3-6 months, most adults can hold basic conversations, ask for directions, and manage daily interactions in Spanish.
By 1 year, many can discuss familiar topics, navigate most social situations, and understand much of what they hear or read.
Within 2 years, a dedicated adult learner can likely achieve strong conversational fluency and understand complex topics, though nuances and slang may still be challenging.
Summary
For an adult, achieving conversational fluency in Spanish typically takes 6 months to 1 year with immersion and regular practice. Advanced proficiency may take 1.5 to 2.5 years, while full fluency could require 3 years or more, depending on the learner’s background, motivation, and exposure to the language.
Dr. Robinson and her Team at TechVision have made a significant global impact via their Team Mission and Purpose. TechVision specializes in 1:1 remote instruction in education for the blind and visually impaired, serving individuals of all ages. We also train School Teams: transcribers, Teachers of the Blind and other School Personal and work with parents. Their expertise is delivered through personalized, real-time 1:1 remote instruction. This approach empowers students and clients to compete equally with their sighted peers in both education and work.
The Power of a Braille Hebrew Bible and Technology
Batya Sperling-Milner, a blind 12-year-old, spent months meticulously preparing for her Orthodox Bat Mitzvah ceremony. Unlike her peers, she faced significant challenges, for her Bat Mitzvah singing from a Braille Hebrew Bible, particularly with learning the musical notes for her Torah portion. Traditionally, visually impaired individuals memorize the notes through recordings or verbal instructions. However, this method proved especially difficult and inefficient for Batya.
A Computer Genius
Last year, a computer genius who is related to Batya, disturbed by the absence of lack of braille musical notes, developed a prototype overnight. for her to sing at her Bat Mitzvah using her Braille Hebrew Bible After a few days of refinement, Batya was able to use these notes on her electronic braille reader. This innovation allowed her to read each note alongside the corresponding letter, dramatically improving her ability to learn. Without this tool, Batya believes mastering her portion would have been nearly impossible.
Batya Singing from the Torah at Her Bat Mitzvah Using a Braille Hebrew Bible
Batya’s mother also played a crucial role in ensuring Batya could perform her Bat Mitzvah like any sighted person using her Braille Hebrew Bible. Overcoming challenges, including the requirement to see and read from the Torah, she presented a 33-page paper and an extensive executive summary to the leaders of their Washington DC synagogue, proving Batya’s capability. This accomplishment gave Batya immense pride, knowing she fulfilled the congregation’s obligation. She has always been a top Braille Reader.
Batya’s accomplishment culminated in her using the Braille Hebrew Bible during her Bat Mitzvah, where she sang and read from the Torah. This experience was deeply meaningful to her. The Braille Hebrew Bible provided her with the tools she needed to fulfill the congregation’s obligation. Ultimately, this milestone brought Batya immense pride, knowing she had successfully navigated her challenges. The combination of her determination, training, her mother’s support, and the Braille Hebrew Bible allowed Batya to fully participate in her Bat Mitzvah, a ceremony that marked a significant and empowering moment in her life.
Dr. Robinson demonstrates how to create and manipulate a parabola using the Desmos shaded parabolas using the graphing calculator. This process is specifically designed for blind and low vision students. She begins by typing an equation. Desmos automatically adds sliders, allowing the adjustment of the graph’s shape in real-time.
As Dr. Robinson runs the equation, the parabola expands, resembling the curve of a ball in motion. She explains the importance of embossing the graph so students can physically feel its structure on the XY plane. This tactile approach helps students understand mathematical concepts more concretely.
To enhance accessibility, Dr. Robinson uses the “Alt + T” command to activate the audio trace. This feature provides valuable auditory information about the graph. She also slows down the narration using “Control + Shift + Page Down,” ensuring clarity and comprehension.
Next, Dr. Robinson shares the graph with her students using the “Insert + F5” command. She exports the graph as a Braille-ready image, making it accessible for students who rely on tactile feedback. After downloading the image, she opens it in a photo editor to enhance contrast. This step ensures that the lines are clearly defined for the student.
Tiger Designer
Dr. Robinson then pastes the edited image of Desmos shaded parabolas into Tiger Designer, a software used to prepare tactile graphics for printing(emboss). Using “Control + P,” she embosses the graph on her ViewPlus embosser, allowing students to feel the parabola and compare it with what their sighted peers see.
This hands-on approach for STEM, ensures that blind students can fully participate in graphing activities. Dr. Robinson’s method integrates technology and tactile feedback, making math accessible and engaging. Through these steps, she empowers students to understand and interact with complex mathematical concepts. This demonstration showcases the effective use of Desmos and related tools to enhance learning for visually impaired students.
Dr. Robinson explains how to navigate the new Google Drive update using a screen reader, focusing on commands that will be essential after the August 1st, 2024 update shortcuts. She begins by demonstrating basic navigation through Google Drive, emphasizing the importance of learning the updated keyboard shortcuts-use FireFox when you have Chrome and Edge Chromium issues with navigation. The point it, same commands but use a different browser when 1 or 2 decide not to work well. Then if you have done that and still issues exist, set up computer to work the best with screen readers.
To start, Dr. Robinson guides users through accessing the settings menu with “Control + Shift + S,” where updates and new keyboard shortcuts can be found. She highlights the automatic update that will apply the new shortcuts starting August 1st. After closing the settings menu with “Escape,” she demonstrates navigating Google Drive using the “Alt + G” command, followed by “N” to access the navigation region.
New Google Drive Update
Dr. Robinson continues by explaining first-letter navigation which presently only works in Firefox but as updates occur Chrome and Edge should start to work again also. List View is where users can jump to items by pressing the first letter of the item’s name. She shows how this method, combined with the updated shortcuts, makes navigation faster and more efficient. For example, to create a new document, she uses “Alt + C” followed by “T,” which quickly opens a new Google Doc and other google items.
She then discusses how to use the “Alt + A” command to open the context menu, allowing users to perform actions like downloading, sharing, or renaming files. The context menu provides additional options, accessible via hotkeys. Dr. Robinson points out the ease of using these commands once learned, making it simpler to manage files within Google Drive.
To demonstrate the process, she creates a new presentation with “Alt + C” followed by “P.” After navigating back to her list view with “Alt + G” followed by “I,” she explains how to use the context menu for specific actions. Dr. Robinson concludes by encouraging users to familiarize themselves with these new commands, ensuring a smooth transition.
Google Drive navigation is more intuitive and accessible for those using screen readers if you use the browser that works . Learn Google Slides navigation with complicated slides to improve navigation and echo also.
Dr. Robinson guides users through setting up Braille mode via Default profile by typing it in the edit box. She types “Braille Mode” in the search box, and F6 to access different settings. She uses “F6” to navigate to the desired options, then “Alt + F” to select language profiles. To access MathCat option via alt D to details then tab to Nemeth and change to MathCat then OK.
Dr. Robinson explains how to select the correct Braille code, such as UEB math with JAWS or Nemeth code. She walks through the process of applying these settings and closing the settings dialog.
Once set up, Dr. Robinson demonstrates how to solve math problems using JAWS in Word. Dr Robinson explains the process of entering equations using “Alt + Equals” to open the math editor. She highlights how to type out equations, like “X squared plus 3 equals 11.” Then how to navigate through the math content using keyboard commands.
She also explains complex math using UEB Math with Jaws, such as using square roots and other mathematical symbols, by using Unicode and LaTeX commands. Dr. Robinson shows the equation tools in Word by pressing “Alt + J” E to equation menu. Then explains how to convert equations between professional and linear formats using “Alt + JE + C.”
Throughout the tutorial, Dr. Robinson ensures users understand the commands necessary for navigating and editing math content effectively. She also provides troubleshooting tips, such as using the Math Viewer with insert space + = . This gives more detailed navigation of hearing each symbol, particularly useful for more complex equations.
Dr. Robinson concludes by encouraging users to explore more advanced math problems and settings. This ensures that they can confidently use JAWS for UEB math in various applications. If you experience computer issues in general, set it up to work the most efficiently with screen readers.
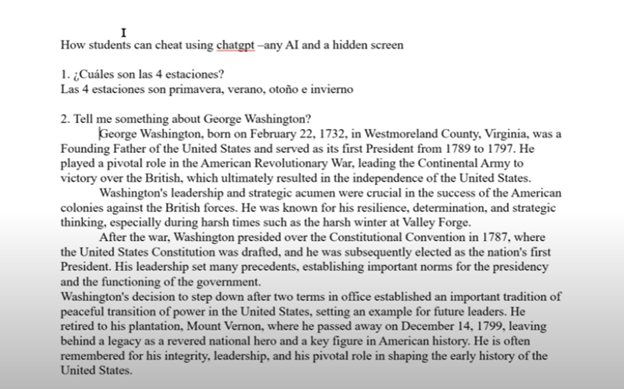
Teachers can Slow or stop AI cheating both in the classroom and at home through strategic measures. In the classroom, lock down browsers effectively prevent students from accessing unauthorized websites or AI tools during exams. These browsers restrict students to a single screen, blocking external resources. Additionally, teachers should design assignments that require critical thinking and personalized responses. Such tasks are challenging for AI to complete accurately, as they demand unique, context-specific answers.
To further Slow or Stop AI cheating in class and home, teachers should incorporate oral assessments and apps like Khan academy. These require students to verbally explain their answers or spell out terms, making it difficult to rely on AI-generated content-Video details here. Monitoring classroom activity is crucial as well. By actively observing students’ screens, teachers can spot hidden screens or content that doesn’t match a student’s usual work.
At home, teachers can assign open-ended projects that require creativity and personal reflection. These assignments are less likely to be successfully completed by AI. Requiring students to submit drafts or process documentation ensures they engage with the material and don’t merely copy answers. Time-limited tests can reduce the likelihood of students using AI tools during online exams. By setting strict time limits and challenging questions, teachers can make quick AI lookups impractical.
Teachers should also utilize plagiarism and AI detection tools to identify suspicious content to curb classroom AI cheating. Follow-up video calls or in-person meetings, where students explain their answers, can verify that they genuinely understand the material. Engaging parents is another key strategy. By encouraging parental involvement, teachers can help monitor the home environment and promote honest academic practices.