A remarkable transformation unfolded in 2000 when a blind teenage girl arrived from the Ukraine–Russia border region. Her journey would soon be defined by the inspiring story of how a Blind Teen Masters JAWS. She had lost her sight due to a brain tumor and survived medical hardship. In addition, she entered the United States without knowing a single word of English. She faced dozens of surgeries to remove the tumor. She was brave, brilliant, and determined — but she faced a world that she feared. Her first English words to me were: “I want to die cause blind can’t do anything!”
I was determined to change that idea.
A Different Way of Life
When she first sat down at the computer, the only screen reader available to her was English JAWS. To bridge the gap, I sought out someone who became friend in Russian to get Jaws scripts for Russian JAWS. This allowed her to switch seamlessly between Russian and English. This simple act opened a doorway. She could hear her native language, type in English, and move back and forth between the two as she learned. Within 3 months she was interpreting the language for her family. She could speak smoothly and understandably to her peers and teachers. The next crucial skill skill was connecting her to friends in Ukraine via email. THAT was the secret. The journey was possible because this blind teen truly mastered JAWS and pushed through the barriers.
And she learned fast. Within that 3 months, she told me: I do not want to die anymore because the technology has changed everything for me and shows me my future. I can do what I want and need.
Every day she practiced navigating the keyboard, reading with JAWS, writing, and communicating. She used the bilingual setup to teach herself English while mastering the technology that would give her independence. Her confidence grew with every keystroke.
Three months later, the young teen who once arrived frightened and silent was now speaking fluent English. She was using JAWS like she had been doing it for years. In the video below, she demonstrates her skills entirely in English: reading email, writing messages, attaching files, and navigating her computer with flawless precision. Her success is a striking example of what happens when a blind teen sets out to master JAWS. She is breaking new ground for herself and others.
Her journey is a powerful reminder that access changes everything. When students receive the right tools, the right training, and unwavering belief, they rise. They thrive. They discover who they were always meant to be.
Best Computer PC Specs buying Guide for 2025 and beyond: RAM, CPU, SSD, graphics card, gaming and more explained
If you’re planning to buy a computer now, pause before diving into the best PC specs. Keep in mind that dealers often clear out older models during holiday sales. To make sure you know exactly what you’re getting, skip down to the section on ‘Older and Newer Naming’ of laptops.
Specs You Need and PC Details Explained
Memory (RAM): 64 GB DDR5 (4800–5600 MHz, dual channel, expandable to 128 GB on some models). Continue for more detailed advice, for Best Computer Specs Guide.
Storage (SSD): 2 TB PCIe Gen 4 NVMe SSD (blazing fast read/write speeds, optional dual SSDs up to 4–8 TB total)
Display: 14‑inch UHD (3840 × 2160) Mini‑LED, 120 Hz refresh rate, HDR support or 14- 16‑inch OLED, 240 Hz for gaming/creative workloads
Reduce Eye Strain with a High Resolution Curved Screen
Ultra HD / 4K: 3840 × 2160 pixels
8K UHD: 7680 × 4320 pixels
Highest Resolutions Available (2025)
8K UHD (7680 × 4320):
Currently the highest mainstream resolution for TVs and monitors.
It is Extremely sharp, but requires powerful GPUs and large screens to notice the difference.
Best Curved Monitors (2025)
Brand
Best Model
Size / Resolution
Use Case
Key Strengths
Samsung
Odyssey OLED G9
49″ Dual QHD (5120×1440)
Gaming / Immersion
240 Hz refresh, deep 1000R curve, HDR OLED
Dell / Alienware
Alienware AW3425DW
34″ QD‑OLED (3440×1440)
Gaming / Esports
Fast response, vivid colors, G‑Sync Ultimate
Dell UltraSharp
U4025QW
40″ 5K2K (5120×2160)
Productivity / Multitasking
Huge workspace, USB‑C hub, color accuracy
LG
UltraGear 45GR75DC
45″ WQHD (3440×1440)
Gaming / Creative
OLED panel, 240 Hz, immersive ultrawide
HP
E45c G5
45″ Dual QHD (5120×1440)
Productivity / Office
Replaces dual monitors, ergonomic design
Gigabyte
G27FC
27″ Full HD (1920×1080)
Budget Gaming / Entry Level
Affordable, decent curve, FreeSync support
Quick Recommendations
For Gaming Immersion: Samsung Odyssey OLED G9 or Alienware AW3425DW.
For Productivity/Work: Dell UltraSharp U4025QW or HP E45c G5.
For Budget Buyers: Gigabyte G27FC.
For Hybrid Use (Gaming + Creative): LG UltraGear 45GR75DC.
Other items you need for laptop and more USBs for a desktop
Ports & Connectivity:
2 × Thunderbolt 4 / USB‑C
3 × USB‑A 3.2
HDMI 2.1
Ethernet RJ‑45
Wi‑Fi 7 + Bluetooth 5.4
Keyboard: QWERTY keyboard, with Applications/Menu key
Around 4 pounds ≈ 1.81 kilograms.
How to Find Your Computer Specs (Windows 11, December 2025)
1: Using System Settings
Press Windows key + E to open File Explorer.
Press Shift + Tab to move focus to the Navigation Pane.
Arrow down to This PC (usually near the bottom).
Right‑click on This PC and choose Properties (or press Enter).
A window will open showing basic system information, including:
Device name
Processor (CPU)
Installed RAM
System type (32‑bit or 64‑bit)
Windows edition and version
2: Using Settings → About
Press Windows key + I to open Settings.
Navigate to System.
Scroll down and select About.
Under Device specifications, you’ll see:
Processor (CPU)
Installed RAM
Device ID
Product ID
System type
Under Windows specifications, you’ll see:
Edition (e.g., Windows 11 Pro)
Version and build number
3: Advanced Specs (Optional)
For deeper details like graphics card, storage, and drivers:
Press Windows key + R, type dxdiag, and press Enter.
This opens the DirectX Diagnostic Tool, showing CPU, RAM, GPU, and driver versions.
Summary
Basic specs (CPU, RAM, Windows version) → System → About or This PC → Properties.
Detailed specs (graphics card, drivers) → dxdiag.
These steps work with keyboard navigation and are accessible for screen reader users.
Find information in MSINFO32
MSINFO32 is the command that opens the System Information utility in Windows.
It provides a comprehensive overview of your computer’s hardware, software, and system components.
Unlike the simple “About” page, MSINFO32 gives deep technical details useful for troubleshooting, upgrades, or support.
How to Open MSINFO32
Press Windows key + R to open the Run dialog.
Type msinfo32 and press Enter.
The System Information window will appear.
What You’ll See in MSINFO32
System Summary (default view):
OS name and version
System manufacturer and model
Processor type and speed
Installed RAM
BIOS version/date
Boot mode (UEFI or Legacy)
Hardware Resources:
IRQs, DMA, I/O ports, memory addresses
Useful for diagnosing hardware conflicts
Components:
Display (graphics card details)
Storage (drives, controllers)
Network (adapters, protocols)
Input devices
Software Environment:
Loaded drivers
Running tasks
Services
Environment variables
Why It’s Useful
Troubleshooting: Quickly check BIOS version, drivers, and hardware conflicts.
Upgrades: Confirm RAM slots, CPU type, and expansion options.
Support: Export system info to share with IT or tech support.
Memory Details
These values describe how your computer uses RAM (physical memory) and virtual memory:
Installed Physical Memory (RAM): 64.0 GB The total amount of RAM physically installed in your system.
Total Physical Memory: 63.8 GB The usable portion of your installed RAM. A small amount is reserved for system hardware.
Available Physical Memory: 56.2 GB The amount of RAM currently free and available for use by applications and the system.
Total Virtual Memory: 67.8 GB This includes physical RAM plus page file space. Virtual memory allows your system to use disk space as extra memory when RAM is full.
Available Virtual Memory: 58.9 GB The portion of virtual memory that’s currently unused and available.
Page File Space: 4.00 GB The size of the page file (a reserved portion of your hard drive used as virtual memory).
Go to Programs and features and make sure you have all your security and power to run programs so do a find command for “run” and look for your .nets.
What .NET Does for a Computer—let’s just say it IS REALLY IMPORTANT
Runs Applications:it is software framework/platform .NET provides the Common Language Runtime (CLR), which acts like a virtual machine. It takes code written in languages like C#, F#, or VB.NET and makes sure it runs correctly on your computer.
Manages Resources: The CLR handles memory management, security, thread management, and error handling. This means programs don’t have to reinvent these functions — they rely on .NET to do it safely.
Provides Libraries: The Framework Class Library (FCL) is a huge collection of pre‑built code for everyday tasks:
Reading/writing files
Connecting to databases
Networking and internet communication
User interface controls
Math, cryptography, and more
Supports Multiple Languages: Developers can write programs in C#, F#, VB.NET, and others. .NET makes them interoperable, so code written in one language can work with another.
Cross‑Platform Evolution:
Go get those important computer items at: Ninite.com
Beat Graphics card for computers using screen readers or other access technologies: NVIDIA
GRAPHICs card RUN that screen reader–get a good one GAMING computers will get you the specs you need for a screen reader or just regular use
NVIDIA RTX cards dominate the high‑end market with unmatched ray tracing, AI features (DLSS, CUDA, Omniverse), and raw compute power.–the BEST for screen readers and older students–middle school up
AMD Radeon RX cards offer better value for money, strong rasterization performance, and more efficient power use, especially at 1440p and 4K gaming.
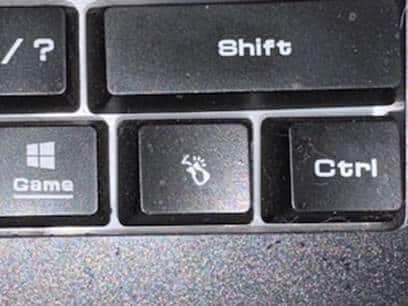
The applications key– is KEY of importance-the funny looking horseshoe on a gaming computer or square with lines in it on general computers–it is a right click of a mouse or 1 press of a key.
Basic specifications for a laptop: gaming computer will have the speed and video card needed for performance
Processor (CPU): some use the words i5, i7, i9 but the new words are Ultra 5,7 or 9 on machines–i9 is compared to ultra 9 and so on like this
Intel Naming Shift
Older naming convention (up to 13th Gen): so if you have this then know it is an older model and during holidays, this is what companies are selling cheaply to get rid of–so just be aware–
Intel Core i3, i5, i7, i9
Example: Intel Core i7‑12700H
New naming convention (14th Gen and newer):
Intel Core Ultra 5, Ultra 7, Ultra 9
Example: Intel Core Ultra 9 185H
The “Ultra” branding emphasizes AI acceleration and new architecture (Meteor Lake, Lunar Lake).
How They Compare
Core i5 → Core Ultra 5
Core i7 → Core Ultra 7
Core i9 → Core Ultra 9
Intel Core Ultra 9 285HX (24 cores, up to 5.5 GHz turbo) or AMD Ryzen 9 7945HX (16 cores, up to 5.4 GHz turbo)
Memory (RAM): 64 GB DDR5 (4800–5600 MHz, dual channel, expandable to 128 GB on some models)
Storage (SSD): 1 TB PCIe Gen 4 NVMe SSD (with option for dual SSDs up to 4 TB total)
Display: 17.3‑inch UHD (3840 × 2160) Mini‑LED, 120 Hz refresh rate, HDR support or 16‑inch OLED, 240 Hz for gaming/creative work
Favorite computers for running software such as JAWS, NVDA and other blind ware–You must have HIGH RAM and speed
Top Favorite: ASUS
ASUS Laptop Weights–based on student–
ZenBook Series (ultralight)
New ZenBook A14: as low as 2.18 lbs (0.99 kg)
VivoBook Series (mid‑range everyday use series)
ROG Gaming Series (heavy duty)
Zephyrus G14: ~3.53 lbs (1.6 kg)
Strix G15: ~5.07 lbs (2.3 kg)
Pic of ASUS-ROG-heavier with numpad
Surface Pro-top Favorite
Microsoft Surface Pro Weights–lightest and most powerful of laptops
Surface Pro 3–7: ~1.7 lbs (0.77 kg)
Surface Pro 8–10: ~1.94–1.96 lbs (0.88–0.89 kg)
Surface Pro 11 (latest): ~1.96 lbs (0.89 kg)
Surface Pro X (ARM model): ~1.7 lbs (0.77 kg)
comparing true laptop form factors, ASUS ultrabooks and Surface Laptop models are closer in weight, while Surface Pro remains the lightest option in the 2‑in‑1 category.
Different versions and do not suggest this collapsible one for students, that flips up–just too easy to flip down
Get Surface Pro with a true laptop lid that opens easily
HP computers
Be careful as most do not come with applications key any more–yes you can use Insert F10 but … takes 2 keys to implement a keystroked of right click
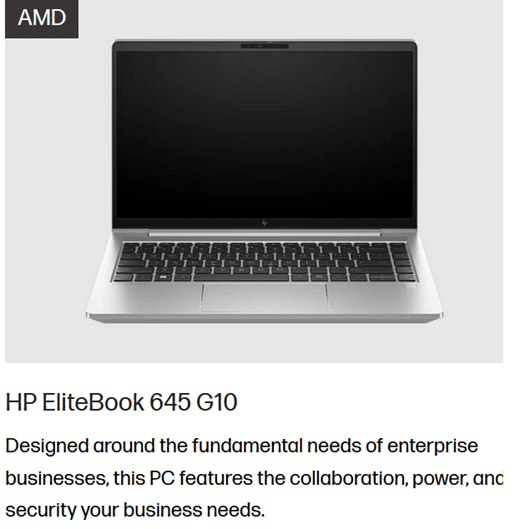
HP EliteBook 645 G10 includes a dedicated Applications/Menu key on its keyboard layout.
Build your computer: EliteBook 645 G10 is a lightweight, secure, and efficient business laptop with AMD Ryzen 7000 series power
Processor Options:
AMD Ryzen 5 7530U: 6 cores / 12 threads, up to 4.5 GHz-elementary and middle school
AMD Ryzen 7 7730U: 8 cores / 16 threads, up to 4.5 GHz-high school
These are efficient 7nm chips with solid multitasking and productivity performance.
Graphics:
Integrated AMD Radeon RX Vega 6 GPU
Suitable for office work, media playback, and light graphics tasks
Not designed for gaming or heavy 3D rendering.–but that is fine as that is not why you buy it
Memory:
Configurable up to 64 GB DDR4 RAM
Dual SO-DIMM slots, user-upgradable.
Storage:
PCIe SSD options, typically up to 1 TB
HP HP EliteBook 870 G11 (17‑inch) -4.1 lbs–keep in mind you want a laptop carry case for laptops
High‑Performance PC Laptop Models
HP ZBook Fury 16 G11 – workstation powerhouse for engineering, CAD, and 3D rendering
MSI Raider 18 HX AI – top‑tier gaming laptop with desktop‑class GPU
ASUS ROG Strix G18 / Zephyrus G16 – high‑end gaming and creator laptops
Do NOT overdo bump dots on keyboard to find position for touch typing-then student start counting dots to get to keys–create muscle memory which means you want to have them repeat typing skills–explanation below dot placements.
Place bump dots on keys: 5 and 0 on num row above qwerty keys-backspace is already large
Place dots on F4, F12–if all the keys run together then either F8 or F9. My F keys are broken up in panels from F1 to F4 and F5 to F8 and F9 to F12 so I do not need any bump dots–a gaming keyboard is divided up for speed of access so no bump dots needed
Many computers share the arrow keys with home, end pg up and pg down–only put a bump dot on up arrow to quickly move hand to the right while left hand holds down the FN key and right hand to do the pg up and so forth
Remember, the keyboard already has built in bump dots on f and j so do not place any more bump dots on keys
Dell is not my top choice of a computer but is a fine machine with specs you can get with:
Processors: Intel Core Ultra 7/9 or AMD Ryzen 9 HX — powerful x86 chips for heavy workloads.
Serviceability: Easier to upgrade storage, RAM, and wireless adapters
Memory: Configurable up to 64–128 GB DDR5 RAM, far beyond Surface’s 16–32 GB.
Storage: Options up to 2–8 TB PCIe NVMe SSDs.
Graphics: Dedicated NVIDIA RTX GPUs (e.g., RTX 5090 or workstation Ada cards).
Displays: Larger 16–18″ screens, often 2.5K or 4K OLED, high refresh rates.
Weight: Heavier (≈4 lbs / 1.8 kg), but more versatile for gaming, AI, or workstation tasks.
What I Use on a Daily Basis-I work very long hours
So I do have a Ultra HD / 4K: 3840 × 2160 pixels and it has changed my life with no more headaches from long hours at my screen and always have night light on-if you do not know about this feature, press your windows key and type night and night light will generate–decrease the brightness to more muted colors and it takes out more blue light which reduces eye strain. But the 4k does that by itself, then the night light takes away brightness–I am very light sensitive so light in general causes my eyes pain which gives headaches (I no longer have that issue with the 4k.). I use my screen reader often–hence the needed power in general.
My PC Computer Specs Explained
CLX computers are made by CLX Gaming, which is a division of Cybertron International Inc., a long‑standing U.S. system integrator based in Wichita, Kansas and an incredible company to work with for any product they sell.
About CLX
Founded: January 29, 2016, as a brand under Cybertron International.
Focus: Custom gaming PCs, workstations, and desktops tailored for gamers, content creators, and professionals.
Specialty:
Fully customizable builds (CPU, GPU, RAM, cooling, case design).
Award‑winning custom paint and chassis designs.
Product families named after Egyptian mythology (Ra, Set, Scarab, Horus, Osiris, Anubis).
Support: Free lifetime technical support, up to 3 years parts warranty, and lifetime labor coverage.
Why CLX Stands Out and why I picked it–I could build exactly what I wanted and needed and their service support is exceptional in the industry as if or when you call, you get a person who knows anything you ask.
Customization: You can configure nearly every component, from Intel/AMD CPUs to NVIDIA/AMD GPUs.
Performance: Builds range from mid‑tier gaming rigs to extreme workstations with 64–128 GB RAM and multi‑GPU setups.
Design: Known for bold, artistic case designs and RGB lighting.
Reliability: As part of Cybertron International (established in 1997), CLX benefits from decades of PC integration experience.
Takeaway
CLX computers are custom‑built in the USA by CLX Gaming (Cybertron International), offering high‑performance, highly customizable systems for gamers and professionals who want both power and personalization.
The CLX is the Best machine I have every owned and then I go portable with my Surface Pro which is also exceptional for power and portability
This session shows how users can start auto-read on the Focus Braille display with JAWS, adjust reading speed, and activate a full-read mode with ER + Space, even though many believed this feature did not exist. This video demonstrates the feature in action and explains how it works along with other useful commands. These commands allow you to fully control your computer exclusively using the Focus 40 or 80 Braille display-See video below
Use the modifier keys to simulate key combinations (keystrokes) that include CTRL, ALT, WINDOWS Key, SHIFT, or the JAWS Key (INSERT). To use these modifiers for the Focus Braille Display when typing a keystroke, do the following:
Hold down DOT 8 CHORD and then press the corresponding modifier keys in the keystroke. Modifier keystrokes are listed in the following table.
After you create the modifier portion of the keystroke, release the keys and press the remaining part of the keystroke. For example, to perform the keystroke CTRL+SHIFT+V, you press DOTS 3-7-8 CHORD, release the keys, and then press V (DOTS 1-2-3-6).
Focus Display combo Commands
Modifier Keys
Key Name
Keystroke
Function Keys (F1 through F12) For more information, see the Function Keys description.
DOT 1
INSERT
DOT 2 8 space
CTRL
DOT 3 8 space
WINDOWS Key
DOT 4 8 space
JAWS Key
DOT 5 8 space
ALT
DOT 6 8 space
SHIFT
DOT 7 8 space
APPLICATION Key
RIGHT SHIFT+DOT 2 CHORD
TAB
DOTS 4-5 CHORD
SHIFT+TAB
B CHORD
HOME
K CHORD
END
DOTS 4-6 CHORD
Select Prior Line
DOTS 1-7 CHORD
Select Next Line
DOTS 4-7 CHORD
Select to End of Line
DOTS 4-6-7 CHORD or 4,7, space
ESC
RIGHT SHIFT+DOT 1 or Z CHORD
DELETE
FOR CHORD
Select word
5,7, space
Selection Commands
Description
Braille Sign
Braille Dot Patterns
Select Next Character
LEFT SHIFT+DOT 6
LEFT SHIFT+DOT 6
Select Prior Character
LEFT SHIFT+DOT 3
LEFT SHIFT+DOT 3
Select Next Line
LEFT SHIFT+DOT 4
LEFT SHIFT+DOT 4
Select Prior Line
LEFT SHIFT+DOT 1
LEFT SHIFT+DOT 1
Select to End of Line
LEFT SHIFT+DOT 5
LEFT SHIFT+DOT 5
Select from Start of Line
LEFT SHIFT+DOT 2
LEFT SHIFT+DOT 2
Select from Top
LEFT SHIFT+L
LEFT SHIFT+DOTS 1-2-3
Select to Bottom
LEFT SHIFT+DOTS 4-5-6
LEFT SHIFT+DOTS 4-5-6
Select Next Screen
LEFT SHIFT+DOTS 4-6
LEFT SHIFT+DOTS 4-6
Select Prior Screen
LEFT SHIFT+K
LEFT SHIFT+DOTS 1-3
Select All
LEFT SHIFT+FOR Sign
LEFT SHIFT+DOTS 1-2-3-4-5-6
Select a Frame
RIGHT SHIFT+9
RIGHT SHIFT+DOTS 3-5
Select a Heading
RIGHT SHIFT+6
RIGHT SHIFT+DOTS 2-3-5
Select a Link
RIGHT SHIFT+7
RIGHT SHIFT+DOTS 2-3-5-6
Windows Commands
Description
Braille Sign
DOTS Pattern
ALT+TAB
LEFT SHIFT+DOTS 4-5
LEFT SHIFT+DOTS 4-5
Paste from Clipboard
LEFT SHIFT+V
LEFT SHIFT+DOTS 1-2-3-6
Copy to Clipboard
LEFT SHIFT+C
LEFT SHIFT+DOTS 1-4
Cut to Clipboard
LEFT SHIFT+X
LEFT SHIFT+DOTS 1-3-4-6
Undo
LEFT SHIFT+Z
LEFT SHIFT+DOTS 1-3-5-6
Delete
LEFT SHIFT+D
LEFT SHIFT+DOTS 1-4-5
Table of Multi-Control Functions
Function
Command
Toggle Auto Advance Mode or auto read
LEFT SELECT+RIGHT SELECT to start and stop down arrow – er+space is read all – if you want to auto read and hear words then down arrow and speed up as you want
Decrease Auto Advance Speed
LEFT SELECT
Increase Auto Advance Speed
RIGHT SELECT
Left Mouse Click
PANNING BUTTON+CURSOR ROUTING BUTTON or PANNING ROCKER UP+CURSOR ROUTING BUTTON or PANNING ROCKER DOWN+CURSOR ROUTING BUTTON
Control+Left Mouse Click
ROUTING BUTTON CHORD
Page Down
LEFT or RIGHT SELECT+ROCKER DOWN
Page Up
LEFT or RIGHT SELECT+ROCKER UP
Top of File
LEFT PANNING BUTTON+SELECT BUTTON or SELECT BUTTON+PANNING ROCKER UP
Bottom of File
RIGHT PANNING BUTTON+SELECT BUTTON or SELECT BUTTON+PANNING ROCKER DOWN
End
PANNING BUTTON+ROCKER BAR DOWN
Home
PANNING BUTTON+ROCKER BAR UP
Next Line
ROCKER BAR DOWN
Prior Line
ROCKER BAR UP
Pan Left
LEFT PANNING BUTTON or LEFT PANNING ROCKER UP
Pan Right
RIGHT PANNING BUTTON or RIGHT PANNING ROCKER UP
Select Text
RIGHT SELECT BUTTON+CURSOR ROUTING BUTTON
Select Block
SELECT BUTTON+CURSOR ROUTING BUTTON at beginning of block; repeat at end of block
Examples to show you how it all goes together:
restart jaws 2,8,space space, 1,8,space d
Windows search box with– right shift, 4
alt tab is 6,8, space then 4,5 space—or right shift 4 5
F6, space/1-8 f
Ctrl tab – 3 8 space the tab with 4,5 space
alt f4 – 1 6 8 space then d
read all, space/1-2-4-5-6, ER cord
say title of window – right shift/dots 1-2
Say time– right shift/dots1-2-3
read all — er chord
refresh screen -right shift z
in drive get contractions off and cursor off
Then –insert z cursor off-2,8,space then z
Or do slash for search—contractions off with g,7,space then dots 3,4
hush up jaws—3,8, space
HOME- K CHORD
END-DOTS 4-6 CHORD
PAGE UP-LEFT SHIFT+ROCKER BAR UP or RIGHT SHIFT+ROCKER BAR UP or DOTS 2-3-7 CHORD
PAGE DOWN-LEFT SHIFT+ROCKER BAR DOWN or RIGHT SHIFT+ROCKER BAR DOWN or DOTS 5-6-7 CHORD
DELETE–FOR CHORD as in 1,2,3,4,5,6 and space –the word chord is the language I grew up with, they made it space a couple decades ago as new people did not get term “chord”
Commands to get you going on Understanding more skills
esc is right shift dot 1
alt right shift dot 2 is
right click right shift dot 3
Windows search box with right shift+4
right shift dot 5 is window list
left shift 1 – select line
left shift 3 – select character
dot 6 8 space then d to URL
3 8 space that opens new tab
dot 3 8 space the tab with 4,5 space
alt tab is 6,8, space then 4,5 space
PC cursor is p space
taskbar is 4,8,6 then t
alt f4 – right shift dot then 1 6 8 space then d for do
F6, space/1-8 then f
read all, space/1-2-4-5-6, ER cord
Went over, say title of window using the Focus, right shift/dots 1-2
Space 4 8 to desktop
Say time with the Focus, right shift/dots1-2-3
say time with right shift 1 2 3
right shift z refresh screen
er chord is read all
8 4 space then t to taskbar
8 4 space then d to desktop
title with space/8-5 followed by T, but the shift/1-2 is just so much nicer.
Decrease Eye Strain and See Your Computer More Easily
Blue light emitted from computer screens can be harmful to your eyes over time, contributing to digital eye strain, disrupted sleep patterns, and even long-term vision damage. For those with low vision, the strain caused by blue light can make using a computer even more challenging. In this post, I will guide you through simple adjustments to your computer settings that will not only help reduce blue light exposure but also make your screen and browser easier to view, enhancing your overall comfort and visual experience with Blue Light Low Vision Tech Tricks.
Blue light from electronic devices can cause a number of issues, including:
Eye strain
Blue light from screens can reduce contrast, leading to eye strain, dry eyes, and fatigue.
Retinal damage
Long-term exposure to blue light can damage retinal cells, which can lead to vision problems like age-related macular degeneration.
Sleep disruption
Exposure to blue light before bed can affect the body’s production of melatonin, which can disrupt sleep patterns.
Other health issues
Research suggests that exposure to blue light may contribute to cancer, diabetes, heart disease, and obesity.
Blue light gone for easy reading with low vision Tech Tricks in a Browser
Use blue light-blocking glasses or filters on your devices
Adjust your display settings
Follow the 20/20/20 rule: every 20 minutes, focus on an object about 20 feet away for at least 20 seconds
Get regular eye exams
Constant exposure to blue light over time could damage retinal cells and cause vision problems such as age-related macular degeneration. It can also contribute to cataracts, eye cancer and growths on the clear covering over the white part of the eye.
Change the setup of your computer and save your VISION!
Digital Math in WORD and Braille Math Editor for Nemeth or UEB Input/Output via MathCat with JAWS or NVDA. This lesson empowers you to learn skills for teaching yourself and others Nemeth or UEB math. By incorporating Math AI, you can transform inaccessible math images into usable formats in just seconds, significantly speeding up the learning process compared to transcribing character by character. While the video covers some essential skills, the following links provide comprehensive lesson details from the Digital Math in WORD Video.
MathCat with JAWS or NVDA
Learning how to teach or learn Nemeth math using assistive technology can seem challenging, but with the right tools and approach, it becomes manageable and effective. Whether you’re a parent helping your child, an educator supporting students, or an independent learner, using a Focus 40 Braille Display and JAWS screen reader provides an accessible way to master Nemeth code. In this guide, I will walk you through setting up your technology and using the Braille Math Editor to confidently teach and learn math concepts from basic arithmetic to advanced algebra. Let’s simplify the process and enhance your skills.
Setup your computer to work the best with Screen readers and Digital Math in WORD
Before beginning the challenge of learning Nemeth or UEB with screen readers, make sure you Optimize your Windows 11 computer for Efficiency with Screen Readers with Key Settings and Configurations. Optimizing Windows 11 Efficiency for Screen Reader with Key Settings and Configurations takes an hour most often 2 or so to complete. Longer if you are new to screen reader and how Windows 11 works. It is different than other OS systems so give yourself grace as you learn all there is to know about this system. As you move through your keyboard and discover you would like a particular key somewhere, like the applications key, you can remap a key to create that yourself. AND, you MUST have Local Admin on School Computers.
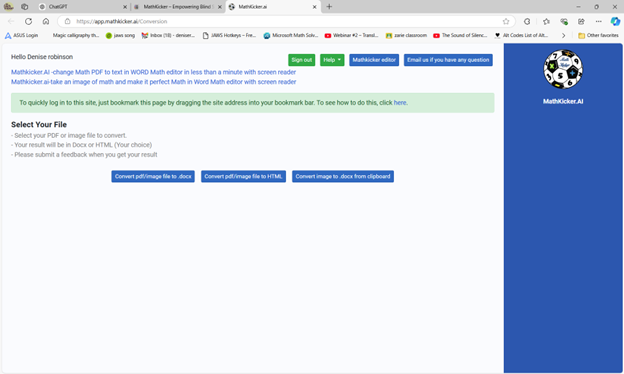
Mathkicker.AI
Mathkicker for digital math access with Jaws or NVDA-Login Page
Learning how to teach or learn Nemeth math using assistive technology can seem challenging, but with the right tools and approach, it becomes manageable and effective. Whether you’re a parent helping your child, an educator supporting students, or an independent learner, using a Focus 40 Braille Display and JAWS screen reader provides an accessible way to master Nemeth code. In this guide, I will walk you through setting up your technology and using the Braille Math Editor to confidently teach and learn math concepts from basic arithmetic to advanced algebra. Let’s simplify the process and enhance your skills.
Setup Nemeth with JAWS
Start by setting JAWS to the proper Nemeth settings. Access the JAWS Settings Center with Insert + 6 then Control+Shift+D to set default: type “Braille m” in the search box. Navigate to “Braille Mode” and make sure you hear “Structured” mode, ensuring that both the active cursor and Braille cursor follow each other. This will allow you to track what the student is doing on their display.
Alt + F to language profiles, and alt + D to details. Once open Alt + M to math options and up arrow to Nemeth if it is not selected. This will ensure that math expressions are correctly read and displayed in Nemeth Braille. Enter to close, Alt + A to apply and enter to close.
Teach or learn Nemeth JAWS, braille display and BME
Using the Braille Math Editor is key to teaching and learning math effectively. Type out equations like “1+2=3” or more complex algebraic expressions, and feel the Braille output directly on your Braille display. Correct mistakes quickly using the Braille display and JAWS auditory feedback, making it easy to follow along. Use the Braille Viewer to see it visually and compare with the Braille Display by opening JAWS context menu, go to Utilities and Braille Viewer to turn it on.
This step-by-step approach works for basic arithmetic to complex math such as algebra, Trigonometry, calculus and beyond. Both the Braille Math Editor and Word Math Editor can help you visualize and interact with Nemeth code to easily learn it and/or teach others. Practice consistently to improve your tactile reading skills and build confidence in math.
By following this guide, you’ll gain the tools to teach and learn Nemeth math efficiently, whether for yourself or for your students.
More options for JUST auditory learners or braille learners and taking totally inaccessible images of WORD and making them accessible using Mathkicker.AI.
Optimizing Windows 11 Efficiency for Screen Reader with Key Settings and Configurations takes an hour most often 2 or so to complete. Longer if you are new to screen reader and how Windows 11 works. It is different than other OS systems so give yourself grace as you learn all there is to know about this system. As you move through your keyboard and discover you would like a particular key somewhere, like the applications key, you can remap a key to create that yourself. AND, you MUST have Local Admin on School Computers.
How to setup Computer for Optimizing Windows 11 Efficiency
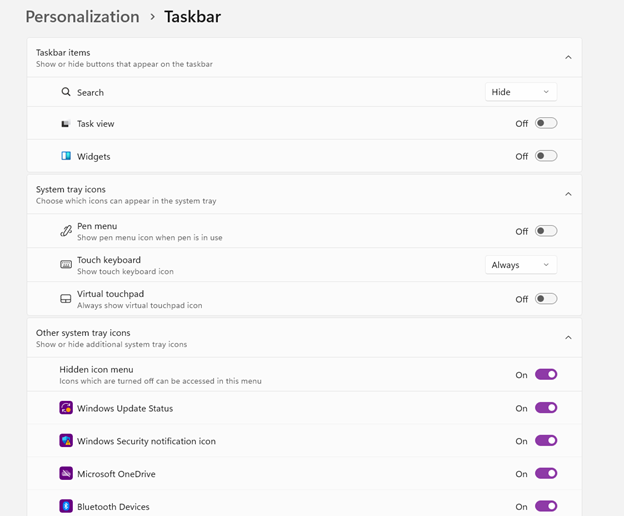
Change Taskbar Settings
Update Computer every day
Go to task manager and disable anything you do not need at start up
Go to Power Options and change from Sleep to Shut Down when you press Shut down button
take off sleep options in general unless you are advanced user
Keep in mind that your screen reader cannot reset or the RAM clear if you computer is in sleep mode or hibernate mode
Turn off Touch pad- if you do not your palm will touch the mouse pad and auto activate items or move your cursor on your computer. This equals huge frustration to a screen reader user.
Windows T and clear that taskbar–this is million dollar real-estate to access programs fast
Setup WORD
Go to control panel and setup Sound card options
Windows and adjust other sound options using sndvol.exe
Setup Gmail and Drive and learn new commands
Setup Outlook
Taskbar setting for Windows 11 setup
Efficiency for Screen Readers and other Setup Skills
Proper Set up Windows 11 to work with screen readers and braille displays is crucial for visually impaired users. This configuration ensures smooth interaction with the system, giving users full access to information and applications such as Gmail for optimizing access..
1. Accessibility and Independence
Configuring Windows 11 for screen readers like JAWS, NVDA, or Narrator, and integrating braille displays, provides full independence. Without proper setup, tasks such as reading documents, browsing, or using software become challenging. A well-configured system ensures all functions are accessible.
2. Productivity and Efficiency
Screen readers and braille displays let users interact quickly with the system. Setting up Windows 11 for compatibility speeds up responses to commands. It also ensures smoother transitions between applications, making multitasking more efficient. Proper configuration prevents lag or software conflicts, which increases productivity in school and work settings.
3. Customization for Personalized Needs
Each user has different needs. Windows 11 allows users to customize screen reader settings (e.g., speech rate, verbosity, and key commands) and braille displays (e.g., output type and formatting). These adjustments create a personalized experience, improving comfort and reducing frustration.
4. Enhanced Braille Support
Windows 11 offers enhanced braille support when paired with leading screen readers. Proper setup lets users access seamless braille input and output for text and math. It also allows advanced navigation of documents. Correct braille display configuration ensures accurate reading and editing of both simple text and more complex content.
5. Compatibility with Updates
As Windows 11 updates, keeping screen readers and braille displays integrated is essential. A well-maintained setup ensures new features or security updates don’t disrupt accessibility tools. This is vital for maintaining ongoing access such as the new Google Commands for navigation.
Key Setup Steps for Optimizing Windows 11 for Accessibility:
Ensure Compatibility: Install the latest versions of screen readers and braille display drivers compatible with Windows 11.
Enable and Configure Narrator: Windows 11 includes Narrator, which can be set up for basic tasks if needed.
Customize Keyboard Shortcuts: Set up shortcuts for easier navigation and quicker interaction.
Adjust Accessibility Settings: Go to “Accessibility” in the Settings app to adjust visual and audio cues like contrast and text size.
Test with Braille Displays: Pair and calibrate braille displays for reading and input in UEB or Nemeth, depending on preferences.
With proper set up, Windows 11 for screen readers and braille displays furthers accessibility. This setup enhances independence, productivity, and ease of use in the digital world.
Embossing graphics for Blind Students: Dr. Robinson offers this video for families and transcribers needing to adapt images for blind students to “see.” This video offers a straightforward approach to creating accessible Venn diagrams using the technique to emboss graphics with Tiger.
Dr. Robinson begins by explaining how to handle a Venn Diagram or any graphic. She demonstrates using a Venn diagram with two large, intertwined circles, where all parts are shaded. Such images blur when transferred into Tiger Designer, a common tool for producing tactile graphics. She recommends redrawing the diagram for clarity, ease, and speed. This approach is more effective than fixing the shaded areas when you emboss graphics with Tiger.
How to Emboss the Tiger Graphic
To show blur issues, she creates a new diagram, by opening Tiger Designer and pressing Control + N to start a new document. After ensuring the default settings are correct, pasting an image using Control + V will result in a blurry output due to the shading. In this case, Dr. Robinson suggests redrawing the Venn diagram. Ctrl + N for new again and Alt+O or click on Tools. Select a line width of 2.5 or 3, as thicker lines are easier for students to feel when you emboss graphics with Tiger.
Dr. Robinson then demonstrates how to draw two circles from the tool’s menu, representing the basic structure of the Venn diagram. She emphasizes the importance of labeling the sections and typing in uncontracted Braille works fine. She notes that while parents may not be familiar with contractions, students are accustomed to reading uncontracted Braille. It’s crucial to use these steps to emboss graphics with Tiger accurately.
Finally, Dr. Robinson shows how to emboss the Tiger graphic with Ctrl + P to emboss. Ensure the correct printer model and settings are applied. The final result will be a clear and accessible tactile diagram that the student can easily interpret.
Learning Spanish Braille involves understanding the unique characteristics of the Braille system used for the Spanish language. Then build on the foundational skills of Braille reading and writing. Here’s how to approach it:
1. Understand the Braille Alphabet in Spanish
Spanish Braille follows the same 6-dot system as English Braille.
Extra characters are included to represent letters with accents and special characters used in Spanish.
Key additions include:
Ñ: Represented by a unique Braille symbol.
Accented vowels: Á, É, Í, Ó, Ú have distinct Braille symbols.
Punctuation: Spanish uses inverted question marks (¿) and exclamation marks (¡), and these have their own symbols in Spanish Braille.
2. Start with the Basics
– Begin by learning the standard Braille alphabet for unaccented letters, numbers, and common punctuation marks.
– Practice reading and writing these basic symbols to build fluency.
3. Familiarize Yourself with the Extra Characters
– Learn the Braille symbols for accented vowels (á, é, í, ó, ú) and ñ.
– Read and practice with materials specifically written in Spanish Braille to develop fluency.
– You can find books, articles, or educational materials written in Spanish Braille to improve your reading skills online.
5. Engage with Digital Tools
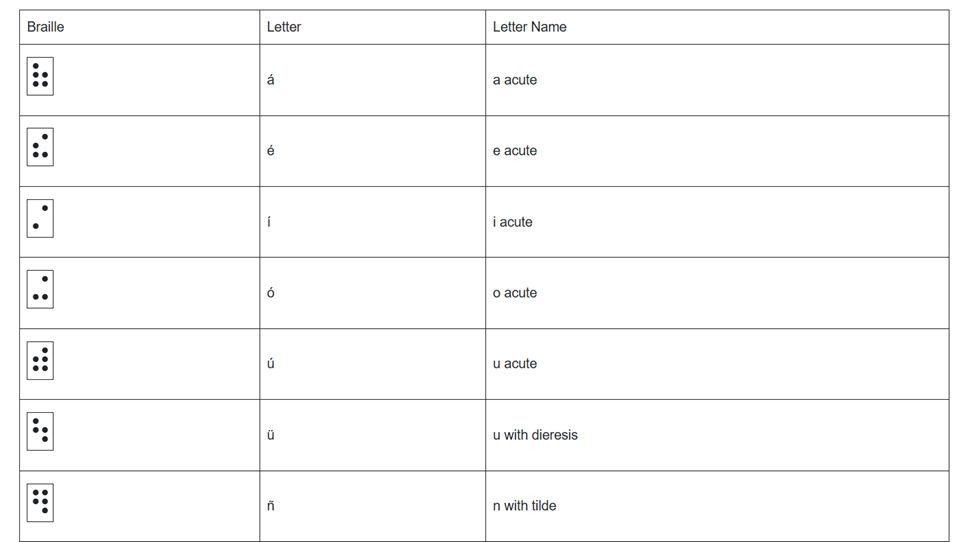
– Tools like Braille displays and screen readers can be set to Spanish to help reinforce learning. See below list of all Spanish symbols
– Software like JAWS or NVDA can be configured to support Braille output in Spanish. This allows for real-time practice with written content.
6. Practice Writing Spanish Braille
– Use a Braille writer to practice writing in Spanish Braille. Focus on mastering punctuation and special characters.
– The fastest and easiest to edit option will be to practice typing or brailling on a display. The FOCUS 40 Braille Display or Brailliant Braille Display to write out Spanish words and sentences.
7. Learn through Immersive Activities
– Reinforce learning, engage in practical activities like labeling objects in Spanish Braille. Work with bilingual Braille texts (Spanish and English).
8. Find a Teacher or Tutor
– If possible, work with an instructor who is fluent in Spanish Braille and the language. They can guide you through the nuances of the language and provide feedback on your progress.
– Organizations specializing in Braille education, like TechVision, can help offer resources or tutors for Spanish Braille.
8. Go to a Spanish Speaking Country
-Totally immerse yourself within a culture that will speak the language you want to learn well.
Spanish-Española Symbols
Spanish-Española 1. Jaws settings: Set up braille profile – insert 6 (ctrl shift D) for default. After completing the steps, open settings again to ensure they apply only to Word settings. Next, type “braille mode” twice, press F6, and use Alt+G to access languages and set your preferences. For those requiring a Spanish Braille display or keyboard, ensure your device is compatible with your software settings. More Video lessons can help.
This lesson is Spain (international) Input and Output are Spanish Grade 1
2. Tab to profile languages and set those up and enter to close Jaws settings
3. Alt 8 to make sure dots 7,8 show on display-accept and close settings
1. Set up Voice profile in Jaws-open context menu, options, voices, add a profile
1. In Word-change voice quickly: 2 options: on keyboard- ctrl shift window L to change profile or on Focus -2,3,4,5,7, space to change languages)
2. Insert+ctrl+S to change to Spanish profile or to other language
3. G+7+space on Focus to computer braille (which will output Spanish grade 1)– capital is dot 7 under capital letter on display
For Braille with Braille Display on Computer
Práctica:
á 1,2,3,5,6
é 2,3,4,6
í 3,4
ó 3,4,6
ú 2,3,4,5,6
ü 1,2,5,6,8
ñ 1,2,4,5,6, 8
Punctuation for Spanish Braille using Braille Display
! 2,3,5, 7 is exclamation mark
inverted ! is 2,3,5, 7, 8 is upside down exclamation mark
Period is . is dot 3
Comma is , is dot 2 for comma
question mark is ? is dot 2, 6
upside down question mark or inverted ? is 2,6,7
Spanish Braille for Keyboard and JAWS
Lower Case Letters
á (lower case a, acute accent) = Press Ctrl + ‘ (apostrophe), then the letter a é (lower case e, acute accent) = Press Ctrl + ‘ (apostrophe), then the letter e í (lower case i, acute accent) = Press Ctrl + ‘ (apostrophe), then the letter i ó (lower case o, acute accent) = Press Ctrl + ‘ (apostrophe), then the letter o ú (lower case u, acute accent) = Press Ctrl + ‘ (apostrophe), then the letter u ñ (lower case n, tilde accent) = Press Ctrl + Shift + ~ (tilde), then the letter n ü (lower case u, diaeresis accent) = Press Ctrl + Shift + : (colon), then the letter u
Upper Case Letters
Á (upper case A, acute accent) = Press Ctrl + ‘ (apostrophe), then Shift + a É (upper case E, acute accent) = Press Ctrl + ‘ (apostrophe), then Shift + e Í (upper case I, acute accent) = Press Ctrl + ‘ (apostrophe), then Shift + i Ó (upper case O, acute accent) = Press Ctrl + ‘ (apostrophe), then Shift + o Ú (upper case U, acute accent) = Press Ctrl + ‘ (apostrophe), then Shift + u Ñ (upper case N, tilde accent) = Press Ctrl + Shift + ~ (tilde), then Shift + n Ü (upper case U, diaeresis accent) = Press Ctrl + Shift + : (colon), then Shift + u
Hasta la vista / Hasta luego. See you / See you later.
Hasta pronto. See you soon.
Hasta mañana. See you tomorrow.
(Muchas) Gracias.
Thank you (very much).
De nada. You’re welcome.
Bienvenidos Welcome
Lo siento I’m sorry
Con permiso / Perdón / Disculpe Excuse me / Pardon me
¡Vamos! Let’s go!
¿Cómo está usted? How are you? (formal)
¿Cómo estás? How are you? (informal)
Insert+4 for eacute in
¿Qué tal? How’s it going?
Bien / Muy bien Good / Very good
Insert+4 for acute in Más below
Mal / Muy mal / Más o menos Bad / Very bad / OK
Sí / No Yes / No
¿Cómo?
¿Cómo se llama usted? What is your name? (formal)
¿Cómo te llamas? What is your name? (informal)
Me llamo… / Mi nombre es… My name is…
Mucho gusto. / Encantado. Nice to meet you.
Immersion in Language
Here is the sequence of learning in order to learn any language well:
The time it takes to learn a new language, like Spanish, while living in a country where it is the only language spoken, depends on several factors. However, here are general timelines and considerations:
1. Immersion Benefits
Living in a Spanish-speaking country accelerates learning because you’re constantly exposed to the language in real-life situations like:
Listening: Conversations, TV, radio, and announcements.
Speaking: Daily interactions with locals, from shopping to asking for directions.
Reading and Writing: Street signs, menus, newspapers, and more.
2. Language Learning Proficiency Levels
The Common European Framework of Reference for Languages (CEFR) breaks language learning into six levels:
A1 (Beginner): Basic phrases and conversations (3–6 months).
A2 (Elementary): Can understand simple texts and conversations (6–12 months).
B1 (Intermediate): Hold conversations on familiar topics and function in everyday life (12–18 months).
B2 (Upper Intermediate): Fluent in most situations, including work and travel (18 months–2 years).
C1 (Advanced): Understand complex topics and engage in nuanced conversation (2–3 years).
C2 (Proficient): Full mastery of the language, similar to a native speaker (3+ years).
Factors that will Determine Speed
3. Factors That Affect Learning Speed
Motivation and Attitude: Strong motivation and a positive mindset can accelerate your progress.
Practice Consistency: Daily practice, speaking, listening, and reading in Spanish speeds up learning.
Prior Language Experience: If you’re already familiar with Romance languages (e.g., Italian or French), learning Spanish might be faster due to similarities in vocabulary and grammar.
Formal Education: Taking classes, whether in person or online, and using language apps like Duolingo or Babbel can help structure your learning and improve your skills more quickly.
Social Interaction: Making friends who are native speakers or joining local groups can enhance your conversational abilities.
4. Realistic Expectations
– For basic conversational fluency (A2-B1), expect about 6 months to 1 year of immersion if you’re dedicated and practicing regularly.
– To reach an advanced level (C1), you might need 2 to 3 years of living and interacting in the language full-time.
5. Cultural Immersion
Your understanding of Spanish will deepen faster if you immerse yourself in the local culture, customs, and idiomatic expressions. Engaging in local activities, reading newspapers, and watching TV shows will all help you learn the language more organically.
Summary:
On average, 6 months to 1 year of immersion in a Spanish-speaking country should allow you to gain conversational fluency, with full mastery taking about 2–3 years, depending on your dedication and resources.
Adult Learning Speed
Sequence of learning for an adult
For adults, learning a new language like Spanish while living in a country where it’s the only language spoken can still be highly effective, but several factors can influence the timeline. Here’s what an adult learner can expect:
1. General Time frames for Adult Learners
Conversational fluency (A2-B1 level): Typically achievable in 6 months to 1 year of immersion.
Advanced proficiency (B2-C1 level): May take 1.5 to 2.5 years of consistent use and practice.
Full fluency (C2 level): Can take 3 years or more, depending on factors like exposure, practice, and language complexity.
2. Factors Affecting Adult Learning Speed
Cognitive Flexibility: Adults tend to be more methodical learners than children, but they can sometimes struggle with retaining new vocabulary and adapting to different grammar structures.
Prior Experience: If the adult already speaks a Romance language (like Italian or French), they will likely learn Spanish more quickly because of the structural similarities.
Learning Environment: The more opportunities for immersion—such as interacting with native speakers, engaging in cultural activities, and using Spanish in daily tasks—the faster the progress.
Language Learning Methods: Adults often benefit from a combination of formal learning (e.g., classes, tutors) and informal learning (e.g., conversations, media consumption).
Motivation and Consistency: Adults with clear goals and regular practice (even just 30 minutes a day) tend to progress faster. Maintaining consistent practice is key to long-term retention.
Challenges for Adult Learners
3. Challenges for Adult Learners
Accent and Pronunciation: Adults might find it harder to develop a native-like accent, though this doesn’t prevent them from becoming highly fluent.
Work and Life Responsibilities: Adults often juggle work and personal responsibilities, which can limit the time available for focused language learning.
Grammar: Grasping grammatical structures, verb conjugations, and nuances may take longer for adults compared to younger learners, who tend to absorb new patterns more intuitively.
4. Accelerating Adult Learning
Use Daily Immersion: Engage in conversations, read signs, watch TV shows, and use apps like Duolingo or Babbel to reinforce lessons in real-life situations.
Structured Learning: Enroll in Spanish classes or hire a tutor to build a strong foundation in vocabulary and grammar.
Use Technology: Utilize language-learning apps, podcasts, or online lessons. Watching Spanish media with subtitles can help you pick up common phrases and pronunciation.
– Join Social Circles: Engage with locals, participate in group activities, and use Spanish in daily interactions. This practical experience will help reinforce what you’ve learned.
– Set Realistic Goals: Adults benefit from having clear, incremental goals (e.g., mastering a certain level of vocabulary or holding a 10-minute conversation) to track progress and stay motivated.
Adult Experience
5. Common Experiences for Adults
After 3-6 months, most adults can hold basic conversations, ask for directions, and manage daily interactions in Spanish.
By 1 year, many can discuss familiar topics, navigate most social situations, and understand much of what they hear or read.
Within 2 years, a dedicated adult learner can likely achieve strong conversational fluency and understand complex topics, though nuances and slang may still be challenging.
Summary
For an adult, achieving conversational fluency in Spanish typically takes 6 months to 1 year with immersion and regular practice. Advanced proficiency may take 1.5 to 2.5 years, while full fluency could require 3 years or more, depending on the learner’s background, motivation, and exposure to the language.
Dr. Robinson and her Team at TechVision have made a significant global impact via their Team Mission and Purpose. TechVision specializes in 1:1 remote instruction in education for the blind and visually impaired, serving individuals of all ages. We also train School Teams: transcribers, Teachers of the Blind and other School Personal and work with parents. Their expertise is delivered through personalized, real-time 1:1 remote instruction. This approach empowers students and clients to compete equally with their sighted peers in both education and work.