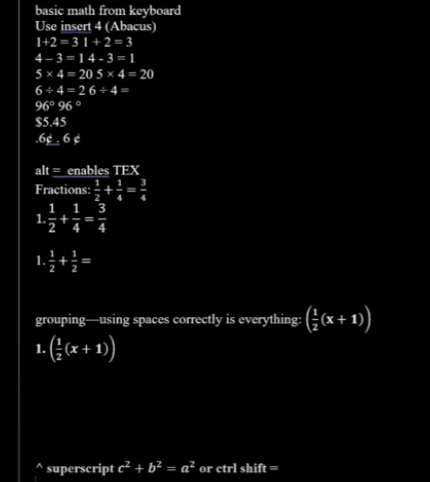
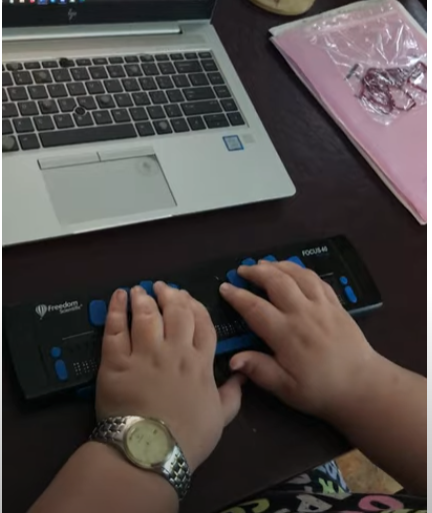
Dr. Robinson demonstrates how to complete multi-level math in WORD using Braille Math Editor with JAWS. She used an algebra problem as an example. She explains that this method applies to several types of math problems. First, she highlights how transcriptionists or students can prepare algebra equations using the Alt + Equals command to insert math symbols directly in Word. Once the equation is ready, the blind student can easily solve it using a Focus 40 Braille display.
Dr. Robinson shows how students can work within the Braille Math Editor. By pressing Insert + Space followed by Shift + Equals, the editor opens, and the math problem appears ready for solving. She mentions that students can choose between Nemeth code or Computer Braille, depending on their preference. Both modes allow for precise calculations and input, enabling them to complete multi-level math problems efficiently across multiple levels.
As the student works through the problem, they can use Braille commands like 4-5-6 Space to navigate to the end of the problem and add a dot 6 for separating steps with commas. This method keeps the equation organized, allowing the student to solve the problem in multiple lines, just as their sighted peers would. By checking the Braille display frequently, students ensure accuracy while solving multi-level math equations and maintaining neatness.
Finalizing and Reviewing Work to complete multi-level math
Once the math is complete, the student hits Enter to insert the solution into Microsoft Word. Dr. Robinson uses Ctrl + L to align the text to the left after confirming correct spacing and formatting. She resolves errors, such as unnecessary commas or misalignments, by reviewing each line. Editing line by line ensures the final product is both clean and accurate. The process concludes with a perfectly formatted, multi-level math solution, efficiently done using the Braille Math Editor, thus completing the task effectively.
This setup provides blind students with the tools to complete complex multi-level math work just like their peers, ensuring accessibility and ease in academic settings. More math lessons here.
Dr. Robinson demonstrates how to remap a key on a keyboard using SharpKeys, which is especially useful for laptops that lack an Applications key. She explains that many screen readers require an Applications key, but not all laptops include one. By remapping an unused key, such as a backslash or the 2nd alt key, students can easily create an Applications key for their screen reader.
Remap keys on keyboard with sharp keys and screen reader commands
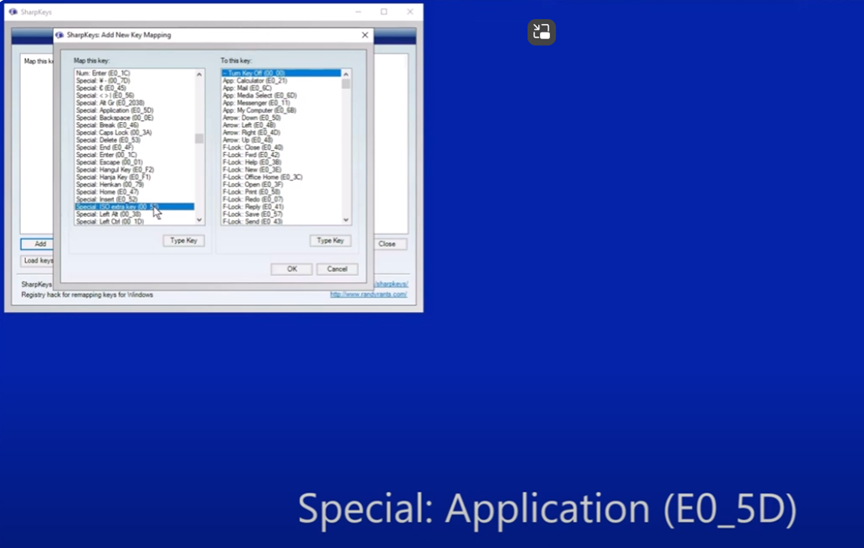
She begins by opening SharpKeys via the Start menu and typing “SharpKeys” into the search bar. Once opened, she navigates the menu with Tab and presses Alt + A to add a new key mapping. To identify the key to remap, she presses Alt + K and hits the backslash key. It’s a straightforward way to remap keys on keyboard devices.
The software recognizes the backslash as ISO Extra Key 0_56, making it easy to remap. Dr. Robinson then scrolls through the list using Down Arrow to find Special: Application E0_5D. After selecting it with Spacebar, she confirms the key mapping by pressing Enter.
To test the remapped key, she presses Windows + T to open the taskbar. She then uses the newly remapped key to access the Applications menu. Though the key is still labeled as backslash, it functions correctly as an Applications key. This technique to remap keys on keyboard setups helps users customize their experience.
Dr. Robinson emphasizes that this method allows blind users to easily remap keys without assistance. The entire process is accessible, making it useful for students relying on screen readers. The remapped Applications key provides full functionality, offering standard Applications key options. Remapping keys on keyboard devices can significantly improve accessibility for all users.
Dr. Robinson ensures that students can remap keys using SharpKeys independently, without needing assistance from a sighted person. She highlights that this process is accessible for blind users and fully supports screen readers.
After confirming the remapping, Dr. Robinson explains how this tool provides flexibility for students using different laptops. By remapping a nonessential key, they can create a functional Applications key, essential for many screen reader commands.
She encourages students to experiment with remapping other keys if needed. This flexibility allows users to personalize their keyboards to fit their preferences. More Screen Reader Lessons here
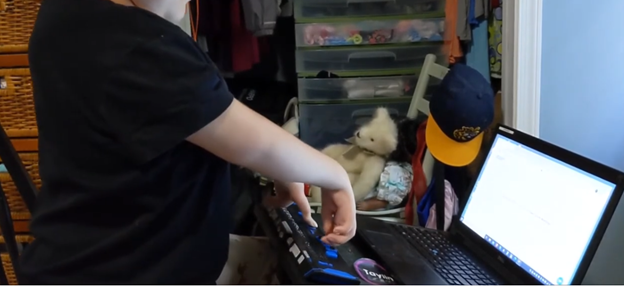
Kaleigh was born with very special hands. So, whether you have 10 fingers or 2 or 3, there is always an easy way to use a braille display to control your computer.
Dr. Robinson’s video covers basic JAWS screen reader commands for Office Word, no matter what version of WORD you use. First, she opens a new document using “Ctrl + N” and teaches key formatting skills, such as right-aligning text with “Ctrl + R” and inserting the date using old and new Office commands. She emphasizes the importance of listening to the software to ensure accuracy. Dr. Robinson guides through bold, underline, and italics commands before typing and spell-checking with keyboard shortcuts. These are all Basic WORD JAWS commands you need to know.
Adjusting speech speed helps beginners better understand software. Learning commands ensures efficient and accurate work, especially Basic WORD JAWS commands.
Gain Typing Speed in WORD
To practice typing skills use a phrase like: “The quick brown fox jumps over the lazy dog.” Type it repeatedly in a Word document by starting slow to gain speed. Use the keyboard shortcuts taught in the video, such as “Ctrl + Left Arrow” and “Ctrl + Right Arrow” to move between words, and “End” to check if you’re at the end of the line. Regular practice, at least 10-15 minutes daily or more, helps build speed. Turn off autocorrect options to avoid automatic changes that may confuse the student and disrupt learning. Focus on accuracy before increasing typing speed. Mastering JAWS commands for WORD is essential for efficient practice.
Computer Local Admin access is Crucial at all education levels. Dr. Robinson, an Assistive Technology and IT specialist, sets up, maintains, and controls all the computers used in TechVision programs while TechVision Team continues teaching students to manage their own technology. She emphasizes the importance of blind students having local admin access on their school computers so they can make necessary updates and changes to their laptops as needed.
Firstly, she highlights that anti-virus software like Kaspersky or Sophos often interferes with screen readers. Instead, Dr. Robinson recommends using Malwarebytes with Microsoft Defender, as it provides strong protection without disrupting screen reader functionality. Having Computer Local Admin access ensures students can implement these software changes.
Dr. Robinson also explains the need for screen readers such as JAWS. Schools often filter out essential websites and programs like Freedom Scientific, which students require for their studies. With local admin access, students can update their screen readers and related software, which is necessary to keep their devices running smoothly. These updates are crucial and happen every few months. Computer Local Admin access allows students to manage these updates efficiently.
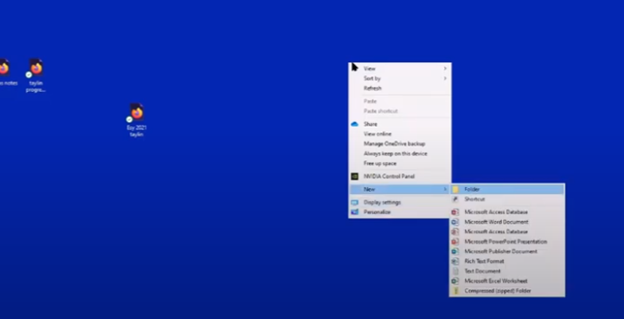
In addition, students must manage their desktops efficiently. They need to pin important programs, such as JAWS, to the taskbar for quick access and adjust their settings without assistance. Pinning their school sites to the desktop make quick access to any site. Through the context menu, students can navigate and personalize their desktop to meet their needs.
Computer Local Admin access to Applications Key on desktop to access anything on the computer
The run dialog box is another essential tool with CTRL+R. Students need to clear temporary files, which can slow down screen readers. Since screen readers are memory-intensive, removing these files improves both the computer’s speed and network performance. Computer Local Admin access is required for these maintenance tasks.
Dr. Robinson further emphasizes the importance of Office 365, especially for math tasks. Using the math editor, students can create and solve equations that read seamlessly on a braille display. This access is crucial for academic success, particularly in STEM subjects.
Lastly, Dr. Robinson stresses the necessity of file explorer -Windows+E and Bluetooth settings. Without a mouse, blind students rely on file explorer to organize their files. Bluetooth access is also essential for reconnecting braille displays and other devices.
In summary, Dr. Robinson believes local admin rights are essential for blind students to manage their technology independently, keep their devices updated, and fully engage in their education. This allows them full access for a lifetime. The TechVision Team ensures students learn essential skills to manage and update their devices independently, preparing them for a lifetime of technological adaptation. As technology evolves, these skills are crucial. Computer Local Admin access is vital for securing and maintaining employment so they know the updates needed, in an increasingly digital world.
Math for all ages, Math Team, Dr. Robinson, along with Professor Betsey, Campbell Rutherford (teacher intern), led the session. Nate Kile (Access Tech Specialist) was the moderator. Math Team emphasized the importance of ensuring blind students can access their technology independently and efficiently. Nate Kile assisted by handling participant questions during the presentation, allowing attendees to type inquiries in the Zoom chat box. Mr Kile would ask the Math Team from the virtual attendees.
Each presenter built on the others’ lessons. Dr. Robinson began with elementary math training skills and how JAWS and other assistive technologies play crucial roles in blind students’ education. Teaching math for all ages, she typed out typically math problems in elementary school to show audience how easily math is completed in WORD. Nate provided opportunities for participants to unmute themselves using Alt + A or Alt + M to ask questions.
Math for all Ages: Dr Robinson
The Math Team turned off their videos to optimize bandwidth. When teaching virtually, turning off video offers better bandwidth for a flow of uninterrupted instruction. Dr. Robinson started the discussion by running JAWS, a screen reader. She explained how to troubleshoot JAWS issues, recommending minimizing programs and restarting the software for optimal performance.
The session highlighted key JAWS commands, such as Windows + D for quick access to the desktop. Dr. Robinson demonstrated how blind students could use Braille displays for math, including Nemeth code. She showed how blind students control their computers by personalizing settings like screen readers and Bluetooth. Customizing the setup is essential for supporting math learning at all ages.
Math for all ages math formulas in Word
Math for all Ages: Professor Betsey
Professor Betsey demonstrated how to effectively use Braille displays, including advanced setups for students. She went into MathType and LaTex and how to use advanced Math techniques to accomplish all math levels. She emphasized the importance of maintaining accessibility and autonomy for students through personalized settings. As a college-level math professor, she explains that using a PC for math enables full inclusion of blind students. Prof. Betsey emphasizes that this technology allows blind students to participate equally in all aspects of their education. This approach supports the goal of providing math for all ages.
Math for all Ages: Campbell
Campbell Rutherford, a teacher intern, demonstrated how to integrate graphing and mathematical functions using accessible technology for blind students. Campbell began by demonstrating how to write a function in Word using LaTeX. She then transitioned to graphing that function in Desmos, an online graphing calculator. Using her braille display and screen reader, she input and analyzed the graph. Campbell explained how blind students can explore mathematical properties like intercepts and undefined points. After reviewing the graph, she took a screenshot and pasted it into a Word document. This tied together the written mathematical properties and the visual representation. Throughout, Campbell stressed the importance of accessible math for students of all ages.
Throughout the session, the Math Team emphasized the importance of managing constant software updates. They explained how providing local admin rights empowers students to update their programs and devices independently. This in-turn prepares them for both academic success and future employment. The TechVision team’s approach ensures that students can fully access their education and maintain control of their technology. This ultimately sets them up for long-term success but especially the STEM field. More Math Lessons here:
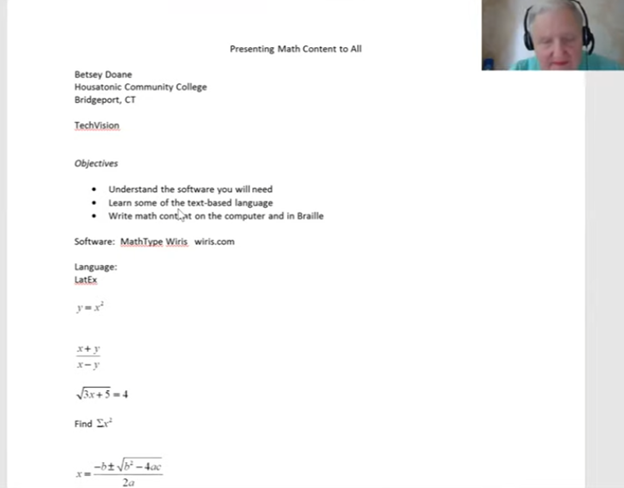
Dr. Betsey Doane shared her experience teaching math for over 50 years and the importance of making math accessible to all students, including those with visual impairments. She began by introducing the software MathType, essential for creating accessible math content. The software integrates into Word and allows users to write math that is accessible to both screen readers and braille displays. Her efforts truly embody the concept of Advanced Math Made Accessible.
Dr. Doane explained the basics of LaTeX, a text-based language used for writing math. She demonstrated how to input and translate common math expressions such as fractions, square roots, and equations using LaTeX in Word. Her instructions included using the Focus 40 Braille Display and ensuring proper configurations for students to view math content in braille. This approach makes advanced math more accessible for everyone.
LaTex using Mathtype to insert perfect Advanced math made accessible
She emphasized the importance of understanding both the visual and non-visual ways of presenting math, highlighting that students need the right software and commands to work effectively. By using LaTeX and MathType, both sighted and blind students can access and solve math problems, ensuring inclusion in any classroom setting. This makes advanced math accessible and easier to understand.
She highlighted the use of MathType software, which integrates seamlessly with Microsoft Word, allowing users to create and present math content that is accessible through screen readers like JAWS and braille displays like the Focus 40. Dr. Doane explained how MathType enables students and educators to write complex equations, such as fractions, square roots, and exponents, in both visual and non-visual formats. This ensures that blind students can access the same content as their sighted peers, making advanced math more accessible.
Advanced Math Made Accessible with LaTex
Dr. Doane also provided an introduction to LaTeX, a powerful text-based language used for writing mathematical expressions. She demonstrated how to write math using LaTeX syntax, such as using backslashes for commands like fractions and square roots. By using LaTeX in Word with MathType, math content can be rendered correctly on both screen readers and braille displays, making it easier for blind students to follow along in class and complete assignments. This is another way to make advanced math accessible.
Furthermore, Dr. Doane stressed the importance of configuring braille displays correctly, ensuring that input is set to computer braille and output is set to grade 2. She provided step-by-step instructions for adjusting these settings on the Focus 40 Braille Display, ensuring that students can navigate math content effectively, contributing to the overall goal of making advanced math accessible.
In conclusion, Dr. Doane encouraged educators to adopt these tools and techniques to create an inclusive learning environment where both sighted and blind students can excel in mathematics. Her detailed instructions and practical advice offer a clear path toward accessible math education for all.
Years ago, Aubrey was just learning how to learn remotely. Dr Robinson lived close by so was able to come over in person to help her with skills and hand under hand and hand over hand as needed to learn position of fingers. A major part of her lessons is to learn to do work on braille display and computer with keyboard shortcuts. This video is her just learning how to do math in WORD.
To answer a Zoom call using keyboard shortcuts when on a braille display and computer, you can use the following:
These shortcuts help you manage calls efficiently without needing to use a mouse. A braille display and computer can make these tasks smoother.
Here are some additional keyboard shortcuts that Aubrey learned to enhance her navigation and accessibility experience:
General Web Navigation on braille display and computer
Ctrl + L or Alt + D: Focus on the address bar.
Ctrl + T: Open a new tab when using a braille display and/or computer.
Ctrl + W: Close the current tab.
Ctrl + Shift + T: Reopen the last closed tab.
Ctrl + Tab: Switch to the next tab.
Ctrl + Shift + Tab: Switch to the previous tab.
Ctrl + R or F5: Refresh the current page.
Ctrl + F: Open the find bar to search within the page on your braille display and computer setup.
Screen Reader Specific
Insert + F7: Open the links list in JAWS.
Insert + F6: Open the headings list in JAWS.
Insert + Down Arrow: Start reading continuously from the current position in JAWS.
Ctrl + Alt + Arrow Keys: Navigate by character, word, or line in NVDA for better synchronization with your braille display and computer.
Aubrey using braille display and computer, to learn how to complete math in WORD
Windows Accessibility commands for display and computer
Windows Key + U: Open the Ease of Access Center.
Windows Key + Plus (+): Turn on Magnifier and zoom in.
Windows Key + Minus (-): Zoom out with Magnifier.
Windows Key + Ctrl + N: Open Narrator settings.
Windows Key + Ctrl + O: Turn on the On-Screen Keyboard.
Text Editing
Ctrl + C: Copy selected text.
Ctrl + X: Cut selected text.
Ctrl + V: Paste copied or cut text.
Ctrl + Z: Undo the last action.
Ctrl + Y: Redo the last undone action.
These shortcuts can help you navigate more efficiently and make your web browsing and computer use more accessible. If you need more specific shortcuts or have other questions, feel free to ask!
When sighted parents’ setup computer for their young child, they learn the commands and how to follow through with lessons after the TechVision Team completes working with their child.
Shared Learning Experience: Learning together can be a bonding experience, making the process enjoyable and less isolating for the child. It also demonstrates to the child that their parents are invested in their education and success.
Here are some general essential keyboard commands to set up and navigate the JAWS screen reader:
Starting and Basic Navigation
Start JAWS:
Press Ctrl + Alt + J or if pinned to taskbar Windows 3 on this computer
Activate PC Cursor:
Press Numpad +.
Activate JAWS Cursor:
Press Numpad -.
Silence Current Speech Output:
Press Ctrl.
Help Sighted Parents Setup Navigating Web Pages
List Links:
Press Insert + F7.
List Headings:
Press Insert + F6.
List Form Fields:
Press Insert + F5.
Next Heading:
Press H.
Next Link:
Press Tab.
Previous Link:
Press Shift + Tab.
Reading Text
Read Next Line:
Press Down Arrow.
Read Previous Line:
Press Up Arrow.
Read Current Line:
Press Insert + Up Arrow.
Read Next Word:
Press Insert + Right Arrow.
Read Previous Word:
Press Insert + Left Arrow.
Forms and Tables
Enter Forms Mode:
Press Enter.
Exit Forms Mode:
Press Numpad +.
Navigate Table Cells:
Press Ctrl + Alt + Arrow Keys.
Sighted Parents Setup computer successfully and if your child is Visually Impaired use this setup to SEE computer better
Teaching a guardian or parent to set up a computer with a braille display for their blind child is key to supporting the child’s learning and independence. In this video on teaching guardian computer setup, you’ll see me, Dr. Denise, working with the child’s guardian as I explain how to set up the technology and guide her on how to assist her granddaughter. When guardians understand how the technology works, they can help their child access school materials and keep up with their classmates. This not only makes learning easier for the child but also equips the guardian with the tools to actively support their education at home, creating a positive and inclusive environment for the child’s growth.
Teaching a guardian how to set up a computer with a braille display for their blind child provides many benefits. Here are the key advantages:
Teaching Guardian Computer Setup Reasons
Increased Independence: When a guardian knows how to use the technology, this enables more independence. The child can access learning materials, without always needing help.
Consistent Learning: A properly set up computer with a braille display ensures the child has the needed tools.
Empowerment for Guardians: When guardians understand the technology, they feel more confident in helping their child. This allows them to play a bigger role in their child’s progress.
Better Communication: A braille display allows the child to share schoolwork. This makes it easier for the child to keep up with assignments.
Building Future Skills: Learning to set up and use a computer with a display teaches the child life skills. Guardians who know the technology can guide their child in mastering these tools.
Access Anytime, Anywhere: Knowing how to set up and fix the technology allows the child to access learning materials at home. This removes barriers to their education.
Teaching tech skills gives the child a strong support system at home. It helps them achieve greater independence and success in learning. More on YouTube