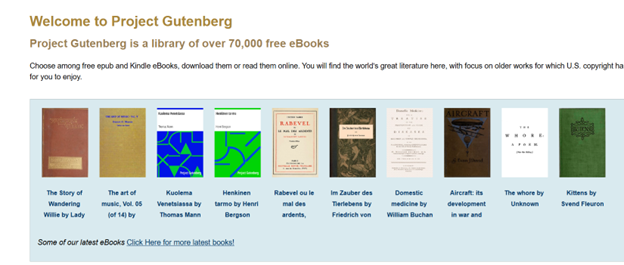
Search results for: “low vision”

  • Accessible Venn Diagrams with a Screen Reader: How Blind Students Navigate and Understand Overlapping Sets

    Accessible Venn Diagrams with a Screen Reader: How Blind Students Navigate and Understand Overlapping Sets

    Using Venn diagrams with screen readers involves strategic design and specific keyboard commands to ensure accessibility. Each set in the diagram must have clear, descriptive labels to guide screen reader users effectively. These labels help users understand the content without needing visual cues. Alt text plays a crucial role by summarizing the Venn diagram’s purpose, the sets involved, and their intersections. This concise description enables screen reader users to grasp the diagram’s structure and intent.

    Keyboard navigation is essential for screen reader users to interact with Venn diagrams. The Tab key allows users to move through interactive elements like text boxes or linked descriptions associated with the diagram. Arrow keys are useful for navigating within tables or text boxes that describe the diagram’s content. This functionality ensures that users can access all relevant information without relying on visual input.

    Screen Reader Venn Diagram Commands

    Screen reader software, like JAWS or NVDA, includes commands that facilitate navigation. In JAWS, the Ctrl+H command lets users jump between headings, making it easier to navigate through complex content. NVDA users can use the Ctrl+Alt+Arrow keys to move between headings or landmarks within a webpage or document. These commands are vital for quickly accessing different parts of the content related to the Venn diagram.

    Incorporating structured content enhances the usability of Venn diagrams for screen reader users. Headings, bullet points, and numbered lists help break down complex information into manageable sections. This structure allows users to follow the logical flow of information without confusion. So, Screen reader users can also navigate through tables that complement the Venn diagram. Tables list elements within each set and describe intersections, making the relationships between sets clear. JAWS users can move horizontally between cells using Ctrl+Alt+Right/Left Arrow keys, and vertically with Ctrl+Alt+Up/Down Arrow keys.

    image of a 3 ringed screen reader Venn Diagram to add information from a download link

    Careful Planning

    Creating accessible Venn diagrams for screen reader users requires careful planning. By using descriptive text, alt text, structured content, and keyboard commands, educators and content creators can ensure that all users, including those who rely on screen readers, can effectively interact with and understand Venn diagrams. These strategies are essential for making complex visual information accessible to everyone. More Video Lessons here

    Create your Venn Diagram via WORD and shapes, applications key to move to back or forward then use these commands to access: Venn Diagram-Accessible

    Ctrl Shift O to all objects, escape when done writing, select object then tab through all objects to access A, B and other combo letters. Once open in Google, Alt f to file and d to download as Word doc. Then F12 for save as and Ctrl Shift O will work correctly. This will NOT work in Google.

    When done, have student emboss off a copy to feel what it is like and if you are having computer issues, tweak it to work better with screen reader.

    Another lesson that occurs in school: Family Tree with Smart Art and screen reader

    Math Lessons

    Transcribe Math Images

    Quadratic Math

    STEM with Embossing

    Perfect Digital Math

    JAWS and MathCat

    Unicode with UEB Math

    UEB Math with Jaws

    UEB LaTex math with Jaws

    Braille Math in WORD Editor-Multi-line

    Split Braille for Buffer Mode

    Braille Blaster

    Desmos Lessons:

    Desmos 3D graphing

    for Geometry in Desmos

    for STEM and Embossing in Desmos

    Desmos and inserting graphs into Math Work in WORD

    Creating shaded Parabolas in Desmos

    Games with Desmos with Drag and Drop

    Drag n Drop in Macmillan Learning

    Creating Geometry Table

  • Braille Math in Word with JAWS: Using a Braille Display to Easily Navigate Multi‑Line Math Problems

    Dr. Robinson demonstrates how to solve multi-line algebra problems using the Braille Math Editor (BME) in JAWS with a braille display. She explains that this method is effective for any multi-line mathematics problem, where isolating variables like x is essential. To start, Dr. Robinson reviews the equation by moving through the text using the up arrow key. She listens to the equation read aloud by JAWS and then enters the Braille Math Editor in Word. This setup is key for mastering Braille Math in Word.

    Specific Braille Commands to solve Multi-Line Algebra Problems

    Dr. Robinson uses specific braille commands to navigate and edit the math content. She mentions that the transcriber typically uses Alt + Equals to ensure the math is perfectly formatted for the student. She also highlights the importance of using a braille display in Word to solve Braille Math problems. It allows users to follow the dots more easily compared to relying solely on auditory cues from JAWS, enhancing the experience of doing Algebra in Braille Math in Word.

    BME in word with print in WORD and braille in virtual BME viewer as student brailles out math

    Input commas to separate lines

    As she progresses, Dr. Robinson inputs commas between steps to maintain clarity in the solution process. This practice enables her to review the steps effectively on the braille display. She demonstrates how to correct mistakes quickly using the arrow or router keys. Dr. Robinson explains the importance of using fraction marks and how specific commands help navigate fractions within BME in Word. Such details are part of mastering Braille Math in Word.

    Toward the end, Dr. Robinson checks her work by moving up and down the lines in the document. She quickly identifies a mistake, corrects it, and emphasizes how easy it is to make corrections with this setup. Dr. Robinson advises students considering a math career to invest in a braille display with at least 40 cells. For the best experience, she recommends choosing a display with 80 cells, especially when working on Braille Math in Word.

    In conclusion, Dr. Robinson effectively shows how to use the Braille Math Editor and JAWS to solve multi-line algebra problems. This method provides a clear and accessible way for blind students to engage in complex math tasks. It ensures both accuracy and efficiency in their work, showing the importance of mastering Braille Math in Word. Here is another student completing Math in the Braille Math Editor, then to advanced math in WORD to UEB Math.

    Other Math Lessons:

    Transcribe Math Images

    Quadratic Math

    STEM with Embossing

    Perfect Digital Math

    JAWS and MathCat

    Unicode with UEB Math

    UEB Math with Jaws

    UEB LaTex math with Jaws

    Desmos Lessons:

    Desmos 3D graphing

    for Geometry in Desmos

    for STEM and Embossing in Desmos

    Desmos and inserting graphs into Math Work in WORD

    Creating shaded Parabolas in Desmos

    Games with Desmos with Drag and Drop

    Drag n Drop in Macmillan Learning

    Creating Geometry Table

    More Video Lessons

  • Spanish Braille Setup with JAWS and a Focus Braille Display: How to Configure Any Language

    Dr. Robinson demonstrates how to set up a Spanish language profile in JAWS for a perfect JAWS Spanish language setup. This focuses on accessibility for Spanish-speaking students or students learning a 2nd language. She begins by explaining the differences in braille capitalization across regions. In European countries, dot six is used for capitals, while the U.S. and other areas use dots four and six. The braille display must output the text correctly in Word to ensure accurate reading.

    Dr. Robinson guides users through the JAWS settings and starts with inserting a language profile. She uses specific keyboard commands, such as “Insert 6,” to access the JAWS settings center. She emphasizes the importance of setting the default language to Spanish (Spain International). This ensures that the braille output is in Spanish Grade 1. After adjusting the settings, she double-checks everything in Word to confirm that the changes have held.

    Jaws Spanish language setup for braille and information on how to type it out in WORD

    Quickly Switch Between Language for Jaws Spanish Braille Setup

    Next, Dr. Robinson explains how to switch between languages. She advises setting up multiple language profiles. This allows quick toggling between them using commands like “Ctrl+Shift+Windows+L” or specific braille display commands. She ensures that the students can easily switch between English and Spanish, making their work seamless and efficient. See all JAWS Spanish language Setups and other lessons here.

    Throughout the setup, Dr. Robinson highlights the importance of using commands to add necessary braille dots for accurate translation. Adding dot eight ensures the correct representation of certain letters and punctuation marks. She demonstrates how to practice symbols and contractions on the braille display, ensuring students are comfortable with the layout.

    Dr. Robinson mentions that a practice sheet with all the necessary symbols and contractions are available on website. The website, yourtechvision.com, offers this resource to help students reinforce their learning. This resource helps students reinforce their learning and practice braille accurately. With this setup, students can work efficiently in Word using JAWS. They will perform tasks just like their peers with the help of a Focus 40 braille display. Then progress to using this in Google Classroom

    Other Spanish Lessons

    Braille Setup for Spanish

    Spanish Braille input output

    Spanish Braille with Jaws

    Switch Display Modes

  • Flashcard Studying in Google Sheets with a Screen Reader: Eme’s Accessible Study Method

    Emē, a student of Dr. Denise Robinson demonstrates how she studies Spanish vocabulary using Google Sheets with a screen reader. She starts by copying vocabulary words into Google Sheets, though typing them in directly is also an option. After setting up the sheet, she explains the importance of naming it to avoid losing any work. She uses Google Sheets similarly to how a sighted student would use flashcards. This method is an excellent example of Flashcard studying in sheets. Column A contains the English words, while Column B holds the Spanish translations.

    Certainly! Here is the revised paragraph with “Emē”:


    Emē introduces a “difficulty” column in Column C, where she rates how challenging each word is to remember. She assigns a value between one and five, depending on how well she recalls each word. This rating system allows her to sort the words based on difficulty later, making her study sessions more effective. This technique enhances the efficiency of flashcard studying in sheets methods.

    To make the study process more efficient, Emē explains how to randomize the rows. This prevents her from memorizing the order of the words rather than learning the words themselves. She uses specific keyboard commands to select all rows and columns, then accesses the “randomize range” function through the search menu. Randomization is key for effective flashcard studying in sheets techniques.

    image of Flashcard studying in sheets with multiple rows and columns of information

    After randomizing, Emē sorts the words by difficulty, placing the hardest words at the top for focused study. She even hides the easiest words, rated as ones, to avoid wasting time on words she already knows well. If she needs to retrieve the hidden words, she can easily unhide them using the “unhide rows” function. This is another way flashcard studying can be efficiently carried out in sheets.

    Emē concludes by showing how she reviews and updates the difficulty ratings as she studies. This method allows her to keep track of her progress and focus on words that need the most attention. She highlights that this approach to flashcard studying in sheets with Google Sheets is both accessible and effective, making it a great tool for blind and visually impaired students.

    solving inequalities

    Create Histogram

    Excel Trend-line with Scatter Plot

    Other Excel Lessons that you can do in Sheets

    Learn more Great Study habits with Google and more Videos on our YouTube Channel:

  • Exploring Zoology on RedShelf: Screen Reader Navigation for the Online Laboratory Guide

    Dr. Robinson demonstrates RedShelf access with JAWS. Demonstrating how to efficiently navigate RedShelf Book: “Exploring Zoology: A Laboratory Guide, Third Edition” using the JAWS screen reader. She emphasizes the importance of pairing the book with tactile graphics for laboratory visuals, especially for unique creatures to make RedShelf access with JAWS more comprehensive.

    Navigating RedShelf access with JAWS -“Exploring Zoology” Online Book

    Dr. Robinson starts by instructing users to open the book, recommending the “Insert + F7” command to quickly access links and jump to a specific section when using RedShelf access with JAWS. To make navigation smoother, she suggests using “Control + Home” to return to the top of any page, ensuring quick access to the table of contents or other necessary sections. This approach helps avoid unnecessary content, allowing users to get straight to the relevant material.

    Redshelf access with JAWS navigating through the table of contents, image of the ocean with fish, turtles and other sea creatures

    For new users, she recommends first down-arrowing through the page to become familiar with its layout. However, for regular navigation, using bookmarks ensures that users can quickly return to where they left off can be used. To create a bookmark, users should navigate to the desired section, then use the RedShelf menu to save the location, enhancing their RedShelf access with JAWS experience.

    While exploring chapters like “Chapter 1: Metric Weights and Measurements”, Dr. Robinson shows how users can navigate to exercises using “Control + Home” or tabbing through headings. She also recommends using “Insert + Down Arrow” to continuously read through a page. For more detailed or specific content, users can search for page numbers directly using the search box by pressing “Alt + Slash”.

    Finally, Dr. Robinson demonstrates how to use JAWS’ Picture Smart feature to analyze and extract text from images in the book. This feature, triggered by “Insert + Space” followed by “P” and “C”, helps users work with graphical data when using RedShelf access with JAWS. More Video Lessons on these types of commands. More Lesson Commands here

    This method provides fully accessible navigation complex laboratory materials, making “Exploring Zoology” easy to use for blind students. More Navigation commands here.

  • Completing Multi‑Level Math in Word Using the Braille Math Editor (BME)


    Dr. Robinson demonstrates how to complete multi-level math in WORD using Braille Math Editor with JAWS. She used an algebra problem as an example. She explains that this method applies to several types of math problems. First, she highlights how transcriptionists or students can prepare algebra equations using the Alt + Equals command to insert math symbols directly in Word. Once the equation is ready, the blind student can easily solve it using a Focus 40 Braille display.

    Navigating the Math Content

    Dr. Robinson shows how students can work within the Braille Math Editor. By pressing Insert + Space followed by Shift + Equals, the editor opens, and the math problem appears ready for solving. She mentions that students can choose between Nemeth code or Computer Braille, depending on their preference. Both modes allow for precise calculations and input, enabling them to complete multi-level math problems efficiently across multiple levels.

    complete multi-level math using BME in WORD image of math

    As the student works through the problem, they can use Braille commands like 4-5-6 Space to navigate to the end of the problem and add a dot 6 for separating steps with commas. This method keeps the equation organized, allowing the student to solve the problem in multiple lines, just as their sighted peers would. By checking the Braille display frequently, students ensure accuracy while solving multi-level math equations and maintaining neatness.

    Finalizing and Reviewing Work to complete multi-level math

    Once the math is complete, the student hits Enter to insert the solution into Microsoft Word. Dr. Robinson uses Ctrl + L to align the text to the left after confirming correct spacing and formatting. She resolves errors, such as unnecessary commas or misalignments, by reviewing each line. Editing line by line ensures the final product is both clean and accurate. The process concludes with a perfectly formatted, multi-level math solution, efficiently done using the Braille Math Editor, thus completing the task effectively.

    This setup provides blind students with the tools to complete complex multi-level math work just like their peers, ensuring accessibility and ease in academic settings. More math lessons here.

  • Remapping Keyboard Keys with SharpKeys While Avoiding JAWS and NVDA Screen Reader Conflicts

    Dr. Robinson demonstrates how to remap a key on a keyboard using SharpKeys, which is especially useful for laptops that lack an Applications key. She explains that many screen readers require an Applications key, but not all laptops include one. By remapping an unused key, such as a backslash or the 2nd alt key, students can easily create an Applications key for their screen reader.

    Remap keys on keyboard with sharp keys and screen reader commands

    She begins by opening SharpKeys via the Start menu and typing “SharpKeys” into the search bar. Once opened, she navigates the menu with Tab and presses Alt + A to add a new key mapping. To identify the key to remap, she presses Alt + K and hits the backslash key. It’s a straightforward way to remap keys on keyboard devices.

    The software recognizes the backslash as ISO Extra Key 0_56, making it easy to remap. Dr. Robinson then scrolls through the list using Down Arrow to find Special: Application E0_5D. After selecting it with Spacebar, she confirms the key mapping by pressing Enter.

    image of sharpkeys and select on the left side pane what you want to change it to on right side pane

    To test the remapped key, she presses Windows + T to open the taskbar. She then uses the newly remapped key to access the Applications menu. Though the key is still labeled as backslash, it functions correctly as an Applications key. This technique to remap keys on keyboard setups helps users customize their experience.

    Dr. Robinson emphasizes that this method allows blind users to easily remap keys without assistance. The entire process is accessible, making it useful for students relying on screen readers. The remapped Applications key provides full functionality, offering standard Applications key options. Remapping keys on keyboard devices can significantly improve accessibility for all users.

    Dr. Robinson ensures that students can remap keys using SharpKeys independently, without needing assistance from a sighted person. She highlights that this process is accessible for blind users and fully supports screen readers.

    After confirming the remapping, Dr. Robinson explains how this tool provides flexibility for students using different laptops. By remapping a nonessential key, they can create a functional Applications key, essential for many screen reader commands.

    She encourages students to experiment with remapping other keys if needed. This flexibility allows users to personalize their keyboards to fit their preferences. More Screen Reader Lessons here

  • Using the JAWS Braille Math Editor in Word: Aubrey’s Guide to Accessible Digital Math

    Dr. Robinson demonstrates how to use the Jaws Braille Math Editor for solving basic math problems. She begins by explaining the process of opening the editor using 3-7-4-6 space on the braille display. This command quickly opens the Jaws Braille Math Editor for users.

    Once in the editor, she types “10 + 5 = 15” to show how math expressions are entered. The math editor automatically adds number signs before each number, ensuring the correct format. To hear the result, Dr. Robinson uses Insert + F1 for help and demonstrates how to navigate through the equation.

    Next, she solves “20 + 5 = 25” and reminds students to carefully check for the number signs before each number. Dr. Robinson encourages the use of both hands when reading math, emphasizing the importance of tactile practice with the right hand and left hand.

    Braille Math Editor Solution

    age of braille math editor with braille before she enters to insert the math into word

    She continues by solving additional problems, such as “30 + 6 = 36” and “40 + 7 = 47.” Each time, she reinforces the process of reading and checking the work with both hands. For every problem, Dr. Robinson ensures that students follow the correct commands to enter the math expression, then press Enter to insert the answer into Microsoft Word. The session effectively shows the benefits of using the Jaws Braille Math Editor.

    Throughout the session, Dr. Robinson emphasizes the value of continuous practice and careful attention to the tactile input. She concludes the lesson with a final problem, “50 + 8 = 58,” guiding students through the steps of reading, checking, and inserting the equation. The Braille Math Editor, combined with the commands in JAWS, offers blind students a seamless way to solve and verify math problems independently.

    Watch Also Aubrey completes Work on her display

    Tay using Braille Math editor

    Find more math lessons here.

  • Spanish Braille on a Braille Display Using JAWS: Input and Output Setup for Multilingual Users

    Setting up Spanish Braille using JAWS-enabled Braille display involves a few key steps. First, configure the Braille profile in JAWS by pressing Insert + 6 to open the settings center. Navigate to the Braille mode settings and select Spanish (Spain International) as the default language. This ensures the Braille output is in Spanish Grade 1. You can quickly switch between languages using Ctrl + Shift + Windows + L or specific Braille display commands. Additionally, practice using symbols and contractions on the Braille display to become comfortable with the layout. This setup allows visually impaired users to work efficiently in Spanish, ensuring accurate Braille representation and seamless integration with their tasks.

    Spanish Braille Display or keyboard Output/Input and special commands below

    Spanish braille with Jaws
    Image Spanish Braille with Jaws

    Spanish-Española 1. Jaws settings: Set up braille profile – insert 6 (ctrl shift D for default but after you complete these steps, open settings again, to make sure they hold for just Word settings) type “braille mode” down twice to hear it, F6, alt g to languages and setup your choices. 

    This lesson is Spain (international) Input and Output are Spanish Grade 1

    2. Tab to profile languages and set those up and enter to close Jaws settings

    3. Alt 8 to make sure dots 7,8 show on display-accept and close settings

    1. Set up Voice profile in Jaws-open context menu, options, voices, add a profile

    1. In Word-change voice quickly:  2 options: on keyboard- ctrl shift window L to change profile or on Focus -2,3,4,5,7, space to change languages)

    2. Insert+ctrl+S to change to Spanish profile or to other language

    3. G+7+space on Focus to computer braille (which will output Spanish grade 1)– capital is dot 7 under capital letter on display

    Práctica: 

    á 1,2,3,5,6   

    é 2,3,4,6   

    í 3,4 

    ó 3,4,6  

    ú 2,3,4,5,6  

    ü 1,2,5,6,8 

    ñ 1,2,4,5,6, 8  

    Punctuation for Spanish Braille using JAWS

    ! 2,3,5, 7 

    inverted ! is 2,3,5, 7, 8

    and

    . is dot 3 

    and

    , is dot 2 

    ? is dot 2, 6 

    inverted ? is 2,6,7

    on keyboard:

    Lower Case Letters

    á   (lower case a, acute accent)  =  Press Ctrl + ‘ (apostrophe), then the letter a
    é   (lower case e, acute accent)  =  Press Ctrl + ‘ (apostrophe), then the letter e
    í   (lower case i, acute accent)  =  Press Ctrl + ‘ (apostrophe), then the letter i
    ó   (lower case o, acute accent)  =  Press Ctrl + ‘ (apostrophe), then the letter o
    ú   (lower case u, acute accent)  =  Press Ctrl + ‘ (apostrophe), then the letter u
    ñ   (lower case n, tilde accent)  =  Press Ctrl + Shift + ~ (tilde), then the letter n
    ü   (lower case u, diaeresis accent)  =  Press Ctrl + Shift + : (colon), then the letter u

    Upper Case Letters

    Á   (upper case A, acute accent)  =  Press Ctrl + ‘ (apostrophe), then Shift + a
    É   (upper case E, acute accent)  =  Press Ctrl + ‘ (apostrophe), then Shift + e
    Í   (upper case I, acute accent)  =  Press Ctrl + ‘ (apostrophe), then Shift + i
    Ó   (upper case O, acute accent)  =  Press Ctrl + ‘ (apostrophe), then Shift + o
    Ú   (upper case U, acute accent)  =  Press Ctrl + ‘ (apostrophe), then Shift + u
    Ñ   (upper case N, tilde accent)  =  Press Ctrl + Shift + ~ (tilde), then Shift + n
    Ü   (upper case U, diaeresis accent)  =  Press Ctrl + Shift + : (colon), then Shift + u

    Punctuation Marks

    ¿   (inverted question mark)  =  Press Alt + Ctrl + Shift + ? (question mark)
    ¡   (inverted exclamation mark)  =  Press Alt + Ctrl + Shift + ! (exclamation mark)
    «   (opening angle quotation mark)  =  Press Ctrl + ` (grave accent), then Shift + < (less than symbol)
    »   (closing angle quotation mark)  =  Press Ctrl + ` (grave accent), then Shift + > (greater than symbol)

    Speaking/Writing Spanish

    Práctica: You can Use insert+4 for any special symbol also

    ¿Qué hora es por favor, señor? 

    Soy de México.  

    !Mucho gusto, Marta! Hola.

    ¡Mucho gusto, Marta! Hola!

     ¿Qué hora es por favor, señor?

    ¿Qué hora es por favor, señor?

    1. ¡Buenos días! ¡Hola! / Good morning!
    2. ¡Buenas tardes!  Good afternoon!
    3. ¡Buenas noches! Good evening! / Good night!
    4. ¡Hola! / ¡Chao!  Hi! / Bye!
    5. Adiós.  Good bye.
    6. Por favor.  Please.
    7. Hasta la vista / Hasta luego. See you / See you later.
    8. Hasta pronto. See you soon.
    9. Hasta mañana. See you tomorrow.
    10. (Muchas) Gracias. 
    11. Thank you (very much).
    12. De nada.You’re welcome.
    13. Bienvenidos  Welcome
    14. Lo siento  I’m sorry
    15. Con permiso / Perdón / Disculpe  Excuse me / Pardon me 
    16. ¡Vamos!  Let’s go!
    17. ¿Cómo está usted?  How are you? (formal) 
    18. ¿Cómo estás?  How are you? (informal)
    19. Insert+4 for eacute in
    20. ¿Qué tal?   How’s it going?
    21. Bien / Muy bien  Good / Very good
    22. Insert+4 for acute in Más below
    23. Mal / Muy mal / Más o menos  Bad / Very bad / OK
    24. Sí / No Yes / No
    25. ¿Cómo?
    26. ¿Cómo se llama usted? What is your name? (formal)
    27. ¿Cómo te llamas?  What is your name? (informal)
    28. Me llamo…  / Mi nombre es… My name is…
    29. Mucho gusto. / Encantado.  Nice to meet you.

    More Lessons at YouTube and YourTechVision WebSite

    Other Spanish Lessons

    Braille Setup for Spanish

    Spanish Braille input output

    Spanish Braille with Jaws

  • Math Work in Excel: Solving Inequalities with Keyboard Shortcuts

    Dr. Robinson introduces a lesson on using Microsoft Excel to solve math work, specifically focusing on inequalities and graphs. She begins by guiding students on how to put Excel in focus to tackle various math problems in Excel. This helps students to optimize their math work in Excel effectively. Next, she instructs them to create a template using a number line. To insert symbols like less than or greater than signs, students use the Alt + N and then U commands to insert bullets or symbols.

    For students with a numpad, Alt + 7 and Alt + 9 quickly insert a hollow or solid bullet, respectively. For those without a numpad, they can use the Insert + Symbols option. Students then align their number line by inserting a bullet in the middle, ensuring four dashes on each side for perfect centering when solving math work in Excel.

    Math Work in Excel and More

    image of excel to solve math problems with inequality graph lines

    To center content, students use the Applications key and press F. They adjust the horizontal and vertical alignment to ensure everything is perfectly centered. This is a useful step when handling math problems in Excel. After completing their problems, students select the content using Shift + Right Arrow and copy it using Ctrl + C. This entire process enhances their skills in doing math work in Excel.

    When pasting into Microsoft Word with Ctrl + V, students have various formatting options. By pressing the Control key and right arrow, they can select different formatting options for their pasted content. They can also Alt H to home and V to paste and right arrow through options. This flexibility allows blind students to format and customize their graphs just like their sighted peers when solving math problems in Excel. After the student pastes an image, they press the Applications key and up arrow to select Alt Text and type the description. Once they finish typing, they press Ctrl + Space and C to close the navigation pane and return to the document.

    Dr. Robinson concludes by showing examples of completed math problems in Excel and graphs, demonstrating how well-formatted the number lines and inequalities look. Blind students can confidently create hollow and solid bullets, as well as inequalities, just like other students, thanks to the accessible features in Excel. This process ensures they stay engaged in their learning, achieving the same results as their peers when doing math work in Excel. Make sure your display is working well.

    Excel Quadratic Trend-line with scatter plot graph including equation in Excel with Jaws talking software

    Curved line in Excel graph with screen reader

    Excel Scatter Plot with Trendline

    Solving inequalities

    Create Histogram

    Excel Trend-line with Scatter Plot

    Other Excel Lessons that you can do in Sheets

    Flashcard Study

    Other excel lessons with commands.