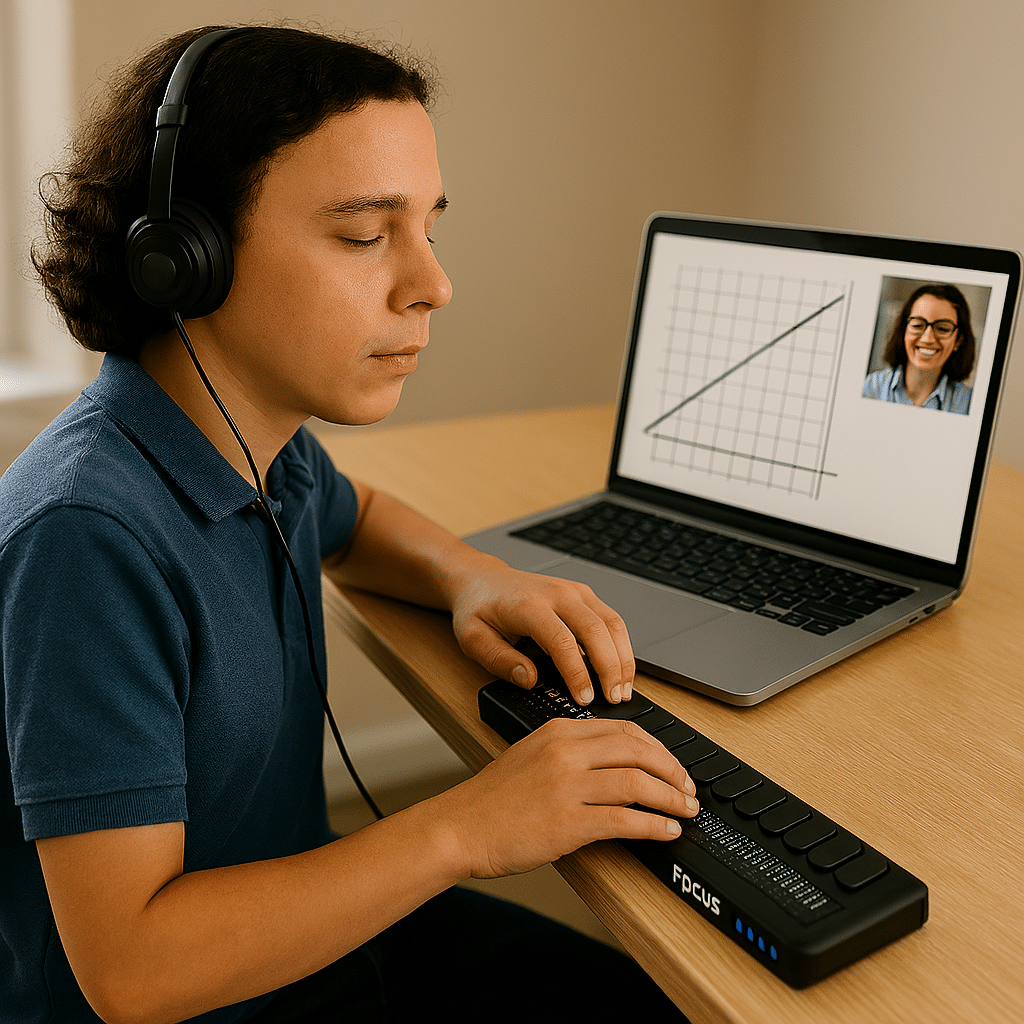
Dr. Robinson demonstrates how to navigate with the Focus 40 Braille Display, highlighting various commands and features for efficient use. She introduces the Focus 40 Braille Display, explains the importance of navigation commands, and demonstrates various navigation techniques. Additionally, she covers Focus Display Navigation Options to help users maximize their efficiency.
Focus Display Navigation Options Video Highlights
Introduction to navigation
Dr. Robinson introduces the Focus 40 Braille Display.
Explains the importance of navigation commands.
Prepares to demonstrate various navigation techniques.
Basic navigation commands
Shows how to move to the top and bottom of the display.
Uses specific key combinations for navigation:
Move to Bottom: Press dots 4-5-6 + Space.
Move to Top: Press dots 1-2-3 + Space.
Emphasizes the logic behind the commands.
Line and word navigation
Demonstrates moving one line at a time.
Uses key combinations for precise movement:
Move Down One Line: Press dot 4 + Space.
Move Up One Line: Press dot 1 + Space.
Explains how to navigate by words:
Move Forward One Word: Press dot 5 + Space.
Move Back One Word: Press dot 2 + Space.
Other Display Navigation
Focus Braille Display navigation options using router keys
Router keys and mode buttons
Highlights the use of router keys for quick cursor movement.
Introduces mode buttons for different navigation options:
Router Keys: Press the router key above the desired character.
Mode Buttons: Located on the left and right sides.
Shows how to navigate by paragraphs and sentences:
Move Forward One Paragraph: Press the right rocker switch down.
Move Back One Paragraph: Press the right rocker switch up.
Move Forward One Sentence: Press the left rocker switch down.
Move Back One Sentence: Press the left rocker switch up.
Panning and rocker switches
Explains the function of panning buttons:
Move Forward One Display Width: Press the right panning button.
Move Back One Display Width: Press the left panning button.
Demonstrates the use of rocker switches for line navigation:
Move Up One Line: Press the right rocker switch up.
Move Down One Line: Press the right rocker switch down.
Highlights the benefits for sighted individuals working with Braille learners.
Benefits of Focus Display
The Focus 40 Braille Display offers numerous benefits. Firstly, it enhances Braille literacy through intuitive navigation commands. Additionally, its versatile features support efficient reading and writing. Moreover, students can easily move through text, improving their skills. The Focus Display can be used exclusively to control the computer–that means, you DO NOT need to use the keyboard if you cannot or do not want to. This makes for VERY efficient math calculations. The device’s compatibility with various screen readers ensures accessibility. Furthermore, its portability allows seamless use in different environments. Overall, the Focus 40 empowers users, boosting their independence and confidence in learning.
Dr. Robinson explains the three toggles to Switch Focus Braille Modes quickly on your Braille display. One toggle puts you into Braille mode for all Braille tasks. Another toggle switches to computer braille which inputs direct Nemeth code for math. The third toggle is for computer in and contracted out for either Nemeth or UEB math.
Access Jaws settings to set up Focus Braille Mode Options
First, press Insert + 6 to check your settings. Type “braille m” and down arrow to “Braille mode.” You can access options one by one with arrow keys or press F6 to jump to structured then Alt+T to jump to output. Press down arrow to UEB Grade 2 then tab to input and c to computer braille first to uncheck the box that says “Show current word in computer Braille”. Shift tab back up to input and choose UEB for both input and output. You can have other options also but this is what used here.
Tab through back to For structured Braille mode, check “Active cursor follows Braille cursor” and “Braille cursor follows active cursor.” These settings help beginners, especially when working with sighted personnel learning Braille to following along visually for instructor. Always have a certified Braille instructor (TVI) to teach reading and writing Braille correctly.
Always press Alt + A to apply settings before exiting. However, if you do not like the extra information at the start of your display, shift tab back to search in settings and type status and enter. Down arrow to status and F6 and down to right (to place status on the right of display) and down to none and apply that and close. When you first turn on your Braille display, the status characters may be confusing to young learners. Additional Braille Display Lessons here.
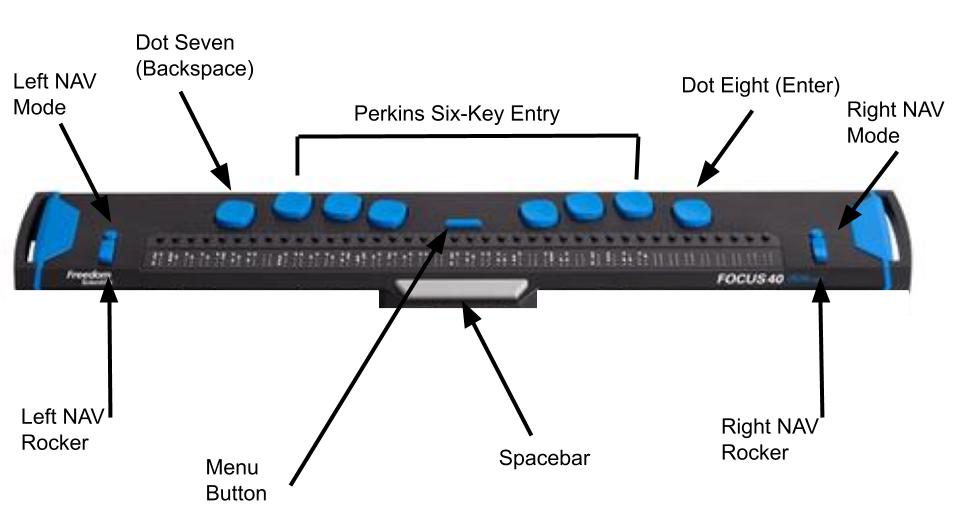
Focus Braille Display Image with Button options
Switch Focus Braille display modes quickly on display
For advanced users, status dots help in tables and other navigation. Beginners should start with “none.” Press Alt + A to apply changes, then enter to close. The Braille display functions like a Braille writer. Keys 1 2 3 are on the left, and keys 4 5 6 are on the right with space in between the left and right side. The left pinky key is backspace, which changes to dot 7, and the right pinky is enter or dot 8 in combination with other keys.
TechVision Team Specialists have provided remote instruction worldwide since 2007.Additionally, under the leadership of Dr. Denise M. Robinson, they empower students through comprehensive education for the blind. Furthermore, with expertise in screen readers, braille displays, braille, Nemeth code, and assistive technologies, the team delivers individualized instructional support for every learner.
A defining strength of the TechVision Team specialists is that over 90% of our instructors are blind themselves. They use the same technology they teach. This brings unmatched authenticity, lived experience, and practical mastery to every lesson. Alongside a small number of sighted specialists, this blended team works together with purpose and unity. They model independence, confidence, and real‑world problem‑solving for every student they serve.
Their commitment to equal access in education guides every aspect of their work.Additionally, they provide real‑time, one‑on‑one instruction and collaborative school‑team training to support full educational access. Furthermore, every TechVision Team Specialist shares a mission of removing barriers and creating pathways to independence.
TechVision Team Specialists create global impact through a mission‑driven approach to education for the blind. I Additionally, they provide personalized, one‑on‑one remote instruction for learners of all ages.
Our specialists hold advanced degrees and certifications in Orientation & Mobility (O&M), Teaching Students with Visual Impairments (TVI), Assistive and Access Technology, and Special Education. Each instructor uses specialized blind and low vision technology daily at an expert level, allowing them to deliver direct instruction across all subject areas including math, science, English, and history aligned to each learner’s individual needs. Instruction supports individuals of all ages from early childhood through adulthood and emphasizes real-world application, independence, and full access to the general education curriculum.
This real-time, individualized instruction empowers students and clients to compete equally in school, work, and daily life. TechVision specialists: both blind and sighted, are central to this mission, ensuring every learner has the tools, skills, and access they need to succeed.
TechVision Director, Assistant Director and Director of Business
Dr. Denise M. Robinson is dedicated to empowering students to reach their full potential.Additionally, she leads a team of expert instructors who share her commitment to excellence and inclusion. Together, they provide comprehensive blind skills instruction across all areas of education.
Furthermore, with deep expertise in instructional technology, Dr. Denise ensures that students of all ages receive essential, on‑demand educational skills. As a result, her leadership continues to guide the transformative work of the TechVision team.
In addition, as a passionate program developer and nationally recognized speaker, she creates innovative instructional models that merge technology with blind skills. Through this work, she equips learners with the tools they need to pursue education, careers, and independence.
Dedication
TechVision’s dedication stems from a deep belief in the transformative power of education and the right of every individual to be fully included in the world. By merging technology with blind skills, the team works to eliminate barriers and ensure equal access and opportunity for all students.
Outside of her professional work, Dr. Denise enjoys spending time outdoors—working with tractors and equipment, hiking daily, gardening, and meeting new people. She finds joy in the diversity of the world and the meaningful connections it brings.
Beth Sellers
Assistant Director of Educational Programming, MA Teaching AT, Braille, Nemeth & Additional Skills
Beth Sellers is a graduate of James Madison University and Eastern Mennonite University, where she earned her master’s degree in education. With more than 20 years of experience in special education and community-based disability services, Beth brings extensive expertise in assistive technology and blind skills instruction.
At TechVision, she teaches braille and access technology and provides consulting services to school divisions in assistive technology. Beth is a former president of the Virginia Chapter of the National Organization of Parents of Blind Children and volunteers with the AMCSI Conference Planning Team and her local SPCA.
In her spare time, Beth and her children enjoy time on the lake, caring for their two dogs and many rescue cats, and exploring new activities—including cross-country skiing with Ski for Light.
James Robinson
Director of Business Services, BS
James Robinson brings extensive administrative experience to TechVision, having previously served as an administrator in care facilities. As TechVision expanded to meet the growing demand for high‑quality remote instruction, he transitioned his leadership and operational expertise into the role of Director of Business Services.
In this capacity, James oversees all business operations, including accounting, billing, financial coordination, and organizational systems. His strong background in management and service administration ensures that TechVision functions efficiently and that both the instructional team and clients receive consistent, reliable support. His work is essential to sustaining TechVision’s growth and mission‑driven impact.
The current page provides instructions on creating a food chain for a class using talking software. It includes steps for saving a document in a specific format and navigating through menus using keyboard shortcuts. Additionally, it references the video below to help you each step of the way.
F12 and save as 97-2023 so after you F12 you will have file and tab once and down arrow or up arrow to 97-2023 doc and enter, then the commands will work for you.
Alt + N then M and right arrow to Food Chain and enter
Listen to recording to add information as you need
WORD accessible food chain and why we use them
A food chain is a sequence that shows how energy and nutrients flow from one organism to another within an ecosystem. Here’s a simple breakdown:
Producers: These are usually plants or algae that create their own food through photosynthesis. They form the base of the food chain.
Primary Consumers: Herbivores that eat the producers. Examples include rabbits and deer.
Secondary Consumers: Carnivores that eat the herbivores. For instance, a fox that eats rabbits.
Tertiary Consumers: These are predators that eat secondary consumers. An example would be an eagle that eats foxes.
Decomposers: Organisms like bacteria and fungi that break down dead plants and animals, returning nutrients to the soil.
Picture of braille display, keyboard and iPhone for who we are and what we do
Our Mission
TechVision’s mission and purpose is to empower blind and visually impaired students through personalized, real‑time instruction in assistive technology, braille, STEM, and essential academic skills. Led by Dr. Denise M. Robinson, our specialists teach the tools and strategies students need to access information, build independence, and compete equally with their sighted peers.
What We Do
TechVision provides 1:1 remote instruction for learners of all ages. Our team teaches and offers:
What others use only through access methods such as but not limited to:
AI‑supported learning strategies: This direct, individualized approach transforms how blind and low‑vision students learn, work, access and navigate the world, staying true to our mission and purpose.
Screen readers
Braille displays
Computers and mobile devices
Word processing and productivity tools such as embossing
All academic classes and especially: Math, STEM, Nemeth, and all literacy
We provide rapid transcription services with quick digital turnaround, often within one hour when needed, and teach students how to independently emboss their own work.
We team with a certified Orientation & Mobility (O&M) specialist -Kevin Hollinger of Blindnesspro.com who travels on-site to deliver intensive instruction in safe, independent travel. Training includes school navigation, community routes, and real-world mobility skills to support full independence.
Why Our Work Matters
TechVision also trains school personnel: including transcribers, Teachers of the Blind, Teachers and support staff, to ensure students receive consistent, accessible materials. We partner with districts, families, and private organizations to create inclusive environments where blind and visually impaired individuals can thrive, fulfilling our mission and purpose.
Mission and Purpose Designed for Every Learner
We teach learners of all ages. Every student receives customized instruction based on their goals, strengths, and needs. Whether developing early childhood skills, mastering advanced mathematics, learning to use a braille display, preparing for college and employment, or adapting to vision loss later in life, our instruction meets each learner exactly where they are. Many of our students go on to pursue STEM fields, including Applied Mathematics at top universities.
The TechVision YouTube channel, created by Dr. Denise M. Robinson and her Team, offers hundreds of free, accessible video lessons. These lessons focus on empowering individuals who are blind or visually impaired through technology education. The channel covers a wide range of topics, making it useful for students, educators, and parents.
Each video provides hands-on, step-by-step tutorials for using assistive technology. Viewers can learn to use screen readers, magnification tools, and braille displays. The lessons also include detailed instructions on using programs like Microsoft Office and Google applications. This practical approach helps users apply technology to real-world tasks.
See What Is Possible with 21st Century Assistive Technology Instruction
These short clips show how quickly students build independence and speed through advanced assistive technology training delivered by instructors who use these tools daily in real-world application.
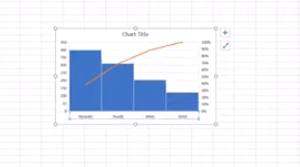
Creating a histogram in Excel using keyboard commands makes data analysis quick and efficient. First, select your data with Shift + Arrow Keys. Then, insert the chart using Alt + N, followed by H to choose a histogram. This process allows you to visualize data distributions without a mouse, making it both accessible and streamlined. By using these simple commands, you can create effective histograms in just a few steps.
To create a graph in Excel using keyboard commands:
Select Data: Highlight the data using Shift + Arrow Keys.
Insert Chart: Press Alt + N to open the Insert tab.
Open Histogram Option: Press H to select the Histogram option from the Charts menu.
Choose Histogram: Use Arrow Keys to navigate and press Enter to insert the histogram.
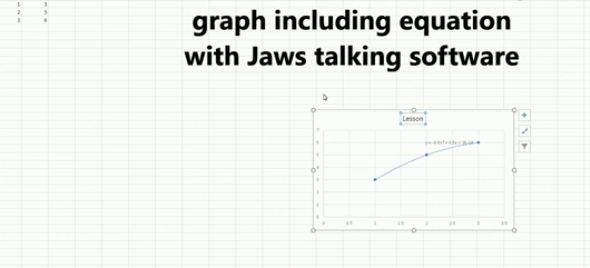
A quadratic trendline with a scatter plot shows the relationship between two sets of data that form a curved pattern. Instead of a straight line, it fits a U-shaped or upside-down U-shaped curve, helping to see trends when data increases or decreases at different rates. Using an Excel Quadratic Trendline with scatter plot makes it useful for predicting changes that don’t happen in a straight line, like acceleration or deceleration. The equation on the graph helps explain this relationship and can be used for future predictions.
Using keyboard commands in Excel, combined with JAWS screen reader, makes it possible to create a quadratic trendline on a scatter plot while also displaying the equation. This process is essential for visually impaired users who need accessible methods to perform complex data analysis. By using commands like Alt + N + S to insert the scatter plot and Alt + J + F to add the quadratic trendline and display the equation, you can efficiently work with Excel’s graphing tools while maintaining full accessibility with JAWS.
Excel Quadratic Trendline with scatter plot Keyboard commands
Excel Quadratic Trendline with scatter plot
Here are the keyboard commands to add a quadratic trendline with a scatter plot and display the equation in Excel using JAWS:
Create Scatter Plot:
Select data with Shift + Arrow Keys.
Press Alt + N, then S to insert a scatter plot.
Add Quadratic Trendline:
Select the graph with Arrow Keys.
Press Alt + J + F, then A for chart options.
Press T to add a trendline, then press Q for polynomial (quadratic).
Show Equation:
Press Alt + J + F, then T to show the trendline equation on the chart.
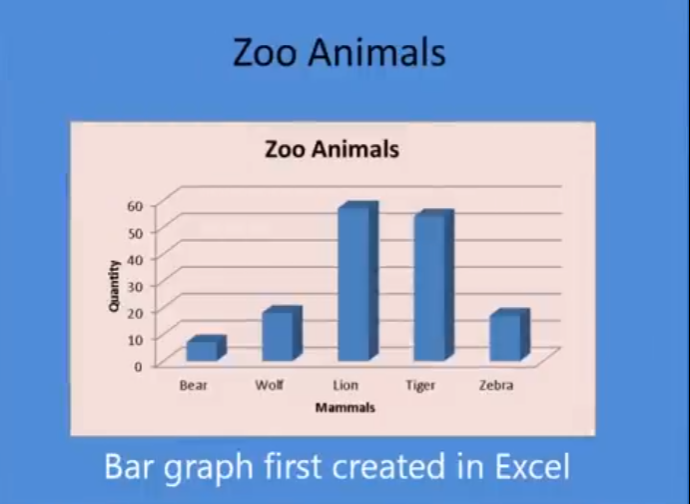
A blind student has demonstrated remarkable skills by completing complex Excel graphs and seamlessly integrating them into PowerPoint presentations. This achievement in Excel Graphs and PowerPoint Integration highlights the potential of assistive technologies and the importance of accessibility in education. He got an A on this project.
A blind student successfully completes sophisticated Excel graphs, showcasing their proficiency with assistive technology. They seamlessly insert these graphs into PowerPoint, showcasing their ability to integrate complex data into presentations. This demonstrates their proficiency with both Excel and PowerPoint, highlighting their technical skills. This process involves several steps:
Creating the Graph in Excel:
Data Entry: The student inputs data into Excel using keyboard commands and screen reader software like JAWS.
Graph Creation: Using commands such as Alt + N + S to insert a scatter plot and Alt + J + F to add a trendline, the student creates a detailed graph.
Customization: The graph is customized by adding titles, labels, and trendlines, ensuring all elements are accessible and correctly formatted.
Inserting the Graph into PowerPoint:
Copying the Graph: The student uses Ctrl + C to copy the graph from Excel.
Insert Graph: He has used the insert menu to insert graphs on the slides
Pasting into PowerPoint: Using Ctrl + V, the graph is pasted into a PowerPoint slide, where it can be further edited and formatted.
Kaleigh, one of my (Dr Robinson) students since 2007, learned to Complete an excel graph in this lesson. She began with in-person lessons before transitioning to remote instruction. My husband and I moved 3,000 miles away to care for his parents, and we continued lessons via Skype, later advancing to Zoom. Over time, Kaleigh progressed from basic lessons to more sophisticated ones, covering her educational needs from third grade through graduation. By the time she finished, she was fully prepared for college and capable of completing all the work necessary to succeed in her future academic endeavors.
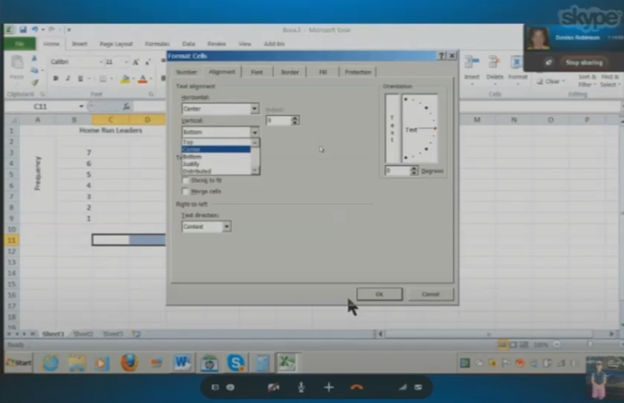
In this lesson, I teach her to navigate Excel using keyboard commands. She starts by creating a new document with CTRL + N and merges cells using ALT + H, M to set up graph labels. She inputs data from her Braille Display, with Excel’s talking software aiding her understanding. As she works on the histogram, she ensure she selects the correct cells and counts for the X and Y axes. She then adds and formats axis titles using ALT + J, A, I, adjusting the text orientation as needed.
Encouragement is Key
I consistently encourage her to check her data, ensuring she relies on assistive technology for accuracy. For formatting, she uses CTRL + C and CTRL + V to copy and paste sections, speeding up the process. We also cover coloring the graph, where I allow her to choose colors freely. I advise her to use consistent formats for simplicity. She shades sections of the histogram based on her data, using keyboard commands to control her workflow efficiently. This reinforces her independence and accuracy throughout the lesson.
Complete an excel graph Settings Option
After finishing the graph, she reviews her work using CTRL + Home to ensure all elements are correct. Satisfied, she copies the graph into Word and prepares to email it. This exercise demonstrates her effective use of keyboard shortcuts and assistive technology. Her growing independence in mastering Excel for academic tasks shows through her efficient and accurate work. The lesson highlights how the student combines guidance and technology to complete a detailed graph with confidence.
Remote Instruction Through Access Technology — Complete Real Work in Real Time for all ages. Our program specializes in providing Training For The Blind to ensure that every individual can succeed and work independently.
Training For The Blind & Vision Impaired-Remote Instruction via access Technology
Empowering Blind & Visually Impaired Students Through Technology and Direct Instruction-Access Technology that Gives you Vision
Offering Personalized 1:1 remote instruction in technology, Braille, Nemeth, and essential blind skills — for students of all ages, anywhere in the world, enhances their educational access. These services ensure all can access educational opportunities effectively.
Founded in 2007 by Dr. Denise M. Robinson, a global leader in remote instruction for blind and low-vision education, TechVision brings together a nationally recognized team of blind education specialists, access technology experts, transcribers, and certified braille instructors. The team delivers expert training in access technology, braille, braille math code, screen readers, and comprehensive academic accessibility. Through real-time, individualized instruction, TechVision equips blind learners of all ages to participate equally, work independently, and succeed across educational and professional environments.
What We Do: Educational Access
We Provide:
Support for families, schools, transition programs, and vocational rehabilitation with the goal of improving access to education.
1:1 specialized instruction in technology, Braille, Nemeth, and all academic access through use of a computer.
Training for school teams — Teachers of the Blind & Visually Impaired, transcribers, paras, and School staff
Technology setup & independence training using screen readers, braille displays, and computers
The TechVision Difference
TechVision, LLC transforms lives through personalized, real‑time remote instruction. Our team equips blind and visually impaired students and clients with the technology skills they need to compete equally with their sighted peers — in school, work, and life. We collaborate with families, districts, and agencies worldwide to ensure every learner has educational access and independence.
Why Educational Access Matters
With cutting‑edge tools — computers, screen readers, braille displays, and smartphones — our students learn to access information, navigate their world, and build independence. TechVision empowers learners to step into education and employment with the same opportunities as their sighted peers.
Who We Serve
College students needing support for educational access
Young adults
Adults returning to work
Anyone needing access to their world
Real 1:1 TechVision Instruction
Students learning to create graphs, write documents, code, and navigate technology independently. Doing Everything their peers are doing.
The most modern way as of 2024 to adapt work for blind or low vision students is using programs like MathKicker.ai, WORD Immersive Reader and Google Docs, follow these steps to ensure full accessibility for both English, Math and other content:
Use MathKicker.ai for Math Content:
Upload or paste math equations into MathKicker.ai. This tool converts complex math problems into formats accessible for screen readers like JAWS or NVDA.
Once converted, paste the accessible math text into Google Docs or other word processing platforms for students to use with their screen readers.
Convert Images to Descriptive Text in Google Docs:
When images contain important information, use Google Docs’ built-in alt text feature. Right-click the image, select “Alt text,” and enter a detailed description of the image, focusing on its relevance to the content.
For math-specific images (e.g., graphs, equations), describe the visual elements and provide the corresponding math in text form or, if needed, through MathKicker.ai to ensure clarity for students using auditory or Braille output.
How to Adapt Work and Why
3. Leverage Google Docs Collaboration Features:
Share Google Docs with students, allowing them to access the document using their preferred screen reader.
Enable real-time collaboration by ensuring that students can work in the document with peers or teachers, making the experience inclusive.
4. Use Heading and Structure Tools:
Make sure to structure documents with proper headings and styles in Google Docs to aid screen readers in navigating the document efficiently.
By combining MathKicker.ai for math accessibility and using Google Docs to convert visual content into descriptive text, blind or low vision students can access both English and math content effectively.
There are many ways to adapt work for inclusion. Inaccessible work creates barriers—choose the right tools, because together we achieve more than apart.
Many people wonder what does legally blind look like? In fact, visual acuity below 20/200 qualifies as legally blind. To actually fit the definition, the person must not be able to attain 20/200 vision even with prescription eye wear. People with legal blindness can function effectively in daily life using appropriate glasses or contact lenses.
Educational Definition for Services
Under the new criteria, if a person’s visual acuity is measured with one of the newer charts, and they cannot read any of the letters on the 20/100 line, they will qualify as legally blind, based on a visual acuity of 20/200 or less. Based on acuity Work will need to be adapted.
This vision means that a person sees at 20 feet what someone with normal vision sees at 70 feet. It is a form of visual impairment classified as mild low vision. Here’s a breakdown of what this means and its implications: Based on diagnosis, this acuity can get worse throughout the day.
1. Definition of 20/70 Vision
In a standard eye exam, the results are written as a fraction, with 20/20 being considered normal vision.
The first number (20) refers to the distance (in feet) from which a person views an object.
The second number (70) indicates the distance at which a person with normal vision can see the same object with clarity.
Thus, someone with 20/70 vision must be closer to an object (20 feet away) to see it as clearly as a person with 20/20 vision can from 70 feet.
2. Implications of 20/70 Vision
Legally Not Blind: This level of vision does not qualify as legal blindness, which is defined as 20/200 or worse with corrective lenses.
Difficulty with Certain Tasks: Individuals with 20/70 vision may struggle with tasks requiring clear distance vision, such as reading road signs, recognizing faces from a distance, or seeing objects clearly in low-light conditions.
Daily Life Adjustments: Depending on the person’s environment, they may need glasses or contact lenses to enhance their vision for specific tasks. However, vision aids may not fully restore perfect clarity.
3. Corrective Measures
Eyeglasses or Contact Lenses: Many individuals with 20/70 vision wear corrective lenses to improve visual acuity.
Low Vision Aids: Some people might benefit from magnifying devices, large-print materials, or enhanced lighting to assist with reading or other close-up tasks.
Adaptive Technology: Screen magnifiers, larger fonts on digital devices, and software that enhances visual contrast can also help improve accessibility for people with 20/70 vision.
4. Potential Causes
Refractive Errors: Conditions like myopia (nearsightedness), hyperopia (farsightedness), or astigmatism can result in 20/70 vision if not corrected.
Eye Diseases: Conditions like cataracts, macular degeneration, glaucoma, or diabetic retinopathy may cause a person’s vision to deteriorate to 20/70.
Age-Related Changes: Vision often declines naturally with age, and some individuals may experience 20/70 vision due to presbyopia or other age-related conditions.
5. Treatment and Management
Regular eye exams are essential to monitor vision changes.
Wearing prescribed corrective lenses and using adaptive aids can help individuals maintain independence and improve their quality of life.
Early detection of underlying conditions (e.g., glaucoma or cataracts) through eye exams can prevent further vision loss.
In summary, 20/70 vision reflects a moderate visual impairment. While it can pose challenges for certain activities, corrective measures and assistive technologies can significantly enhance visual functioning and quality of life.
all acuity levels compared
20/100 vision means that a person sees at 20 feet what someone with normal vision can see clearly at 100 feet. This level of visual acuity is considered moderate low vision. Here’s a detailed explanation of what 20/100 vision means and its implications:
1. Definition of 20/100 Vision
Visual Acuity Measurement: Vision is typically measured using a Snellen eye chart, and the result is expressed as a fraction. The first number (20) represents the distance at which the person is standing from the chart. The second number (100) indicates the distance at which a person with normal vision (20/20) can see the same object clearly.
Therefore, a person with 20/100 vision must be much closer to an object (20 feet away) to see it clearly, while someone with normal vision can see it clearly from 100 feet away.
2. Implications of 20/100 Vision
People with 20/100 vision are considered legally visually impaired. However, this does not meet the definition of legal blindness, which is 20/200 or worse. Even with corrective lenses, they fall under the low vision category. This means normal vision remains unattainable.
When it comes to daily tasks, they often struggle with seeing distant objects clearly. For instance, they may have trouble reading signs from far away. Recognizing faces across a room or on the street is also challenging. Watching TV or presentations requires sitting close. Driving presents challenges, as they may not clearly see signs or signals from a safe distance.
Close-up tasks can be easier for those with 20/100 vision. Reading or using a computer may not be as difficult. However, many still require magnification or adaptive tools to assist with these activities.
Driving: In many regions, individuals with 20/100 vision may not meet the vision requirements for driving. Driving may be possible with special accommodations or vision aids, but restrictions usually apply.
Work and Education: Individuals with 20/100 vision may need accommodations in the workplace or classroom, such as enlarged print materials, magnifiers, or assistive software. Special seating or devices may also be necessary to ensure they can participate fully.
Mobility: While 20/100 vision allows for some independent movement, it can still make navigating unfamiliar environments more challenging. Some individuals may benefit from mobility aids like a cane or guide dog in certain situations. Based on diagnosis, 20/100 can change to 20/200 or worse during any day at school or work based on eye fatigue.
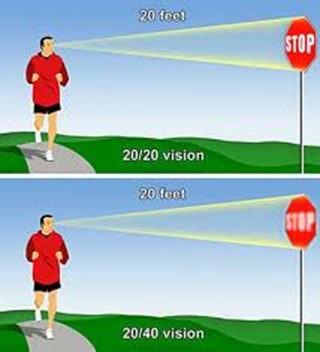
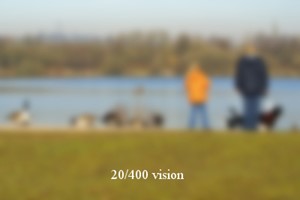
Different levels of Vision Loss to easily compare:
20/20 visual acuity to see people clearly in distance20/200 seeing blurry people in the distance20/400 acuity seeing people extremely blurry in distance
What legally blind looks like and is:
20/200 vision is a severe level of visual impairment and is often classified as legal blindness in many regions. It means that a person with this level of vision can see at 20 feet what a person with normal vision can see clearly at 200 feet. Here’s an overview of 20/200 vision and its implications: Technology has changed everything toward independence, including AI apps that will transcribe the inaccessible to accessible for you what you cannot see
1. Definition of 20/200 Vision
In an eye exam, vision is expressed as a fraction. The first number (20) refers to the distance (in feet) from which the person views an object. The second number (200) indicates the distance at which a person with normal vision can see the same object clearly.
Therefore, someone with 20/200 vision must be much closer to an object (20 feet away) to see it with clarity, while a person with normal vision can see it clearly from 200 feet away.
2. Legal Blindness
Legally Blind: A person with 20/200 vision is considered legally blind. Legal blindness is defined as having a visual acuity of 20/200 or worse in the better eye with the best possible corrective lenses.
Low Vision Category: While legally blind, individuals with 20/200 vision may still have some functional sight. They fall under the category of low vision, meaning that although their vision is severely impaired, they can still benefit from visual aids.
3. Impact on Daily Life
Challenges with Distance Vision: Individuals with 20/200 vision have significant difficulty seeing objects, signs, or faces at a distance. Recognizing faces across a room, reading road signs while driving, or watching TV from a typical distance can be very challenging or impossible.
Mobility and Orientation: Moving through unfamiliar environments may require assistance or adaptations. People with 20/200 vision often need to use mobility aids, such as a white cane or guide dog, to navigate safely.
Reading and Close-Up Work: Although close-up vision may be better, people with 20/200 vision often require magnifiers or other visual aids for reading or detailed work.
4. Corrective Measures
Eyeglasses or Contact Lenses: In some cases, corrective lenses may slightly improve vision. However, they often cannot bring a person’s vision to normal (20/20) levels when the vision loss is significant.
Low Vision Aids: Various devices can assist people with 20/200 vision in their daily lives, including:
Magnifiers: Handheld or electronic magnifiers for reading and detailed work.
Screen Readers: Digital devices or computers with screen readers that convert text to speech.
CCTV Systems: Closed-circuit television systems that enlarge printed text or images onto a screen.
Large-Print Materials: Books and materials with large text can make reading easier.
5. Driving Restrictions
Not Eligible for Driving: In most countries and regions, individuals with 20/200 vision are not permitted to drive. Driving requires a higher level of visual acuity to safely recognize signs, signals, and hazards.
6. Assistive Technology and Adaptations
Adaptive Technologies: Screen readers, screen magnifiers, and voice commands on computers and smartphones help individuals with 20/200 vision engage with digital content.
Environmental Modifications: Enhanced lighting, contrast modifications, and large-text displays make daily tasks like reading, working, and navigating spaces easier.
Orientation and Mobility Training: People with 20/200 vision need O&M (orientation and mobility) training to help them navigate safely and independently using mobility aids or techniques.
20/800 vision is a severe visual impairment often classified as profound low vision or near-total blindness. This means a person with 20/800 vision can see at 20 feet what someone with normal vision sees at 800 feet. Consequently, this level of impairment presents significant challenges for daily functioning. Even with corrective lenses, the limitations remain.
1. Definition of 20/800 Vision
A person with 20/800 vision must be 20 feet away to see something that a person with normal vision can see clearly from 800 feet. This substantial loss of visual acuity severely limits the ability to see details at any distance.
2. Legal Blindness and Classification
Individuals with 20/800 vision fall under the category of profound low vision. Although some residual vision may remain, it is limited. People with 20/800 vision are legally blind. Legal blindness is defined as having a visual acuity of 20/200 or worse in the better eye, even with corrective lenses.
3. Impact on Daily Life
People with 20/800 vision face significant visual challenges in everyday tasks. They may struggle with activities such as reading, recognizing faces, or navigating unfamiliar environments. Even simple tasks like watching TV or identifying objects across a room are often inaccessible. As a result, they must rely on non-visual cues such as tactile or auditory information. This helps them navigate their surroundings and accomplish tasks.
4. Corrective Measures
Although corrective lenses offer limited improvement for individuals with 20/800 vision, magnifiers or other visual aids may enhance any remaining vision for specific tasks. However, many people with this level of impairment depend on advanced assistive technologies. Screen readers, braille displays, and text magnifiers help them access information. Voice-controlled devices enable hands-free interaction with technology. Additionally, orientation and mobility aids, such as white canes or guide dogs, help individuals move safely.
5. Causes of 20/800 Vision
Congenital conditions, like Retinitis Pigmentosa or Optic Nerve Hypoplasia, often lead to severe vision loss. Progressive eye diseases such as Glaucoma, Macular Degeneration, or Diabetic Retinopathy can also cause vision to deteriorate to 20/800. Additionally, trauma or injury to the eye may result in permanent vision impairment.
6. Mobility and Independence
People with 20/800 vision rely on white canes, guide dogs, or assistance to travel safely. Orientation and mobility training teaches them how to use these aids effectively. This training also helps them develop strategies for moving confidently through public spaces. Some individuals also use adaptive techniques like echolocation to supplement their remaining vision.
7. Driving Restrictions
Due to the severity of the impairment, individuals with 20/800 vision are not permitted to drive.
8. Support and Resources
Low vision rehabilitation programs provide essential training in daily living skills, technology use, and mobility techniques. These programs enable individuals with 20/800 vision to maximize their remaining vision. Various organizations offer services such as guide dog training, braille literacy, and mobility aid instruction. Vision loss support groups also offer emotional and practical support for those facing similar challenges.
Result
20/800 vision represents profound visual impairment, often resulting in near-total blindness. People with this condition face substantial challenges in daily life. However, they can rely on assistive technology, mobility aids, and rehabilitation services to maintain independence. While corrective lenses may offer limited improvement, adaptive tools and strategies help individuals with 20/800 vision engage in work, education, and social activities successfully.
Now, you can get an idea of what a visual impairment actually looks like. Educational Services starting at youngest age possible but no later than age 3 years old is crucial.
Understanding Vision in Children: What Visual Acuity Really Means
Essential WORD keyboard commands to help teachers who teach blind with talking software or sighted who just want to move faster. These are some of the most essential commands everyone should know, especially those mastering the essential commands for WORD keyboard users.
Here’s a summary of essential WORD keyboard commands for video users.
Keyboard shortcuts for all WORD versions.
Open Word: Press Windows + 5 to start Word from the taskbar.
Zoom In: Use Alt + V + Z to zoom to 200%.
Change Defaults:
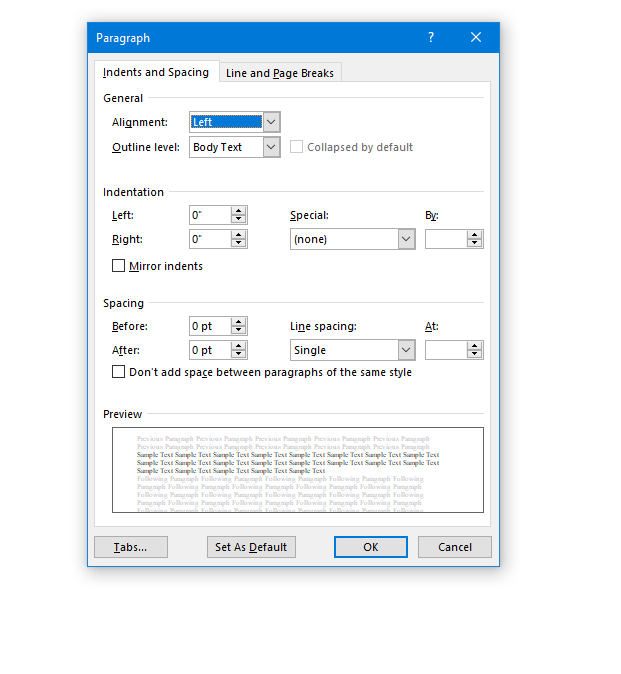
Open Paragraph Spacing: Press Alt + O + P.
Set Spacing to Single: Press Alt + P and change to single spacing.
Set Default for All Documents: Press Alt + D followed by Alt + A and then Enter.
Customize Document further
Change Font:
Select All Text: Press Ctrl + A.
Open Font Dialog: Press Ctrl + D.
Change Font to Times New Roman: Type “Times New Roman” and set size to 12.
Set Default for All Documents: Press Alt + D followed by Alt + A and then Enter.
Create Columns:
Open Page Layout: Press Alt + P.
Select Columns: Press J for columns.
Set Number of Columns: Press Alt + O + C and choose the number of columns.
Change Page Color:
Open Page Layout: Press Alt + P.
Open Colors: Press PC.
Select Color: Use arrow keys to choose a color and press Enter.
Add Border:
Open Borders: Press Alt + O + B.
These commands will help you efficiently navigate and customize documents. See other Setup options
Essential WORD keyboard commands for windows page setup for defaults
You can perform all these tasks using current PDF versions, even with inaccessible scanned images. First, demonstrate how to write text directly on scanned PDFs, then save the edited file. Next, show students how to type directly on PDF and email the completed PDF to their teacher for submission. Perfect touch typing is always preferred for ease.
For low vision users, all math content with voice output offers additional support. Combine this tool with text manipulation in PDFs to make materials more accessible. This approach ensures students can interact with complex materials efficiently, despite any visual challenges.
Here are some useful keyboard commands for working with PDFs in Adobe Acrobat, focusing on enlarging the screen and typing on the document:
Type directly on PDF commands
Enlarge Screen (Zoom In/Out)
Zoom In:
Press Ctrl + + (Plus sign) on Windows.
Press Cmd + + (Plus sign) on Mac.
Zoom Out:
Press Ctrl + - (Minus sign) on Windows.
Press Cmd + - (Minus sign) on Mac.
Fit to Screen:
Press Ctrl + 0 (Zero) on Windows.
Press Cmd + 0 (Zero) on Mac.
Typing on a PDF
Type Directly on PDF
Add Text:
Select the Text Box Tool by pressing Ctrl + Shift + T on Windows.
On Mac, you might need to manually select the tool from the toolbar.
Type in a Form Field:
Navigate to the form field using the Tab key.
Press Enter to start typing.
Add a Comment:
Press Ctrl + 6 to open the comment tool on Windows.
Versatile Model Magic Clay- and other types of modeling items, instantly make anything to enable blind students understand concepts. This product is great for Math, letters, geography, science, everything!
Versitile Model Magic clay is a malleable, non-toxic modeling compound by Crayola. It is lightweight, clean, and resilient, making it ideal for various educational and creative projects. The compound doesn’t crumble or cling to surfaces, and it can be attached to materials like plastic, wood, and cardboard. After drying for 24 hours, it becomes paintable. Model Magic is available in multiple colors and can be used to create a wide range of objects and shapes. Combine this with instruction in subject matter and you will have a child that understands more concepts
Model Magic – make anything
Example Projects for Versatile Model Magic Clay
Math Models: Create 3D shapes like cubes, spheres, and pyramids to help students visualize and understand geometry.
Science Models: Build a model of the solar system or a plant cell to make science lessons more engaging.
Art Creations: Sculpt animals, characters, or abstract shapes to explore creativity and artistic expression.
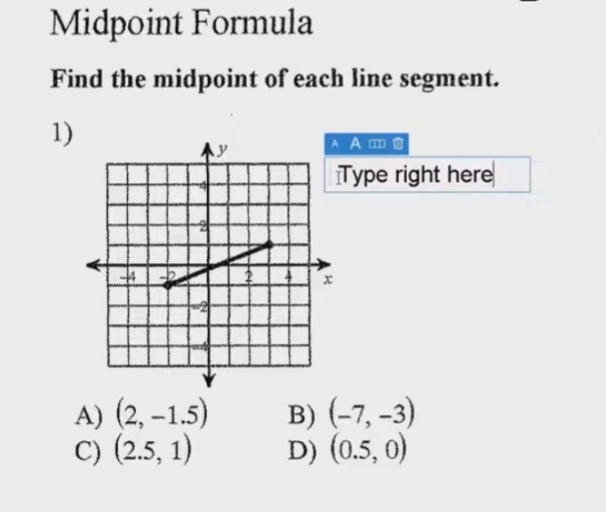
Track changes in Word for a 9th grade. This student was only using a brailler to braille out all work….a very slow process to get it transcribed, then to the teacher, then back to the student. Now, in 2 months the student has moved to completing all work on a computer, emailing to teacher, teacher corrects and sends back.
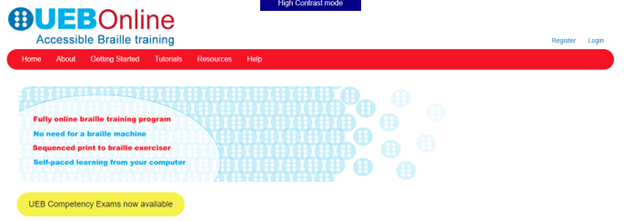
Welcome to the UEB Online website, administered by the NextSense Institute. This website offers online training programs and competency exams in braille literacy and mathematics using the Unified English Braille (UEB) code.
The purpose of the UEB Online website is to provide systematic instruction and accreditation in UEB for people worldwide who are teaching and promoting braille for persons with blindness, low vision, and deafblindness.
Target Audience
The UEB Online training programs and competency exams are suitable for anyone who wants to learn and teach braille. This includes educators, families, allied health professionals, and administrators and decision makers who promote the use of braille as a medium for information access and communication.
Website Accessibility Options
Accessible, inclusive digital technologies enable equitable information access for all through UEB Online.
Visual access mode: For people with sufficient sight to access regular sized print-based information on the website,
High contrast mode: For people with low vision who wish to adjust the font size, background colour or text color,
Non-Visual access mode: For people who wish to use a screen reader for accessing website information.
UEB Online is a training program for sighted people to learn Unified English Braille (UEB). Many countries have adopted Unified English Braille, replacing standard English braille. This program is the first online UEB training tool. The program is suitable for classroom and specialist teachers, parents, teacher aides and other professionals supporting children and adults with vision impairment.
I am presently taking this online class. I like to get the jump on knowledge so I can teach my students along the way to keep updated with braille in general. This class is excellent, self-paced…on either a Mac or PC…learning the new (2016) UEB Braille code. I highly recommend this great and easy way to learn. When you finish, get the certification you need….and it is free!
Sensational Books offers Inclusive Multi-Sensory Learning Tools. These tools provide a multi-sensory approach to early learning, focusing on tactile and visual experiences. Their products include books and tools designed for both sighted and visually impaired children. For example, “Sadie Can Count” is a children’s book with large print, Braille text, and fully embossed pictures. This book helps beginning readers, including those with visual impairments, to enjoy reading with their friends and family.
Inclusive Multi-Sensory Learning- from Sensational Books
Sensational Books also offers workshops and tactile artwork, promoting sensory integration and early literacy. Their products are suitable for diverse populations, including Montessori students and children with autism. The website provides a comprehensive overview of their offerings, including detailed product descriptions and testimonials from users. Some users need other types of tactile tools also.
One example is Sensational BlackBoard which offers a fun, fast, easy and inexpensive way to get tactile access to images. Draw your own raised line pictures or you can have photo copy images of text book or research materials quickly traced. More on this site for Inclusive Multi-Sensory Learning Tools. Make sure you incorporate audio reading as a skill to add to braille reading.
More information and lessons at: TechVision YouTube
Perfect Brailler for little children: Children often struggle to press the keys on a regular brailler due to their small fingers. That’s why I recommend the Mountbatten brailler.
I’ve introduced students as young as 3 years old to the Mountbatten brailler. They can braille with perfect finger positioning using this device.
Mountbatten- Perfect Brailler for Kids
We want to be careful when letting young children use the regular brailler so they don’t start poor brailling habits, such as using 2 fingers to press one key. This is not only time consuming, but also very slow because it takes so much effort to press the keys. The Mountbatten brailler, however allows for good habits to form while fingers are growing and getting stronger. Starting out correctly, our children will then be successful braillers with an ability to increase their output as they get older, creating a joy in reading what they wrote. This will lead to learning perfect touch typing on a keyboard and using a braille display on a computer. Then onto learning math on the brailler to moving it to the computer
Perfect Brailler for Kids: Versatile and User-Friendly
The video on the Math Window® system provides an in-depth look at how this tool benefits blind and visually impaired students. Here are some key details:
Magnetic Tiles: The system uses magnetic tiles that feature both Braille and print. This dual-format approach allows students to read and interact with math problems tactilely.
Portability: The Math Window® board is designed to be portable. It fits easily on a student’s desk and comes with a carrying tote, making it convenient for use in different settings.
Versatility: The system is available in various versions, including basic math, algebra, and geometry. This versatility ensures that it can be used across different levels of math education.
Braille Standards: Math Window® supports both Nemeth and UEB Braille standards. This compatibility ensures that it can be used by students who are familiar with either Braille system.
Hands-On Learning: The tactile nature of the Math Window® system allows students to engage with math problems in a hands-on manner. This method helps in building a deeper understanding of mathematical concepts.
Adaptability: Instructors can easily personalize lessons using the Math Window® system. They can arrange and modify the magnetic tiles to suit each student’s learning pace and needs.
Confidence Building: By allowing students to “see” the structure of math equations through touch, the system helps build their confidence. It encourages them to explore STEM subjects more independently.
Collaborative Environment: The system fosters a collaborative learning environment. Students can work individually or in groups, making it suitable for both classroom and home use.
The Math Window® system makes an Ideal Brailler for Children with more Math lessons here
Regarding Children Who Are Blind or Have Low Vision
Technology, Independence, and the Right to Compete
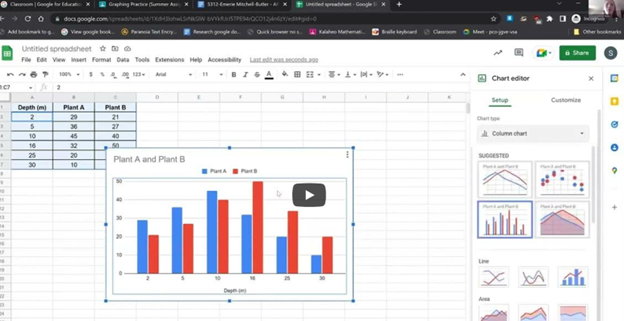
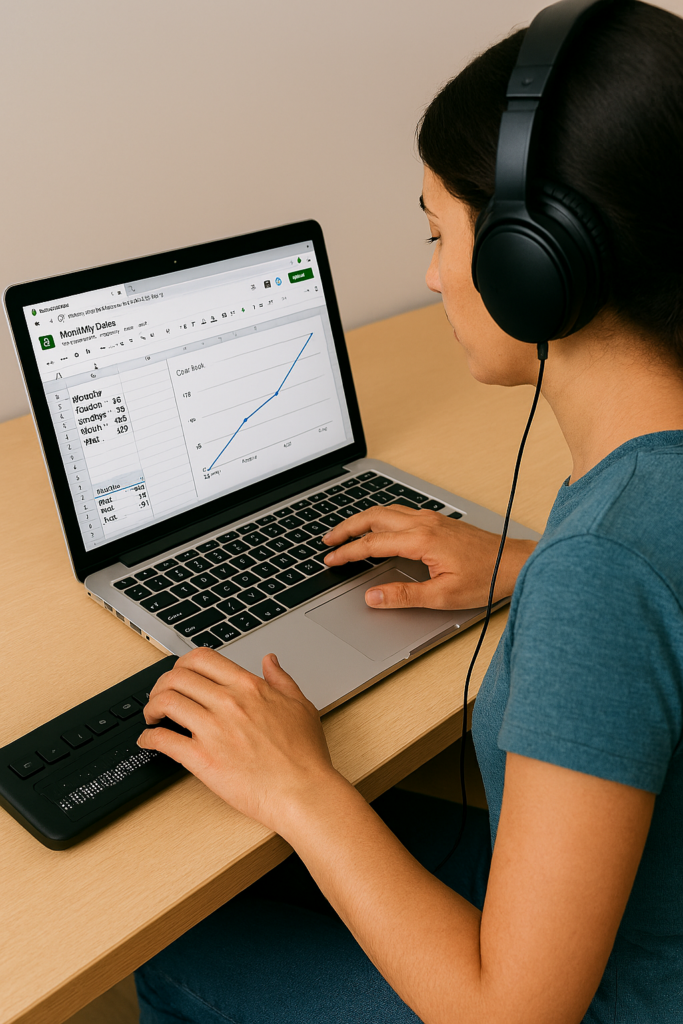
Access Technology Training lessons: Student creating a Google sheets line graph with screen reader and Braille Display
To Every School Administrator, Teacher, and Parent Who has a Child With Vision Loss:
This is not a suggestion. This is a plea – born from nearly 40 years of professional experience in the field of blindness, visual impairment and access technology, and from the realities of a competitive world that will not slow down and will not make exceptions – that you act now, while there is still time to give your child or student every possible advantage.
Children who are blind or have low vision are just as intelligent, capable, and ambitious as any sighted child. What they deserve – what they are owed – is the proper set of tools to demonstrate that capability at full speed. Right now, in too many classrooms and homes across this country, those tools are absent, delayed, or introduced far too late. That must change.
The Foundation: A Windows PC — The World’s Standard Platform
Windows-based PCs represent approximately 72% of all personal computers in use worldwide. This is not a preference – it is the dominant reality of the workplace, the university, the government agency, and the business world your child will enter. Teaching a blind or low vision child on any other primary platform is preparing them for a world that does not exist at scale.
Windows is also open and extensible. Unlike closed ecosystems, a Windows PC can be configured, customized, and expanded with virtually any assistive technology available – screen readers, braille drivers, magnification software, speech input – without restriction. It is the most future-proof environment for a child whose assistive needs may evolve over time. One critical requirement, however: the person who teaches your child must be actively using all components of the system themselves every single day, navigating exclusively by screen reader and braille display. You cannot teach what you do not live.
Every blind or low vision child should be learning on a Windows PC. Period. At the earliest age possible.
The Tools That Open the World: Screen Readers
A screen reader converts on-screen text and navigation into speech or braille output, allowing a blind user to operate a computer fully and independently. There are three primary options, each with a distinct role – and a serious student needs fluency in all three.
JAWS (Job Access With Speech)
JAWS is the gold standard in professional and educational environments. It offers the deepest compatibility with Microsoft Office, enterprise software, and web-based platforms. For any student planning to enter the professional workforce, JAWS fluency is a career asset. It is the screen reader most commonly encountered in workplaces that have made accessibility accommodations.
NVDA (NonVisual Desktop Access)
NVDA is free, open-source, and exceptionally powerful. It is fully supported, actively developed, and used by millions of blind individuals worldwide. For families and schools with budget constraints, NVDA removes every financial barrier to professional-grade access. Students who master NVDA are fluent in a tool used in homes, libraries, and workplaces globally.
Microsoft Narrator
Narrator is built directly into Windows and requires no installation. While not as feature-rich as JAWS or NVDA for complex tasks, it is a valuable tool for early introduction, emergency access, and environments where installing additional software is not immediately possible. Every Windows user – blind or not – has access to Narrator the moment they power on their device and complete setup.
iPhone with Siri and VoiceOver
No conversation about screen readers is complete without addressing the iPhone. Apple’s VoiceOver, built directly into every iPhone, is one of the most powerful tools available to combine the perfect team of PC with iPhone. It is the device you carry with you every hour of every day. Siri adds hands-free voice control outside class but inside class ability to send a quick SOS to their tech instructor for help keeps them moving. One command on the braille display connected to the computer goes right to the iPhone in their pocket, enables the student to send and SOS tech issue so a remote tech instructor can jump on to solve their issue so they can keep moving in class ASAP.
In the real world, blind professionals use a Windows PC at their desk and an iPhone in their pocket. Teaching both, from early on, prepares a student for exactly that reality.
Braille Displays: The Essential Partner to the Screen Reader
A refreshable braille display connects to a PC and presents on-screen text as braille cells that the user reads with their fingertips to teach spelling, paragraph layout and everything the sighted student does with print. This is not optional equipment for a serious student – it is essential. Reading braille is to literacy what reading print is to a sighted child. Without it, a blind student depends entirely on audio output, which is slower for review, comprehension, proofreading, and deep reading tasks. Beyond speed, a braille display teaches spelling, formatting, punctuation, and document structure in ways that audio alone simply cannot.
Recommended Displays
Focus 40 Blue (Freedom Scientific) — The preferred professional-grade display. Forty braille cells, excellent build quality, seamless integration with JAWS, and trusted in educational and workplace settings worldwide. The 40-cell width allows students to read longer passages without constant panning, dramatically improving reading speed and comprehension.
Brailliant BI 40X (HumanWare) — An outstanding alternative with strong multi-device connectivity and a comfortable key layout. Compatible with all major screen readers and well-suited for students who work across multiple devices throughout the school day.
A 40-cell display – not a smaller 14- or 20-cell model – is strongly recommended for students. The larger cell count significantly reduces the scrolling required and more closely mirrors the experience of reading a full line of text, building the natural reading rhythm that leads to true fluency. For students pursuing STEM fields, an 80-cell display is worth the investment.
The Hard Truth That No One Wants to Say Out Loud
A blind or low vision child, without proper tools, cannot complete academic work at the same speed as a sighted child with 20/20 vision. This is not a failure of the child. It is biology and failure of an educational system. It is the reality of navigating a world designed for sighted people without the technology that closes that gap.
Schools often respond to this reality by granting extended time – double time, time and a half, reduced assignments – on work and exams. And while this accommodation is legally appropriate, it comes with a hidden cost that is rarely spoken aloud: less work assigned means less information learned, and reduced exposure to content creates knowledge gaps that compound over time. The job that child will one day compete for will not reduce its requirements to match. We must look further down the road with clear Vision:
Extended time does not exist in a job interview.
Extended time does not exist when competing against other applicants for a position.
Extended time does not exist when a deadline arrives, a client is waiting, or a team needs output.
You learn less in school — and the job will demand more.
Close the Gap Before It Closes Their Future
Life is competitive. It has always been competitive. The kindest, most loving thing we can do for a child who is blind or has low vision is to prepare them to compete – not just to participate, but to compete effectively, efficiently, and with confidence, from kindergarten through career.
The only way to close the speed gap is technology mastered early with braille. A student who has used a screen reader and braille display fluently since early elementary school does not look like a student with a disability when they move through school or enter the workforce. They look like someone who is fast, precise, and capable, because they are.
Additional Reasons This Cannot Wait
1. Independence Is Dignity
A child who relies on a sighted person to read their screen or paper work, describe their assignments, write down their answers, or help navigate their computer is not independent – and they know it. That awareness is not abstract. It settles into them quietly and deeply: the knowledge that someone else is doing for them what they cannot yet do for themselves. It becomes embarrassment. Then frustration. Then, for far too many children, it becomes depression.
This is one of the most significant and least discussed emotional consequences of inadequate assistive technology instruction. These children are not failing because they lack intelligence or effort. They are failing because they have not been given their tools and they are old enough to understand the difference. Worse they watch their classmates work independently. They watch themselves need help. And over time, that gap between what they can do and what they are expected to do without support begins to define how they see themselves.
Independence Is the Antidote
Technology taught by a highly skilled instructor who uses these access tools daily eliminates this dependency. A child who can navigate their own screen, read their own assignments, and submit their own work has done something that no grade or test score can fully capture: they have proven to themselves and others that they can do it. That proof is the foundation of self-worth, confidence, and the unshakeable belief that one can manage one’s own life on one’s own terms.
Independence is not merely practical. It is the antidote to the depression that follows when a child has been taught, unintentionally, that they cannot.
2. Early Learning Equals Deep Fluency
A child who learns a screen reader at age four or five develops the same automatic, effortless relationship with that tool that a sighted child develops with reading text on a page and writing with a pencil. A teenager introduced to a screen reader for the first time is fighting an uphill cognitive battle, learning the tool at the same time they are trying to use it to complete schoolwork. Early adoption eliminates this double burden entirely.
3. Academic Access Across All Subjects
A properly configured PC with a screen reader opens every subject: reading, writing, math (with accessible tools like MathML and Nemeth braille, UEB Braille), science, coding, history, art research, everything. Without it, a blind student’s access to the full curriculum depends entirely on the availability of a human aide or specially prepared materials. Technology removes that bottleneck and gives the student direct, independent access to the same content as every other child in the room.
4. The Job Market Rewards Technology Fluency
Employers, by and large, do not know what screen readers are. They will not know to provide accommodations they have never heard of and in that gap of understanding, a qualified candidate can lose a job simply because the employer cannot picture how the work would get done.
A candidate who arrives already proficient changes that entire dynamic. They sit down at a Windows PC, they are productive immediately, and at the right moment they say with confidence: “I want you to know, I am blind, and this is exactly how I do this job.” Then they show it. With speed and efficiency. With no hesitation. That demonstration does more to overcome an employer’s uncertainty than any disclosure form or accommodation request ever could.
This person competes. The person who has never been properly trained walks into that same room hoping for understanding they may not receive. The difference between those two outcomes is not intelligence. It is preparation.
5. Post-Secondary Education Expectations
Colleges and universities have disability services offices, but those offices cannot replace skill. A student who arrives at university without strong assistive technology fluency will spend precious early semesters struggling to catch up on tools rather than engaging with coursework or they will not catch up at all, and fail. Too often, the alternative is that a parent steps in to do the work for them, which is exactly what regularly occurs when students arrive unprepared. Students who arrive already expert in their technology can advocate for themselves effectively, focus entirely on their education, and move forward alongside their peers.
6. Mental Health and Self-Efficacy
The psychological toll of constantly needing help of always being the student who requires special arrangements, who cannot do what everyone else is doing is real and cumulative. Technology-empowered students report significantly higher confidence, academic engagement, and willingness to attempt challenging tasks. Giving a blind or low vision child their tools is giving them their identity as a capable person.
On the Question of Learning Braille: Who, When, and Why
Braille literacy is one of the strongest predictors of academic success and employment for blind individuals. The research on this is not subtle, it is decisive. But the question of who should learn braille is not always straightforward, and it must be considered carefully in the context of each child’s specific diagnosis.
Children Who Are Fully Blind
There is no question. Braille instruction should begin immediately, ideally by age three, and no later than the beginning of formal schooling. Braille is their print. Delaying braille for a blind child is the equivalent of delaying reading instruction for a sighted child. Every year of delay compounds into a literacy deficit that becomes harder to close.
Children With Low Vision
This requires careful evaluation in partnership with the child’s ophthalmologist and prognosis. Three key questions must guide the decision:
Is the condition stable or progressive? If progressive, the answer is clear: begin braille instruction immediately, regardless of how much vision the child currently has.
Can the child read print efficiently at a rate and comfort level that matches a child with 20/20 vision? If not, print alone is not sufficient and braille must be part of the plan.
Is the child’s functional vision expected to remain sufficient throughout their lifetime? If there is any reasonable doubt, begin braille now. It is far easier to have a skill and not need it than to need a skill and not have it.
When Braille Starts Late
What if the child is older and braille instruction is only beginning now? Research is unambiguous on this point: students who begin braille instruction after 6th grade rarely achieve functional reading fluency. The tactile sensitivity, finger dexterity, and automatic cell recognition that true braille literacy requires develop in early childhood. That window is largely closed by the time a child enters middle school, and full literary braille instruction after that point becomes, in most cases, an exercise in frustration for both the student and the instructor.
For the older student who is past that window, the goal must shift to functional braille, what they will actually use in daily life: device navigation, labels, signage, reference points, and targeted reading tasks. Trying to force full literary braille on a resistant older student creates a battle you will not win. You will spend more time fighting than teaching. Focus on usefulness. Motivation follows. And in every case, a PC with a screen reader and braille display becomes the central key to that student’s success going forward.
If the Condition Is Progressive: Braille Is Not Optional
If a child has a progressive eye condition – retinitis pigmentosa, Stargardt disease, glaucoma, or any diagnosis with a trajectory toward increasing vision loss – braille instruction must begin immediately, regardless of how much usable vision the child currently has. Here is why:
Braille is most easily and deeply learned when taught young, when the brain’s neuroplasticity is at its peak, just as with learning any other language. The earlier the exposure, the deeper the fluency.
A child who waits until their vision has deteriorated significantly is learning braille at the same time they are grieving a loss: an emotionally devastating combination that slows learning or stops it entirely.
A teenager or adult who must learn braille after vision loss faces a steep, stressful acquisition curve that can take years to develop into functional fluency.
A child who learns braille at age three or four and uses it throughout their education will be functionally fluent by the time their vision deteriorates, ready, not scrambling.
Teaching braille to a child who still has usable vision is not pessimism. It is planning. It is love with foresight.
The Crisis That Arrives in Middle School
Every summer, TechVision receives calls about blind and low-vision students who are beginning to fall behind significantly. In most cases, blind children have no technology at all, and low-vision students lack both technology and braille instruction. By middle school, the academic demands increase sharply, the volume of reading and writing grows, and students are expected to manage far more digital work on their own, and they cannot.
For students with progressive low-vision diagnoses, middle school is often the point where remaining vision no longer allows them to complete work efficiently, even with low-vision tools. At that point, they are not only trying to keep up academically. They are also trying to learn braille, screen-reader skills, braille-display use, keyboarding, file management, accessible math, and online platform navigation, all at the same time. The academic and the remedial collide, and the student is caught in the middle.
That is why early instruction matters. Waiting until a student begins failing creates an avoidable crisis. Teaching braille and technology before the crisis gives the student time to build fluency, confidence, and independence.
The Timeline: What the Research and Experience Tell Us
Age 3: The ideal starting point. Children at this age learn through play and exploration and absorb braille as naturally as sighted children absorb picture books and letters (include a cane here also). Tactile literacy can begin before formal reading instruction in other areas. Introduce them to a PC with a screen reader and braille display through play. By age four, begin teaching touch typing. Done consistently, a child is ready to begin kindergarten already equipped.
Kindergarten through 2nd grade: Still an excellent window. With intensive, consistent instruction, a child can achieve strong foundational literacy by early elementary school.
3rd through 5th grade: Still achievable but increasingly challenging. By this stage, the child is already behind in braille literacy relative to academic demands. Intensive TVI/Tech support is essential and must begin immediately. Think summer time instruction-always.
Middle school and beyond: Braille can and should still be taught, but the window for achieving deep, automatic fluency is narrowing. Every year of delay past 5th grade represents a harder road. Shift the focus to functional braille and technology mastery.
When a school district first receives a blind or low vision student at any age: Instruction in assistive technology and braille (where indicated) must begin on day one: not after evaluation periods, not after IEP meetings have stretched across months or years. The clock is running from the moment that child walks through the door. Day one.
What We Are Asking You to Do
For School Districts:
Ensure every blind or low vision student has immediate access to a Windows PC configured with both NVDA and JAWS, connected to a 40-cell refreshable braille display and paired with a highly skilled instructor who uses these tools daily.
Hire TVIs and assistive technology instructors who are genuine daily users of the technology they teach. A degree or certification alone does not qualify someone to teach JAWS, NVDA, or a braille display. Technology fluency is not academic knowledge, it is muscle memory. It is the ability to troubleshoot in real time, demonstrate at speed, and anticipate where a student will struggle because you have been there yourself. A Teacher of the Blind and Visually Impaired (TVI) who does not use this technology every single day cannot teach it well, regardless of what their diploma says.
Coordinate braille and technology instruction as one integrated program, not two separate tracks. When these skills are taught together on the same device, they reinforce each other and the student learns faster. If a TVI is a strong braille teacher but does not have deep technology expertise, the right answer is to pair them with a qualified assistive technology instructor who does. Integration from one highly skilled person is the ideal; a strong partnership between specialists is the practical alternative. One person doing both poorly serves no one.
Begin NOW
Begin braille instruction for eligible students immediately upon enrollment, not pending further evaluation, not after the next IEP meeting, not once the “right” TVI is located. Interim solutions are acceptable. Delay is not.
Embed assistive technology instruction into the student’s daily academic life as the primary mode of access, not as a pull-out supplement. Remote instruction is a powerful and underutilized tool: a qualified technology instructor can be present in the classroom via headset and screen share, guiding the student in real time without disrupting the class, while the student remains fully included with their peers. When pulling a student out is unavoidable, choose the one hour of the school day that causes the least disruption to their social and academic integration. These students are already navigating more than their sighted peers. Do not add social isolation to that burden.
Measure student progress in assistive technology fluency with the same rigor applied to reading, math, and every other subject. The student completes all work on the PC. They email completed assignments to the teacher. The teacher places feedback directly in the document using Word comments and emails it back. This is not a workaround, this is the workflow. It is clean, professional, and mirrors exactly how the working world operates. It holds the student to the same standard of output and accountability as every other person in the room.
For Parents:
Do not wait for the school to take the lead. Advocate immediately and loudly for your child’s right to assistive technology and braille instruction.
If your child has a progressive eye condition, contact a TVI and assistive technology specialist today about beginning braille instruction, regardless of your child’s current functional vision level.
Set up a Windows PC at home with NVDA (free to download) and have your child use it for reading, homework, and exploration every single day.
Connect with the National Federation of the Blind, the American Foundation for the Blind, and your state’s Blind and Low Vision Services for resources, advocacy support, and community.
Believe, fiercely and without apology, that your child can compete. Then make sure they have the tools to prove it.
The Future Is Waiting. Start Today.
The child who is three years old today and begins braille and assistive technology instruction this year will walk into their first job interview at age twenty-two as a fully equipped, confident, and capable professional. The child who waits may walk in hoping for accommodations they may not receive, competing at a speed they were never trained to reach.
The tools exist. The research is clear. The need is urgent. All that is required is the will to act: now, not later, not after one more evaluation, not after the next IEP cycle. Now.
Every blind and low vision child deserves to compete. Give them the tools to do it.
Empowering Blind and Visually Impaired Students Globally
Under the leadership of Dr. Denise M. Robinson, the TechVision Team equips blind and visually impaired students—and the educators who serve them—with the technology skills needed to thrive in school, work, and life. Our team integrates computers, screen readers, braille displays, mobile devices, and AI into daily instruction, ensuring equal access to academics and independence.
Access Training to laptop and braille display with Screen reader
Personalized Instruction
Every learner is unique. TechVision provides customized, 1:1 instruction for students, clients, and educators. We teach the exact tech skills needed to access information, complete tasks efficiently, and compete equally with sighted peers—whether mastering keyboard commands, transcribing work, or navigating digital platforms.
Equal Access in Action
Equal access is foundational to our mission at TechVision. We believe every learner, regardless of visual impairment, deserves the ability to participate fully in school, work, and life. Our video lessons and real‑world demonstrations show exactly how students use technology to complete their work independently. These resources equip both students and educators with the practical skills needed to thrive in any environment and ensure that equal access is not just a goal, but a daily reality.
Global Reach and Collaboration
TechVision serves learners worldwide through remote instruction and digital resources. We collaborate with families, school districts, businesses, private organizations, and vocational programs to expand educational and employment opportunities.
TechVision also provides high‑quality transcription in electronic format for immediate access, ensuring students receive the materials they need without delay. We train school personnel when possible, and when districts are unable to take on this work, our team continues providing all transcription to maintain accuracy, consistency, and equal access for every learner.
Technology & AI for Independence
We teach students and clients to confidently use:
screen readers
braille displays
mobile devices
AI‑powered learning tools
voice and image recognition
accessible navigation and productivity apps
and so much more
These tools build independence, problem‑solving skills, and real‑world readiness. AI enhances learning by adapting to individual needs, converting print to accessible formats, supporting navigation, and assisting with daily tasks.
Early Instruction & Long‑Term Success
Starting early with proper academics—ideally at age 3—keeps students on pace with their sighted peers. TechVision teaches braille, technology, and digital output from the beginning, enabling students to complete and submit work just like everyone else. As students grow, they learn to make inaccessible tasks accessible, upload assignments, and use advanced tools for math, science, and daily life. These skills open doors to employment, independence, and lifelong success.
Community Engagement & Ongoing Support
We work closely with parents, teachers, schools and communities to build strong support systems. Our personalized training empowers everyone involved and creates a community of confident learners and educators. Together, we remove barriers and expand possibilities for every student.
Our Commitment
TechVision is transforming access education. Through innovative technology, tailored instruction, and a deep commitment to equal access, we ensure every learner’s journey is marked by growth, independence, and success. We remain dedicated to providing top‑quality education to visually impaired learners and educators worldwide.