Search results for: “math”

  • Accessible Work at School: What Blind Students Need — by Eme

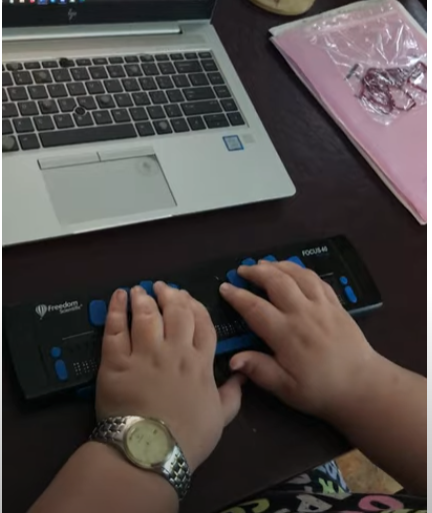
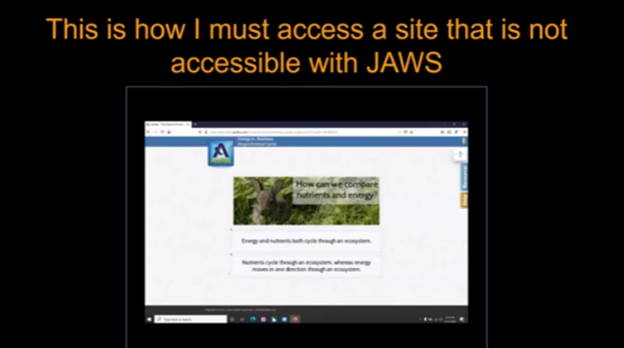
    Emery, a blind ninth-grader at Kalaheo, introduces herself and shares her love for math and technology. She uses a computer with a screen reader and Braille display to access her education. Eme navigates her world with a cane and texts friends using her phone. During the pandemic, her computer became essential for schoolwork. She explains how she uses various tools to access her education, including JAWS screen reader and Braille Display and other access technology. Eme highlights the importance of accessible assignments and demonstrates navigating an online platform despite its challenges. Accessible work at school is critical for her success.

    Emery uses tools like the JAWS screen reader and Braille display connected to her computer to navigate her studies. She emphasizes that accessible assignments are crucial because they allow her to engage with the same content as her peers. When assignments are not accessible, it creates significant barriers to her learning. It is evident that accessible work at school can make a big difference.

    Eme Making Work accessible on an inaccessible site
    Eme Making Work accessible on an inaccessible site

    By ensuring Teachers’ work is accessible, you empower students like Emery to succeed and participate fully in their education. Accessible materials foster a learning environment where all students can be included and thrive. Therefore, focusing on making work accessible at school helps all students.

    She thanks teachers for their commitment to making education accessible for everyone. Providing accessible work at school shows dedication to inclusion and highlights the importance of accessibility.

    Making Work Accessible:

    Complete Advanced Math with LaTex to finish math fast using Mathkicker.AI, JAWS, NVDA and/or display

    Math & AI =Mathkicker.ai convert PDF math or any work into WORD docx.

    Perfect Digital Math at all levels using only audio or tactile Braille or both in Mathkicker.ai

    Math & AI is MathKicker.ai — convert to .docx from clipboard- make inaccessible accessible

    Mathkicker.ai-take an image of math and make it perfect Math in Word Math editor with screen reader

    Mathkicker.AI -change Math PDF to text in WORD Math editor in less than a minute with screen reader

  • Miss Aubrey Learns to Work on a Braille Display and Computer

    Years ago, Aubrey was just learning how to learn remotely. Dr Robinson lived close by so was able to come over in person to help her with skills and hand under hand and hand over hand as needed to learn position of fingers. A major part of her lessons is to learn to do work on braille display and computer with keyboard shortcuts. This video is her just learning how to do math in WORD.

    To answer a Zoom call using keyboard shortcuts when on a braille display and computer, you can use the following:

    These shortcuts help you manage calls efficiently without needing to use a mouse. A braille display and computer can make these tasks smoother.

    Here are some additional keyboard shortcuts that Aubrey learned to enhance her navigation and accessibility experience:

    General Web Navigation on braille display and computer

    • Ctrl + L or Alt + D: Focus on the address bar.
    • Ctrl + T: Open a new tab when using a braille display and/or computer.
    • Ctrl + W: Close the current tab.
    • Ctrl + Shift + T: Reopen the last closed tab.
    • Ctrl + Tab: Switch to the next tab.
    • Ctrl + Shift + Tab: Switch to the previous tab.
    • Ctrl + R or F5: Refresh the current page.
    • Ctrl + F: Open the find bar to search within the page on your braille display and computer setup.

    Screen Reader Specific

    • Insert + F7: Open the links list in JAWS.
    • Insert + F6: Open the headings list in JAWS.
    • Insert + Down Arrow: Start reading continuously from the current position in JAWS.
    • Ctrl + Alt + Arrow Keys: Navigate by character, word, or line in NVDA for better synchronization with your braille display and computer.
    Aubrey using braille display and computer to learn how to complete math in WORD
    Aubrey using braille display and computer, to learn how to complete math in WORD

    Windows Accessibility commands for display and computer

    • Windows Key + U: Open the Ease of Access Center.
    • Windows Key + Plus (+): Turn on Magnifier and zoom in.
    • Windows Key + Minus (-): Zoom out with Magnifier.
    • Windows Key + Ctrl + N: Open Narrator settings.
    • Windows Key + Ctrl + O: Turn on the On-Screen Keyboard.

    Text Editing

    • Ctrl + C: Copy selected text.
    • Ctrl + X: Cut selected text.
    • Ctrl + V: Paste copied or cut text.
    • Ctrl + Z: Undo the last action.
    • Ctrl + Y: Redo the last undone action.

    These shortcuts can help you navigate more efficiently and make your web browsing and computer use more accessible. If you need more specific shortcuts or have other questions, feel free to ask!

  • Starfall Learning Games for Kids and the Accessible Option

    Starfall.com is a wonderful website for kids. It provides free and subscription-based learning games and resources for young children. It focuses on early literacy, math, and foundational skills. Initially created to teach reading through phonics, Starfall has since expanded to include interactive content in math, social studies, and more. Go to: https://www.starfall.com/h/accessibility.php which is on the first page so your child can access the site also.

    Key Features of Starfall.com Website for kids:

    1. Phonics and Reading: The website offers various phonics-based reading games and activities, helping children build vocabulary and comprehension skills.
    2. Math: Starfall includes interactive games and exercises that teach basic math concepts such as counting, addition, subtraction, and geometry.
    3. Language Arts: Activities to help kids understand grammar, sentence building, and other language concepts.
    4. Science and Social Studies: Limited resources are available for early science and social studies learning.
    starfall.com website for kids
    Starfall.com website for kids

    Accessibility and Screen Reader Compatibility for young children:

    While Starfall.com website for kids aim to be accessible (most of it is) BUT, you must use: https://www.starfall.com/h/accessibility.php for accessible play for interactive games and animations, which are a major component of Starfall’s appeal.

    1. VoiceOver (iOS): Some parts of Starfall are accessible when using VoiceOver on iOS devices. However, many interactive elements may not be read or described in full by the screen reader, making navigation difficult.
    2. JAWS and NVDA (Windows): Starfall’s web-based activities have mixed results with JAWS and NVDA. Some of the educational content is accessible, but much of the visual and interactive games may not be fully usable. The site does not appear to have been fully optimized for these tools.
    3. Keyboard Navigation: For users who rely on keyboard navigation, Starfall might be challenging since many games require dragging and dropping or clicking on specific items that are visually represented.
    4. Text Descriptions and Audio Narration: Starfall includes a lot of audio instructions and narrated text, which can be helpful for users with low vision or reading difficulties, but this is often tied to specific animations or games that may not be fully accessible to blind children.

    More Video Lessons Here

  • Rebuild the Microsoft Word Template When It Is Not Working Well

    You want to Rebuild Microsoft Word Template when you close WORD and it starts to ask: There are changes to the Normal Template, “Do you want to save the normal template?” You always want to say “NO” because if you do not it will start opening with the last work you did in it. If you want WORD to STOP asking that question or fix your goof, here is how to rebuild that Normal Template

    Commands to rebuild Word template when it gets messed up and constantly asks if you want to save it. Other Lessons to fix Tech

    Rebuild Microsoft Word Template with RUN
    Rebuild Microsoft Word Template with RUN
    1. Open the Run Dialog Box:
      • Press Windows + R.
      • Type %appdata%\Microsoft\Templates and press Enter.
    2. Delete the Normal Template:
      • In the opened folder, find normal.dotm (or the equivalent for your Office version).
      • Select it and press Delete.
    3. Reopen Word:
      • This action will rebuild the normal template automatically.
    4. Reconfigure Your Settings:
      • Fonts:
        • Press Ctrl + D to open the Font dialog box.
        • Set your desired font (e.g., Times New Roman, 12 pt).
        • Press Alt + D to set as default for all documents.
      • Paragraph Spacing:
        • Press Alt + O, then P to open the Paragraph dialog box.
        • Adjust spacing settings (e.g., single spacing).
        • Press Alt + D to set as default for all documents.

    This process ensures your Word template is reset and configured to your preferences. Here are some more fixes you can do

    Other WORD Lessons

    Optimizing Windows 11 Efficiency for Screen Reader with Key Settings and Configurations

    WORD Efficient Text Navigation and Selection

    Basic WORD JAWS commands with Typing Trick

    Rebuild Microsoft Word Template when it is not working well

    Microsoft Word MLA format with Christopher Duffley

    WORD accessible food chain for class using talking software

    Commands to change mouse -access programs fast, basics in Word font & movement

    Excel line plot graph-copy to Word for Math

    Complete an excel graph and copy into Word document with screen reader

    Essential WORD keyboard commands for setting defaults

    Track changes in Word-How teachers make corrections in work

    Track Changes with Commands-inserting comments and editing work

    Let us know how we can help you: Contact US: TechVisionTraining@yourtechvision.com

  • Navigate Schoology with Jaws via Kim

    To Navigate Schoology with Jaws is easy using these useful keyboard commands for navigation. When you’re using a screen reader like JAWS or NVDA it is very accessible. Kim demonstrates her skills, showing how to navigate schoology with efficiency. She shares with others how this training has allowed her to access her education.

    Schoology Navigation Skills Video-General Commands to help navigate Schoology

    1. Navigate to Courses:
      • Press Insert + F7 to bring up the links list.
      • Use the arrow keys to navigate to the desired course and press Enter.
    2. Access Course Materials:
      • Press H to navigate through headings until you reach the course materials section.
      • Use the arrow keys to select the material you want to access.
    3. Navigate to Assignments:
      • Press Insert + F6 to bring up the headings list.
      • Use the arrow keys to find and select the “Assignments” heading.
    4. Access Notifications:
      • Press Insert + F5 to bring up the form fields list.
      • Navigate to the notifications section and press Enter.
    5. Navigate to Discussions:
      • Press H to move through headings until you reach the “Discussions” section.
      • Use the arrow keys to select and enter a discussion.
    6. General Navigation:
      • Use Tab and Shift + Tab to move forward and backward through interactive elements.
      • Press G to navigate to graphics and L to navigate to lists.
    7. One Trick to remember is when a PDF viewer of work opens, the download in WORD link is at the very bottom. Use your links list or ctrl end and up arrow to find it.

    More Schoology Lessons to help Navigate Schoology with Jaws

    Navigate schoology with JAWS
    Navigate schoology with JAWS

    Let us know how we can help you: Contact US: TechVisionTraining@yourtechvision.com

  • MLA and APA Format Paper Writing — Tech Tip

    Formatting an APA format paper writing style using keyboard commands is an efficient way to create a properly structured document without relying on a mouse. By using shortcuts within programs like Microsoft Word, you can quickly adjust key elements such as margins, fonts, line spacing, and indentation. This guide outlines the essential steps, including setting up the title page, organizing headings, and formatting the references page. By mastering these keyboard commands, you can streamline the process of formatting your APA paper and ensure it meets academic standards.

    To format an APA paper using keyboard commands, you can use several standard shortcuts within word processors like Microsoft Word. Follow these tips to make APA format paper writing easier:

    1. Setup the Document in APA format paper writing style

    • Margins: The default margins in Word are typically 1 inch, but you can check by pressing Alt + P, then M, and selecting “Normal”.
    • Font and Size: Use Ctrl + D to open the Font dialog box. Set the font to Times New Roman and the size to 12. Both settings are essential in APA format paper writing.
    • Line Spacing: To set double spacing, press Ctrl + 2.
    • Indentation: For the first line of each paragraph, press Ctrl + T to create a hanging indent. To undo this and create a regular first-line indent, press Ctrl + Shift + T and then Tab to indent the first line.
    APA format of paper
    APA format of paper

    2. Title Page

    • Running Head: Press Alt + N to go to the “Insert” tab, then H for “Header”, and Ctrl + R to right-align the text. Type “Running head: YOUR TITLE” (in caps) on the first page. On other pages, just type the title without “Running head”.
    • Title: Press Ctrl + E to center the title. Capitalize each major word in the title.
    • Author and Institution: Press Ctrl + E again to center your name and institution. Press Enter between lines. Proper formatting of this section is crucial for APA format paper writing.

    3. Main Body

    • Heading Levels:
      • Level 1: Centered, bold. Use Ctrl + E to center and Ctrl + B to bold.
      • Level 2: Left-aligned, bold. Use Ctrl + L to left-align and Ctrl + B to bold.
      • Level 3: Left-aligned, bold, and italicized. Use Ctrl + L, Ctrl + B, and Ctrl + I.
      • Level 4: Indented, bold, ending with a period. Use Ctrl + T for hanging indent, Ctrl + B, and type your text.
      • Level 5: Indented, italicized, ending with a period. Use Ctrl + T, Ctrl + I, and type your text.

    4. References Page

    • Hanging Indent: Select the references text and press Ctrl + T to apply a hanging indent, following APA format paper conventions.
    • Title: Center the title “References” using Ctrl + E.

    5. Page Numbers

    • Insert page numbers by pressing Alt + N, then N, and selecting “Page Number”. Place the number in the top right by pressing Ctrl + R.

    This approach covers the essential formatting elements for an APA paper using keyboard shortcuts. Let me know if you need specific details on any step for better APA format paper writing! Find MLA Word Format here.

    Other Tech Tip Lessons

    How to Properly Format a Paper

    Teach how to set up computer

    Google dictation

    Apply latest update

    APA-MLA tech tip

    Select Noncontiguous folders

    Braille Display to do work in WORD

    Math for all ages

    Let us know how we can help you: Contact US: TechVisionTraining@yourtechvision.com

  • Connect Focus 40 braille display to Jaws

    Connecting a Focus Braille Display to a computer using JAWS screen reader enhances accessibility for blind and visually impaired users. The process of connecting a Connect Focus 40 Braille display allows users to interact with digital content through tactile feedback, improving independence and productivity. By following a few simple steps, you can seamlessly connect the Braille display via USB or Bluetooth and configure it in JAWS for optimal use. This guide provides an easy-to-follow approach for setting up your Focus Braille Display and ensuring smooth integration with JAWS.

    Here are the steps to connect a Focus Braille Display to your computer using JAWS screen reader:

    Connect Focus 40 Braille Display or other displays

    1. Power on the Focus Braille Display

    Ensure the Focus Braille Display is fully charged and powered on before connecting.

    1. Connect the Display to the Computer

    Use either USB or Bluetooth to connect the Focus Braille Display to your computer.

    For USB: Plug the USB cable into both the Braille display and the computer.

    For Bluetooth: Enable your computer’s Bluetooth and pair the Focus display in the Bluetooth settings.

    1. Enable Braille in JAWS

    Open JAWS by pressing Insert + J. Then, press Alt + O to open the Options menu.

    Press B to select Braille or use the arrow keys to navigate, then press Enter.

    1. Select the Braille Display

    In the Braille settings window, ensure the “Focus” display is selected under the Default Braille Display dropdown.

    If it’s not selected, use the arrow keys to choose “Focus” or manually type the model of the Braille display.

    1. Check Braille Display Connection

    After selecting the correct display, click OK or press Enter to confirm the connection.

    JAWS should now detect the Focus Braille Display. Braille output should appear, and the display keys will control JAWS.

    1. Configure Settings (Optional)

    To further customize settings like verbosity and Braille output, go to Braille options via Insert + J, Alt + O, and B.

    1. Test the Connection

    Use JAWS commands on your keyboard or the Focus Braille Display keys to navigate.

    If the connection works, the Braille display will respond to the text output from the computer.

    By following these steps, you should successfully connect your Focus Braille Display to a computer using JAWS.

    Braille Display and Other Lessons

    Quadratic Formulas with UEB Math or Nemeth and/or display with JAWS audio & MathCat

    Complete Advanced Math with LaTex to finish math fast using Mathkicker.AI, JAWS, NVDA and/or display

    Transcribe Math into Word documents for blind students using Math editor, Jaws and a Braille Display

    Track Changes with Commands-inserting comments and editing work

    Essential WORD keyboard commands for setting defaults

    Excel line plot graph-copy to Word for Math

    Complete an excel graph and copy into Word document with screen reader

    Basic WORD JAWS commands with Typing Trick

    Rebuild Microsoft Word Template when it is not working well

    Other Focus Display lessons

  • Excel for Geometry: Create Shapes and Label Graphs with JAWS

    Using Excel for geometry tasks, such as inserting shapes and labeling graphs, can be highly effective, especially for visually impaired students. By leveraging keyboard commands, students can efficiently navigate through Excel’s features. For instance, pressing Alt + N opens the Insert tab, and SH brings up the Shapes menu, allowing users to select and draw shapes. To label a graph, students can use Alt + JC to access the Chart Tools Design tab, followed by A to add chart elements like data labels and titles. These steps not only enhance the learning experience but also demonstrate the power of assistive technology in making complex tasks accessible and manageable

    Start at the top of A1 and start adding data in both A and B. Make sure you add a space between you 2 Geometric shapes so they can mirror each other or whatever the assignment requires.

    Here are other options for Geometry shapes

    Here’s how you can insert shapes and label a graph in Excel using keyboard commands:

    Geometry: create Shapes and label graphs
    Geometry: create Shapes and label graphs

    Excel for Geometry: Create Shapes and Label Graph

    Inserting Shapes

    1. Open Excel and navigate to the worksheet where you want to insert shapes.
    2. Press Alt to activate the ribbon shortcuts.
    3. Press N to go to the Insert tab.
    4. Press SH to open the Shapes menu.
    5. Use the arrow keys to select the shape you want, then press Enter.
    6. Click and drag (or use arrow keys) to draw the shape on your worksheet.

    Labeling a Graph

    1. Select your chart by pressing Ctrl + Arrow keys to navigate to it.
    2. Press Alt to activate the ribbon shortcuts.
    3. Press JC to go to the Chart Tools Design tab.
    4. Press A to open the Add Chart Element menu.
    5. Press D to select Data Labels, then choose the desired position using the arrow keys and press Enter.

    Adding a Chart Title to Excel for Geometry

    1. Select your chart.
    2. Press Alt to activate the ribbon shortcuts.
    3. Press JC to go to the Chart Tools Design tab.
    4. Press A to open the Add Chart Element menu.
    5. Press T to add a chart title, then type your title and press Enter.

    These steps should help you efficiently create Shapes and label graphs in Excel using keyboard commands. If you need more detailed instructions or have any specific questions, feel free to ask!

    Other Excel Lessons

    Another Student Mastering Excel with PPT integration

    Create a Histogram

    Scatter plot with trendline

    Excel line plot graph-copy to Word for Math

    Complete an excel graph and copy into Word document with screen reader

    If your fingers need to see multiple lines on your display, then this lesson will help

  • Desmos Graphing Calculator: Creating and Exporting Graphs

    The Desmos Graphing Calculator using keyboard commands is a powerful and accessible tool for visualizing mathematical concepts and solving complex equations. With a range of keyboard commands, users can efficiently navigate the interface, manipulate graphs, and explore functions without relying on a mouse. Whether you’re zooming in on a graph, adjusting sliders, or using audio trace mode, these commands enhance the user experience, making it easier for everyone, including those with visual impairments, to engage with mathematics. This introduction will guide you through the essential keyboard shortcuts to maximize your productivity and understanding while using the Desmos Graphing Calculator.

    The Desmos Graphing Calculator is a powerful and accessible tool for visualizing mathematical concepts and solving complex equations. With a range of keyboard commands, users can efficiently navigate the interface, manipulate graphs, and explore functions without relying on a mouse. Whether you’re zooming in on a graph, adjusting sliders, or using audio trace mode, these commands enhance the user experience, making it easier for everyone, including those with visual impairments, to engage with mathematics.

    Essential Desmos Graphing Calculator

    General Navigation

    • Open Graphing Calculator: Alt + G
    • Focus on Expression List: Ctrl + E
    • Add New Expression: Enter

    Graph Manipulation

    • Zoom In: Ctrl + +
    • Zoom Out: Ctrl + -
    • Reset Zoom: Ctrl + 0

    Audio Trace Mode

    • Enable/Disable Audio Trace Mode: Alt + T
    • Summarize Selected Curve: Alt + S
    • Describe Graph Axes: Alt + G
    • Move to Next Point: Right Arrow or Down Arrow
    • Move to Previous Point: Left Arrow or Up Arrow

    Sliders

    • Decrease Value: Left Arrow
    • Increase Value: Right Arrow
    • Decrease Value by Larger Increment: Page Down
    • Increase Value by Larger Increment: Page Up

    Tables

    • Next Cell: Tab
    • Previous Cell: Shift + Tab
    • Next Row: Down Arrow
    • Previous Row: Up Arrow

    Exporting Graphs

    • Open Share Menu: Ctrl + Shift + S
    • Print Graph: Select “Print” to save as a PDF.
    • Export as Image: Select “Export Image” to save as PNG, SVG, or for a Braille embosser.
    • Copy Link: Select “Copy Link” to share the graph online.

    These commands should help you navigate, edit, and export your graphs efficiently.

    Combine excel commands with Desmos for smooth integration

    You can also create Excel Graphs separately and so many more math lessons here

  • Desmos Graphing Calculator Solution for Blind and Low Vision

    In this Video lesson, Dr. Denise Robinson demonstrates the Desmos calculator, an online tool used in schools for graphing solution for even Geometry. She highlights its fun and accessible nature, noting that while she can’t cover all its features in 1 video, she will guide through the basics of using the Desmos.

    First, she instructs users to press Control + O for 1 option for a new graph. Using JAWS screen reader. But any screen reader will work. After pressing Control + O, users hit Enter to create a new blank graph. They can navigate through options using the down arrow also for many other types of graphs. Dr. Robinson then guides users to type in formulas to create parabolas and lines, making use of various functionalities in the Desmos Graphing Calculator Solution.

    Visual Calculator and PC Calculator for Desmos Graphing Calculator Solution

    A keyboard appears at the bottom of the screen, which is manageable for low vision children. For low vision children, she recommends using Control + Plus to zoom in, allowing them to adjust the size as needed. Control + Zero returns the display to normal size. Blind students will use the PC built in calculator for full access, ensuring the best use of the Desmos Graphing Calculator Solution.

    Desmos graphing solutions- picture of parabola and formulas
    Desmos Calculator Graphing Solutions- picture of parabola and formulas

    Next, Dr. Robinson explains how to open the field dialogues or share or export to emboss a graph by pressing Insert + F5. She mentions Desmos works well in Chrome, Edge and sometimes in Firefox based on updates. She advises users to label their graph. Insert + F5 also assists in many other JAWS screen reader functionalities, enhancing the use of the Desmos Graphing Calculator Solution.

    Dr. Robinson then demonstrates typing formulas, such as X superscript 2 minus 1/2. She shows how the graph forms visually and explains using Shift + 6 for superscript. Users can listen to the graph’s details by using H and the arrow keys, with the right arrow moving right and the left arrow moving left, providing detailed information about the graph’s points. Desmos Keyboard Shortcuts and other Math Lessons further elaborate on how to effectively use the Desmos Graphing Calculator Solution.

    Find more with Desmos:

    Desmos 3D graphing

    for Geometry in Desmos

    for STEM and Embossing in Desmos

    Desmos and inserting graphs into Math Work in WORD

    Creating shaded Parabolas in Desmos

    Games with Desmos with Drag and Drop