Kaleigh was born with very special hands. So, whether you have 10 fingers or 2 or 3, there is always an easy way to use a braille display to control your computer.
Dr. Robinson’s video covers basic JAWS screen reader commands for Office Word, no matter what version of WORD you use. First, she opens a new document using “Ctrl + N” and teaches key formatting skills, such as right-aligning text with “Ctrl + R” and inserting the date using old and new Office commands. She emphasizes the importance of listening to the software to ensure accuracy. Dr. Robinson guides through bold, underline, and italics commands before typing and spell-checking with keyboard shortcuts. These are all Basic WORD JAWS commands you need to know.
Adjusting speech speed helps beginners better understand software. Learning commands ensures efficient and accurate work, especially Basic WORD JAWS commands.
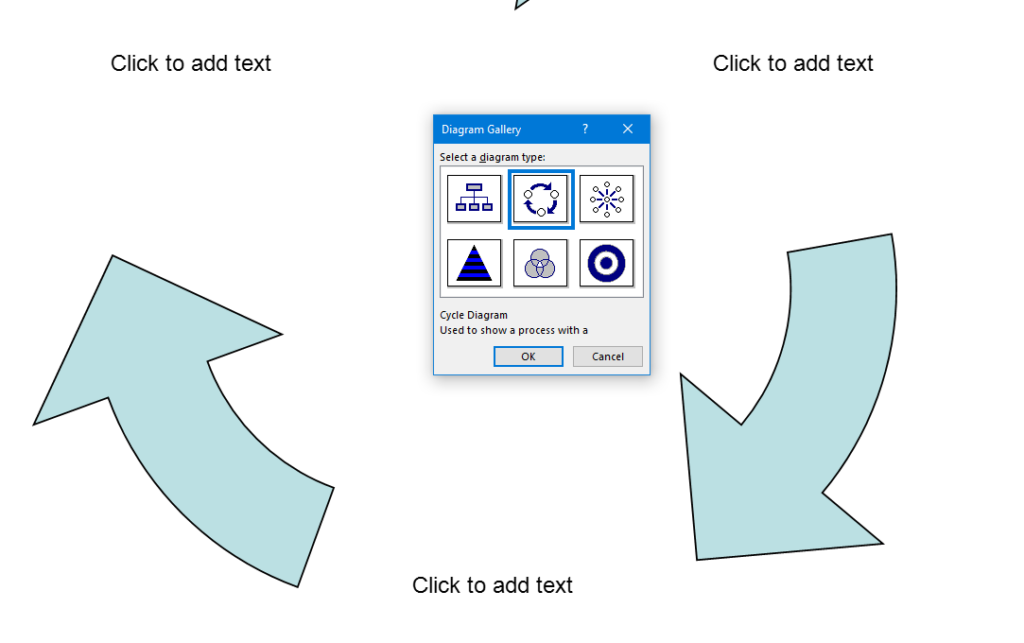
Gain Typing Speed in WORD
To practice typing skills use a phrase like: “The quick brown fox jumps over the lazy dog.” Type it repeatedly in a Word document by starting slow to gain speed. Use the keyboard shortcuts taught in the video, such as “Ctrl + Left Arrow” and “Ctrl + Right Arrow” to move between words, and “End” to check if you’re at the end of the line. Regular practice, at least 10-15 minutes daily or more, helps build speed. Turn off autocorrect options to avoid automatic changes that may confuse the student and disrupt learning. Focus on accuracy before increasing typing speed. Mastering JAWS commands for WORD is essential for efficient practice.
Computer Local Admin access is Crucial at all education levels. Dr. Robinson, an Assistive Technology and IT specialist, sets up, maintains, and controls all the computers used in TechVision programs while TechVision Team continues teaching students to manage their own technology. She emphasizes the importance of blind students having local admin access on their school computers so they can make necessary updates and changes to their laptops as needed.
Firstly, she highlights that anti-virus software like Kaspersky or Sophos often interferes with screen readers. Instead, Dr. Robinson recommends using Malwarebytes with Microsoft Defender, as it provides strong protection without disrupting screen reader functionality. Having Computer Local Admin access ensures students can implement these software changes.
Dr. Robinson also explains the need for screen readers such as JAWS. Schools often filter out essential websites and programs like Freedom Scientific, which students require for their studies. With local admin access, students can update their screen readers and related software, which is necessary to keep their devices running smoothly. These updates are crucial and happen every few months. Computer Local Admin access allows students to manage these updates efficiently.
In addition, students must manage their desktops efficiently. They need to pin important programs, such as JAWS, to the taskbar for quick access and adjust their settings without assistance. Pinning their school sites to the desktop make quick access to any site. Through the context menu, students can navigate and personalize their desktop to meet their needs.
Computer Local Admin access to Applications Key on desktop to access anything on the computer
The run dialog box is another essential tool with CTRL+R. Students need to clear temporary files, which can slow down screen readers. Since screen readers are memory-intensive, removing these files improves both the computer’s speed and network performance. Computer Local Admin access is required for these maintenance tasks.
Dr. Robinson further emphasizes the importance of Office 365, especially for math tasks. Using the math editor, students can create and solve equations that read seamlessly on a braille display. This access is crucial for academic success, particularly in STEM subjects.
Lastly, Dr. Robinson stresses the necessity of file explorer -Windows+E and Bluetooth settings. Without a mouse, blind students rely on file explorer to organize their files. Bluetooth access is also essential for reconnecting braille displays and other devices.
In summary, Dr. Robinson believes local admin rights are essential for blind students to manage their technology independently, keep their devices updated, and fully engage in their education. This allows them full access for a lifetime. The TechVision Team ensures students learn essential skills to manage and update their devices independently, preparing them for a lifetime of technological adaptation. As technology evolves, these skills are crucial. Computer Local Admin access is vital for securing and maintaining employment so they know the updates needed, in an increasingly digital world.
Math for all ages, Math Team, Dr. Robinson, along with Professor Betsey, Campbell Rutherford (teacher intern), led the session. Nate Kile (Access Tech Specialist) was the moderator. Math Team emphasized the importance of ensuring blind students can access their technology independently and efficiently. Nate Kile assisted by handling participant questions during the presentation, allowing attendees to type inquiries in the Zoom chat box. Mr Kile would ask the Math Team from the virtual attendees.
Each presenter built on the others’ lessons. Dr. Robinson began with elementary math training skills and how JAWS and other assistive technologies play crucial roles in blind students’ education. Teaching math for all ages, she typed out typically math problems in elementary school to show audience how easily math is completed in WORD. Nate provided opportunities for participants to unmute themselves using Alt + A or Alt + M to ask questions.
Math for all Ages: Dr Robinson
The Math Team turned off their videos to optimize bandwidth. When teaching virtually, turning off video offers better bandwidth for a flow of uninterrupted instruction. Dr. Robinson started the discussion by running JAWS, a screen reader. She explained how to troubleshoot JAWS issues, recommending minimizing programs and restarting the software for optimal performance.
The session highlighted key JAWS commands, such as Windows + D for quick access to the desktop. Dr. Robinson demonstrated how blind students could use Braille displays for math, including Nemeth code. She showed how blind students control their computers by personalizing settings like screen readers and Bluetooth. Customizing the setup is essential for supporting math learning at all ages.
Math for all ages math formulas in Word
Math for all Ages: Professor Betsey
Professor Betsey demonstrated how to effectively use Braille displays, including advanced setups for students. She went into MathType and LaTex and how to use advanced Math techniques to accomplish all math levels. She emphasized the importance of maintaining accessibility and autonomy for students through personalized settings. As a college-level math professor, she explains that using a PC for math enables full inclusion of blind students. Prof. Betsey emphasizes that this technology allows blind students to participate equally in all aspects of their education. This approach supports the goal of providing math for all ages.
Math for all Ages: Campbell
Campbell Rutherford, a teacher intern, demonstrated how to integrate graphing and mathematical functions using accessible technology for blind students. Campbell began by demonstrating how to write a function in Word using LaTeX. She then transitioned to graphing that function in Desmos, an online graphing calculator. Using her braille display and screen reader, she input and analyzed the graph. Campbell explained how blind students can explore mathematical properties like intercepts and undefined points. After reviewing the graph, she took a screenshot and pasted it into a Word document. This tied together the written mathematical properties and the visual representation. Throughout, Campbell stressed the importance of accessible math for students of all ages.
Throughout the session, the Math Team emphasized the importance of managing constant software updates. They explained how providing local admin rights empowers students to update their programs and devices independently. This in-turn prepares them for both academic success and future employment. The TechVision team’s approach ensures that students can fully access their education and maintain control of their technology. This ultimately sets them up for long-term success but especially the STEM field. More Math Lessons here:
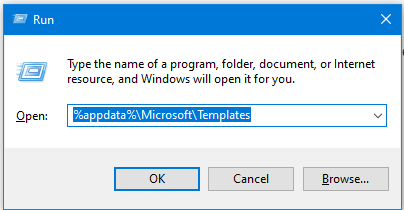
You want to Rebuild Microsoft Word Template when you close WORD and it starts to ask: There are changes to the Normal Template, “Do you want to save the normal template?” You always want to say “NO” because if you do not it will start opening with the last work you did in it. If you want WORD to STOP asking that question or fix your goof, here is how to rebuild that Normal Template
Commands to rebuild Word template when it gets messed up and constantly asks if you want to save it.Other Lessons to fix Tech
Rebuild Microsoft Word Template with RUN
Open the Run Dialog Box:
Press Windows + R.
Type %appdata%\Microsoft\Templates and press Enter.
Delete the Normal Template:
In the opened folder, find normal.dotm (or the equivalent for your Office version).
Select it and press Delete.
Reopen Word:
This action will rebuild the normal template automatically.
Reconfigure Your Settings:
Fonts:
Press Ctrl + D to open the Font dialog box.
Set your desired font (e.g., Times New Roman, 12 pt).
Press Alt + D to set as default for all documents.
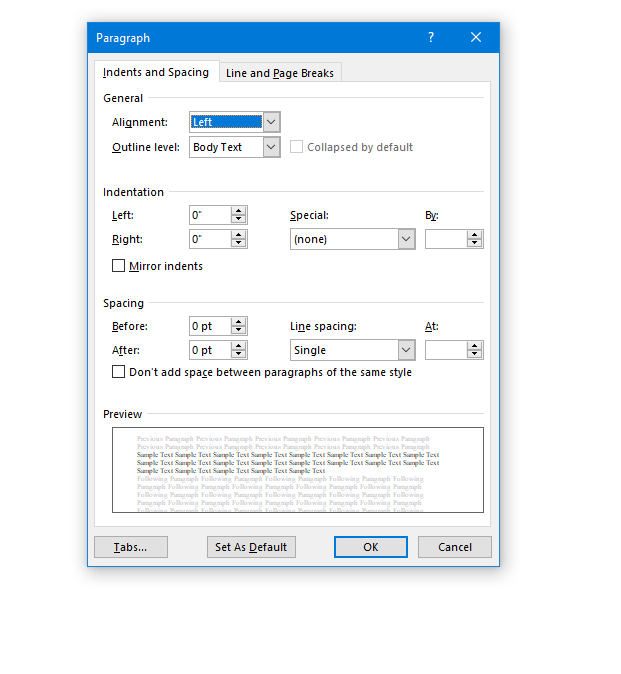
Paragraph Spacing:
Press Alt + O, then P to open the Paragraph dialog box.
Adjust spacing settings (e.g., single spacing).
Press Alt + D to set as default for all documents.
This process ensures your Word template is reset and configured to your preferences. Here are some more fixes you can do
When sighted parents’ setup computer for their young child, they learn the commands and how to follow through with lessons after the TechVision Team completes working with their child.
Shared Learning Experience: Learning together can be a bonding experience, making the process enjoyable and less isolating for the child. It also demonstrates to the child that their parents are invested in their education and success.
Here are some general essential keyboard commands to set up and navigate the JAWS screen reader:
Starting and Basic Navigation
Start JAWS:
Press Ctrl + Alt + J or if pinned to taskbar Windows 3 on this computer
Activate PC Cursor:
Press Numpad +.
Activate JAWS Cursor:
Press Numpad -.
Silence Current Speech Output:
Press Ctrl.
Help Sighted Parents Setup Navigating Web Pages
List Links:
Press Insert + F7.
List Headings:
Press Insert + F6.
List Form Fields:
Press Insert + F5.
Next Heading:
Press H.
Next Link:
Press Tab.
Previous Link:
Press Shift + Tab.
Reading Text
Read Next Line:
Press Down Arrow.
Read Previous Line:
Press Up Arrow.
Read Current Line:
Press Insert + Up Arrow.
Read Next Word:
Press Insert + Right Arrow.
Read Previous Word:
Press Insert + Left Arrow.
Forms and Tables
Enter Forms Mode:
Press Enter.
Exit Forms Mode:
Press Numpad +.
Navigate Table Cells:
Press Ctrl + Alt + Arrow Keys.
Sighted Parents Setup computer successfully and if your child is Visually Impaired use this setup to SEE computer better
The current page provides instructions on creating a food chain for a class using talking software. It includes steps for saving a document in a specific format and navigating through menus using keyboard shortcuts. Additionally, it references the video below to help you each step of the way.
F12 and save as 97-2023 so after you F12 you will have file and tab once and down arrow or up arrow to 97-2023 doc and enter, then the commands will work for you.
Alt + N then M and right arrow to Food Chain and enter
Listen to recording to add information as you need
WORD accessible food chain and why we use them
A food chain is a sequence that shows how energy and nutrients flow from one organism to another within an ecosystem. Here’s a simple breakdown:
Producers: These are usually plants or algae that create their own food through photosynthesis. They form the base of the food chain.
Primary Consumers: Herbivores that eat the producers. Examples include rabbits and deer.
Secondary Consumers: Carnivores that eat the herbivores. For instance, a fox that eats rabbits.
Tertiary Consumers: These are predators that eat secondary consumers. An example would be an eagle that eats foxes.
Decomposers: Organisms like bacteria and fungi that break down dead plants and animals, returning nutrients to the soil.
The population of individuals with low vision exceeds that of those who are blind. It is expanding quickly as the population ages and experiences vision decline. A variety of lessons teach you how to download large cursors, enhance contrast, and enlarge text in Word. These skills also help you read with more ease. You’ll also learn how to magnify text and graphics on the Internet using different methods. Additionally, instructions on setting up low vision devices for students in classrooms who need to see the board are provided. These lessons are designed to improve your ability to see everything on your computer. The fact that these videos predate screen capture technology is irrelevant, as the skills are applicable to all versions of Windows.
Skills to Enlarge Text as you need on any computer
SEE your computer better, for users with low vision, using keyboard commands in Microsoft Word can significantly enhance visibility and ease of use. Here are some useful shortcuts:
Zoom In/Out:
Zoom In: Press Alt + W, then Q, and use the Tab key to navigate to the zoom value you want.
Zoom Out: Use the same steps as above but adjust the zoom value accordingly.
Adjust Font Size:
Increase Font Size: Press Ctrl + ].
Decrease Font Size: Press Ctrl + [.
Magnifier:
Turn on Magnifier: Press Windows + + (Plus sign).
Zoom In: Press Windows + + (Plus sign).
Zoom Out: Press Windows + - (Minus sign).
Exit Magnifier: Press Windows + Esc.
Change Font:
Open Font Dialog Box: Press Ctrl + D to open the Font dialog box where you can adjust font size, style, and other attributes.
High Contrast Mode:
Toggle High Contrast Mode: Press Left Alt + Left Shift + Print Screen.
Other Low Vision Skills to increase “Seeing” Ability
Essential WORD keyboard commands to help teachers who teach blind with talking software or sighted who just want to move faster. These are some of the most essential commands everyone should know, especially those mastering the essential commands for WORD keyboard users.
Here’s a summary of essential WORD keyboard commands for video users.
Keyboard shortcuts for all WORD versions.
Open Word: Press Windows + 5 to start Word from the taskbar.
Zoom In: Use Alt + V + Z to zoom to 200%.
Change Defaults:
Open Paragraph Spacing: Press Alt + O + P.
Set Spacing to Single: Press Alt + P and change to single spacing.
Set Default for All Documents: Press Alt + D followed by Alt + A and then Enter.
Customize Document further
Change Font:
Select All Text: Press Ctrl + A.
Open Font Dialog: Press Ctrl + D.
Change Font to Times New Roman: Type “Times New Roman” and set size to 12.
Set Default for All Documents: Press Alt + D followed by Alt + A and then Enter.
Create Columns:
Open Page Layout: Press Alt + P.
Select Columns: Press J for columns.
Set Number of Columns: Press Alt + O + C and choose the number of columns.
Change Page Color:
Open Page Layout: Press Alt + P.
Open Colors: Press PC.
Select Color: Use arrow keys to choose a color and press Enter.
Add Border:
Open Borders: Press Alt + O + B.
These commands will help you efficiently navigate and customize documents. See other Setup options
Essential WORD keyboard commands for windows page setup for defaults