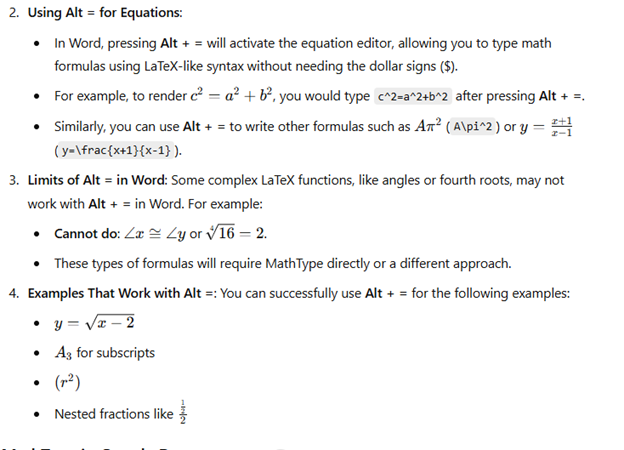
This story is rewritten from original post.
JEFFERSON COUNTY, Tenn. As school resumed, a Jefferson County student waited weeks for an important textbook to arrive from out of state. This doesn’t seem like a big deal, except it’s a calculus book for Math for blind students and it’s written in Braille. Campbell Rutherford is a home school student in Jefferson County.
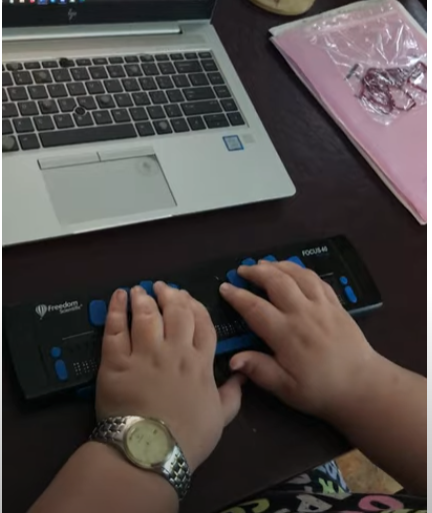
She started homeschooling with a teacher for the visually impaired because math for blind students was no longer available in the local school district. Campbell was born blind and has been reading braille since she was 3 years old. “I rely completely on braille and screen readers to access the printed word,” she said. Campbell, accustomed to reading Braille, competes in state Braille reading competitions yearly and has even reached nationals. So naturally, she’d like to be able to read her textbooks in Braille.
Because each page has to be embossed with the Braille indentations, Campbell’s textbooks are huge. Here’s her AP physics book. All these binders are one book for Math for blind students, containing everything in the print book next to it, just in Braille.
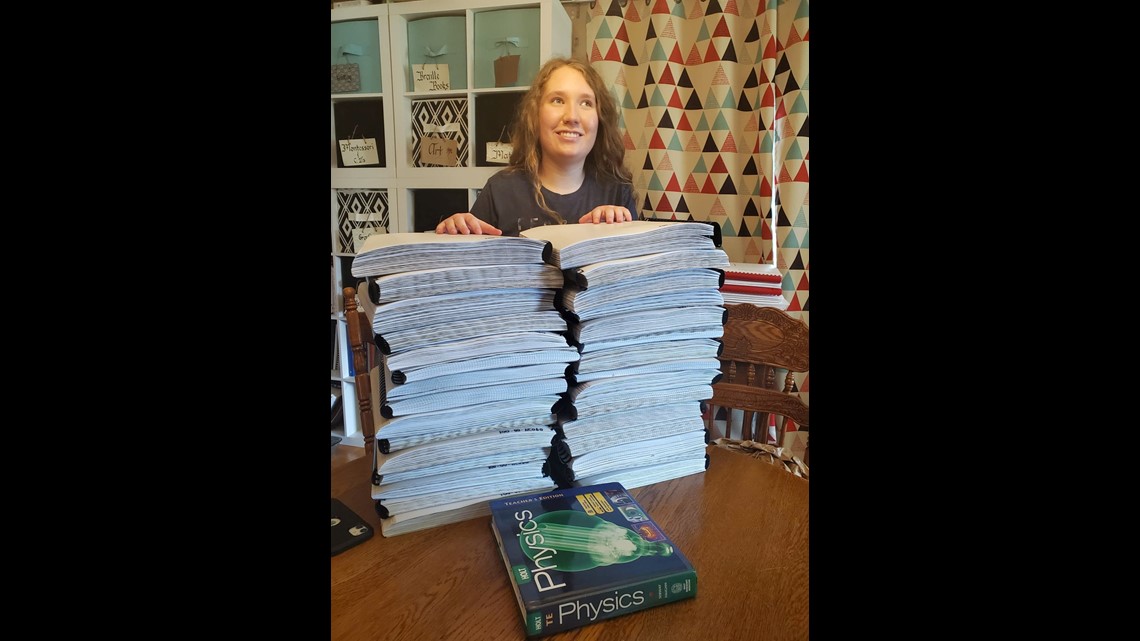
Credit: Liza Rutherford: Campbell Rutherford stands with her AP Physics book in Braille of 25 volumes of 11 x11.5 size, next to the book in print of 2 inches thick.
“I used to have to borrow a truck to go get her books,” said her mom, Liza Rutherford. Braille books are larger because the text must be big enough for readers to feel with their fingertips. A standard physics book may have four graphs on one page, but in Braille, each graph requires its own page. The National Braille Press reported about 12 percent of blind school-age students can read Braille, limiting access to advanced textbooks.
NO AP Math Books
There were no Braille AP calculus books in the state of Tennessee. The Rutherford’s worked with the Tennessee School for the Blind to find this 20-year-old edition from Maryland. Campbell said schools often discourage visually impaired students from taking challenging courses. “I have friends that, when they’re struggling with Math, they’ve been told, ‘it’s okay that blind people aren’t good at math typically,’” said Campbell.

Credit: Liza Rutherford-Campbell Rutherford’s calculus book in Braille of 32 volumes of 11 x11.5 size, by to the book in print of 2 inches thick..
Campbell plans to major in math in college and go into epidemiology. She said it’s those low expectations that hinder her and others the most, not her lack of vision. “We even had an administrator at one point come to me and say, ‘does Campbell really need a high school diploma for her adult life?’” said her mom Liza Rutherford. “That’s probably the one that’s infuriated me the most over the years,” said Campbell.
Lack of Advanced Placement (AP) Math for blind students Books
The National Federation for the Blind reported only 31.6 percent of blind individuals hold a high school diploma or GED. The Rutherford’s believe a shortage of teachers for the visually impaired adds to this problem.
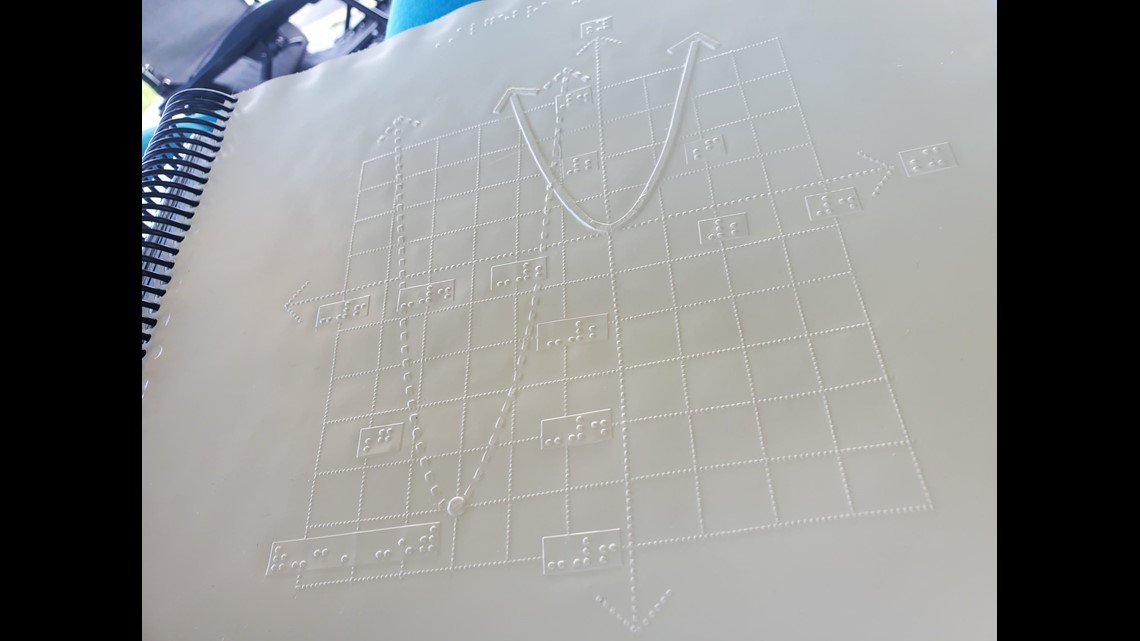
Credit: Liza Rutherford: A mathematical graph transcribed in Braille.
They are hopeful that as technology spreads, more blind students will have the educational access they need. “There are other ways of doing things besides the sighted way or the able way,” said Campbell. Campbell connected with a blind math professor from Connecticut who assists her with any course-related questions. She took AP physics and AP calculus with a proctor who will describe the graphs and record her multiple-choice answers.
Math for Blind Students- Full Broadcast and article
Campbell is now attending Harvard University taking Applied Mathematics as a major and a Junior.
Lessons to Prepare YOU!
Math Lessons:
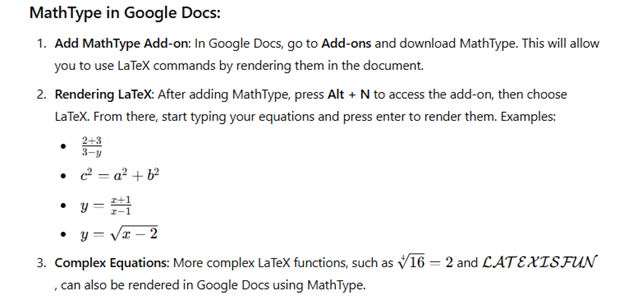
Braille Math in WORD Editor-Multi-line
complete multi line BME-Braille Math Editor
More Desmos Lessons:
for STEM and Embossing in Desmos
Desmos and inserting graphs into Math Work in WORD
Creating shaded Parabolas in Desmos
Games with Desmos with Drag and Drop
Drag n Drop in Macmillan Learning
Excel Trend line with Scatter Plot
Other Excel Lessons that you can do in Sheets