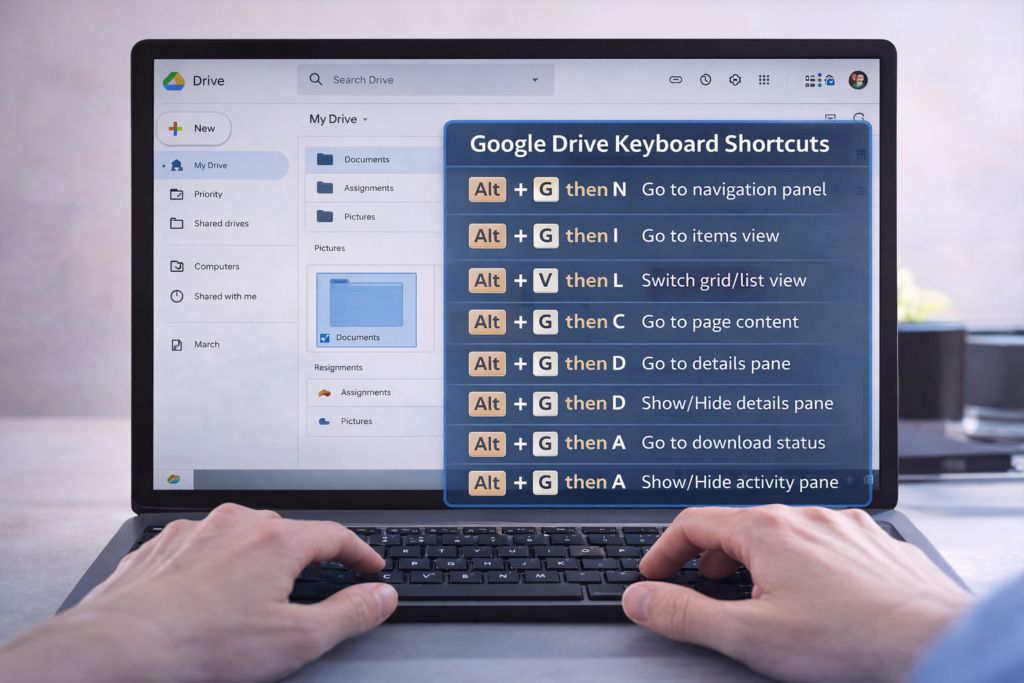
Google Drive Keyboard shortcuts become much easier — and faster — when you know the right screen reader keyboard commands. In this TechVision tutorial, I walk you through how JAWS and NVDA users can move through folders, open files, switch views, and manage Drive content without ever touching a mouse.
These skills build confidence, speed, and independence for blind and low‑vision users, students learning digital literacy, and anyone who prefers keyboard‑based navigation. You’ll learn how to open menus, jump between items, select files, search your Drive, and access settings with predictable, repeatable commands.
Whether you’re organizing schoolwork, managing shared folders, or teaching students how to work in the cloud, these shortcuts make Google Drive more accessible and efficient for everyone.
TechVision: Empowering real‑life tech skills with clarity, accessibility, and confidence.
Is your computer running slow, freezing, or taking forever to start up? Speed Up a Slow Computer with a few simple maintenance steps can make a huge difference. This is especially true for beginners and blind/low‑vision users who rely on consistent performance with JAWS or NVDA.
In this TechVision tutorial, I walk you through practical, real‑life steps to speed up your PC and keep it running smoothly:
✔ Update your .NET Framework Having the latest .NET installed in your Control Panel helps programs run correctly. It also reduces system errors.
✔ Manage your startup programs Too many apps launching at boot can slow everything down. Turning off unnecessary startup items gives you a faster, cleaner start.
Keep Windows and Office updated
Regular updates improve performance, stability, and security — and prevent many common slow‑computer issues.
✔ Declutter your system Uninstall programs you don’t use and delete temporary files to free up space. This also reduces background load.
✔ Run a full antivirus scan Malware can dramatically slow down your system. A full scan helps identify and remove hidden threats.
✔ Perform regular maintenance Disk Cleanup, defrag (for HDDs), or optimize for SSD and clearing temp files all help your computer run more efficiently.
These steps are simple, effective, and perfect for anyone building independence and confidence with their technology.
TechVision: Empowering real‑life tech skills with clarity, accessibility, and confidence.Video with steps here
Struggling to find your drives or open File Explorer quickly? Adding the This PC icon to your desktop is one of the fastest ways to navigate Windows — especially for beginners, blind/low‑vision users, and anyone building confidence with their computer.
In this quick TechVision tutorial, I show you how to turn on desktop icons, place This PC right where you need it, and get instant access to your drives, folders, and storage. A simple change that makes a big difference in independence and efficiency.
Whether you’re teaching students, supporting a family member, or learning for yourself, this step gives you a clean, predictable starting point every time you sit down at the computer.
TechVision: Building real‑life tech skills with clarity, confidence, and accessibility at the center.
This session shows how users can start auto-read on the Focus Braille display with JAWS, adjust reading speed, and activate a full-read mode with ER + Space, even though many believed this feature did not exist. This video demonstrates the feature in action and explains how it works along with other useful commands. These commands allow you to fully control your computer exclusively using the Focus 40 or 80 Braille display-See video below
Use the modifier keys to simulate key combinations (keystrokes) that include CTRL, ALT, WINDOWS Key, SHIFT, or the JAWS Key (INSERT). To use these modifiers for the Focus Braille Display when typing a keystroke, do the following:
Hold down DOT 8 CHORD and then press the corresponding modifier keys in the keystroke. Modifier keystrokes are listed in the following table.
After you create the modifier portion of the keystroke, release the keys and press the remaining part of the keystroke. For example, to perform the keystroke CTRL+SHIFT+V, you press DOTS 3-7-8 CHORD, release the keys, and then press V (DOTS 1-2-3-6).
Focus Display combo Commands
Modifier Keys
Key Name
Keystroke
Function Keys (F1 through F12) For more information, see the Function Keys description.
DOT 1
INSERT
DOT 2 8 space
CTRL
DOT 3 8 space
WINDOWS Key
DOT 4 8 space
JAWS Key
DOT 5 8 space
ALT
DOT 6 8 space
SHIFT
DOT 7 8 space
APPLICATION Key
RIGHT SHIFT+DOT 2 CHORD
TAB
DOTS 4-5 CHORD
SHIFT+TAB
B CHORD
HOME
K CHORD
END
DOTS 4-6 CHORD
Select Prior Line
DOTS 1-7 CHORD
Select Next Line
DOTS 4-7 CHORD
Select to End of Line
DOTS 4-6-7 CHORD or 4,7, space
ESC
RIGHT SHIFT+DOT 1 or Z CHORD
DELETE
FOR CHORD
Select word
5,7, space
Selection Commands
Description
Braille Sign
Braille Dot Patterns
Select Next Character
LEFT SHIFT+DOT 6
LEFT SHIFT+DOT 6
Select Prior Character
LEFT SHIFT+DOT 3
LEFT SHIFT+DOT 3
Select Next Line
LEFT SHIFT+DOT 4
LEFT SHIFT+DOT 4
Select Prior Line
LEFT SHIFT+DOT 1
LEFT SHIFT+DOT 1
Select to End of Line
LEFT SHIFT+DOT 5
LEFT SHIFT+DOT 5
Select from Start of Line
LEFT SHIFT+DOT 2
LEFT SHIFT+DOT 2
Select from Top
LEFT SHIFT+L
LEFT SHIFT+DOTS 1-2-3
Select to Bottom
LEFT SHIFT+DOTS 4-5-6
LEFT SHIFT+DOTS 4-5-6
Select Next Screen
LEFT SHIFT+DOTS 4-6
LEFT SHIFT+DOTS 4-6
Select Prior Screen
LEFT SHIFT+K
LEFT SHIFT+DOTS 1-3
Select All
LEFT SHIFT+FOR Sign
LEFT SHIFT+DOTS 1-2-3-4-5-6
Select a Frame
RIGHT SHIFT+9
RIGHT SHIFT+DOTS 3-5
Select a Heading
RIGHT SHIFT+6
RIGHT SHIFT+DOTS 2-3-5
Select a Link
RIGHT SHIFT+7
RIGHT SHIFT+DOTS 2-3-5-6
Windows Commands
Description
Braille Sign
DOTS Pattern
ALT+TAB
LEFT SHIFT+DOTS 4-5
LEFT SHIFT+DOTS 4-5
Paste from Clipboard
LEFT SHIFT+V
LEFT SHIFT+DOTS 1-2-3-6
Copy to Clipboard
LEFT SHIFT+C
LEFT SHIFT+DOTS 1-4
Cut to Clipboard
LEFT SHIFT+X
LEFT SHIFT+DOTS 1-3-4-6
Undo
LEFT SHIFT+Z
LEFT SHIFT+DOTS 1-3-5-6
Delete
LEFT SHIFT+D
LEFT SHIFT+DOTS 1-4-5
Table of Multi-Control Functions
Function
Command
Toggle Auto Advance Mode or auto read
LEFT SELECT+RIGHT SELECT to start and stop down arrow – er+space is read all – if you want to auto read and hear words then down arrow and speed up as you want
Decrease Auto Advance Speed
LEFT SELECT
Increase Auto Advance Speed
RIGHT SELECT
Left Mouse Click
PANNING BUTTON+CURSOR ROUTING BUTTON or PANNING ROCKER UP+CURSOR ROUTING BUTTON or PANNING ROCKER DOWN+CURSOR ROUTING BUTTON
Control+Left Mouse Click
ROUTING BUTTON CHORD
Page Down
LEFT or RIGHT SELECT+ROCKER DOWN
Page Up
LEFT or RIGHT SELECT+ROCKER UP
Top of File
LEFT PANNING BUTTON+SELECT BUTTON or SELECT BUTTON+PANNING ROCKER UP
Bottom of File
RIGHT PANNING BUTTON+SELECT BUTTON or SELECT BUTTON+PANNING ROCKER DOWN
End
PANNING BUTTON+ROCKER BAR DOWN
Home
PANNING BUTTON+ROCKER BAR UP
Next Line
ROCKER BAR DOWN
Prior Line
ROCKER BAR UP
Pan Left
LEFT PANNING BUTTON or LEFT PANNING ROCKER UP
Pan Right
RIGHT PANNING BUTTON or RIGHT PANNING ROCKER UP
Select Text
RIGHT SELECT BUTTON+CURSOR ROUTING BUTTON
Select Block
SELECT BUTTON+CURSOR ROUTING BUTTON at beginning of block; repeat at end of block
Examples to show you how it all goes together:
restart jaws 2,8,space space, 1,8,space d
Windows search box with– right shift, 4
alt tab is 6,8, space then 4,5 space—or right shift 4 5
F6, space/1-8 f
Ctrl tab – 3 8 space the tab with 4,5 space
alt f4 – 1 6 8 space then d
read all, space/1-2-4-5-6, ER cord
say title of window – right shift/dots 1-2
Say time– right shift/dots1-2-3
read all — er chord
refresh screen -right shift z
in drive get contractions off and cursor off
Then –insert z cursor off-2,8,space then z
Or do slash for search—contractions off with g,7,space then dots 3,4
hush up jaws—3,8, space
HOME- K CHORD
END-DOTS 4-6 CHORD
PAGE UP-LEFT SHIFT+ROCKER BAR UP or RIGHT SHIFT+ROCKER BAR UP or DOTS 2-3-7 CHORD
PAGE DOWN-LEFT SHIFT+ROCKER BAR DOWN or RIGHT SHIFT+ROCKER BAR DOWN or DOTS 5-6-7 CHORD
DELETE–FOR CHORD as in 1,2,3,4,5,6 and space –the word chord is the language I grew up with, they made it space a couple decades ago as new people did not get term “chord”
Commands to get you going on Understanding more skills
esc is right shift dot 1
alt right shift dot 2 is
right click right shift dot 3
Windows search box with right shift+4
right shift dot 5 is window list
left shift 1 – select line
left shift 3 – select character
dot 6 8 space then d to URL
3 8 space that opens new tab
dot 3 8 space the tab with 4,5 space
alt tab is 6,8, space then 4,5 space
PC cursor is p space
taskbar is 4,8,6 then t
alt f4 – right shift dot then 1 6 8 space then d for do
F6, space/1-8 then f
read all, space/1-2-4-5-6, ER cord
Went over, say title of window using the Focus, right shift/dots 1-2
Space 4 8 to desktop
Say time with the Focus, right shift/dots1-2-3
say time with right shift 1 2 3
right shift z refresh screen
er chord is read all
8 4 space then t to taskbar
8 4 space then d to desktop
title with space/8-5 followed by T, but the shift/1-2 is just so much nicer.
To configure the Focus Braille Display SD card and Scratchpad, allowing you to copy files to and from the Micro SD card, make sure the unit is powered off and the supplied USB cable is connected to your PC. Next, press and hold the Left Panning button while simultaneously inserting the USB cable. The display powers on and the PC recognizes the Focus as a removable USB drive.
Note: If you use a screen reader such as JAWS over USB, it is recommended that you turn on speech or use a Bluetooth connection as braille will currently not work over USB when the Focus is being used as a storage device. You will also not be able to use the Scratchpad while in this mode.
Create .brf or .brl files in Braille Blaster or Duxbury or other braille translation APPs
Create .txt files in WORD, WordPad or another Braille editor
To transfer BRF and TXT files to the Micro SD card:
On the PC, open the folder containing the files you want to copy, select the files you want, and then press CTRL+C. This is key step when managing the Focus Braille Display SD card and Scratchpad option.
Windows E to file explorer and navigate to and open the USB drive to display the contents of the Micro SD card in navigation pane.
Open FSI, Focus5, Scratchpad, and then open the folder where you want to place the files and press CTRL+V. Files you want to edit should be placed into the Notes folder. Files placed into the Books folder cannot be modified.
To transfer TXT files created in Scratchpad:
Navigate to and open the USB drive to display the contents of the Micro SD card. Under This PC and navigation pane typically
Open FSI, Focus5, Scratchpad, Notes, and then select the TXT files you want to copy and press CTRL+C.
Navigate to the folder on your PC where you want to place the files and press CTRL+V. You can now use Notepad or another text editor to access these files.
Once you have finished transferring files, press the APPLICATIONS key on your computer while focused on the USB drive, and choose Eject. Power the Focus off and back on and you will once again be able to use the Scratchpad as well as receive braille output from your screen reader over USB.
Press right shift + x to close current file if u make changes it will prompt you to save or discard so you can use cursor router button or dot 8 to navigate thru options
If you want to temporarily leave the scratchpad in the background and resume connection to computer do menu +B (space + dot 1,2)
Get out of file by pressing menu and it pops to file menu and rocker down to file, open, etc. and enter on choice
Rocker down to open or what you want
Select folder-I save most books in books so I open that with enter
Rocker down to file you want to open
To edit and type in the Scratchpad of a Focus Braille Display (like the Focus 40 Blue), you’ll be using its onboard notepad feature. This is a standalone function that lets you jot down notes directly on the device without needing a connected screen reader. Here’s how to navigate and use it:
Accessing and Using the Scratchpad
Enter Scratchpad Mode
Press Menu button (in center of dots 1 and 4) and rocker down until you reach Scratchpad or N+Menu for new file and enter for options-fastest but sometimes does not work so go Menu option rocker down
Press a cursor router button above the word “Scratchpad” to select it or enter to open.
Brailling and Editing
Use Braille input keys to type your content.
Use cursor router buttons to move the cursor to specific characters.
Use DOTS 7 + character to delete backward.
Use DOTS 8 to insert a new line or confirm actions.
Save Your Work
After brailling what you want just right shift + X and enter and it will prompt you to save.
Exit Scratchpad
Right Shift + X
Connect to computer will be B space to switch back and forth between your Notes folder with file to type in info and your computer. See video
Tips for Efficient Use
You can transfer Scratchpad files to a PC via USB or SD card in reader on your PC.
Scratchpad supports BRF and TXT formats, ensuring that the Focus Braille Display and SD card work harmoniously.
Tips & Limitations
Only plain text (.TXT) files are editable in NOTES folder
Files transferred from PC must be in UTF-8 or ASCII format which is .txt as it takes all format out
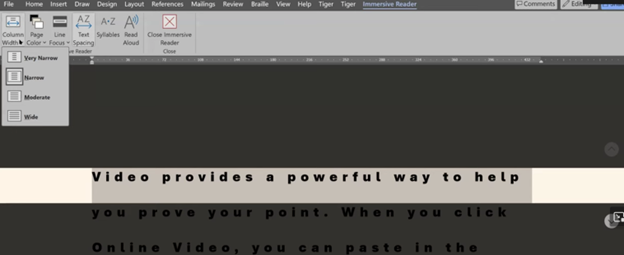
Low-vision users enhance visibility and accessibility using tech tricks for screen scaling, mouse visibility, and reading tools. Immersive Reader in Microsoft Word, accessible from the View tab, adjusts text spacing, column width, and background color. UsersThese Low Vision Computer Tricks improve readability by customizing these settings to suit their visual needs efficiently. In Microsoft Edge, Immersive Reader activates on supported pages to simplify reading and navigation. These tools combine to provide low-vision users with a personalized, accessible digital experience.
Dr. Robinson teaches strategies to enhance accessibility using low-visionLow toolsVision Computer Tricks in Microsoft Word, Edge, and system settings. First, she demonstrates how to adjust display settings for optimized visibility using the Windows key. By typing “display,” users can access scaling options, which enlarge screen content for better readability. Additionally, increasing mouse pointer size and inverting its color improves navigation while reducing eye strain.
Next, in Microsoft Word, Dr. Robinson highlights Immersive Reader, available in the View tab, to enhance readability and adjust text settings. For instance, users can change font styles and sizes with Ctrl+A and Ctrl+Shift+> or Ctrl+Shift+< for better clarity. These Low Vision Computer Tricks include changing font styles and sizes with Ctrl+A and Ctrl+Shift+> or Ctrl+Shift+< for better clarity. Furthermore, the Line Focus feature reduces clutter by focusing on one or a few lines, aiding users with dyslexia. Moreover, Read Aloud, activated with Alt+Ctrl+Space, provides text-to-speech support with adjustable speed and voice options.
In Edge, pressing F9 activates Immersive Reader, which simplifies web pages by removing clutter for a cleaner reading experience. Users can also customize text preferences or enable Read Aloud for auditory assistance. These Low Vision Computer Tricks also include customizing text preferences or enabling Read Aloud for auditory assistance. Notably, Dr. Robinson recommends Edge for its built-in accessibility commands, though Chrome and Firefox offer similar tools.
Immersive reader for low vision
Finally, she emphasizes using Night Light mode to reduce blue light exposure and protect long-term eye health. These tools, combined with her strategies, empower low-vision users to navigate technology effectively.
Speed up your computer and fix slow-loading programs with a few adjustments and updates. Ensure all necessary .NET runtimes for programs are installed in the control panel. This allows programs to run smoothly.Regularly update your computer system to improve performance. Maintain a clean computer system, optimize performance, and disable unnecessary startup applications to keep your computer running efficiently.
Fix a Slow computer To Do List:
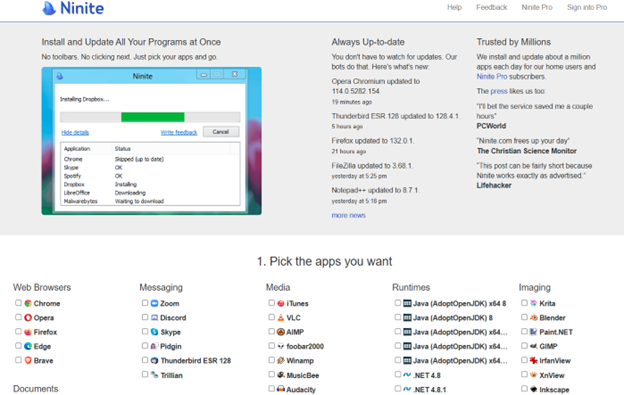
Users to update their .NET runtime to version 8 (and version 9 by end of 2024) using ninite.com.
Users to clean out their temp folder by running %temp% in Windows Run and deleting the contents to help speed up the computer.
Users to disable unnecessary startup apps in Task Manager to improve computer startup speed.
Details:
Downloading and Installing Runtimes for better Performance
Download and install these runtimes using the .NET Microsoft download and the Ninite.com website. Make sure to download the correct versions, specifically 64-bit and 86-bit. Use a screen reader to navigate the download process if needed. Check if the runtimes are correctly installed in programs and features. Update to version 9 by the end of December 2024.
Ninite.com will help speed up and fix a slow computer
Improving Computer Speed and Fix slow Computer Network
Improving computer speedand network connection involves cleaning the computer by removing temporary files and emptying the recycle bin. Regularly check for updates to keep the system running efficiently. Navigate to the temp folder and delete unnecessary files, handling files in use appropriately. Use windows key and type in updates to go to check for updates and do them several times a week. Keep your software updated also and the speed of your computer increases with every fix and adjustment. Here are other Tech Tricks to improve you computer and new commands for Google
Embossing graphics for Blind Students: Dr. Robinson offers this video for families and transcribers needing to adapt images for blind students to “see.” This video offers a straightforward approach to creating accessible Venn diagrams using the technique to emboss graphics with Tiger.
Dr. Robinson begins by explaining how to handle a Venn Diagram or any graphic. She demonstrates using a Venn diagram with two large, intertwined circles, where all parts are shaded. Such images blur when transferred into Tiger Designer, a common tool for producing tactile graphics. She recommends redrawing the diagram for clarity, ease, and speed. This approach is more effective than fixing the shaded areas when you emboss graphics with Tiger.
How to Emboss the Tiger Graphic
To show blur issues, she creates a new diagram, by opening Tiger Designer and pressing Control + N to start a new document. After ensuring the default settings are correct, pasting an image using Control + V will result in a blurry output due to the shading. In this case, Dr. Robinson suggests redrawing the Venn diagram. Ctrl + N for new again and Alt+O or click on Tools. Select a line width of 2.5 or 3, as thicker lines are easier for students to feel when you emboss graphics with Tiger.
Dr. Robinson then demonstrates how to draw two circles from the tool’s menu, representing the basic structure of the Venn diagram. She emphasizes the importance of labeling the sections and typing in uncontracted Braille works fine. She notes that while parents may not be familiar with contractions, students are accustomed to reading uncontracted Braille. It’s crucial to use these steps to emboss graphics with Tiger accurately.
Finally, Dr. Robinson shows how to emboss the Tiger graphic with Ctrl + P to emboss. Ensure the correct printer model and settings are applied. The final result will be a clear and accessible tactile diagram that the student can easily interpret.
Learning Spanish Braille involves understanding the unique characteristics of the Braille system used for the Spanish language. Then build on the foundational skills of Braille reading and writing. Here’s how to approach it:
1. Understand the Braille Alphabet in Spanish
Spanish Braille follows the same 6-dot system as English Braille.
Extra characters are included to represent letters with accents and special characters used in Spanish.
Key additions include:
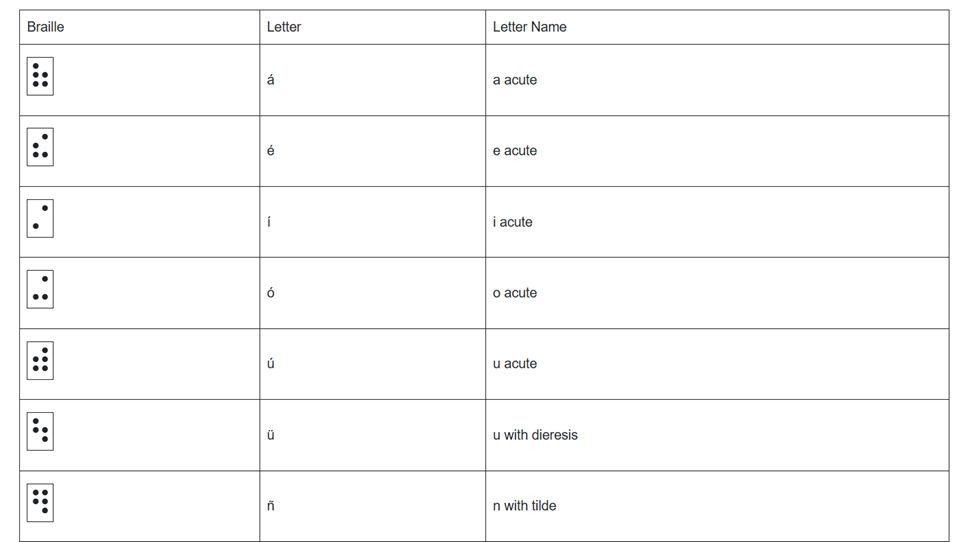
Ñ: Represented by a unique Braille symbol.
Accented vowels: Á, É, Í, Ó, Ú have distinct Braille symbols.
Punctuation: Spanish uses inverted question marks (¿) and exclamation marks (¡), and these have their own symbols in Spanish Braille.
2. Start with the Basics
– Begin by learning the standard Braille alphabet for unaccented letters, numbers, and common punctuation marks.
– Practice reading and writing these basic symbols to build fluency.
3. Familiarize Yourself with the Extra Characters
– Learn the Braille symbols for accented vowels (á, é, í, ó, ú) and ñ.
– Read and practice with materials specifically written in Spanish Braille to develop fluency.
– You can find books, articles, or educational materials written in Spanish Braille to improve your reading skills online.
5. Engage with Digital Tools
– Tools like Braille displays and screen readers can be set to Spanish to help reinforce learning. See below list of all Spanish symbols
– Software like JAWS or NVDA can be configured to support Braille output in Spanish. This allows for real-time practice with written content.
6. Practice Writing Spanish Braille
– Use a Braille writer to practice writing in Spanish Braille. Focus on mastering punctuation and special characters.
– The fastest and easiest to edit option will be to practice typing or brailling on a display. The FOCUS 40 Braille Display or Brailliant Braille Display to write out Spanish words and sentences.
7. Learn through Immersive Activities
– Reinforce learning, engage in practical activities like labeling objects in Spanish Braille. Work with bilingual Braille texts (Spanish and English).
8. Find a Teacher or Tutor
– If possible, work with an instructor who is fluent in Spanish Braille and the language. They can guide you through the nuances of the language and provide feedback on your progress.
– Organizations specializing in Braille education, like TechVision, can help offer resources or tutors for Spanish Braille.
8. Go to a Spanish Speaking Country
-Totally immerse yourself within a culture that will speak the language you want to learn well.
Spanish-Española Symbols
Spanish-Española 1. Jaws settings: Set up braille profile – insert 6 (ctrl shift D) for default. After completing the steps, open settings again to ensure they apply only to Word settings. Next, type “braille mode” twice, press F6, and use Alt+G to access languages and set your preferences. For those requiring a Spanish Braille display or keyboard, ensure your device is compatible with your software settings. More Video lessons can help.
This lesson is Spain (international) Input and Output are Spanish Grade 1
2. Tab to profile languages and set those up and enter to close Jaws settings
3. Alt 8 to make sure dots 7,8 show on display-accept and close settings
1. Set up Voice profile in Jaws-open context menu, options, voices, add a profile
1. In Word-change voice quickly: 2 options: on keyboard- ctrl shift window L to change profile or on Focus -2,3,4,5,7, space to change languages)
2. Insert+ctrl+S to change to Spanish profile or to other language
3. G+7+space on Focus to computer braille (which will output Spanish grade 1)– capital is dot 7 under capital letter on display
For Braille with Braille Display on Computer
Práctica:
á 1,2,3,5,6
é 2,3,4,6
í 3,4
ó 3,4,6
ú 2,3,4,5,6
ü 1,2,5,6,8
ñ 1,2,4,5,6, 8
Punctuation for Spanish Braille using Braille Display
! 2,3,5, 7 is exclamation mark
inverted ! is 2,3,5, 7, 8 is upside down exclamation mark
Period is . is dot 3
Comma is , is dot 2 for comma
question mark is ? is dot 2, 6
upside down question mark or inverted ? is 2,6,7
Spanish Braille for Keyboard and JAWS
Lower Case Letters
á (lower case a, acute accent) = Press Ctrl + ‘ (apostrophe), then the letter a é (lower case e, acute accent) = Press Ctrl + ‘ (apostrophe), then the letter e í (lower case i, acute accent) = Press Ctrl + ‘ (apostrophe), then the letter i ó (lower case o, acute accent) = Press Ctrl + ‘ (apostrophe), then the letter o ú (lower case u, acute accent) = Press Ctrl + ‘ (apostrophe), then the letter u ñ (lower case n, tilde accent) = Press Ctrl + Shift + ~ (tilde), then the letter n ü (lower case u, diaeresis accent) = Press Ctrl + Shift + : (colon), then the letter u
Upper Case Letters
Á (upper case A, acute accent) = Press Ctrl + ‘ (apostrophe), then Shift + a É (upper case E, acute accent) = Press Ctrl + ‘ (apostrophe), then Shift + e Í (upper case I, acute accent) = Press Ctrl + ‘ (apostrophe), then Shift + i Ó (upper case O, acute accent) = Press Ctrl + ‘ (apostrophe), then Shift + o Ú (upper case U, acute accent) = Press Ctrl + ‘ (apostrophe), then Shift + u Ñ (upper case N, tilde accent) = Press Ctrl + Shift + ~ (tilde), then Shift + n Ü (upper case U, diaeresis accent) = Press Ctrl + Shift + : (colon), then Shift + u
Hasta la vista / Hasta luego. See you / See you later.
Hasta pronto. See you soon.
Hasta mañana. See you tomorrow.
(Muchas) Gracias.
Thank you (very much).
De nada. You’re welcome.
Bienvenidos Welcome
Lo siento I’m sorry
Con permiso / Perdón / Disculpe Excuse me / Pardon me
¡Vamos! Let’s go!
¿Cómo está usted? How are you? (formal)
¿Cómo estás? How are you? (informal)
Insert+4 for eacute in
¿Qué tal? How’s it going?
Bien / Muy bien Good / Very good
Insert+4 for acute in Más below
Mal / Muy mal / Más o menos Bad / Very bad / OK
Sí / No Yes / No
¿Cómo?
¿Cómo se llama usted? What is your name? (formal)
¿Cómo te llamas? What is your name? (informal)
Me llamo… / Mi nombre es… My name is…
Mucho gusto. / Encantado. Nice to meet you.
Immersion in Language
Here is the sequence of learning in order to learn any language well:
The time it takes to learn a new language, like Spanish, while living in a country where it is the only language spoken, depends on several factors. However, here are general timelines and considerations:
1. Immersion Benefits
Living in a Spanish-speaking country accelerates learning because you’re constantly exposed to the language in real-life situations like:
Listening: Conversations, TV, radio, and announcements.
Speaking: Daily interactions with locals, from shopping to asking for directions.
Reading and Writing: Street signs, menus, newspapers, and more.
2. Language Learning Proficiency Levels
The Common European Framework of Reference for Languages (CEFR) breaks language learning into six levels:
A1 (Beginner): Basic phrases and conversations (3–6 months).
A2 (Elementary): Can understand simple texts and conversations (6–12 months).
B1 (Intermediate): Hold conversations on familiar topics and function in everyday life (12–18 months).
B2 (Upper Intermediate): Fluent in most situations, including work and travel (18 months–2 years).
C1 (Advanced): Understand complex topics and engage in nuanced conversation (2–3 years).
C2 (Proficient): Full mastery of the language, similar to a native speaker (3+ years).
Factors that will Determine Speed
3. Factors That Affect Learning Speed
Motivation and Attitude: Strong motivation and a positive mindset can accelerate your progress.
Practice Consistency: Daily practice, speaking, listening, and reading in Spanish speeds up learning.
Prior Language Experience: If you’re already familiar with Romance languages (e.g., Italian or French), learning Spanish might be faster due to similarities in vocabulary and grammar.
Formal Education: Taking classes, whether in person or online, and using language apps like Duolingo or Babbel can help structure your learning and improve your skills more quickly.
Social Interaction: Making friends who are native speakers or joining local groups can enhance your conversational abilities.
4. Realistic Expectations
– For basic conversational fluency (A2-B1), expect about 6 months to 1 year of immersion if you’re dedicated and practicing regularly.
– To reach an advanced level (C1), you might need 2 to 3 years of living and interacting in the language full-time.
5. Cultural Immersion
Your understanding of Spanish will deepen faster if you immerse yourself in the local culture, customs, and idiomatic expressions. Engaging in local activities, reading newspapers, and watching TV shows will all help you learn the language more organically.
Summary:
On average, 6 months to 1 year of immersion in a Spanish-speaking country should allow you to gain conversational fluency, with full mastery taking about 2–3 years, depending on your dedication and resources.
Adult Learning Speed
Sequence of learning for an adult
For adults, learning a new language like Spanish while living in a country where it’s the only language spoken can still be highly effective, but several factors can influence the timeline. Here’s what an adult learner can expect:
1. General Time frames for Adult Learners
Conversational fluency (A2-B1 level): Typically achievable in 6 months to 1 year of immersion.
Advanced proficiency (B2-C1 level): May take 1.5 to 2.5 years of consistent use and practice.
Full fluency (C2 level): Can take 3 years or more, depending on factors like exposure, practice, and language complexity.
2. Factors Affecting Adult Learning Speed
Cognitive Flexibility: Adults tend to be more methodical learners than children, but they can sometimes struggle with retaining new vocabulary and adapting to different grammar structures.
Prior Experience: If the adult already speaks a Romance language (like Italian or French), they will likely learn Spanish more quickly because of the structural similarities.
Learning Environment: The more opportunities for immersion—such as interacting with native speakers, engaging in cultural activities, and using Spanish in daily tasks—the faster the progress.
Language Learning Methods: Adults often benefit from a combination of formal learning (e.g., classes, tutors) and informal learning (e.g., conversations, media consumption).
Motivation and Consistency: Adults with clear goals and regular practice (even just 30 minutes a day) tend to progress faster. Maintaining consistent practice is key to long-term retention.
Challenges for Adult Learners
3. Challenges for Adult Learners
Accent and Pronunciation: Adults might find it harder to develop a native-like accent, though this doesn’t prevent them from becoming highly fluent.
Work and Life Responsibilities: Adults often juggle work and personal responsibilities, which can limit the time available for focused language learning.
Grammar: Grasping grammatical structures, verb conjugations, and nuances may take longer for adults compared to younger learners, who tend to absorb new patterns more intuitively.
4. Accelerating Adult Learning
Use Daily Immersion: Engage in conversations, read signs, watch TV shows, and use apps like Duolingo or Babbel to reinforce lessons in real-life situations.
Structured Learning: Enroll in Spanish classes or hire a tutor to build a strong foundation in vocabulary and grammar.
Use Technology: Utilize language-learning apps, podcasts, or online lessons. Watching Spanish media with subtitles can help you pick up common phrases and pronunciation.
– Join Social Circles: Engage with locals, participate in group activities, and use Spanish in daily interactions. This practical experience will help reinforce what you’ve learned.
– Set Realistic Goals: Adults benefit from having clear, incremental goals (e.g., mastering a certain level of vocabulary or holding a 10-minute conversation) to track progress and stay motivated.
Adult Experience
5. Common Experiences for Adults
After 3-6 months, most adults can hold basic conversations, ask for directions, and manage daily interactions in Spanish.
By 1 year, many can discuss familiar topics, navigate most social situations, and understand much of what they hear or read.
Within 2 years, a dedicated adult learner can likely achieve strong conversational fluency and understand complex topics, though nuances and slang may still be challenging.
Summary
For an adult, achieving conversational fluency in Spanish typically takes 6 months to 1 year with immersion and regular practice. Advanced proficiency may take 1.5 to 2.5 years, while full fluency could require 3 years or more, depending on the learner’s background, motivation, and exposure to the language.
Dr. Robinson and her Team at TechVision have made a significant global impact via their Team Mission and Purpose. TechVision specializes in 1:1 remote instruction in education for the blind and visually impaired, serving individuals of all ages. We also train School Teams: transcribers, Teachers of the Blind and other School Personal and work with parents. Their expertise is delivered through personalized, real-time 1:1 remote instruction. This approach empowers students and clients to compete equally with their sighted peers in both education and work.
In this video, Dr. Denise M. Robinson demonstrates how to use the WORD Math Editor and Braille Math Editor with JAWS using LaTeX or Braille. This tutorial is designed for screen reader users, with or without braille displays, who want to improve their math skills.
First, Dr. Robinson introduces the essential tools for using matrices in WORD, including JAWS, a Braille display (if desired), and the WORD Math Editor. She explains how to set up each tool to work together smoothly, which is crucial for creating and editing math content.
Next, the video focuses on creating matrices. Dr. Robinson uses LaTeX to input mathematical expressions. She explains each step clearly, making it easy to follow along. Viewers will learn how to enter rows and columns in a matrix, helping them understand matrix structure.
Then, Dr. Robinson demonstrates how to use auditory feedback, which allows users to hear the math content they are working on. This feature helps ensure accuracy and makes it easier to catch mistakes. Additionally, she shows how to switch between auditory and Braille feedback, providing flexibility for different learning styles.
The video also covers using the Braille display with the math editors. Dr. Robinson explains how to navigate through the matrix using Braille and provides tips on reading and editing the content efficiently. This section is particularly helpful for users who rely on Braille for their work.
Finally, the tutorial concludes with a review of the key points. Dr. Robinson summarizes the steps for creating and editing matrices. She encourages viewers to practice using the tools and techniques demonstrated in the video. By the end of the tutorial, users will feel more confident in their ability to work with math content.