Learning how to teach or learn Nemeth math using assistive technology can seem challenging, but with the right tools and approach, it becomes manageable and effective. Whether you’re a parent helping your child, an educator supporting students, or an independent learner, using a Focus 40 Braille Display and JAWS screen reader provides an accessible way to master Nemeth code. In this guide, I will walk you through setting up your technology and using the Braille Math Editor to confidently teach and learn math concepts from basic arithmetic to advanced algebra. Let’s simplify the process and enhance your skills.
Setup Nemeth with JAWS
Start by setting JAWS to the proper Nemeth settings. Access the JAWS Settings Center with Insert + 6 then Control+Shift+D to set default: type “Braille m” in the search box. Navigate to “Braille Mode” and make sure you hear “Structured” mode, ensuring that both the active cursor and Braille cursor follow each other. This will allow you to track what the student is doing on their display.
Alt + F to language profiles, and alt + D to details. Once open Alt + M to math options and up arrow to Nemeth if it is not selected. This will ensure that math expressions are correctly read and displayed in Nemeth Braille. Enter to close, Alt + A to apply and enter to close.
Teach or learn Nemeth JAWS, braille display and BME
Using the Braille Math Editor is key to teaching and learning math effectively. Type out equations like “1+2=3” or more complex algebraic expressions, and feel the Braille output directly on your Braille display. Correct mistakes quickly using the Braille display and JAWS auditory feedback, making it easy to follow along. Use the Braille Viewer to see it visually and compare with the Braille Display by opening JAWS context menu, go to Utilities and Braille Viewer to turn it on.
This step-by-step approach works for basic arithmetic to complex math such as algebra, Trigonometry, calculus and beyond. Both the Braille Math Editor and Word Math Editor can help you visualize and interact with Nemeth code to easily learn it and/or teach others. Practice consistently to improve your tactile reading skills and build confidence in math.
By following this guide, you’ll gain the tools to teach and learn Nemeth math efficiently, whether for yourself or for your students.
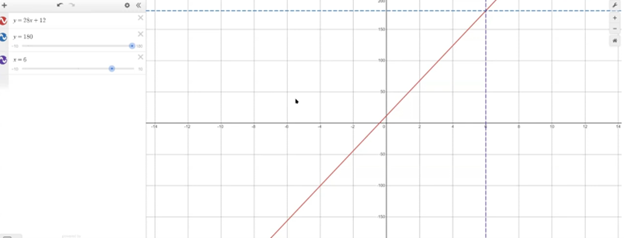
The DESMOS Graphing Calculator offers a powerful and accessible tool for blind and visually impaired students to explore geometry and all mathematics. By integrating seamlessly with screen readers like JAWS and NVDA, DESMOS provides real-time audio feedback and tactile support, enabling students to plot points, create shapes, and analyze graphs. With features like Audio Trace and braille compatibility, this innovative tool ensures that all learners can engage meaningfully with geometric concepts, fostering independence and confidence in STEM learning. Combine with embossing what is created gives the whole picture to a student under their fingers.
Using the DESMOS Graphing Calculator with a screen reader, such as JAWS or NVDA, gives blind and visually impaired students accessible tools to engage with geometry and other mathematical concepts.
Key Features of Geometry in DESMOS graphing Calculator with screen reader
Screen Reader Compatibility: First, DESMOS integrates with screen readers, offering spoken feedback for graph creation, interaction, and navigation. It reads inputs aloud.
Graphing and Plotting Points: Next, students plot points, lines, or shapes using equations or coordinates. The screen reader then reads back the corresponding inputs and outputs.
Geometric Shapes: Additionally, DESMOS supports various geometric figures like circles and triangles. Students define these shapes, and the screen reader provides immediate feedback.
Accessibility Features: Moreover, the “Audio Trace” feature converts visual graphs into sound. Pitch and tone changes represent graph shifts, offering an auditory experience.
Tactile Representation: For tactile interaction, emboss the graph or use refreshable braille displays which allow students to access the calculator’s output, further enhancing their understanding of graphs.
Exploration of Graphs: Meanwhile, users navigate graphs with arrow keys, and the screen reader offers real-time feedback on points, intersections, and key areas.
Labeling and Describing: Finally, DESMOS allows labeling of points and graphs. The screen reader reads these labels aloud, improving organization and understanding of complex graphs.
Desmos Geometry shape with dotted line solutions
By leveraging these features, blind or visually impaired students can effectively learn and apply geometric concepts, making DESMOS a valuable tool for STEM education. If Desmos is not an option Excel works well also with shapes. Continue learning anything you need and if you cannot find it, just ask.
Embossing graphics for Blind Students: Dr. Robinson offers this video for families and transcribers needing to adapt images for blind students to “see.” This video offers a straightforward approach to creating accessible Venn diagrams using the technique to emboss graphics with Tiger.
Dr. Robinson begins by explaining how to handle a Venn Diagram or any graphic. She demonstrates using a Venn diagram with two large, intertwined circles, where all parts are shaded. Such images blur when transferred into Tiger Designer, a common tool for producing tactile graphics. She recommends redrawing the diagram for clarity, ease, and speed. This approach is more effective than fixing the shaded areas when you emboss graphics with Tiger.
How to Emboss the Tiger Graphic
To show blur issues, she creates a new diagram, by opening Tiger Designer and pressing Control + N to start a new document. After ensuring the default settings are correct, pasting an image using Control + V will result in a blurry output due to the shading. In this case, Dr. Robinson suggests redrawing the Venn diagram. Ctrl + N for new again and Alt+O or click on Tools. Select a line width of 2.5 or 3, as thicker lines are easier for students to feel when you emboss graphics with Tiger.
Dr. Robinson then demonstrates how to draw two circles from the tool’s menu, representing the basic structure of the Venn diagram. She emphasizes the importance of labeling the sections and typing in uncontracted Braille works fine. She notes that while parents may not be familiar with contractions, students are accustomed to reading uncontracted Braille. It’s crucial to use these steps to emboss graphics with Tiger accurately.
Finally, Dr. Robinson shows how to emboss the Tiger graphic with Ctrl + P to emboss. Ensure the correct printer model and settings are applied. The final result will be a clear and accessible tactile diagram that the student can easily interpret.
Learning Spanish Braille involves understanding the unique characteristics of the Braille system used for the Spanish language. Then build on the foundational skills of Braille reading and writing. Here’s how to approach it:
1. Understand the Braille Alphabet in Spanish
Spanish Braille follows the same 6-dot system as English Braille.
Extra characters are included to represent letters with accents and special characters used in Spanish.
Key additions include:
Ñ: Represented by a unique Braille symbol.
Accented vowels: Á, É, Í, Ó, Ú have distinct Braille symbols.
Punctuation: Spanish uses inverted question marks (¿) and exclamation marks (¡), and these have their own symbols in Spanish Braille.
2. Start with the Basics
– Begin by learning the standard Braille alphabet for unaccented letters, numbers, and common punctuation marks.
– Practice reading and writing these basic symbols to build fluency.
3. Familiarize Yourself with the Extra Characters
– Learn the Braille symbols for accented vowels (á, é, í, ó, ú) and ñ.
– Read and practice with materials specifically written in Spanish Braille to develop fluency.
– You can find books, articles, or educational materials written in Spanish Braille to improve your reading skills online.
5. Engage with Digital Tools
– Tools like Braille displays and screen readers can be set to Spanish to help reinforce learning. See below list of all Spanish symbols
– Software like JAWS or NVDA can be configured to support Braille output in Spanish. This allows for real-time practice with written content.
6. Practice Writing Spanish Braille
– Use a Braille writer to practice writing in Spanish Braille. Focus on mastering punctuation and special characters.
– The fastest and easiest to edit option will be to practice typing or brailling on a display. The FOCUS 40 Braille Display or Brailliant Braille Display to write out Spanish words and sentences.
7. Learn through Immersive Activities
– Reinforce learning, engage in practical activities like labeling objects in Spanish Braille. Work with bilingual Braille texts (Spanish and English).
8. Find a Teacher or Tutor
– If possible, work with an instructor who is fluent in Spanish Braille and the language. They can guide you through the nuances of the language and provide feedback on your progress.
– Organizations specializing in Braille education, like TechVision, can help offer resources or tutors for Spanish Braille.
8. Go to a Spanish Speaking Country
-Totally immerse yourself within a culture that will speak the language you want to learn well.
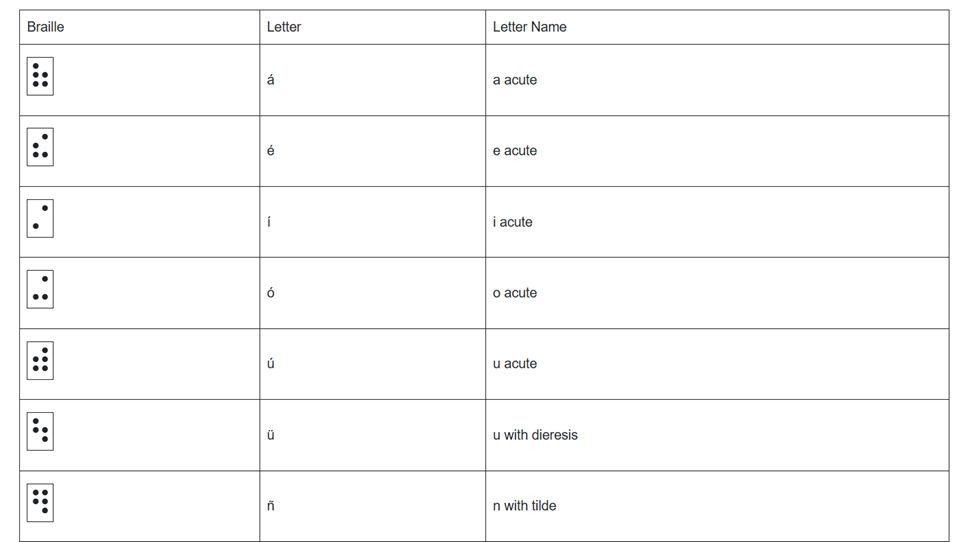
Spanish-Española Symbols
Spanish-Española 1. Jaws settings: Set up braille profile – insert 6 (ctrl shift D) for default. After completing the steps, open settings again to ensure they apply only to Word settings. Next, type “braille mode” twice, press F6, and use Alt+G to access languages and set your preferences. For those requiring a Spanish Braille display or keyboard, ensure your device is compatible with your software settings. More Video lessons can help.
This lesson is Spain (international) Input and Output are Spanish Grade 1
2. Tab to profile languages and set those up and enter to close Jaws settings
3. Alt 8 to make sure dots 7,8 show on display-accept and close settings
1. Set up Voice profile in Jaws-open context menu, options, voices, add a profile
1. In Word-change voice quickly: 2 options: on keyboard- ctrl shift window L to change profile or on Focus -2,3,4,5,7, space to change languages)
2. Insert+ctrl+S to change to Spanish profile or to other language
3. G+7+space on Focus to computer braille (which will output Spanish grade 1)– capital is dot 7 under capital letter on display
For Braille with Braille Display on Computer
Práctica:
á 1,2,3,5,6
é 2,3,4,6
í 3,4
ó 3,4,6
ú 2,3,4,5,6
ü 1,2,5,6,8
ñ 1,2,4,5,6, 8
Punctuation for Spanish Braille using Braille Display
! 2,3,5, 7 is exclamation mark
inverted ! is 2,3,5, 7, 8 is upside down exclamation mark
Period is . is dot 3
Comma is , is dot 2 for comma
question mark is ? is dot 2, 6
upside down question mark or inverted ? is 2,6,7
Spanish Braille for Keyboard and JAWS
Lower Case Letters
á (lower case a, acute accent) = Press Ctrl + ‘ (apostrophe), then the letter a é (lower case e, acute accent) = Press Ctrl + ‘ (apostrophe), then the letter e í (lower case i, acute accent) = Press Ctrl + ‘ (apostrophe), then the letter i ó (lower case o, acute accent) = Press Ctrl + ‘ (apostrophe), then the letter o ú (lower case u, acute accent) = Press Ctrl + ‘ (apostrophe), then the letter u ñ (lower case n, tilde accent) = Press Ctrl + Shift + ~ (tilde), then the letter n ü (lower case u, diaeresis accent) = Press Ctrl + Shift + : (colon), then the letter u
Upper Case Letters
Á (upper case A, acute accent) = Press Ctrl + ‘ (apostrophe), then Shift + a É (upper case E, acute accent) = Press Ctrl + ‘ (apostrophe), then Shift + e Í (upper case I, acute accent) = Press Ctrl + ‘ (apostrophe), then Shift + i Ó (upper case O, acute accent) = Press Ctrl + ‘ (apostrophe), then Shift + o Ú (upper case U, acute accent) = Press Ctrl + ‘ (apostrophe), then Shift + u Ñ (upper case N, tilde accent) = Press Ctrl + Shift + ~ (tilde), then Shift + n Ü (upper case U, diaeresis accent) = Press Ctrl + Shift + : (colon), then Shift + u
Hasta la vista / Hasta luego. See you / See you later.
Hasta pronto. See you soon.
Hasta mañana. See you tomorrow.
(Muchas) Gracias.
Thank you (very much).
De nada. You’re welcome.
Bienvenidos Welcome
Lo siento I’m sorry
Con permiso / Perdón / Disculpe Excuse me / Pardon me
¡Vamos! Let’s go!
¿Cómo está usted? How are you? (formal)
¿Cómo estás? How are you? (informal)
Insert+4 for eacute in
¿Qué tal? How’s it going?
Bien / Muy bien Good / Very good
Insert+4 for acute in Más below
Mal / Muy mal / Más o menos Bad / Very bad / OK
Sí / No Yes / No
¿Cómo?
¿Cómo se llama usted? What is your name? (formal)
¿Cómo te llamas? What is your name? (informal)
Me llamo… / Mi nombre es… My name is…
Mucho gusto. / Encantado. Nice to meet you.
Immersion in Language
Here is the sequence of learning in order to learn any language well:
The time it takes to learn a new language, like Spanish, while living in a country where it is the only language spoken, depends on several factors. However, here are general timelines and considerations:
1. Immersion Benefits
Living in a Spanish-speaking country accelerates learning because you’re constantly exposed to the language in real-life situations like:
Listening: Conversations, TV, radio, and announcements.
Speaking: Daily interactions with locals, from shopping to asking for directions.
Reading and Writing: Street signs, menus, newspapers, and more.
2. Language Learning Proficiency Levels
The Common European Framework of Reference for Languages (CEFR) breaks language learning into six levels:
A1 (Beginner): Basic phrases and conversations (3–6 months).
A2 (Elementary): Can understand simple texts and conversations (6–12 months).
B1 (Intermediate): Hold conversations on familiar topics and function in everyday life (12–18 months).
B2 (Upper Intermediate): Fluent in most situations, including work and travel (18 months–2 years).
C1 (Advanced): Understand complex topics and engage in nuanced conversation (2–3 years).
C2 (Proficient): Full mastery of the language, similar to a native speaker (3+ years).
Factors that will Determine Speed
3. Factors That Affect Learning Speed
Motivation and Attitude: Strong motivation and a positive mindset can accelerate your progress.
Practice Consistency: Daily practice, speaking, listening, and reading in Spanish speeds up learning.
Prior Language Experience: If you’re already familiar with Romance languages (e.g., Italian or French), learning Spanish might be faster due to similarities in vocabulary and grammar.
Formal Education: Taking classes, whether in person or online, and using language apps like Duolingo or Babbel can help structure your learning and improve your skills more quickly.
Social Interaction: Making friends who are native speakers or joining local groups can enhance your conversational abilities.
4. Realistic Expectations
– For basic conversational fluency (A2-B1), expect about 6 months to 1 year of immersion if you’re dedicated and practicing regularly.
– To reach an advanced level (C1), you might need 2 to 3 years of living and interacting in the language full-time.
5. Cultural Immersion
Your understanding of Spanish will deepen faster if you immerse yourself in the local culture, customs, and idiomatic expressions. Engaging in local activities, reading newspapers, and watching TV shows will all help you learn the language more organically.
Summary:
On average, 6 months to 1 year of immersion in a Spanish-speaking country should allow you to gain conversational fluency, with full mastery taking about 2–3 years, depending on your dedication and resources.
Adult Learning Speed
Sequence of learning for an adult
For adults, learning a new language like Spanish while living in a country where it’s the only language spoken can still be highly effective, but several factors can influence the timeline. Here’s what an adult learner can expect:
1. General Time frames for Adult Learners
Conversational fluency (A2-B1 level): Typically achievable in 6 months to 1 year of immersion.
Advanced proficiency (B2-C1 level): May take 1.5 to 2.5 years of consistent use and practice.
Full fluency (C2 level): Can take 3 years or more, depending on factors like exposure, practice, and language complexity.
2. Factors Affecting Adult Learning Speed
Cognitive Flexibility: Adults tend to be more methodical learners than children, but they can sometimes struggle with retaining new vocabulary and adapting to different grammar structures.
Prior Experience: If the adult already speaks a Romance language (like Italian or French), they will likely learn Spanish more quickly because of the structural similarities.
Learning Environment: The more opportunities for immersion—such as interacting with native speakers, engaging in cultural activities, and using Spanish in daily tasks—the faster the progress.
Language Learning Methods: Adults often benefit from a combination of formal learning (e.g., classes, tutors) and informal learning (e.g., conversations, media consumption).
Motivation and Consistency: Adults with clear goals and regular practice (even just 30 minutes a day) tend to progress faster. Maintaining consistent practice is key to long-term retention.
Challenges for Adult Learners
3. Challenges for Adult Learners
Accent and Pronunciation: Adults might find it harder to develop a native-like accent, though this doesn’t prevent them from becoming highly fluent.
Work and Life Responsibilities: Adults often juggle work and personal responsibilities, which can limit the time available for focused language learning.
Grammar: Grasping grammatical structures, verb conjugations, and nuances may take longer for adults compared to younger learners, who tend to absorb new patterns more intuitively.
4. Accelerating Adult Learning
Use Daily Immersion: Engage in conversations, read signs, watch TV shows, and use apps like Duolingo or Babbel to reinforce lessons in real-life situations.
Structured Learning: Enroll in Spanish classes or hire a tutor to build a strong foundation in vocabulary and grammar.
Use Technology: Utilize language-learning apps, podcasts, or online lessons. Watching Spanish media with subtitles can help you pick up common phrases and pronunciation.
– Join Social Circles: Engage with locals, participate in group activities, and use Spanish in daily interactions. This practical experience will help reinforce what you’ve learned.
– Set Realistic Goals: Adults benefit from having clear, incremental goals (e.g., mastering a certain level of vocabulary or holding a 10-minute conversation) to track progress and stay motivated.
Adult Experience
5. Common Experiences for Adults
After 3-6 months, most adults can hold basic conversations, ask for directions, and manage daily interactions in Spanish.
By 1 year, many can discuss familiar topics, navigate most social situations, and understand much of what they hear or read.
Within 2 years, a dedicated adult learner can likely achieve strong conversational fluency and understand complex topics, though nuances and slang may still be challenging.
Summary
For an adult, achieving conversational fluency in Spanish typically takes 6 months to 1 year with immersion and regular practice. Advanced proficiency may take 1.5 to 2.5 years, while full fluency could require 3 years or more, depending on the learner’s background, motivation, and exposure to the language.
Dr. Robinson and her Team at TechVision have made a significant global impact via their Team Mission and Purpose. TechVision specializes in 1:1 remote instruction in education for the blind and visually impaired, serving individuals of all ages. We also train School Teams: transcribers, Teachers of the Blind and other School Personal and work with parents. Their expertise is delivered through personalized, real-time 1:1 remote instruction. This approach empowers students and clients to compete equally with their sighted peers in both education and work.
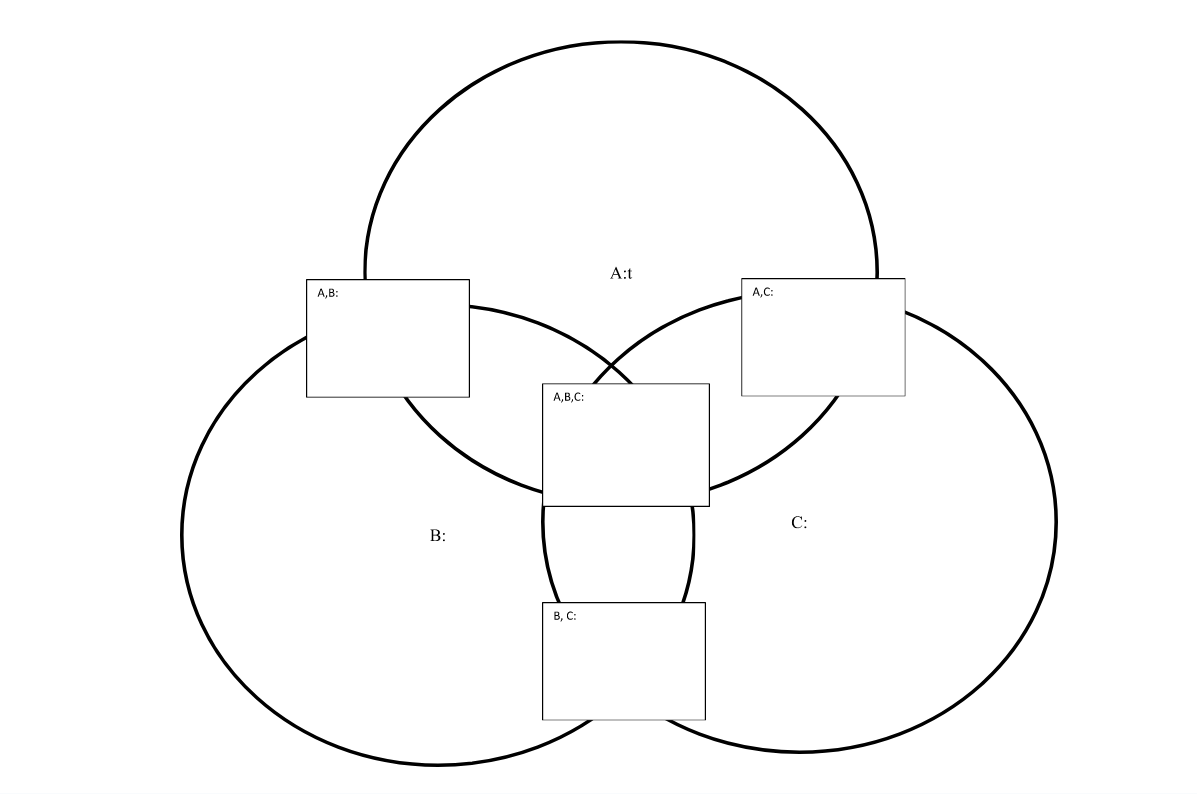
Using Venn diagrams with screen readers involves strategic design and specific keyboard commands to ensure accessibility. Each set in the diagram must have clear, descriptive labels to guide screen reader users effectively. These labels help users understand the content without needing visual cues. Alt text plays a crucial role by summarizing the Venn diagram’s purpose, the sets involved, and their intersections. This concise description enables screen reader users to grasp the diagram’s structure and intent.
Keyboard navigation is essential for screen reader users to interact with Venn diagrams. The Tab key allows users to move through interactive elements like text boxes or linked descriptions associated with the diagram. Arrow keys are useful for navigating within tables or text boxes that describe the diagram’s content. This functionality ensures that users can access all relevant information without relying on visual input.
Screen reader software, like JAWS or NVDA, includes commands that facilitate navigation. In JAWS, the Ctrl+H command lets users jump between headings, making it easier to navigate through complex content. NVDA users can use the Ctrl+Alt+Arrow keys to move between headings or landmarks within a webpage or document. These commands are vital for quickly accessing different parts of the content related to the Venn diagram.
Incorporating structured content enhances the usability of Venn diagrams for screen reader users. Headings, bullet points, and numbered lists help break down complex information into manageable sections. This structure allows users to follow the logical flow of information without confusion. So, Screen reader users can also navigate through tables that complement the Venn diagram. Tables list elements within each set and describe intersections, making the relationships between sets clear. JAWS users can move horizontally between cells using Ctrl+Alt+Right/Left Arrow keys, and vertically with Ctrl+Alt+Up/Down Arrow keys.
Careful Planning
Creating accessible Venn diagrams for screen reader users requires careful planning. By using descriptive text, alt text, structured content, and keyboard commands, educators and content creators can ensure that all users, including those who rely on screen readers, can effectively interact with and understand Venn diagrams. These strategies are essential for making complex visual information accessible to everyone. More Video Lessons here
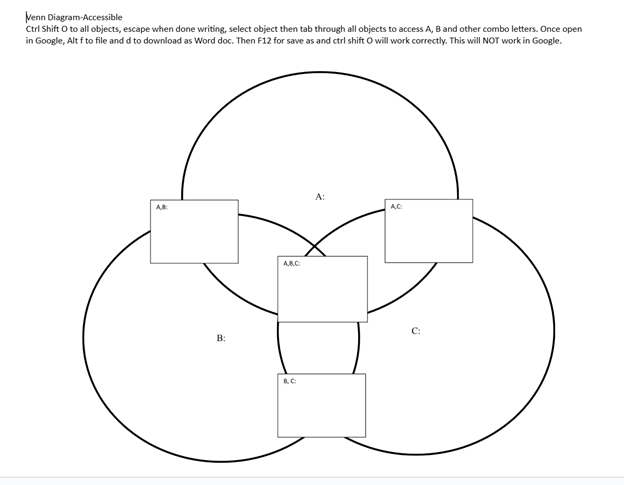
Create your Venn Diagram via WORD and shapes, applications key to move to back or forward then use these commands to access: Venn Diagram-Accessible
Ctrl Shift O to all objects, escape when done writing, select object then tab through all objects to access A, B and other combo letters. Once open in Google, Alt f to file and d to download as Word doc. Then F12 for save as and Ctrl Shift O will work correctly. This will NOT work in Google.
When done, have student emboss off a copy to feel what it is like and if you are having computer issues, tweak it to work better with screen reader.
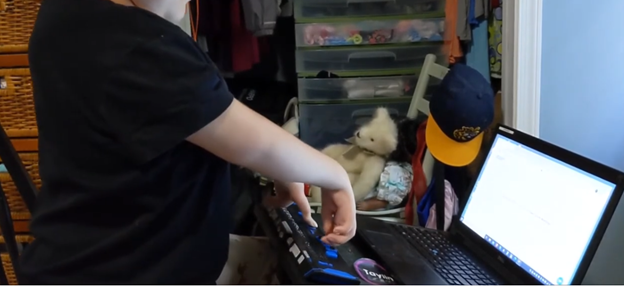
Kaleigh was born with very special hands. So, whether you have 10 fingers or 2 or 3, there is always an easy way to use a braille display to control your computer.
Computer Local Admin access is Crucial at all education levels. Dr. Robinson, an Assistive Technology and IT specialist, sets up, maintains, and controls all the computers used in TechVision programs while TechVision Team continues teaching students to manage their own technology. She emphasizes the importance of blind students having local admin access on their school computers so they can make necessary updates and changes to their laptops as needed.
Firstly, she highlights that anti-virus software like Kaspersky or Sophos often interferes with screen readers. Instead, Dr. Robinson recommends using Malwarebytes with Microsoft Defender, as it provides strong protection without disrupting screen reader functionality. Having Computer Local Admin access ensures students can implement these software changes.
Dr. Robinson also explains the need for screen readers such as JAWS. Schools often filter out essential websites and programs like Freedom Scientific, which students require for their studies. With local admin access, students can update their screen readers and related software, which is necessary to keep their devices running smoothly. These updates are crucial and happen every few months. Computer Local Admin access allows students to manage these updates efficiently.
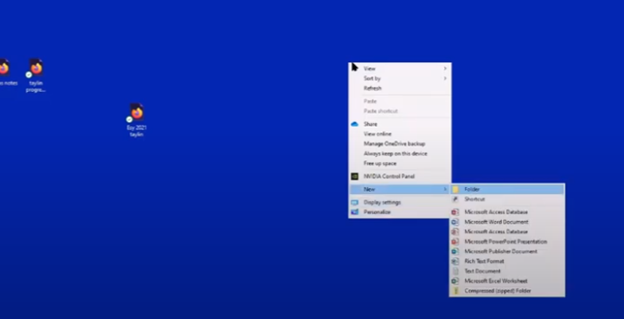
In addition, students must manage their desktops efficiently. They need to pin important programs, such as JAWS, to the taskbar for quick access and adjust their settings without assistance. Pinning their school sites to the desktop make quick access to any site. Through the context menu, students can navigate and personalize their desktop to meet their needs.
Computer Local Admin access to Applications Key on desktop to access anything on the computer
The run dialog box is another essential tool with CTRL+R. Students need to clear temporary files, which can slow down screen readers. Since screen readers are memory-intensive, removing these files improves both the computer’s speed and network performance. Computer Local Admin access is required for these maintenance tasks.
Dr. Robinson further emphasizes the importance of Office 365, especially for math tasks. Using the math editor, students can create and solve equations that read seamlessly on a braille display. This access is crucial for academic success, particularly in STEM subjects.
Lastly, Dr. Robinson stresses the necessity of file explorer -Windows+E and Bluetooth settings. Without a mouse, blind students rely on file explorer to organize their files. Bluetooth access is also essential for reconnecting braille displays and other devices.
In summary, Dr. Robinson believes local admin rights are essential for blind students to manage their technology independently, keep their devices updated, and fully engage in their education. This allows them full access for a lifetime. The TechVision Team ensures students learn essential skills to manage and update their devices independently, preparing them for a lifetime of technological adaptation. As technology evolves, these skills are crucial. Computer Local Admin access is vital for securing and maintaining employment so they know the updates needed, in an increasingly digital world.
Connecting a Focus Braille Display to a computer using JAWS screen reader enhances accessibility for blind and visually impaired users. The process of connecting a Connect Focus 40 Braille display allows users to interact with digital content through tactile feedback, improving independence and productivity. By following a few simple steps, you can seamlessly connect the Braille display via USB or Bluetooth and configure it in JAWS for optimal use. This guide provides an easy-to-follow approach for setting up your Focus Braille Display and ensuring smooth integration with JAWS.
Here are the steps to connect a Focus Braille Display to your computer using JAWS screen reader:
Connect Focus 40 Braille Display or other displays
Power on the Focus Braille Display
Ensure the Focus Braille Display is fully charged and powered on before connecting.
Connect the Display to the Computer
Use either USB or Bluetooth to connect the Focus Braille Display to your computer.
For USB: Plug the USB cable into both the Braille display and the computer.
For Bluetooth: Enable your computer’s Bluetooth and pair the Focus display in the Bluetooth settings.
Enable Braille in JAWS
Open JAWS by pressing Insert + J. Then, press Alt + O to open the Options menu.
Press B to select Braille or use the arrow keys to navigate, then press Enter.
Select the Braille Display
In the Braille settings window, ensure the “Focus” display is selected under the Default Braille Display dropdown.
If it’s not selected, use the arrow keys to choose “Focus” or manually type the model of the Braille display.
Check Braille Display Connection
After selecting the correct display, click OK or press Enter to confirm the connection.
JAWS should now detect the Focus Braille Display. Braille output should appear, and the display keys will control JAWS.
Configure Settings (Optional)
To further customize settings like verbosity and Braille output, go to Braille options via Insert + J, Alt + O, and B.
Test the Connection
Use JAWS commands on your keyboard or the Focus Braille Display keys to navigate.
If the connection works, the Braille display will respond to the text output from the computer.
By following these steps, you should successfully connect your Focus Braille Display to a computer using JAWS.
Dr. Robinson explains the three toggles to Switch Focus Braille Modes quickly on your Braille display. One toggle puts you into Braille mode for all Braille tasks. Another toggle switches to computer braille which inputs direct Nemeth code for math. The third toggle is for computer in and contracted out for either Nemeth or UEB math.
Access Jaws settings to set up Focus Braille Mode Options
First, press Insert + 6 to check your settings. Type “braille m” and down arrow to “Braille mode.” You can access options one by one with arrow keys or press F6 to jump to structured then Alt+T to jump to output. Press down arrow to UEB Grade 2 then tab to input and c to computer braille first to uncheck the box that says “Show current word in computer Braille”. Shift tab back up to input and choose UEB for both input and output. You can have other options also but this is what used here.
Tab through back to For structured Braille mode, check “Active cursor follows Braille cursor” and “Braille cursor follows active cursor.” These settings help beginners, especially when working with sighted personnel learning Braille to following along visually for instructor. Always have a certified Braille instructor (TVI) to teach reading and writing Braille correctly.
Always press Alt + A to apply settings before exiting. However, if you do not like the extra information at the start of your display, shift tab back to search in settings and type status and enter. Down arrow to status and F6 and down to right (to place status on the right of display) and down to none and apply that and close. When you first turn on your Braille display, the status characters may be confusing to young learners. Additional Braille Display Lessons here.
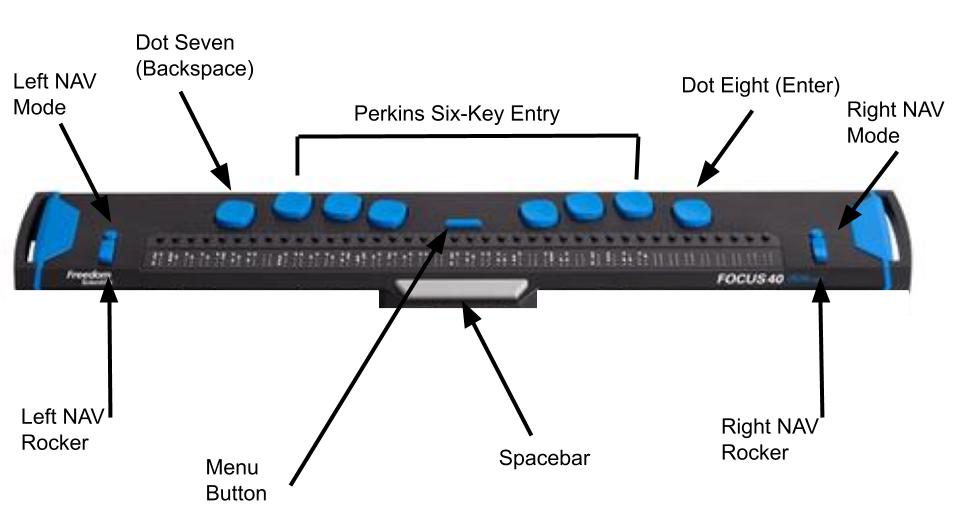
Focus Braille Display Image with Button options
Switch Focus Braille display modes quickly on display
For advanced users, status dots help in tables and other navigation. Beginners should start with “none.” Press Alt + A to apply changes, then enter to close. The Braille display functions like a Braille writer. Keys 1 2 3 are on the left, and keys 4 5 6 are on the right with space in between the left and right side. The left pinky key is backspace, which changes to dot 7, and the right pinky is enter or dot 8 in combination with other keys.
Creating Geometry tables in Desmos provides a structured way to input and explore data, especially for users who rely on screen readers or keyboard navigation. Desmos is designed to be accessible, allowing blind and visually impaired users to create tables and input values using simple keyboard commands. By using the table function, users can input x- and y-values and navigate through cells seamlessly. This accessibility enables full participation in mathematical exploration and data visualization, making Desmos a valuable tool for both students and professionals. Through keyboard shortcuts and screen reader compatibility, creating and managing tables in Desmos becomes an intuitive and efficient process: even creating 2 or more shapes.
To create a table in Desmos, follow these steps, especially if you’re using a screen reader or keyboard navigation:
Creating Geometry Tables in Desmos Using Keyboard:
Open Desmos Graphing Calculator:
Go to the Desmos website and open the graphing calculator interface.
Activate the Add Expression Button:
If you’re using a screen reader, navigate to the “Add Expression” field by pressing Tab until you hear the option.
Enter the Table Command:
Type table() and hit Enter. This will create an empty table. The screen reader will announce that a table has been created, and it will move you into the table input fields.
Fill in Table Values:
To fill in the values for your table, use the arrow keys to navigate between cells.
Input the x-values in the left column and the y-values in the right column.
After typing each value, press Enter to move to the next cell. The screen reader will confirm each input.
Navigation Commands (for Screen Readers):
Move to the Next Cell: Press the Right Arrow or Down Arrow to move between cells.
Move Back: Press the Left Arrow or Up Arrow to go back to previous cells.
Delete an Entry: Use Backspace to delete the contents of a cell.
Add More Rows: Navigate to the last row and press Enter. This will automatically add a new row for more data points.
Keyboard Shortcuts in Desmos:
Navigate between expressions/tables: Use the Up and Down Arrow keys.
Create a new table: Type table() in the expression line.
Results
By typing table() into the Desmos expression field, users can create tables and populate them with x- and y-values. Or just create a Table from menu. Screen readers will provide auditory feedback, helping users navigate through the cells and input values. Desmos’ intuitive keyboard commands make this process efficient for users relying on screen readers or those who prefer keyboard navigation.