Search results for: “low vision”

  • Digital Math with UEB Math, NVDA completing Matrices in WORD Math Editor 365

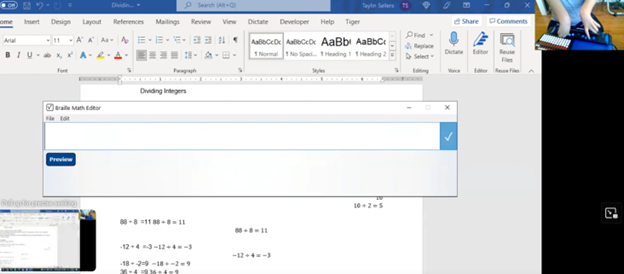
    In this video, Dr. Denise M. Robinson demonstrates how to use the WORD Math Editor and Braille Math Editor with UEB and NVDA. The tutorial, focused on Digital Math with UEB, is specifically designed for screen reader users, with or without braille displays, who want to improve their math skills.

    Matrix work in Word-Digital Math with UEB Math

    First, Dr. Robinson introduces the essential tools needed for using matrices in WORD using UEB Math. These include NVDA though Jaws can be used, a Braille display (if desired), and the WORD Math Editor. She carefully explains how to set up each tool to work seamlessly together. This setup is crucial for creating and editing math content efficiently.

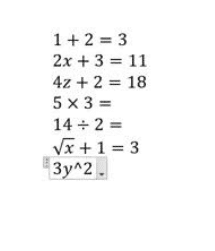
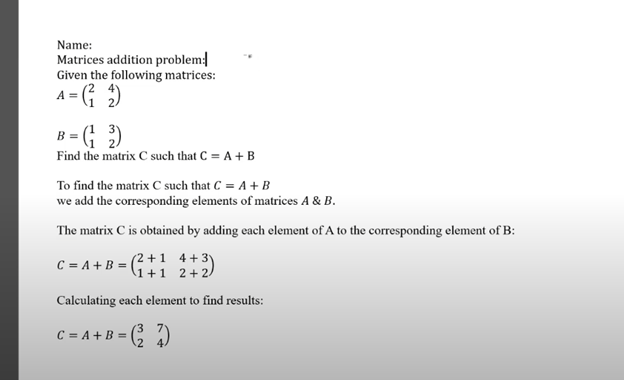
    Next, Dr. Robinson focuses on creating matrices using LaTeX. She walks viewers through each step, making it easy to follow along. The video shows how to enter rows and columns in a matrix, helping users understand the structure of matrices. Dr. Robinson’s clear explanations ensure that even complex steps are understandable.

    The video then demonstrates how to use auditory feedback with the math editors. Dr. Robinson shows how users can hear the math content they are working on. This feature helps in catching mistakes and ensuring accuracy. Additionally, she explains how to switch between auditory and Braille feedback. This flexibility is particularly useful for different learning styles and preferences.

    Dr. Robinson also covers how to navigate through the matrix using a Braille display if desired. She offers practical tips on reading and editing the content efficiently. This section is especially beneficial for those who rely on Braille for their work.

    Finally, the video concludes with a summary of the key points of working in WORD using UEB Math. Dr. Robinson encourages viewers to practice the tools and techniques demonstrated in the video. By the end, users will feel more confident in their ability to create and edit math content using JAWS and the WORD Math Editor

    Also try digital Math with UEB and NVDA

    or UEB Math using Braille Math Editor

    and Accessible UEB Braille Training for free

  • Google Slides-access the table and links with screen reader with navigation commands


    Accessing tables and links in Google Slides with a screen reader is straightforward though at times seems inaccessible. First, ensure screen reader support is enabled. To do this, press Ctrl + Alt + Z. This command activates screen reader support in Google Slides and for more google videos, open link.

    Next, to access the table and links with screen reader with navigation commands, navigate to the table. Use the arrow keys to move through the slides. When you reach the desired slide, press Alt + / to open the search menu. Type “insert table” and press Enter. This action inserts a table into your slide, making use of Google Slides navigation commands.

    table in google docs
    Table in Google Docs

    To navigate the table:

    Use the arrow keys. Each cell is read aloud by the screen reader. To move to the next cell, press the Right Arrow key. To move to the previous cell, press the Left Arrow key. Similarly, use the Up and Down Arrow keys to navigate vertically.

    Also, accessing links in the table and links with screen reader with navigation commands is also simple. Navigate to the slide containing the link. Press Tab to move through the interactive elements. When the screen reader announces the link, press Enter to activate it. Ensure you are familiar with Google Slides navigation commands to make this process easier.

    For more efficient navigation, use the screen reader’s navigation commands. For example, press Ctrl + F to search for specific text. This command helps locate links or table elements quickly. Understanding Google Slides navigation commands can significantly enhance your experience.

    Additionally, you can use headings to organize your slides. Press Ctrl + Alt + 1 to apply a heading. This action helps the screen reader identify sections, making navigation easier.

    Using a screen reader with Google Slides enhances accessibility. Make sure you learn the new commands for Google. By following these steps, visually impaired users can efficiently access tables and links. This integration ensures an inclusive and productive experience. For more: Access Videos Here. Utilizing Google Slides navigation commands enhances accessibility and productivity.


    Often turning Slides into just text helps tremendously along with learning the keyboard commands to navigate more smoothly.

    Other Helpful lessons:

    Making Google Accessible with EDGE: Screen Readers Can’t Read This!

    Save a Google Doc as Plain Text Using Keyboard Commands

  • Emboss Math from WORD Math editor through Braille Blaster and change to Nemeth fast

    To emboss math with braille blaster content from Microsoft Word, start by creating equations in the Math Editor. This tool helps you write complex mathematical expressions clearly. Once you finish, save the document in a .DOCX format, which is compatible with Braille Blaster and other embossing software.

    Next, open Braille Blaster and import your Word document. The software automatically converts your math content into Nemeth code, the Braille standard for mathematics. This conversion ensures visually impaired readers can understand the material. Moreover, Braille Blaster allows quick switching between Unified English Braille (UEB) and Nemeth codes, offering flexibility based on the user’s needs.

    After conversion, to emboss math with Braille Blaster, send the document directly to a Braille embosser. This machine prints the digital Braille content as physical Braille that can be read by touch. Transitioning from digital to physical Braille is quick and efficient with this process.

    picture of braille conversion in braille blaster changing it from ueb to nemeth

    Furthermore, this workflow supports various mathematical formats, making it versatile for different educational levels. For instance, whether you’re working on basic arithmetic or advanced calculus, the combination of Word and Braille Blaster handles it smoothly. This versatility is crucial in educational environments where diverse math content is necessary.

    Advanced Features

    Educators can also take advantage of Braille Blaster’s advanced features, such as the ability to preview the Braille output before embossing. This step allows for checking accuracy and making any necessary adjustments. It’s particularly useful when dealing with intricate math equations that require precise formatting. If you would like to combine this with a graph, Desmos is your key with Tiger software.

    Moreover, the ability to seamlessly switch between UEB and Nemeth within the same document saves time and ensures consistency across educational materials. This dual-mode capability is essential for creating comprehensive resources that cater to different learning needs.

    Using Word’s Math Editor, Braille Blaster, and a Braille embosser not only streamlines the creation of accessible math materials but also enhances the educational experience for visually impaired students. This efficient process ensures that high-quality Braille math content is readily available, supporting inclusive education and empowering students to succeed in their studies. By implementing this workflow, educators can deliver timely, accurate, and accessible learning materials that meet the diverse needs of all students. Here are options if you would like to use NVDA for Math. And to take any math 1 step further in creating graphics, Tiger and graphic embosser will take you there.

    Other Math Lessons:

    Transcribe Math Images

    Quadratic Math

    STEM with Embossing

    Perfect Digital Math

    JAWS and MathCat

    Unicode with UEB Math

    UEB Math with Jaws

    UEB LaTex math with Jaws

    Braille Math in WORD Editor-Multi-line

    Split Braille for Buffer Mode

    More lessons on our YouTube Channel.

  • Use Desmos graphing calculator to emboss graphs & insert Graphs into Math Work for teacher

    To emboss graphs and insert them into math work, start by using the Desmos graphing calculator. Desmos offers an intuitive platform for creating precise graphs, making it ideal for educational settings. Begin by plotting the necessary mathematical functions or data points on Desmos. The calculator’s user-friendly interface allows for easy manipulation and customization of graphs, ensuring they meet your exact needs.

    After creating the graph, export it as an image. Desmos provides options to download the graph in various formats, such as PNG. Once downloaded, you can insert this image into your math document. Whether you’re using Microsoft Word, Google Docs, or another word processor, simply embed the graph as an image. This step integrates the visual data directly into your math work, making it more comprehensive for both teachers and students.

    Next, prepare the document for embossing. If you’re working with visually impaired students, use software like Braille Blaster to convert the document into Braille. While the text content will convert directly, the graph requires special handling. This is where embossing comes in. By using an embosser, you can transform the visual graph into a tactile format that students can feel and understand.

    Furthermore, this workflow ensures that math assignments are accessible to all students, regardless of visual ability. Teachers can also annotate the graphs before embossing, adding labels or descriptions to enhance understanding. This process not only aids in teaching but also reinforces the student’s learning experience.

    shaded graph with 2 equations in desmos

    The combination of Desmos for graph creation and embossing for tactile output makes for a powerful educational tool. It bridges the gap between visual and tactile learning, providing an inclusive approach to math education. By following these steps, educators can effectively integrate graphs into math work, ensuring that all students have the tools they need to succeed.

    More lessons at TechVision YouTube Channel

  • Braille Math editor Contracted out, computer in mode with Tay–most efficient

    Braille Math Editor Mode on Display

    In this video, Dr. Denise Robinson guides Tay in proper Braille Math Editor Mode on her FOCUS Display. The session begins with Dr. Robinson reminding Tay how to change the computer’s mode to “contracted out/computer in.” This change ensures proper Braille math output, which simplifies the process and reduces errors.

    Dr. Robinson then encourages Tay to use the Braille Math Editor with confidence, using her 2 knuckles on her right hand and 1 pointer finger on her left hand. She goes onto explain that the chosen mode automatically handles many aspects of math input. This approach allows Tay to focus more effectively on solving problems.

    Next, Tay is guided through various math problems, including division and multiplication. Dr. Robinson carefully ensures that Tay understands how to input problems correctly into the Braille Math Editor. For division tasks, she provides clear instructions on entering Braille codes and following the correct sequences.

    Tay using proper Braille Math Editor Mode

    Furthermore, Dr. Robinson emphasizes the importance of memorizing math facts. She highlights how strong basic math skills can significantly improve accuracy and speed. Through consistent practice and repetition, Tay begins to reinforce these essential concepts.

    As the session continues, Tay receives positive reinforcement, which helps her gain confidence. With each task, Tay requires fewer prompts, showing her growing independence in handling math problems.

    Finally, Dr. Robinson concludes by praising Tay’s progress. She expresses confidence in Tay’s continued improvement and emphasizes that ongoing practice will help Tay master essential math skills. Dr. Robinson also reassures Tay that she will become more comfortable using the Braille Math Editor with time.

    Overall, this session reflects Dr. Robinson’s commitment to fostering independence and competence in her students using proper Braille Math Editor Mode. She ensures they have the necessary tools and confidence to succeed academically. This methodical approach helps students like Tay build a strong foundation for future learning and problem-solving. To further learning, Embossing math using Braille Blaster or graphics using Tiger will always increase understanding of math in general.

    If you need a UEB Math process, this lesson can guide you.

  • Batya Singing from Her Braille Hebrew Bible at Her Orthodox Bat Mitzvah

    The Power of a Braille Hebrew Bible and Technology

    Batya Sperling-Milner, a blind 12-year-old, spent months meticulously preparing for her Orthodox Bat Mitzvah ceremony. Unlike her peers, she faced significant challenges, for her Bat Mitzvah singing from a Braille Hebrew Bible, particularly with learning the musical notes for her Torah portion. Traditionally, visually impaired individuals memorize the notes through recordings or verbal instructions. However, this method proved especially difficult and inefficient for Batya.

    A Computer Genius

    Last year, a computer genius who is related to Batya, disturbed by the absence of lack of braille musical notes, developed a prototype overnight. for her to sing at her Bat Mitzvah using her Braille Hebrew Bible After a few days of refinement, Batya was able to use these notes on her electronic braille reader. This innovation allowed her to read each note alongside the corresponding letter, dramatically improving her ability to learn. Without this tool, Batya believes mastering her portion would have been nearly impossible.

    Batya reading Hebrew Braille Bible from Torah at  her Bat Mitzvah

    Batya Singing from the Torah at Her Bat Mitzvah Using a Braille Hebrew Bible

    Batya’s mother also played a crucial role in ensuring Batya could perform her Bat Mitzvah like any sighted person using her Braille Hebrew Bible. Overcoming challenges, including the requirement to see and read from the Torah, she presented a 33-page paper and an extensive executive summary to the leaders of their Washington DC synagogue, proving Batya’s capability. This accomplishment gave Batya immense pride, knowing she fulfilled the congregation’s obligation. She has always been a top Braille Reader.

    Batya’s accomplishment culminated in her using the Braille Hebrew Bible during her Bat Mitzvah, where she sang and read from the Torah. This experience was deeply meaningful to her. The Braille Hebrew Bible provided her with the tools she needed to fulfill the congregation’s obligation. Ultimately, this milestone brought Batya immense pride, knowing she had successfully navigated her challenges. The combination of her determination, training, her mother’s support, and the Braille Hebrew Bible allowed Batya to fully participate in her Bat Mitzvah, a ceremony that marked a significant and empowering moment in her life.

    Start Young

    4 year old began Formal instruction at 3 years old., but he began services at 5 months old. Continue with Typing to gain speed and Braille to increase reading speed

  • Google Drive screen reader navigation with keyboard commands

    Dr. Robinson explains how to navigate the new Google Drive update using a screen reader, focusing on commands that will be essential after the August 1st, 2024 update shortcuts. She begins by demonstrating basic navigation through Google Drive, emphasizing the importance of learning the updated keyboard shortcuts-use FireFox when you have Chrome and Edge Chromium issues with navigation. The point it, same commands but use a different browser when 1 or 2 decide not to work well. Then if you have done that and still issues exist, set up computer to work the best with screen readers.

    To start, Dr. Robinson guides users through accessing the settings menu with “Control + Shift + S,” where updates and new keyboard shortcuts can be found. She highlights the automatic update that will apply the new shortcuts starting August 1st. After closing the settings menu with “Escape,” she demonstrates navigating Google Drive using the “Alt + G” command, followed by “N” to access the navigation region.

    New Google Drive Update

    Dr. Robinson continues by explaining first-letter navigation which presently only works in Firefox but as updates occur Chrome and Edge should start to work again also. List View is where users can jump to items by pressing the first letter of the item’s name. She shows how this method, combined with the updated shortcuts, makes navigation faster and more efficient. For example, to create a new document, she uses “Alt + C” followed by “T,” which quickly opens a new Google Doc and other google items.

    She then discusses how to use the “Alt + A” command to open the context menu, allowing users to perform actions like downloading, sharing, or renaming files. The context menu provides additional options, accessible via hotkeys. Dr. Robinson points out the ease of using these commands once learned, making it simpler to manage files within Google Drive.

    To demonstrate the process, she creates a new presentation with “Alt + C” followed by “P.” After navigating back to her list view with “Alt + G” followed by “I,” she explains how to use the context menu for specific actions. Dr. Robinson concludes by encouraging users to familiarize themselves with these new commands, ensuring a smooth transition.

    Google Drive navigation is more intuitive and accessible for those using screen readers if you use the browser that works . Learn Google Slides navigation with complicated slides to improve navigation and echo also.

    Make Google Accessible

    Making Google Accessible with EDGE: Screen Readers Can’t Read This!

  • Drag n Drop with Jaws, in Macmillan Learning online

    Raveena demonstrates how to navigate and complete a drag-and-drop exercise on the Macmillan Learning website using JAWS Drag n Drop screen reader commands. She begins by turning off the virtual cursor with “Insert + Z” and then tabs to the answer bank. To lift an answer, she presses “Space,” then uses “Shift + Tab” to move the item to the correct bin and presses “Space” again to drop it.

    She describes the process while placing items into three bins: Abundant Inputs, Mass Production, and Specialized Skills. As she navigates through the answer bank, she explains each action, ensuring clarity for users following along. For instance, when encountering the answer “Japan’s comparative advantage in automobile manufacturing,” Raveena picks up the item with “Space,” shift tabs to the correct bin, and drops it with “Space” again.

    Double Check Work after JAWS Drag n Drop

    drag n drop bins to place items

    Raveena emphasizes the importance of verifying answers. After placing an item, she recommends tabbing back to the answer bank to ensure no items are left. She also notes that when an item is correctly placed, JAWS will confirm it by saying “item dropped in.” If the item is incorrectly placed, it will say “placed in item,” prompting users to recheck their work.

    To submit the answers, Raveena turns the virtual cursor back on with “Insert + Z” and uses the “Control + F” command to search for the “Submit Answer” button. She enters “submit” and presses “Enter” to locate the button quickly. After submitting, JAWS provides feedback, indicating whether the answers were correct.

    Raveena concludes by highlighting the effectiveness of using these commands for JAWS drag n drop tasks. She encourages users to practice these steps to enhance their efficiency and accuracy when completing similar exercises. This method ensures that visually impaired users can fully engage with interactive online content, making learning accessible and manageable. JAWS Drag n Drop is just one component of learning advanced keyboard commands in College. Make sure you computer is working well to keep your screen reader happy.

    As a side note, getting a hobby like rock climbing, makes one well rounded as Raveena also demonstrates by scaling a wall at the Olympics.

    Find more with Desmos:

    Desmos 3D graphing

    for Geometry in Desmos

    for STEM and Embossing in Desmos

    Desmos and inserting graphs into Math Work in WORD

    Creating shaded Parabolas in Desmos

    Lessons with Desmos with Drag and Drop

  • Perfect Digital Math at all levels using only audio or tactile Braille or both in Mathkicker.ai

    Dr. Robinson demonstrates how to use MathKicker.AI to complete various types of math with NVDA and UEB math. She begins by accessing a math problem in HTML format through a browser. Using outdated software, including NVDA on Windows 10, she shows how even older technology can effectively handle advanced math tasks.

    First, Dr. Robinson opens a math problem in Firefox, which currently translates math perfectly. She presses “Control + P” to print the page as a PDF, saving it to her downloads folder. Next, she switches to Chrome using “Windows + 3” and opens Math Kicker.AI, a tool designed for converting math problems. She uses the “Alt + C” command to start the conversion process.

    She navigates through MathKicker’s options using the applications key and selects UEB math code with NVDA commands. After selecting the PDF file, she waits for two chimes, indicating the conversion is complete. To begin solving the problem, she turns off the virtual cursor, moves to the problem area, and uses the “F2” key to break down the equation into individual components.

    She demonstrates how to solve the problem step by step, using commands like “Alt + B” to apply operations to both sides of the equation. She also uses “Control + R” to replace specific elements in the equation, simplifying the problem as she goes. After completing the math problem, she presses “F9” to review the LaTeX code, reinforcing her understanding of the math.

    Dr. Robinson explains how these steps ensure that even visually impaired students can solve advanced math problems with outdated technology. She emphasizes that Math Kicker.AI, combined with NVDA, allows for accurate UEB math transcription, making it accessible to a global audience. She concludes by encouraging viewers to use these methods to handle any type of math problem effectively. More NVDA and UEB Math videos here.

    Other Math Lessons

    Transcribe Math Images

    Quadratic Math

    STEM with Embossing

  • UEB Math with NVDA in WORD using unicode-LaTex or Braille -easy to advanced math

    Mathcat UEB in WORD
    Mathcat UEB in WORD

    Dr. Robinson demonstrates how to complete UEB math in Microsoft Word using NVDA and MathCAT in this video. She begins by showing how to download MathCAT, an essential add-on for NVDA. To do this, she presses “Insert + N” to open the NVDA menu, navigates to “Preferences,” then “Tools,” and selects the “Add-ons Store.” From there, she types “MathCAT” to find it and install it.

    After installing MathCAT, Dr. Robinson begins demonstrating basic math commands in Word. She starts by pressing “Alt + Equals” to insert an equation, then types a simple addition problem, such as “1 + 2 = 3.” She checks the Braille viewer to confirm that the equation displays correctly in UEB math. Using the arrow keys, she navigates through the equation, ensuring each character is correctly interpreted.

    Next, she demonstrates more complex equations. For example, she types “2x + 3 = 11” and highlights how NVDA reads the equation character by character. She emphasizes the importance of using arrow keys to review the entire equation, especially for those who rely solely on auditory feedback.

    LaTex and more Advanced MathCat NVDA in WORD Options

    Dr. Robinson also shows how to input advanced math symbols like the times sign and division symbol using backslash commands, such as “\times” and “\div.” She explains how these symbols are visually represented and confirms their accuracy in the Braille viewer.

    To demonstrate radicals, she uses the “\sqrt” command to insert a square root symbol, followed by an expression like “\sqrt{x+1} = 3.” She guides users through the process of checking and navigating through the equation using the arrow keys.

    Finally, Dr. Robinson addresses potential issues with inserting equations, such as when “Alt + Equals” doesn’t work correctly. She advises using “Alt + N” and navigating through the ribbon to insert equations manually if needed.

    This tutorial provides a guide for performing UEB math in Word using NVDA, ensuring accurate and accessible math solutions for users with visual impairments.