Search results for: “windows 11”

  • Braille Display with Jaws-auto read

    This session shows how users can start auto-read on the Focus Braille display with JAWS, adjust reading speed, and activate a full-read mode with ER + Space, even though many believed this feature did not exist. This video demonstrates the feature in action and explains how it works along with other useful commands. These commands allow you to fully control your computer exclusively using the Focus 40 or 80 Braille display-See video below

    Focus Braille Display auto-read or auto scroll mode to increase reading speed or just read quietly-from YouTube Video

    Focus Braille Display Commands to control computer for auto-read or auto-scroll

    Modifier Keys

    Use the modifier keys to simulate key combinations (keystrokes) that include CTRL, ALT, WINDOWS Key, SHIFT, or the JAWS Key (INSERT). To use these modifiers for the Focus Braille Display when typing a keystroke, do the following:

    1. Hold down DOT 8 CHORD and then press the corresponding modifier keys in the keystroke. Modifier keystrokes are listed in the following table.
    2. After you create the modifier portion of the keystroke, release the keys and press the remaining part of the keystroke. For example, to perform the keystroke CTRL+SHIFT+V, you press DOTS 3-7-8 CHORD, release the keys, and then press V (DOTS 1-2-3-6).

    Focus Display combo Commands

    Modifier Keys
    Key NameKeystroke
    Function Keys (F1 through F12)
    For more information, see the Function Keys description.
    DOT 1
    INSERTDOT 2 8 space
    CTRLDOT 3 8 space
    WINDOWS KeyDOT 4 8 space
    JAWS KeyDOT 5 8 space
    ALTDOT 6 8 space
    SHIFTDOT 7 8 space
    APPLICATION KeyRIGHT SHIFT+DOT 2 CHORD
     TABDOTS 4-5 CHORD 
     SHIFT+TABB CHORD 
     HOMEK CHORD 
     ENDDOTS 4-6 CHORD 
    Select Prior LineDOTS 1-7 CHORD 
    Select Next LineDOTS 4-7 CHORD 
    Select to End of LineDOTS 4-6-7 CHORD or 4,7, space
    ESCRIGHT SHIFT+DOT 1 or Z CHORD
    DELETEFOR CHORD
    Select word5,7, space

    Selection Commands

    DescriptionBraille SignBraille Dot Patterns
    Select Next CharacterLEFT SHIFT+DOT 6LEFT SHIFT+DOT 6
    Select Prior CharacterLEFT SHIFT+DOT 3LEFT SHIFT+DOT 3
    Select Next LineLEFT SHIFT+DOT 4LEFT SHIFT+DOT 4
    Select Prior LineLEFT SHIFT+DOT 1LEFT SHIFT+DOT 1
    Select to End of LineLEFT SHIFT+DOT 5LEFT SHIFT+DOT 5
    Select from Start of LineLEFT SHIFT+DOT 2LEFT SHIFT+DOT 2
    Select from TopLEFT SHIFT+LLEFT SHIFT+DOTS 1-2-3
    Select to BottomLEFT SHIFT+DOTS 4-5-6LEFT SHIFT+DOTS 4-5-6
    Select Next ScreenLEFT SHIFT+DOTS 4-6LEFT SHIFT+DOTS 4-6
    Select Prior ScreenLEFT SHIFT+KLEFT SHIFT+DOTS 1-3
    Select AllLEFT SHIFT+FOR SignLEFT SHIFT+DOTS 1-2-3-4-5-6
    Select a FrameRIGHT SHIFT+9RIGHT SHIFT+DOTS 3-5
    Select a HeadingRIGHT SHIFT+6RIGHT SHIFT+DOTS 2-3-5
    Select a LinkRIGHT SHIFT+7RIGHT SHIFT+DOTS 2-3-5-6
    Windows Commands
    DescriptionBraille SignDOTS Pattern
    ALT+TABLEFT SHIFT+DOTS 4-5LEFT SHIFT+DOTS 4-5
    Paste from ClipboardLEFT SHIFT+VLEFT SHIFT+DOTS 1-2-3-6
    Copy to ClipboardLEFT SHIFT+CLEFT SHIFT+DOTS 1-4
    Cut to ClipboardLEFT SHIFT+XLEFT SHIFT+DOTS 1-3-4-6
    UndoLEFT SHIFT+ZLEFT SHIFT+DOTS 1-3-5-6
    DeleteLEFT SHIFT+DLEFT SHIFT+DOTS 1-4-5

    Table of Multi-Control Functions

    FunctionCommand
    Toggle Auto Advance Mode or auto readLEFT SELECT+RIGHT SELECT to start and stop down arrow – er+space is read all – if you want to auto read and hear words then down arrow and speed up as you want
    Decrease Auto Advance SpeedLEFT SELECT
    Increase Auto Advance SpeedRIGHT SELECT
    Left Mouse ClickPANNING BUTTON+CURSOR ROUTING BUTTON or
    PANNING ROCKER UP+CURSOR ROUTING BUTTON or
    PANNING ROCKER DOWN+CURSOR ROUTING BUTTON
    Control+Left Mouse ClickROUTING BUTTON CHORD
    Page DownLEFT or RIGHT SELECT+ROCKER DOWN
    Page UpLEFT or RIGHT SELECT+ROCKER UP
    Top of FileLEFT PANNING BUTTON+SELECT BUTTON or
    SELECT BUTTON+PANNING ROCKER UP
    Bottom of FileRIGHT PANNING BUTTON+SELECT BUTTON or
    SELECT BUTTON+PANNING ROCKER DOWN
    EndPANNING BUTTON+ROCKER BAR DOWN
    HomePANNING BUTTON+ROCKER BAR UP
    Next LineROCKER BAR DOWN
    Prior LineROCKER BAR UP
    Pan LeftLEFT PANNING BUTTON or
    LEFT PANNING ROCKER UP
    Pan RightRIGHT PANNING BUTTON or RIGHT PANNING ROCKER UP
    Select TextRIGHT SELECT BUTTON+CURSOR ROUTING BUTTON
    Select BlockSELECT BUTTON+CURSOR ROUTING BUTTON at beginning of block; repeat at end of block

    Examples to show you how it all goes together:

    restart jaws 2,8,space space,  1,8,space d

    Windows search box with–  right shift, 4

    alt tab is 6,8, space then 4,5 space—or  right shift 4 5

    F6, space/1-8 f

    Ctrl tab – 3 8 space the tab with 4,5 space

    alt f4  – 1 6 8 space then d

    read all, space/1-2-4-5-6, ER cord

    say title of window – right shift/dots 1-2

    Say time– right shift/dots1-2-3

    read all — er chord 

    refresh screen  -right shift z

    in drive get contractions off and cursor off

    Then –insert z cursor off-2,8,space then z

    Or do slash for search—contractions off with g,7,space then dots 3,4

    hush up jaws—3,8, space

    HOME- K CHORD

    END-DOTS 4-6 CHORD

    PAGE UP-LEFT SHIFT+ROCKER BAR UP or RIGHT SHIFT+ROCKER BAR UP or DOTS 2-3-7 CHORD

    PAGE DOWN-LEFT SHIFT+ROCKER BAR DOWN or RIGHT SHIFT+ROCKER BAR DOWN or DOTS 5-6-7 CHORD

    DELETE–FOR CHORD as in 1,2,3,4,5,6 and space –the word chord is the language I grew up with, they made it space a couple decades ago as new people did not get term “chord”

    Commands to get you going on Understanding more skills

    esc is right shift dot 1

    alt right shift dot 2 is

    right click right shift dot 3

    Windows search box with right shift+4

    right shift dot 5 is window list

    left shift 1 – select line

    left shift 3  – select character

    dot 6 8 space then d to URL

    3 8 space that opens new tab

    dot 3 8 space the tab with 4,5 space

    alt tab is 6,8, space then 4,5 space

    PC cursor is p space

    taskbar is 4,8,6 then t

    alt f4  – right shift dot then 1 6 8 space then d for do

    F6, space/1-8 then f

    read all, space/1-2-4-5-6, ER cord

    Went over, say title of window using the Focus, right shift/dots 1-2

    Space 4 8 to desktop

    Say time with the Focus, right shift/dots1-2-3

    say time with right shift 1 2 3

    right shift z refresh screen

    er chord is read all

    8 4 space then t to taskbar

    8 4 space then d to desktop

    title with space/8-5 followed by T, but the shift/1-2 is just so much nicer.

    ESC–RIGHT SHIFT+DOT 1 or Z CHORD

    ALT–RIGHT SHIFT+DOT 2

    APPLICATION Key–RIGHT SHIFT+DOT 2 CHORD

    BACKSPACE–DOT 7

    ENTER-DOT 8

    CTRL+BACK SPACE- DOTS 1-2-3-4-5-6-7 CHORD

    TAB DOTS – 4-5 CHORD

    SHIFT+TAB–B CHORD

    Other Focus Display Lessons

    Focus Braille Display and SD to and from Scratchpad and PC

    Spanish Braille setup or any language with JAWS and Focus Display

    Algebra with Focus Display and JAWS in Word- YouTube

    Advanced math: Mathtype & LaTex for using Word for blind students, using Focus Display & JAWS with Professor Betsey- YouTube

  • Focus Braille Display and SD to and from Scratchpad and PC

    To configure the Focus Braille Display SD card and Scratchpad, allowing you to copy files to and from the Micro SD card, make sure the unit is powered off and the supplied USB cable is connected to your PC. Next, press and hold the Left Panning button while simultaneously inserting the USB cable. The display powers on and the PC recognizes the Focus as a removable USB drive.

    Note: If you use a screen reader such as JAWS over USB, it is recommended that you turn on speech or use a Bluetooth connection as braille will currently not work over USB when the Focus is being used as a storage device. You will also not be able to use the Scratchpad while in this mode.

    Create .brf or .brl files in Braille Blaster or Duxbury or other braille translation APPs

    Create .txt files in WORD, WordPad or another Braille editor

    To transfer BRF and TXT files to the Micro SD card:

    • On the PC, open the folder containing the files you want to copy, select the files you want, and then press CTRL+C. This is key step when managing the Focus Braille Display SD card and Scratchpad option.
    • Windows E to file explorer and navigate to and open the USB drive to display the contents of the Micro SD card in navigation pane.
    • Open FSI, Focus5, Scratchpad, and then open the folder where you want to place the files and press CTRL+V. Files you want to edit should be placed into the Notes folder. Files placed into the Books folder cannot be modified.

    To transfer TXT files created in Scratchpad:

    • Navigate to and open the USB drive to display the contents of the Micro SD card. Under This PC and navigation pane typically
    • Open FSI, Focus5, Scratchpad, Notes, and then select the TXT files you want to copy and press CTRL+C.
    • Navigate to the folder on your PC where you want to place the files and press CTRL+V. You can now use Notepad or another text editor to access these files.

    Once you have finished transferring files, press the APPLICATIONS key on your computer while focused on the USB drive, and choose Eject. Power the Focus off and back on and you will once again be able to use the Scratchpad as well as receive braille output from your screen reader over USB.

    Press right shift + x to close current file if u make changes it will prompt you to save or discard so you can use cursor router button or dot 8 to navigate thru options

    If you want to temporarily leave the scratchpad in the background and resume connection to computer do menu +B (space + dot 1,2)     

    Get out of file by pressing menu and it pops to file menu and rocker down to file, open, etc. and enter on choice

    Rocker down to open or what you want

    Select folder-I save most books in books so I open that with enter

    Rocker down to file you want to open     

    To edit and type in the Scratchpad of a Focus Braille Display (like the Focus 40 Blue), you’ll be using its onboard notepad feature. This is a standalone function that lets you jot down notes directly on the device without needing a connected screen reader. Here’s how to navigate and use it:

    Accessing and Using the Scratchpad

    Enter Scratchpad Mode

    • Press Menu button (in center of dots 1 and 4) and rocker down until you reach Scratchpad or N+Menu for new file and enter for options-fastest but sometimes does not work so go Menu option rocker down
    • Press a cursor router button above the word “Scratchpad” to select it or enter to open.

    Brailling and Editing

    • Use Braille input keys to type your content.
    • Use cursor router buttons to move the cursor to specific characters.
    • Use DOTS 7 + character to delete backward.
    • Use DOTS 8 to insert a new line or confirm actions.

    Save Your Work

    • After brailling what you want just right shift + X and enter and it will prompt you to save.

    Exit Scratchpad

    • Right Shift + X

    Connect to computer will be B space to switch back and forth between your Notes folder with file to type in info and your computer. See video


    Tips for Efficient Use

    • You can transfer Scratchpad files to a PC via USB or SD card in reader on your PC.
    • Scratchpad supports BRF and TXT formats, ensuring that the Focus Braille Display and SD card work harmoniously.

    Tips & Limitations

    • Only plain text (.TXT) files are editable in NOTES folder
    • Files transferred from PC must be in UTF-8 or ASCII format which is .txt as it takes all format out
    • Large files may not open or save properly

    More Scratchpad commands, go to freedom scientific

    Host of other FOCUS display Lessons

    Braille Display with Jaws-auto read

  • Low Vision Computer Tricks

    Low-vision users enhance visibility and accessibility using tech tricks for screen scaling, mouse visibility, and reading tools. Immersive Reader in Microsoft Word, accessible from the View tab, adjusts text spacing, column width, and background color. UsersThese Low Vision Computer Tricks improve readability by customizing these settings to suit their visual needs efficiently. In Microsoft Edge, Immersive Reader activates on supported pages to simplify reading and navigation. These tools combine to provide low-vision users with a personalized, accessible digital experience.

    Dr. Robinson teaches strategies to enhance accessibility using low-visionLow toolsVision Computer Tricks in Microsoft Word, Edge, and system settings. First, she demonstrates how to adjust display settings for optimized visibility using the Windows key. By typing “display,” users can access scaling options, which enlarge screen content for better readability. Additionally, increasing mouse pointer size and inverting its color improves navigation while reducing eye strain.

    Next, in Microsoft Word, Dr. Robinson highlights Immersive Reader, available in the View tab, to enhance readability and adjust text settings. For instance, users can change font styles and sizes with Ctrl+A and Ctrl+Shift+> or Ctrl+Shift+< for better clarity. These Low Vision Computer Tricks include changing font styles and sizes with Ctrl+A and Ctrl+Shift+> or Ctrl+Shift+< for better clarity. Furthermore, the Line Focus feature reduces clutter by focusing on one or a few lines, aiding users with dyslexia. Moreover, Read Aloud, activated with Alt+Ctrl+Space, provides text-to-speech support with adjustable speed and voice options.

    In Edge, pressing F9 activates Immersive Reader, which simplifies web pages by removing clutter for a cleaner reading experience. Users can also customize text preferences or enable Read Aloud for auditory assistance. These Low Vision Computer Tricks also include customizing text preferences or enabling Read Aloud for auditory assistance. Notably, Dr. Robinson recommends Edge for its built-in accessibility commands, though Chrome and Firefox offer similar tools.

    Immersive reader for low vision
    Immersive reader for low vision

    Finally, she emphasizes using Night Light mode to reduce blue light exposure and protect long-term eye health. These tools, combined with her strategies, empower low-vision users to navigate technology effectively.

    Include in your learning with Finding the Mouse Cursor FAST and How to SEE your computer better with Low Vision

  • Speed up and Fix a SLOW Computer

    Speed up your computer and fix slow-loading programs with a few adjustments and updates. Ensure all necessary .NET runtimes for programs are installed in the control panel. This allows programs to run smoothly.Regularly update your computer system to improve performance. Maintain a clean computer system, optimize performance, and disable unnecessary startup applications to keep your computer running efficiently.

    Fix a Slow computer To Do List:

    • Users to update their .NET runtime to version 8 (and version 9 by end of 2024) using ninite.com.
    • Users to clean out their temp folder by running %temp% in Windows Run and deleting the contents to help speed up the computer.
    • Users to disable unnecessary startup apps in Task Manager to improve computer startup speed.

    Details:

    Downloading and Installing Runtimes for better Performance

    Download and install these runtimes using the .NET Microsoft download and the Ninite.com website. Make sure to download the correct versions, specifically 64-bit and 86-bit. Use a screen reader to navigate the download process if needed. Check if the runtimes are correctly installed in programs and features. Update to version 9 by the end of December 2024.

    Ninite.com will help speed up and fix a slow computer
    Ninite.com will help speed up and fix a slow computer

    Improving Computer Speed and Fix slow Computer Network

    Improving computer speed and network connection involves cleaning the computer by removing temporary files and emptying the recycle bin. Regularly check for updates to keep the system running efficiently. Navigate to the temp folder and delete unnecessary files, handling files in use appropriately. Use windows key and type in updates to go to check for updates and do them several times a week. Keep your software updated also and the speed of your computer increases with every fix and adjustment. Here are other Tech Tricks to improve you computer and new commands for Google

  • Create and Emboss Graphics with Tiger Designer

    Embossing graphics for Blind Students: Dr. Robinson offers this video for families and transcribers needing to adapt images for blind students to “see.” This video offers a straightforward approach to creating accessible Venn diagrams using the technique to emboss graphics with Tiger.

    Dr. Robinson begins by explaining how to handle a Venn Diagram or any graphic. She demonstrates using a Venn diagram with two large, intertwined circles, where all parts are shaded. Such images blur when transferred into Tiger Designer, a common tool for producing tactile graphics. She recommends redrawing the diagram for clarity, ease, and speed. This approach is more effective than fixing the shaded areas when you emboss graphics with Tiger.

    How to Emboss the Tiger Graphic

    To show blur issues, she creates a new diagram, by opening Tiger Designer and pressing Control + N to start a new document. After ensuring the default settings are correct, pasting an image using Control + V will result in a blurry output due to the shading. In this case, Dr. Robinson suggests redrawing the Venn diagram. Ctrl + N for new again and Alt+O or click on Tools. Select a line width of 2.5 or 3, as thicker lines are easier for students to feel when you emboss graphics with Tiger.

    Dr. Robinson then demonstrates how to draw two circles from the tool’s menu, representing the basic structure of the Venn diagram. She emphasizes the importance of labeling the sections and typing in uncontracted Braille works fine. She notes that while parents may not be familiar with contractions, students are accustomed to reading uncontracted Braille. It’s crucial to use these steps to emboss graphics with Tiger accurately.

    Finally, Dr. Robinson shows how to emboss the Tiger graphic with Ctrl + P to emboss. Ensure the correct printer model and settings are applied. The final result will be a clear and accessible tactile diagram that the student can easily interpret.

    This and more lessons provide a simple and effective way for parents and transcribers to create accessible Venn diagrams for visually impaired students. Need Training?. Ask away. We are tech specialists in all areas.

    UEB Math to emboss also

    But first make sure that computer is working well.

  • Spanish Braille Display or Keyboard Output/Input

    Learning Spanish Braille

    Learning Spanish Braille involves understanding the unique characteristics of the Braille system used for the Spanish language. Then build on the foundational skills of Braille reading and writing. Here’s how to approach it:

     1. Understand the Braille Alphabet in Spanish

       Spanish Braille follows the same 6-dot system as English Braille.  

    Extra characters are included to represent letters with accents and special characters used in Spanish.

      Key additions include:

         Ñ: Represented by a unique Braille symbol.

         Accented vowels: Á, É, Í, Ó, Ú have distinct Braille symbols.

         Punctuation: Spanish uses inverted question marks (¿) and exclamation marks (¡), and these have their own symbols in Spanish Braille.

     2. Start with the Basics

       – Begin by learning the standard Braille alphabet for unaccented letters, numbers, and common punctuation marks.

       – Practice reading and writing these basic symbols to build fluency.

     3. Familiarize Yourself with the Extra Characters

       – Learn the Braille symbols for accented vowels (á, é, í, ó, ú) and ñ.

       – Practice using these in words and sentences.

    Gain Fluency Through Access Training

     4. Use Spanish Braille Materials

       – Read and practice with materials specifically written in Spanish Braille to develop fluency.

       – You can find books, articles, or educational materials written in Spanish Braille to improve your reading skills online.

     5. Engage with Digital Tools

       – Tools like Braille displays and screen readers can be set to Spanish to help reinforce learning. See below list of all  Spanish symbols

       – Software like JAWS or NVDA can be configured to support Braille output in Spanish. This allows for real-time practice with written content.

     6. Practice Writing Spanish Braille

       – Use a Braille writer to practice writing in Spanish Braille. Focus on mastering punctuation and special characters.

       – The fastest and easiest to edit option will be to practice typing or brailling on a display. The FOCUS 40 Braille Display or Brailliant Braille Display to write out Spanish words and sentences.

     7. Learn through Immersive Activities

       – Reinforce learning, engage in practical activities like labeling objects in Spanish Braille. Work with bilingual Braille texts (Spanish and English).

     8. Find a Teacher or Tutor

       – If possible, work with an instructor who is fluent in Spanish Braille and the language. They can guide you through the nuances of the language and provide feedback on your progress.

       – Organizations specializing in Braille education, like TechVision, can help offer resources or tutors for Spanish Braille.

    8. Go to a Spanish Speaking Country

    -Totally immerse yourself within a culture that will speak the language you want to learn well.

    Spanish-Española Symbols

    Spanish-Española 1. Jaws settings: Set up braille profile – insert 6 (ctrl shift D) for default. After completing the steps, open settings again to ensure they apply only to Word settings. Next, type “braille mode” twice, press F6, and use Alt+G to access languages and set your preferences. For those requiring a Spanish Braille display or keyboard, ensure your device is compatible with your software settings. More Video lessons can help.

    This lesson is Spain (international) Input and Output are Spanish Grade 1

    2. Tab to profile languages and set those up and enter to close Jaws settings

    3. Alt 8 to make sure dots 7,8 show on display-accept and close settings

    1. Set up Voice profile in Jaws-open context menu, options, voices, add a profile

    1. In Word-change voice quickly:  2 options: on keyboard- ctrl shift window L to change profile or on Focus -2,3,4,5,7, space to change languages)

    2. Insert+ctrl+S to change to Spanish profile or to other language

    3. G+7+space on Focus to computer braille (which will output Spanish grade 1)– capital is dot 7 under capital letter on display

    Spanish Braille display or keyboard image of braille dots that are in this accessible page for auditory learners

    For Braille with Braille Display on Computer

    Práctica: 

    á 1,2,3,5,6   

    é 2,3,4,6   

    í 3,4 

    ó 3,4,6  

    ú 2,3,4,5,6  

    ü 1,2,5,6,8 

    ñ 1,2,4,5,6, 8  

    Punctuation for Spanish Braille using Braille Display

    ! 2,3,5, 7 is exclamation mark

    inverted ! is 2,3,5, 7, 8 is upside down exclamation mark

    Period is . is dot 3 

    Comma is , is dot 2 for comma

    question mark is ? is dot 2, 6 

    upside down question mark or inverted ? is 2,6,7

    Spanish Braille for Keyboard and JAWS

    Lower Case Letters

    á   (lower case a, acute accent)  =  Press Ctrl + ‘ (apostrophe), then the letter a
    é   (lower case e, acute accent)  =  Press Ctrl + ‘ (apostrophe), then the letter e
    í   (lower case i, acute accent)  =  Press Ctrl + ‘ (apostrophe), then the letter i
    ó   (lower case o, acute accent)  =  Press Ctrl + ‘ (apostrophe), then the letter o
    ú   (lower case u, acute accent)  =  Press Ctrl + ‘ (apostrophe), then the letter u
    ñ   (lower case n, tilde accent)  =  Press Ctrl + Shift + ~ (tilde), then the letter n
    ü   (lower case u, diaeresis accent)  =  Press Ctrl + Shift + : (colon), then the letter u

    Upper Case Letters

    Á   (upper case A, acute accent)  =  Press Ctrl + ‘ (apostrophe), then Shift + a
    É   (upper case E, acute accent)  =  Press Ctrl + ‘ (apostrophe), then Shift + e
    Í   (upper case I, acute accent)  =  Press Ctrl + ‘ (apostrophe), then Shift + i
    Ó   (upper case O, acute accent)  =  Press Ctrl + ‘ (apostrophe), then Shift + o
    Ú   (upper case U, acute accent)  =  Press Ctrl + ‘ (apostrophe), then Shift + u
    Ñ   (upper case N, tilde accent)  =  Press Ctrl + Shift + ~ (tilde), then Shift + n
    Ü   (upper case U, diaeresis accent)  =  Press Ctrl + Shift + : (colon), then Shift + u

    Punctuation Marks

    ¿   (inverted question mark)  =  Press Alt + Ctrl + Shift + ? (question mark)
    ¡   (inverted exclamation mark)  =  Press Alt + Ctrl + Shift + ! (exclamation mark)
    «   (opening angle quotation mark)  =  Press Ctrl + ` (grave accent), then Shift + < (less than symbol)
    »   (closing angle quotation mark)  =  Press Ctrl + ` (grave accent), then Shift + > (greater than symbol)

    Practice Spanish Braille with Braille Display or Keyboard

    Practice Perfect Touch Typing for accuracy as this helps tremendously with any language typing skills.

    Práctica: You can Use JAWS insert+4 on keyboard for any special symbol also

    ¿Qué hora es por favor, señor? 

    Soy de México.  

    !Mucho gusto, Marta! Hola.

    ¡Mucho gusto, Marta! Hola!

     ¿Qué hora es por favor, señor?

    ¿Qué hora es por favor, señor?

    Practice Conversational Spanish

    If you find your computer is working odd–here is a video on how to fix it then continue

    1. ¡Buenos días! ¡Hola! / Good morning!
    2. ¡Buenas tardes!  Good afternoon!
    3. ¡Buenas noches! Good evening! / Good night!
    4. ¡Hola! / ¡Chao!  ¡Hi! / Bye!
    5. Adiós.  Goodbye.
    6. Por favor.  Please.
    7. Hasta la vista / Hasta luego. See you / See you later.
    8. Hasta pronto. See you soon.
    9. Hasta mañana. See you tomorrow.
    10. (Muchas) Gracias. 
    11. Thank you (very much).
    12. De nada. You’re welcome.
    13. Bienvenidos  Welcome
    14. Lo siento  I’m sorry
    15. Con permiso / Perdón / Disculpe  Excuse me / Pardon me 
    16. ¡Vamos!  Let’s go!
    17. ¿Cómo está usted?  How are you? (formal) 
    18. ¿Cómo estás?  How are you? (informal)
    19. Insert+4 for eacute in
    20. ¿Qué tal?   How’s it going?
    21. Bien / Muy bien  Good / Very good
    22. Insert+4 for acute in Más below
    23. Mal / Muy mal / Más o menos  Bad / Very bad / OK
    24. Sí / No Yes / No
    25. ¿Cómo?
    26. ¿Cómo se llama usted? What is your name? (formal)
    27. ¿Cómo te llamas?  What is your name? (informal)
    28. Me llamo…  / Mi nombre es… My name is…
    29. Mucho gusto. / Encantado.  Nice to meet you.

    Immersion in Language

    Here is the sequence of learning in order to learn any language well:

    The time it takes to learn a new language, like Spanish, while living in a country where it is the only language spoken, depends on several factors. However, here are general timelines and considerations:

     1. Immersion Benefits

       Living in a Spanish-speaking country accelerates learning because you’re constantly exposed to the language in real-life situations like:

       Listening: Conversations, TV, radio, and announcements.

       Speaking: Daily interactions with locals, from shopping to asking for directions.

       Reading and Writing: Street signs, menus, newspapers, and more.

     2. Language Learning Proficiency Levels

       The Common European Framework of Reference for Languages (CEFR) breaks language learning into six levels:

       A1 (Beginner): Basic phrases and conversations (3–6 months).

       A2 (Elementary): Can understand simple texts and conversations (6–12 months).

       B1 (Intermediate): Hold conversations on familiar topics and function in everyday life (12–18 months).

       B2 (Upper Intermediate): Fluent in most situations, including work and travel (18 months–2 years).

       C1 (Advanced): Understand complex topics and engage in nuanced conversation (2–3 years).

       C2 (Proficient): Full mastery of the language, similar to a native speaker (3+ years).

    Factors that will Determine Speed

     3. Factors That Affect Learning Speed

       Motivation and Attitude: Strong motivation and a positive mindset can accelerate your progress.

       Practice Consistency: Daily practice, speaking, listening, and reading in Spanish speeds up learning.

       Prior Language Experience: If you’re already familiar with Romance languages (e.g., Italian or French), learning Spanish might be faster due to similarities in vocabulary and grammar.

       Formal Education: Taking classes, whether in person or online, and using language apps like Duolingo or Babbel can help structure your learning and improve your skills more quickly.

       Social Interaction: Making friends who are native speakers or joining local groups can enhance your conversational abilities.

     4. Realistic Expectations

       – For basic conversational fluency (A2-B1), expect about 6 months to 1 year of immersion if you’re dedicated and practicing regularly.

       – To reach an advanced level (C1), you might need 2 to 3 years of living and interacting in the language full-time.

     5. Cultural Immersion

       Your understanding of Spanish will deepen faster if you immerse yourself in the local culture, customs, and idiomatic expressions. Engaging in local activities, reading newspapers, and watching TV shows will all help you learn the language more organically.

     Summary:

       On average, 6 months to 1 year of immersion in a Spanish-speaking country should allow you to gain conversational fluency, with full mastery taking about 2–3 years, depending on your dedication and resources.

    Adult Learning Speed

    Sequence of learning for an adult

    For adults, learning a new language like Spanish while living in a country where it’s the only language spoken can still be highly effective, but several factors can influence the timeline. Here’s what an adult learner can expect:

     1. General Time frames for Adult Learners

       Conversational fluency (A2-B1 level): Typically achievable in 6 months to 1 year of immersion.

       Advanced proficiency (B2-C1 level): May take 1.5 to 2.5 years of consistent use and practice.

       Full fluency (C2 level): Can take 3 years or more, depending on factors like exposure, practice, and language complexity.

     2. Factors Affecting Adult Learning Speed

       Cognitive Flexibility: Adults tend to be more methodical learners than children, but they can sometimes struggle with retaining new vocabulary and adapting to different grammar structures.

       Prior Experience: If the adult already speaks a Romance language (like Italian or French), they will likely learn Spanish more quickly because of the structural similarities.

       Learning Environment: The more opportunities for immersion—such as interacting with native speakers, engaging in cultural activities, and using Spanish in daily tasks—the faster the progress.

       Language Learning Methods: Adults often benefit from a combination of formal learning (e.g., classes, tutors) and informal learning (e.g., conversations, media consumption).

       Motivation and Consistency: Adults with clear goals and regular practice (even just 30 minutes a day) tend to progress faster. Maintaining consistent practice is key to long-term retention.

    Challenges for Adult Learners

     3. Challenges for Adult Learners

       Accent and Pronunciation: Adults might find it harder to develop a native-like accent, though this doesn’t prevent them from becoming highly fluent.

       Work and Life Responsibilities: Adults often juggle work and personal responsibilities, which can limit the time available for focused language learning.

       Grammar: Grasping grammatical structures, verb conjugations, and nuances may take longer for adults compared to younger learners, who tend to absorb new patterns more intuitively.

     4. Accelerating Adult Learning

       Use Daily Immersion: Engage in conversations, read signs, watch TV shows, and use apps like Duolingo or Babbel to reinforce lessons in real-life situations.

       Structured Learning: Enroll in Spanish classes or hire a tutor to build a strong foundation in vocabulary and grammar.

       Use Technology: Utilize language-learning apps, podcasts, or online lessons. Watching Spanish media with subtitles can help you pick up common phrases and pronunciation.

       – Join Social Circles: Engage with locals, participate in group activities, and use Spanish in daily interactions. This practical experience will help reinforce what you’ve learned.

       – Set Realistic Goals: Adults benefit from having clear, incremental goals (e.g., mastering a certain level of vocabulary or holding a 10-minute conversation) to track progress and stay motivated.

    Adult Experience

     5. Common Experiences for Adults

       After 3-6 months, most adults can hold basic conversations, ask for directions, and manage daily interactions in Spanish.

       By 1 year, many can discuss familiar topics, navigate most social situations, and understand much of what they hear or read.

       Within 2 years, a dedicated adult learner can likely achieve strong conversational fluency and understand complex topics, though nuances and slang may still be challenging.

    Summary

    For an adult, achieving conversational fluency in Spanish typically takes 6 months to 1 year with immersion and regular practice. Advanced proficiency may take 1.5 to 2.5 years, while full fluency could require 3 years or more, depending on the learner’s background, motivation, and exposure to the language.

    Team Specialists to Train YOU

    Learn UEB Braille on your own

    Make sure to keep your display clean and learn to read Braille Fast

    Advance to UEB Math learning

    Dr. Robinson and her Team at TechVision have made a significant global impact via their Team Mission and Purpose. TechVision specializes in 1:1 remote instruction in education for the blind and visually impaired, serving individuals of all ages. We also train School Teams: transcribers, Teachers of the Blind and other School Personal and work with parents. Their expertise is delivered through personalized, real-time 1:1 remote instruction. This approach empowers students and clients to compete equally with their sighted peers in both education and work.

    Other Spanish Setup Lessons

    Braille Setup for Spanish

    Spanish Braille input output

    Spanish Braille with Jaws

  • Matrices in WORD Math Editor-Braille Math editor with Jaws using LaTex, auditory and/or Braille

    Matrices in WORD Math Editor

    In this video, Dr. Denise M. Robinson demonstrates how to use the WORD Math Editor and Braille Math Editor with JAWS using LaTeX or Braille. This tutorial is designed for screen reader users, with or without braille displays, who want to improve their math skills.

    First, Dr. Robinson introduces the essential tools for using matrices in WORD, including JAWS, a Braille display (if desired), and the WORD Math Editor. She explains how to set up each tool to work together smoothly, which is crucial for creating and editing math content.

    Next, the video focuses on creating matrices. Dr. Robinson uses LaTeX to input mathematical expressions. She explains each step clearly, making it easy to follow along. Viewers will learn how to enter rows and columns in a matrix, helping them understand matrix structure.

    Then, Dr. Robinson demonstrates how to use auditory feedback, which allows users to hear the math content they are working on. This feature helps ensure accuracy and makes it easier to catch mistakes. Additionally, she shows how to switch between auditory and Braille feedback, providing flexibility for different learning styles.

    matrices addition problem

    The video also covers using the Braille display with the math editors. Dr. Robinson explains how to navigate through the matrix using Braille and provides tips on reading and editing the content efficiently. This section is particularly helpful for users who rely on Braille for their work.

    Finally, the tutorial concludes with a review of the key points. Dr. Robinson summarizes the steps for creating and editing matrices. She encourages viewers to practice using the tools and techniques demonstrated in the video. By the end of the tutorial, users will feel more confident in their ability to work with math content.

    1:1 or School Team Remote lessons to get you to where you want to be!

    Other Math Lessons

    Transcribe Math Images

    Quadratic Math

    STEM with Embossing

    Perfect Digital Math

    JAWS and MathCat

    Unicode with UEB Math

    UEB Math with Jaws

    Braille Math in WORD Editor-Multi-line

    Split Braille for Buffer Mode

    or MathType with JAWS

    But make sure your computer is first setup to work the best with screen reader

    More Tech Lessons: @DrDenisemRobinsontech

  • Standard Gmail, sending emails fast and all else with Jaws -screen reader and keyboard commands

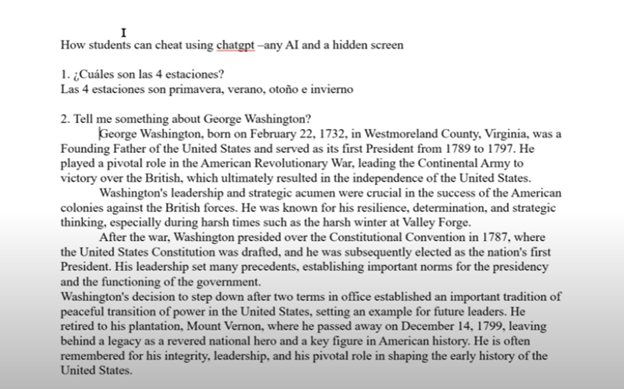
    To optimize your Gmail experience with JAWS, it’s important to first set up keyboard shortcuts in Gmail’s settings. This initial step ensures that you can navigate and perform actions quickly using JAWS. If you notice your computer is not working well, then we highly suggest optimizing it for Windows with screen readers. Here is a parent setting it up with a trainer if you would like more direction.

    Start by opening Gmail in your web browser. Once inside, press the letter “G” followed by “S” to go directly to the settings. Next, use the “Tab” key to navigate through the settings menu until you reach the “See all settings” option. Press “Enter” to access the full settings menu.

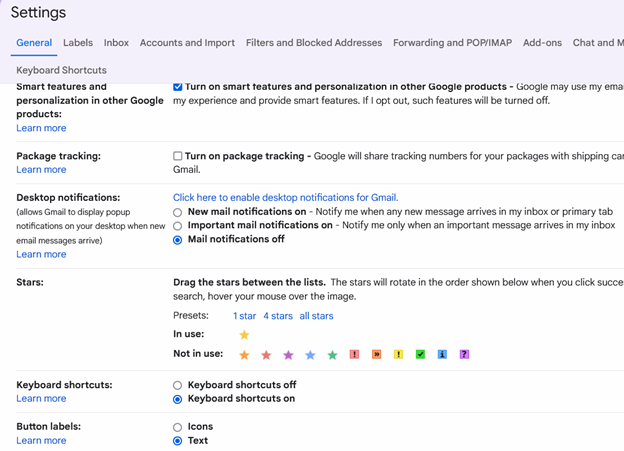
    In the settings menu, continue pressing “Tab” until you reach the “Keyboard shortcuts” section. Here, you’ll find an option to turn on keyboard shortcuts. Press the spacebar to enable this feature. Enabling keyboard shortcuts is crucial as it allows you to execute commands more efficiently, which is particularly beneficial when using JAWS.

     settings in gmail showing keyboard shortcuts on

    After turning on keyboard shortcuts, press “Tab” to navigate to the “Save Changes” button and press “Enter.” This action ensures that your settings are saved, and keyboard shortcuts are now active in Gmail.

    With keyboard shortcuts enabled, you can now easily compose, send, and manage emails using JAWS. For example, press “C” to open the compose window, where you can start drafting an email. Use the “Tab” key to move between the “To,” “Subject,” and “Body” fields, and use JAWS commands to review your text as you type.

    Finally, once your email is ready, press “Tab” to reach the “Send” button and press “Enter.” JAWS will confirm that your email has been sent. With keyboard shortcuts active, you can also quickly navigate through your inbox, search for emails, and perform other tasks, making your Gmail experience much more efficient.

    In conclusion for most crucial item, is setting up keyboard shortcuts in Gmail which is the first essential step to using JAWS effectively. This setup ensures that you can send emails quickly and navigate Gmail seamlessly, enhancing productivity for blind and low vision users. For addition information see TechVision YouTube channel. While you advance your tech, include your Braille reading speed skills.

  • AI to describe images, pictures, or what you want with Jaws keyboard commands by Lucas

    Lucas, a blind individual, demonstrates JAWS Commands using AI Descriptions and how to effectively use ChatGPT with DALL-E to generate and describe images. Starting with ChatGPT, Lucas opens the platform, which places him directly in the edit box. To navigate out, he presses the “up arrow” key. He then maximizes the screen with “Windows + up arrow,” enhancing readability for JAWS.

    Next, Lucas demonstrates how to locate the DALL-E AI Description image generator by accessing the links list using Jaws Commands with “Caps Lock + F7.” He navigates to the search box using the “E” key and types “DALL-E” in all capitals, with the period included. After pressing “Enter,” he tabs through the search results until he finds the relevant link, then presses “Enter” again to open it.

    AI to make the InaccessibleAccessible

    Once inside the image generator, Lucas describes the process of inputting a prompt. He emphasizes the importance of being specific, including details about the setting, characters, and art style. For instance, he generates an image of a wizard casting a spell on a cliff-side in a realistic art style. By pressing “Enter,” the image generation process begins, typically producing two images by default. He demonstrates how to make the inaccessible-accessible.

    To download an image, Lucas uses “Shift + B” to find the “Show Image” button, followed by pressing “Enter” and then down arrow to the “Download Image” button. He encounters a warning about the dialog not being focused, while the download proceeds. Remember to Email your beautiful creations to someone also.

    Dall-E platform image

    For image descriptions, Lucas follows a similar process to find the “Image Description Assistant” link. After inputting his request and attaching the image file, he waits for the description to generate. To review the description, Lucas uses “Shift + G” to jump to the top of the graphic, then down arrows to read it. This methodical approach allows Lucas to create detailed images and receive comprehensive descriptions efficiently.

    AI has transformed how screen reader users access their world, MathKicker.AI is a powerful MATH app that allows top level Math work. Do not let Low Vision issues or legal blindness stop you from accelerating in school.

    Continue to learn how to make images such as Math into Text.

    Be My Eyes for Computer: Describe Images, Graphs, and Screens Instantly

  • Transcribe math images into text in WORD math editor with mathkicker and transcriber tricks

    Dr. Robinson guides transcribers through the process of math image conversion for accessibility, specifically focusing on converting math images into accessible Word documents using MathKicker.AI. She begins by highlighting that transcribers will easily recognize an image when it turns blue upon clicking it when opened in PDFs. These images, often blurry due to repeated copying by teachers, require careful description for students who cannot feel the number lines. Dr. Robinson emphasizes the importance of adjusting the level of detail based on the student’s age and familiarity with number lines during the math image conversion access process.

    To begin the process to learn how to convert math images into accessible Word documents for students with accessibility needs, Dr. Robinson gives step-by-step video instruction using “Windows + Shift + S” to capture the image and then select “Convert Image to Doc” using the clipboard in Mathkicker.AI. This method is particularly useful for large documents. Once converted, the image opens in Word, where it is important to enable editing with F6. She advises saving the document with a simple name, like “Line Work,” and placing it in the downloads folder from Mathkicker.AI.

    Dr. Robinson demonstrates how to work side-by-side with the original image and the converted document. By adjusting the zoom to 200%, transcribers can compare the math accurately. She notes that sometimes images may contain extra elements, like a punched hole, which the software might misinterpret. These should be corrected during math image conversion for access.

    mathkicker on left side of screen and image of math on right for transcribe to acquire Word text

    Accuracy for Math image conversion access

    For further accuracy, Dr. Robinson recommends using alternative text (alt text) for the graphic line. This helps students and sighted individuals, such as teachers or parents, understand the content. She explains that leaving the graphic in the document with added alt text is beneficial. A user can add the braille Math editor into use in WORD also for more options or even using EXCEL.

    Moving to more complex math for math image conversion access, she instructs on using the Desmos graphing calculator. Students can use “Alt + Print Screen” to capture and paste graphs into the Word document. Describing shaded areas or specific graph features is crucial for clarity. Finally, Dr. Robinson shows how Math Kicker efficiently converts math into text, creating clean, accessible documents. This method, combining math image conversion access and alt text descriptions, significantly speeds up the transcription process while ensuring students receive accurate, accessible math content. Dr. Robinson concludes by encouraging transcribers to reach out with any further questions. At times, you need to adjust Margins, etc.

    When you are ready progress to advanced Math and more ways to convert inaccessible PDF math into actual text in WORD.

    Be My Eyes for Computer: Describe Images, Graphs, and Screens Instantly