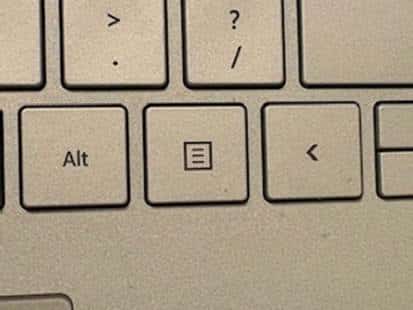
Optimizing Windows 11 Efficiency for Screen Reader with Key Settings and Configurations takes an hour most often 2 or so to complete. Longer if you are new to screen reader and how Windows 11 works. It is different than other OS systems so give yourself grace as you learn all there is to know about this system. As you move through your keyboard and discover you would like a particular key somewhere, like the applications key, you can remap a key to create that yourself. AND, you MUST have Local Admin on School Computers.
How to setup Computer for Optimizing Windows 11 Efficiency
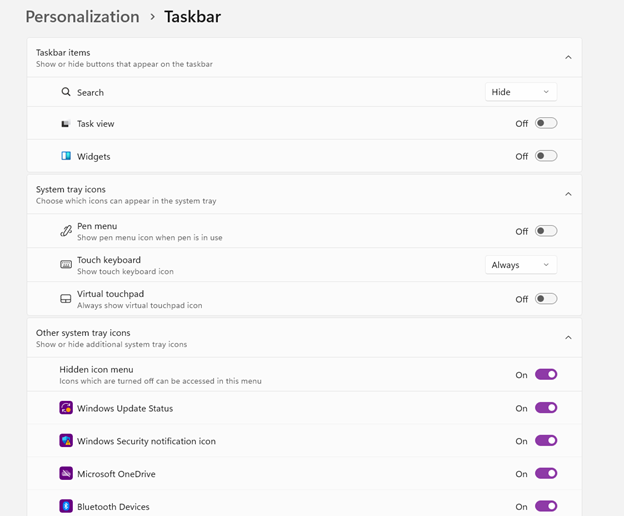
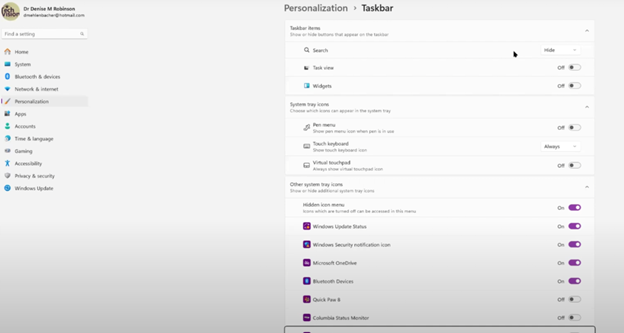
Change Taskbar Settings
Update Computer every day
Go to task manager and disable anything you do not need at start up
Go to Power Options and change from Sleep to Shut Down when you press Shut down button
take off sleep options in general unless you are advanced user
Keep in mind that your screen reader cannot reset or the RAM clear if you computer is in sleep mode or hibernate mode
Turn off Touch pad- if you do not your palm will touch the mouse pad and auto activate items or move your cursor on your computer. This equals huge frustration to a screen reader user.
Windows T and clear that taskbar–this is million dollar real-estate to access programs fast
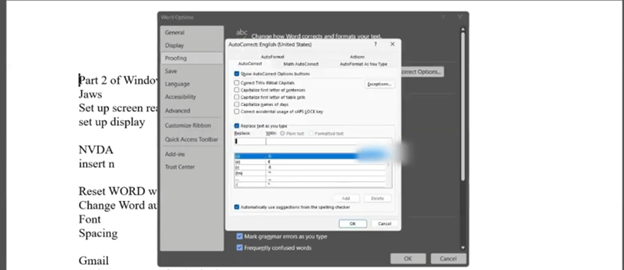
Setup WORD
Go to control panel and setup Sound card options
Windows and adjust other sound options using sndvol.exe
Setup Gmail and Drive and learn new commands
Setup Outlook
Taskbar setting for Windows 11 setup
Efficiency for Screen Readers and other Setup Skills
Proper Set up Windows 11 to work with screen readers and braille displays is crucial for visually impaired users. This configuration ensures smooth interaction with the system, giving users full access to information and applications such as Gmail for optimizing access..
1. Accessibility and Independence
Configuring Windows 11 for screen readers like JAWS, NVDA, or Narrator, and integrating braille displays, provides full independence. Without proper setup, tasks such as reading documents, browsing, or using software become challenging. A well-configured system ensures all functions are accessible.
2. Productivity and Efficiency
Screen readers and braille displays let users interact quickly with the system. Setting up Windows 11 for compatibility speeds up responses to commands. It also ensures smoother transitions between applications, making multitasking more efficient. Proper configuration prevents lag or software conflicts, which increases productivity in school and work settings.
3. Customization for Personalized Needs
Each user has different needs. Windows 11 allows users to customize screen reader settings (e.g., speech rate, verbosity, and key commands) and braille displays (e.g., output type and formatting). These adjustments create a personalized experience, improving comfort and reducing frustration.
4. Enhanced Braille Support
Windows 11 offers enhanced braille support when paired with leading screen readers. Proper setup lets users access seamless braille input and output for text and math. It also allows advanced navigation of documents. Correct braille display configuration ensures accurate reading and editing of both simple text and more complex content.
5. Compatibility with Updates
As Windows 11 updates, keeping screen readers and braille displays integrated is essential. A well-maintained setup ensures new features or security updates don’t disrupt accessibility tools. This is vital for maintaining ongoing access such as the new Google Commands for navigation.
Key Setup Steps for Optimizing Windows 11 for Accessibility:
Ensure Compatibility: Install the latest versions of screen readers and braille display drivers compatible with Windows 11.
Enable and Configure Narrator: Windows 11 includes Narrator, which can be set up for basic tasks if needed.
Customize Keyboard Shortcuts: Set up shortcuts for easier navigation and quicker interaction.
Adjust Accessibility Settings: Go to “Accessibility” in the Settings app to adjust visual and audio cues like contrast and text size.
Test with Braille Displays: Pair and calibrate braille displays for reading and input in UEB or Nemeth, depending on preferences.
With proper set up, Windows 11 for screen readers and braille displays furthers accessibility. This setup enhances independence, productivity, and ease of use in the digital world.
Dr. Robinson starts by showing how to set up JAWS with windows 11. She explains how to find and use the JAWS context menu by pinning it to the taskbar. To access it, use Windows + T and the right arrow key. She also advises switching JAWS to laptop mode, even if you’re on a desktop, to use both desktop and laptop commands. This makes JAWS more flexible.
Next, Dr. Robinson talks about setting up voice profiles. She recommends creating different profiles for different tasks, like using a slower speed for reading and a faster speed for navigating. This helps make the screen reader more effective.
The video also explains how to set up a Braille display. Dr. Robinson guides you on choosing and configuring the right Braille display. She also mentions the early adopter program, where you can enable MathCAT for advanced math work, ensuring it works well with JAWS in Microsoft Word.
Adjusting Microsoft Word and Email Settings
Dr. Robinson then moves on to Microsoft Word settings. She explains how to adjust autocorrect features to prevent automatic changes that might confuse the screen reader, especially in math. By disabling certain autocorrect options, you can make sure the screen reader reads everything accurately.
Finally, Dr. Robinson shows how to set up Gmail with keyboard shortcuts and integrate it with Outlook. She gives clear steps on enabling IMAP and adjusting security settings. This setup allows you to manage your email smoothly using screen readers.
How to set up a Windows 11 computer for optimal screen reader performance is crucial for blind and low vision users. First, ensure that your computer meets the necessary system requirements. A powerful processor and sufficient RAM are essential for smooth operation. Additionally, installing the latest updates for Windows 11 is important. These updates include crucial security patches and performance improvements. If you find you need to remap a key to say, acquire an applications key on your keyboard, you can do that yourself.
Next, customize the display settings to enhance visibility. Adjusting the screen resolution and scaling ensures that text and icons are easier to read. Moreover, enabling high contrast mode can make the interface more accessible. This setting increases the contrast between background and text, making it easier to distinguish elements on the screen.
In addition, configuring keyboard shortcuts can significantly improve efficiency. Windows 11 offers a variety of shortcuts for navigating the system. Customizing these shortcuts allows for quicker access to frequently used features. Furthermore, consider enabling the on-screen keyboard for easier input.
How to setup Windows 11 for screen readers such as JAWS, NVDA, and Narrator are essential tools for blind users. Ensure that your chosen screen reader is installed and updated. It’s also important to adjust the screen reader settings to match your preferences. For instance, modifying the speech rate and verbosity can make navigation more comfortable. See second video on proper setup of windows11 settings.
Enhance Experience with AI
Moreover, installing and configuring additional assistive software can enhance your experience. Programs like MathKicker.AI and MathCat in WORD improve accessibility for mathematical content. These tools integrate seamlessly with screen readers, providing a more inclusive environment.
Lastly, securing your computer is vital. Enable strong passwords and two-factor authentication to protect your data. Regularly updating your antivirus software will also safeguard your system from potential threats.
Thus, setting up a Windows 11 computer for screen reader users involves careful configuration. By following these steps, users can achieve the best performance and efficiency. This ensures a more accessible and productive computing experience.
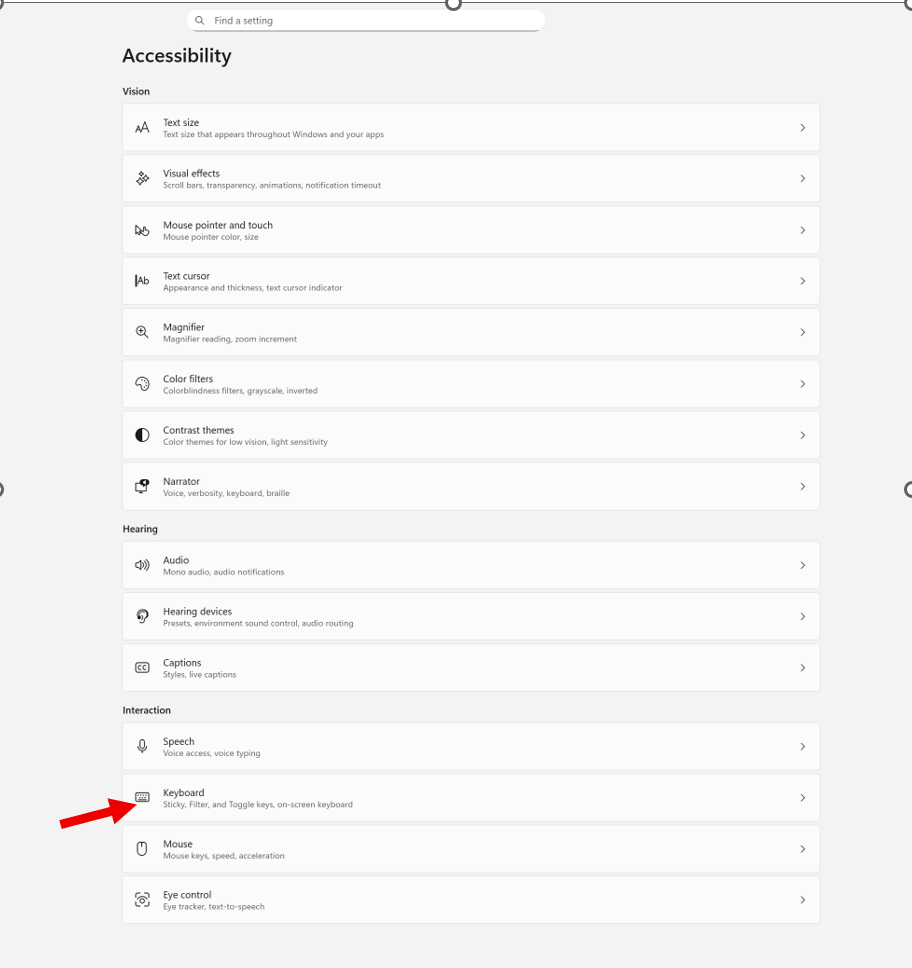
Windows + I to settings and find Accessibility on the far left column and open then open keyboard. If you want to stop annoying ding sounds on Windows, the following steps will help you do that.
If your computer keeps chiming, dinging, or beeping at the worst possible moments, or when you press a particular key, you can silence or customize every system sound in just a few steps.
How to check whether Filter Keys or Toggle Keys are turned on
How to turn them off if you don’t need them
How to adjust them properly if you do use them
How to prevent Windows from enabling them by mistake
How to silence or customize the sounds they make
Commands & Navigation Steps
Open Windows Accessibility Settings (Keyboard Section)
Windows + I → opens Settings
down arrow to Accessibility, press Enter, then tab down to Keyboard
or press windows (start menu) or using keyboard type Accessibility in the search box
Check all these Features
Turn Sticky Keys, Filter Keys, or Toggle Keys On/Off
Tab to the setting you want
Press Space bar to toggle it on or off
Hear What Toggle Keys Sounds Like
Turn on Toggle Keys → Windows plays a beep when pressing Caps Lock, Num Lock, or Scroll Lock
Turn it off again → sound stops immediately
Notification Preferences for Accessibility Keys
Windows will play a sound when:
Sticky Keys is turned on
Filter Keys is turned on
Toggle Keys is turned on
This helps you know when you’ve activated something by accident.
On‑Screen Keyboard (for mouse users or one‑handed typing)
Turn on On‑screen keyboard in the Keyboard settings
Click keys with your mouse if typing is difficult
Underline Access Keys
Turn on Underline access keys
This shows keyboard shortcuts even when you’re not holding Alt
Print Screen Behavior (Updated in Windows 11)
While you are here adjust Print Screen
Arrow to Print Screen and enter → opens the Snipping Tool options at the top of the screen
Screen reader users:
Tab through options
Go to the last one
Press Spacebar, then Down Arrow to choose screenshot type-then you have options
When you cannot do something: Take a Screenshot & Send It to your help person
Take screenshot- which literally is copy
Press Ctrl + V to paste into an email
Send to your tech instructor or support person
Whether you’re troubleshooting your own device or helping someone else, this quick fix will bring instant peace and quiet — and give you full control over your keyboard behavior.
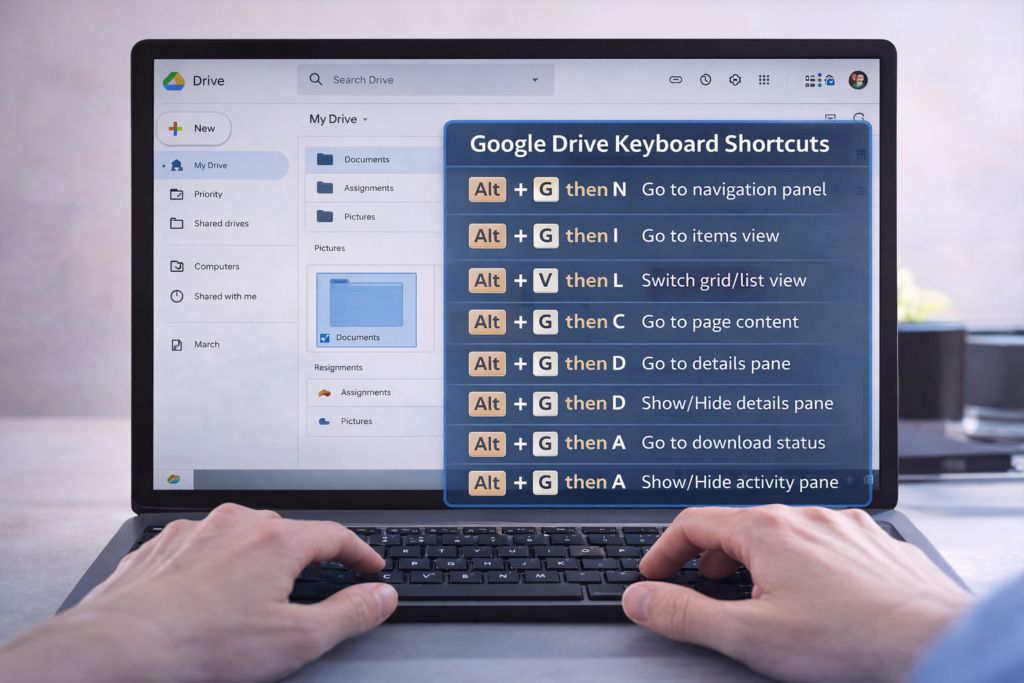
Google Drive Keyboard shortcuts become much easier — and faster — when you know the right screen reader keyboard commands. In this TechVision tutorial, I walk you through how JAWS and NVDA users can move through folders, open files, switch views, and manage Drive content without ever touching a mouse.
These skills build confidence, speed, and independence for blind and low‑vision users, students learning digital literacy, and anyone who prefers keyboard‑based navigation. You’ll learn how to open menus, jump between items, select files, search your Drive, and access settings with predictable, repeatable commands.
Whether you’re organizing schoolwork, managing shared folders, or teaching students how to work in the cloud, these shortcuts make Google Drive more accessible and efficient for everyone.
TechVision: Empowering real‑life tech skills with clarity, accessibility, and confidence.
Is your computer running slow, freezing, or taking forever to start up? Speed Up a Slow Computer with a few simple maintenance steps can make a huge difference. This is especially true for beginners and blind/low‑vision users who rely on consistent performance with JAWS or NVDA.
In this TechVision tutorial, I walk you through practical, real‑life steps to speed up your PC and keep it running smoothly:
✔ Update your .NET Framework Having the latest .NET installed in your Control Panel helps programs run correctly. It also reduces system errors.
✔ Manage your startup programs Too many apps launching at boot can slow everything down. Turning off unnecessary startup items gives you a faster, cleaner start.
Keep Windows and Office updated
Regular updates improve performance, stability, and security — and prevent many common slow‑computer issues.
✔ Declutter your system Uninstall programs you don’t use and delete temporary files to free up space. This also reduces background load.
✔ Run a full antivirus scan Malware can dramatically slow down your system. A full scan helps identify and remove hidden threats.
✔ Perform regular maintenance Disk Cleanup, defrag (for HDDs), or optimize for SSD and clearing temp files all help your computer run more efficiently.
These steps are simple, effective, and perfect for anyone building independence and confidence with their technology.
TechVision: Empowering real‑life tech skills with clarity, accessibility, and confidence.Video with steps here
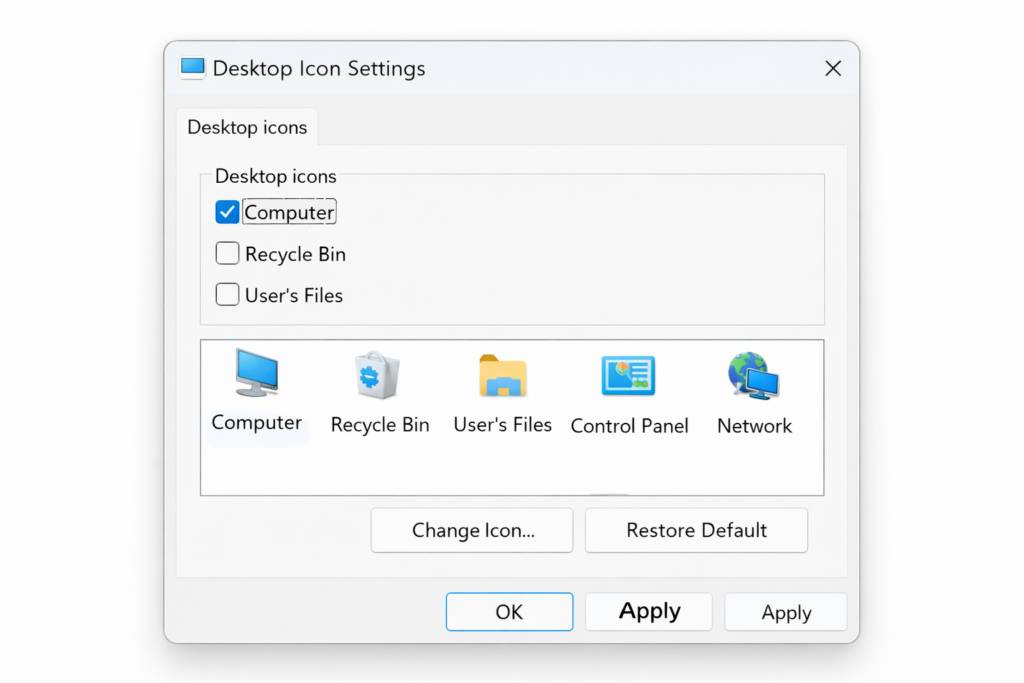
Struggling to find your drives or open File Explorer quickly? Adding the This PC icon to your desktop is one of the fastest ways to navigate Windows — especially for beginners, blind/low‑vision users, and anyone building confidence with their computer.
In this quick TechVision tutorial, I show you how to turn on desktop icons, place This PC right where you need it, and get instant access to your drives, folders, and storage. A simple change that makes a big difference in independence and efficiency.
Whether you’re teaching students, supporting a family member, or learning for yourself, this step gives you a clean, predictable starting point every time you sit down at the computer.
TechVision: Building real‑life tech skills with clarity, confidence, and accessibility at the center.
Best Computer PC Specs buying Guide for 2025 and beyond: RAM, CPU, SSD, graphics card, gaming and more explained
If you’re planning to buy a computer now, pause before diving into the best PC specs. Keep in mind that dealers often clear out older models during holiday sales. To make sure you know exactly what you’re getting, skip down to the section on ‘Older and Newer Naming’ of laptops.
Specs You Need and PC Details Explained
Memory (RAM): 64 GB DDR5 (4800–5600 MHz, dual channel, expandable to 128 GB on some models). Continue for more detailed advice, for Best Computer Specs Guide.
Storage (SSD): 2 TB PCIe Gen 4 NVMe SSD (blazing fast read/write speeds, optional dual SSDs up to 4–8 TB total)
Display: 14‑inch UHD (3840 × 2160) Mini‑LED, 120 Hz refresh rate, HDR support or 14- 16‑inch OLED, 240 Hz for gaming/creative workloads
Reduce Eye Strain with a High Resolution Curved Screen
Ultra HD / 4K: 3840 × 2160 pixels
8K UHD: 7680 × 4320 pixels
Highest Resolutions Available (2025)
8K UHD (7680 × 4320):
Currently the highest mainstream resolution for TVs and monitors.
It is Extremely sharp, but requires powerful GPUs and large screens to notice the difference.
Best Curved Monitors (2025)
Brand
Best Model
Size / Resolution
Use Case
Key Strengths
Samsung
Odyssey OLED G9
49″ Dual QHD (5120×1440)
Gaming / Immersion
240 Hz refresh, deep 1000R curve, HDR OLED
Dell / Alienware
Alienware AW3425DW
34″ QD‑OLED (3440×1440)
Gaming / Esports
Fast response, vivid colors, G‑Sync Ultimate
Dell UltraSharp
U4025QW
40″ 5K2K (5120×2160)
Productivity / Multitasking
Huge workspace, USB‑C hub, color accuracy
LG
UltraGear 45GR75DC
45″ WQHD (3440×1440)
Gaming / Creative
OLED panel, 240 Hz, immersive ultrawide
HP
E45c G5
45″ Dual QHD (5120×1440)
Productivity / Office
Replaces dual monitors, ergonomic design
Gigabyte
G27FC
27″ Full HD (1920×1080)
Budget Gaming / Entry Level
Affordable, decent curve, FreeSync support
Quick Recommendations
For Gaming Immersion: Samsung Odyssey OLED G9 or Alienware AW3425DW.
For Productivity/Work: Dell UltraSharp U4025QW or HP E45c G5.
For Budget Buyers: Gigabyte G27FC.
For Hybrid Use (Gaming + Creative): LG UltraGear 45GR75DC.
Other items you need for laptop and more USBs for a desktop
Ports & Connectivity:
2 × Thunderbolt 4 / USB‑C
3 × USB‑A 3.2
HDMI 2.1
Ethernet RJ‑45
Wi‑Fi 7 + Bluetooth 5.4
Keyboard: QWERTY keyboard, with Applications/Menu key
Around 4 pounds ≈ 1.81 kilograms.
How to Find Your Computer Specs (Windows 11, December 2025)
1: Using System Settings
Press Windows key + E to open File Explorer.
Press Shift + Tab to move focus to the Navigation Pane.
Arrow down to This PC (usually near the bottom).
Right‑click on This PC and choose Properties (or press Enter).
A window will open showing basic system information, including:
Device name
Processor (CPU)
Installed RAM
System type (32‑bit or 64‑bit)
Windows edition and version
2: Using Settings → About
Press Windows key + I to open Settings.
Navigate to System.
Scroll down and select About.
Under Device specifications, you’ll see:
Processor (CPU)
Installed RAM
Device ID
Product ID
System type
Under Windows specifications, you’ll see:
Edition (e.g., Windows 11 Pro)
Version and build number
3: Advanced Specs (Optional)
For deeper details like graphics card, storage, and drivers:
Press Windows key + R, type dxdiag, and press Enter.
This opens the DirectX Diagnostic Tool, showing CPU, RAM, GPU, and driver versions.
Summary
Basic specs (CPU, RAM, Windows version) → System → About or This PC → Properties.
Detailed specs (graphics card, drivers) → dxdiag.
These steps work with keyboard navigation and are accessible for screen reader users.
Find information in MSINFO32
MSINFO32 is the command that opens the System Information utility in Windows.
It provides a comprehensive overview of your computer’s hardware, software, and system components.
Unlike the simple “About” page, MSINFO32 gives deep technical details useful for troubleshooting, upgrades, or support.
How to Open MSINFO32
Press Windows key + R to open the Run dialog.
Type msinfo32 and press Enter.
The System Information window will appear.
What You’ll See in MSINFO32
System Summary (default view):
OS name and version
System manufacturer and model
Processor type and speed
Installed RAM
BIOS version/date
Boot mode (UEFI or Legacy)
Hardware Resources:
IRQs, DMA, I/O ports, memory addresses
Useful for diagnosing hardware conflicts
Components:
Display (graphics card details)
Storage (drives, controllers)
Network (adapters, protocols)
Input devices
Software Environment:
Loaded drivers
Running tasks
Services
Environment variables
Why It’s Useful
Troubleshooting: Quickly check BIOS version, drivers, and hardware conflicts.
Upgrades: Confirm RAM slots, CPU type, and expansion options.
Support: Export system info to share with IT or tech support.
Memory Details
These values describe how your computer uses RAM (physical memory) and virtual memory:
Installed Physical Memory (RAM): 64.0 GB The total amount of RAM physically installed in your system.
Total Physical Memory: 63.8 GB The usable portion of your installed RAM. A small amount is reserved for system hardware.
Available Physical Memory: 56.2 GB The amount of RAM currently free and available for use by applications and the system.
Total Virtual Memory: 67.8 GB This includes physical RAM plus page file space. Virtual memory allows your system to use disk space as extra memory when RAM is full.
Available Virtual Memory: 58.9 GB The portion of virtual memory that’s currently unused and available.
Page File Space: 4.00 GB The size of the page file (a reserved portion of your hard drive used as virtual memory).
Go to Programs and features and make sure you have all your security and power to run programs so do a find command for “run” and look for your .nets.
What .NET Does for a Computer—let’s just say it IS REALLY IMPORTANT
Runs Applications:it is software framework/platform .NET provides the Common Language Runtime (CLR), which acts like a virtual machine. It takes code written in languages like C#, F#, or VB.NET and makes sure it runs correctly on your computer.
Manages Resources: The CLR handles memory management, security, thread management, and error handling. This means programs don’t have to reinvent these functions — they rely on .NET to do it safely.
Provides Libraries: The Framework Class Library (FCL) is a huge collection of pre‑built code for everyday tasks:
Reading/writing files
Connecting to databases
Networking and internet communication
User interface controls
Math, cryptography, and more
Supports Multiple Languages: Developers can write programs in C#, F#, VB.NET, and others. .NET makes them interoperable, so code written in one language can work with another.
Cross‑Platform Evolution:
Go get those important computer items at: Ninite.com
Beat Graphics card for computers using screen readers or other access technologies: NVIDIA
GRAPHICs card RUN that screen reader–get a good one GAMING computers will get you the specs you need for a screen reader or just regular use
NVIDIA RTX cards dominate the high‑end market with unmatched ray tracing, AI features (DLSS, CUDA, Omniverse), and raw compute power.–the BEST for screen readers and older students–middle school up
AMD Radeon RX cards offer better value for money, strong rasterization performance, and more efficient power use, especially at 1440p and 4K gaming.
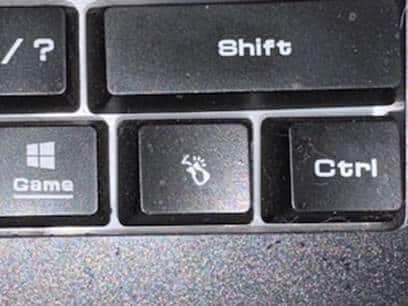
The applications key– is KEY of importance-the funny looking horseshoe on a gaming computer or square with lines in it on general computers–it is a right click of a mouse or 1 press of a key.
Basic specifications for a laptop: gaming computer will have the speed and video card needed for performance
Processor (CPU): some use the words i5, i7, i9 but the new words are Ultra 5,7 or 9 on machines–i9 is compared to ultra 9 and so on like this
Intel Naming Shift
Older naming convention (up to 13th Gen): so if you have this then know it is an older model and during holidays, this is what companies are selling cheaply to get rid of–so just be aware–
Intel Core i3, i5, i7, i9
Example: Intel Core i7‑12700H
New naming convention (14th Gen and newer):
Intel Core Ultra 5, Ultra 7, Ultra 9
Example: Intel Core Ultra 9 185H
The “Ultra” branding emphasizes AI acceleration and new architecture (Meteor Lake, Lunar Lake).
How They Compare
Core i5 → Core Ultra 5
Core i7 → Core Ultra 7
Core i9 → Core Ultra 9
Intel Core Ultra 9 285HX (24 cores, up to 5.5 GHz turbo) or AMD Ryzen 9 7945HX (16 cores, up to 5.4 GHz turbo)
Memory (RAM): 64 GB DDR5 (4800–5600 MHz, dual channel, expandable to 128 GB on some models)
Storage (SSD): 1 TB PCIe Gen 4 NVMe SSD (with option for dual SSDs up to 4 TB total)
Display: 17.3‑inch UHD (3840 × 2160) Mini‑LED, 120 Hz refresh rate, HDR support or 16‑inch OLED, 240 Hz for gaming/creative work
Favorite computers for running software such as JAWS, NVDA and other blind ware–You must have HIGH RAM and speed
Top Favorite: ASUS
ASUS Laptop Weights–based on student–
ZenBook Series (ultralight)
New ZenBook A14: as low as 2.18 lbs (0.99 kg)
VivoBook Series (mid‑range everyday use series)
ROG Gaming Series (heavy duty)
Zephyrus G14: ~3.53 lbs (1.6 kg)
Strix G15: ~5.07 lbs (2.3 kg)
Pic of ASUS-ROG-heavier with numpad
Surface Pro-top Favorite
Microsoft Surface Pro Weights–lightest and most powerful of laptops
Surface Pro 3–7: ~1.7 lbs (0.77 kg)
Surface Pro 8–10: ~1.94–1.96 lbs (0.88–0.89 kg)
Surface Pro 11 (latest): ~1.96 lbs (0.89 kg)
Surface Pro X (ARM model): ~1.7 lbs (0.77 kg)
comparing true laptop form factors, ASUS ultrabooks and Surface Laptop models are closer in weight, while Surface Pro remains the lightest option in the 2‑in‑1 category.
Different versions and do not suggest this collapsible one for students, that flips up–just too easy to flip down
Get Surface Pro with a true laptop lid that opens easily
HP computers
Be careful as most do not come with applications key any more–yes you can use Insert F10 but … takes 2 keys to implement a keystroked of right click
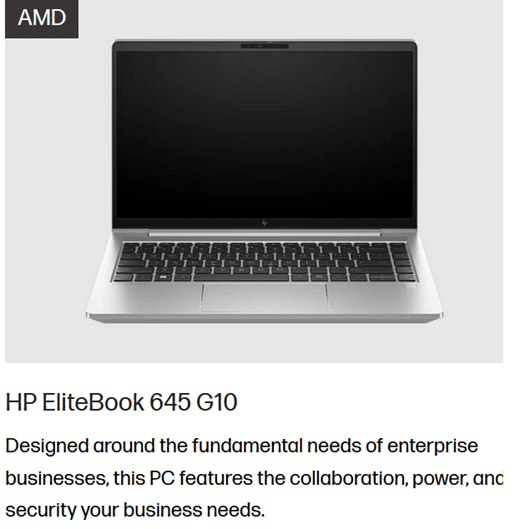
HP EliteBook 645 G10 includes a dedicated Applications/Menu key on its keyboard layout.
Build your computer: EliteBook 645 G10 is a lightweight, secure, and efficient business laptop with AMD Ryzen 7000 series power
Processor Options:
AMD Ryzen 5 7530U: 6 cores / 12 threads, up to 4.5 GHz-elementary and middle school
AMD Ryzen 7 7730U: 8 cores / 16 threads, up to 4.5 GHz-high school
These are efficient 7nm chips with solid multitasking and productivity performance.
Graphics:
Integrated AMD Radeon RX Vega 6 GPU
Suitable for office work, media playback, and light graphics tasks
Not designed for gaming or heavy 3D rendering.–but that is fine as that is not why you buy it
Memory:
Configurable up to 64 GB DDR4 RAM
Dual SO-DIMM slots, user-upgradable.
Storage:
PCIe SSD options, typically up to 1 TB
HP HP EliteBook 870 G11 (17‑inch) -4.1 lbs–keep in mind you want a laptop carry case for laptops
High‑Performance PC Laptop Models
HP ZBook Fury 16 G11 – workstation powerhouse for engineering, CAD, and 3D rendering
MSI Raider 18 HX AI – top‑tier gaming laptop with desktop‑class GPU
ASUS ROG Strix G18 / Zephyrus G16 – high‑end gaming and creator laptops
Do NOT overdo bump dots on keyboard to find position for touch typing-then student start counting dots to get to keys–create muscle memory which means you want to have them repeat typing skills–explanation below dot placements.
Place bump dots on keys: 5 and 0 on num row above qwerty keys-backspace is already large
Place dots on F4, F12–if all the keys run together then either F8 or F9. My F keys are broken up in panels from F1 to F4 and F5 to F8 and F9 to F12 so I do not need any bump dots–a gaming keyboard is divided up for speed of access so no bump dots needed
Many computers share the arrow keys with home, end pg up and pg down–only put a bump dot on up arrow to quickly move hand to the right while left hand holds down the FN key and right hand to do the pg up and so forth
Remember, the keyboard already has built in bump dots on f and j so do not place any more bump dots on keys
Dell is not my top choice of a computer but is a fine machine with specs you can get with:
Processors: Intel Core Ultra 7/9 or AMD Ryzen 9 HX — powerful x86 chips for heavy workloads.
Serviceability: Easier to upgrade storage, RAM, and wireless adapters
Memory: Configurable up to 64–128 GB DDR5 RAM, far beyond Surface’s 16–32 GB.
Storage: Options up to 2–8 TB PCIe NVMe SSDs.
Graphics: Dedicated NVIDIA RTX GPUs (e.g., RTX 5090 or workstation Ada cards).
Displays: Larger 16–18″ screens, often 2.5K or 4K OLED, high refresh rates.
Weight: Heavier (≈4 lbs / 1.8 kg), but more versatile for gaming, AI, or workstation tasks.
What I Use on a Daily Basis-I work very long hours
So I do have a Ultra HD / 4K: 3840 × 2160 pixels and it has changed my life with no more headaches from long hours at my screen and always have night light on-if you do not know about this feature, press your windows key and type night and night light will generate–decrease the brightness to more muted colors and it takes out more blue light which reduces eye strain. But the 4k does that by itself, then the night light takes away brightness–I am very light sensitive so light in general causes my eyes pain which gives headaches (I no longer have that issue with the 4k.). I use my screen reader often–hence the needed power in general.
My PC Computer Specs Explained
CLX computers are made by CLX Gaming, which is a division of Cybertron International Inc., a long‑standing U.S. system integrator based in Wichita, Kansas and an incredible company to work with for any product they sell.
About CLX
Founded: January 29, 2016, as a brand under Cybertron International.
Focus: Custom gaming PCs, workstations, and desktops tailored for gamers, content creators, and professionals.
Specialty:
Fully customizable builds (CPU, GPU, RAM, cooling, case design).
Award‑winning custom paint and chassis designs.
Product families named after Egyptian mythology (Ra, Set, Scarab, Horus, Osiris, Anubis).
Support: Free lifetime technical support, up to 3 years parts warranty, and lifetime labor coverage.
Why CLX Stands Out and why I picked it–I could build exactly what I wanted and needed and their service support is exceptional in the industry as if or when you call, you get a person who knows anything you ask.
Customization: You can configure nearly every component, from Intel/AMD CPUs to NVIDIA/AMD GPUs.
Performance: Builds range from mid‑tier gaming rigs to extreme workstations with 64–128 GB RAM and multi‑GPU setups.
Design: Known for bold, artistic case designs and RGB lighting.
Reliability: As part of Cybertron International (established in 1997), CLX benefits from decades of PC integration experience.
Takeaway
CLX computers are custom‑built in the USA by CLX Gaming (Cybertron International), offering high‑performance, highly customizable systems for gamers and professionals who want both power and personalization.
The CLX is the Best machine I have every owned and then I go portable with my Surface Pro which is also exceptional for power and portability
This session shows how users can start auto-read on the Focus Braille display with JAWS, adjust reading speed, and activate a full-read mode with ER + Space, even though many believed this feature did not exist. This video demonstrates the feature in action and explains how it works along with other useful commands. These commands allow you to fully control your computer exclusively using the Focus 40 or 80 Braille display-See video below
Use the modifier keys to simulate key combinations (keystrokes) that include CTRL, ALT, WINDOWS Key, SHIFT, or the JAWS Key (INSERT). To use these modifiers for the Focus Braille Display when typing a keystroke, do the following:
Hold down DOT 8 CHORD and then press the corresponding modifier keys in the keystroke. Modifier keystrokes are listed in the following table.
After you create the modifier portion of the keystroke, release the keys and press the remaining part of the keystroke. For example, to perform the keystroke CTRL+SHIFT+V, you press DOTS 3-7-8 CHORD, release the keys, and then press V (DOTS 1-2-3-6).
Focus Display combo Commands
Modifier Keys
Key Name
Keystroke
Function Keys (F1 through F12) For more information, see the Function Keys description.
DOT 1
INSERT
DOT 2 8 space
CTRL
DOT 3 8 space
WINDOWS Key
DOT 4 8 space
JAWS Key
DOT 5 8 space
ALT
DOT 6 8 space
SHIFT
DOT 7 8 space
APPLICATION Key
RIGHT SHIFT+DOT 2 CHORD
TAB
DOTS 4-5 CHORD
SHIFT+TAB
B CHORD
HOME
K CHORD
END
DOTS 4-6 CHORD
Select Prior Line
DOTS 1-7 CHORD
Select Next Line
DOTS 4-7 CHORD
Select to End of Line
DOTS 4-6-7 CHORD or 4,7, space
ESC
RIGHT SHIFT+DOT 1 or Z CHORD
DELETE
FOR CHORD
Select word
5,7, space
Selection Commands
Description
Braille Sign
Braille Dot Patterns
Select Next Character
LEFT SHIFT+DOT 6
LEFT SHIFT+DOT 6
Select Prior Character
LEFT SHIFT+DOT 3
LEFT SHIFT+DOT 3
Select Next Line
LEFT SHIFT+DOT 4
LEFT SHIFT+DOT 4
Select Prior Line
LEFT SHIFT+DOT 1
LEFT SHIFT+DOT 1
Select to End of Line
LEFT SHIFT+DOT 5
LEFT SHIFT+DOT 5
Select from Start of Line
LEFT SHIFT+DOT 2
LEFT SHIFT+DOT 2
Select from Top
LEFT SHIFT+L
LEFT SHIFT+DOTS 1-2-3
Select to Bottom
LEFT SHIFT+DOTS 4-5-6
LEFT SHIFT+DOTS 4-5-6
Select Next Screen
LEFT SHIFT+DOTS 4-6
LEFT SHIFT+DOTS 4-6
Select Prior Screen
LEFT SHIFT+K
LEFT SHIFT+DOTS 1-3
Select All
LEFT SHIFT+FOR Sign
LEFT SHIFT+DOTS 1-2-3-4-5-6
Select a Frame
RIGHT SHIFT+9
RIGHT SHIFT+DOTS 3-5
Select a Heading
RIGHT SHIFT+6
RIGHT SHIFT+DOTS 2-3-5
Select a Link
RIGHT SHIFT+7
RIGHT SHIFT+DOTS 2-3-5-6
Windows Commands
Description
Braille Sign
DOTS Pattern
ALT+TAB
LEFT SHIFT+DOTS 4-5
LEFT SHIFT+DOTS 4-5
Paste from Clipboard
LEFT SHIFT+V
LEFT SHIFT+DOTS 1-2-3-6
Copy to Clipboard
LEFT SHIFT+C
LEFT SHIFT+DOTS 1-4
Cut to Clipboard
LEFT SHIFT+X
LEFT SHIFT+DOTS 1-3-4-6
Undo
LEFT SHIFT+Z
LEFT SHIFT+DOTS 1-3-5-6
Delete
LEFT SHIFT+D
LEFT SHIFT+DOTS 1-4-5
Table of Multi-Control Functions
Function
Command
Toggle Auto Advance Mode or auto read
LEFT SELECT+RIGHT SELECT to start and stop down arrow – er+space is read all – if you want to auto read and hear words then down arrow and speed up as you want
Decrease Auto Advance Speed
LEFT SELECT
Increase Auto Advance Speed
RIGHT SELECT
Left Mouse Click
PANNING BUTTON+CURSOR ROUTING BUTTON or PANNING ROCKER UP+CURSOR ROUTING BUTTON or PANNING ROCKER DOWN+CURSOR ROUTING BUTTON
Control+Left Mouse Click
ROUTING BUTTON CHORD
Page Down
LEFT or RIGHT SELECT+ROCKER DOWN
Page Up
LEFT or RIGHT SELECT+ROCKER UP
Top of File
LEFT PANNING BUTTON+SELECT BUTTON or SELECT BUTTON+PANNING ROCKER UP
Bottom of File
RIGHT PANNING BUTTON+SELECT BUTTON or SELECT BUTTON+PANNING ROCKER DOWN
End
PANNING BUTTON+ROCKER BAR DOWN
Home
PANNING BUTTON+ROCKER BAR UP
Next Line
ROCKER BAR DOWN
Prior Line
ROCKER BAR UP
Pan Left
LEFT PANNING BUTTON or LEFT PANNING ROCKER UP
Pan Right
RIGHT PANNING BUTTON or RIGHT PANNING ROCKER UP
Select Text
RIGHT SELECT BUTTON+CURSOR ROUTING BUTTON
Select Block
SELECT BUTTON+CURSOR ROUTING BUTTON at beginning of block; repeat at end of block
Examples to show you how it all goes together:
restart jaws 2,8,space space, 1,8,space d
Windows search box with– right shift, 4
alt tab is 6,8, space then 4,5 space—or right shift 4 5
F6, space/1-8 f
Ctrl tab – 3 8 space the tab with 4,5 space
alt f4 – 1 6 8 space then d
read all, space/1-2-4-5-6, ER cord
say title of window – right shift/dots 1-2
Say time– right shift/dots1-2-3
read all — er chord
refresh screen -right shift z
in drive get contractions off and cursor off
Then –insert z cursor off-2,8,space then z
Or do slash for search—contractions off with g,7,space then dots 3,4
hush up jaws—3,8, space
HOME- K CHORD
END-DOTS 4-6 CHORD
PAGE UP-LEFT SHIFT+ROCKER BAR UP or RIGHT SHIFT+ROCKER BAR UP or DOTS 2-3-7 CHORD
PAGE DOWN-LEFT SHIFT+ROCKER BAR DOWN or RIGHT SHIFT+ROCKER BAR DOWN or DOTS 5-6-7 CHORD
DELETE–FOR CHORD as in 1,2,3,4,5,6 and space –the word chord is the language I grew up with, they made it space a couple decades ago as new people did not get term “chord”
Commands to get you going on Understanding more skills
esc is right shift dot 1
alt right shift dot 2 is
right click right shift dot 3
Windows search box with right shift+4
right shift dot 5 is window list
left shift 1 – select line
left shift 3 – select character
dot 6 8 space then d to URL
3 8 space that opens new tab
dot 3 8 space the tab with 4,5 space
alt tab is 6,8, space then 4,5 space
PC cursor is p space
taskbar is 4,8,6 then t
alt f4 – right shift dot then 1 6 8 space then d for do
F6, space/1-8 then f
read all, space/1-2-4-5-6, ER cord
Went over, say title of window using the Focus, right shift/dots 1-2
Space 4 8 to desktop
Say time with the Focus, right shift/dots1-2-3
say time with right shift 1 2 3
right shift z refresh screen
er chord is read all
8 4 space then t to taskbar
8 4 space then d to desktop
title with space/8-5 followed by T, but the shift/1-2 is just so much nicer.
To configure the Focus Braille Display SD card and Scratchpad, allowing you to copy files to and from the Micro SD card, make sure the unit is powered off and the supplied USB cable is connected to your PC. Next, press and hold the Left Panning button while simultaneously inserting the USB cable. The display powers on and the PC recognizes the Focus as a removable USB drive.
Note: If you use a screen reader such as JAWS over USB, it is recommended that you turn on speech or use a Bluetooth connection as braille will currently not work over USB when the Focus is being used as a storage device. You will also not be able to use the Scratchpad while in this mode.
Create .brf or .brl files in Braille Blaster or Duxbury or other braille translation APPs
Create .txt files in WORD, WordPad or another Braille editor
To transfer BRF and TXT files to the Micro SD card:
On the PC, open the folder containing the files you want to copy, select the files you want, and then press CTRL+C. This is key step when managing the Focus Braille Display SD card and Scratchpad option.
Windows E to file explorer and navigate to and open the USB drive to display the contents of the Micro SD card in navigation pane.
Open FSI, Focus5, Scratchpad, and then open the folder where you want to place the files and press CTRL+V. Files you want to edit should be placed into the Notes folder. Files placed into the Books folder cannot be modified.
To transfer TXT files created in Scratchpad:
Navigate to and open the USB drive to display the contents of the Micro SD card. Under This PC and navigation pane typically
Open FSI, Focus5, Scratchpad, Notes, and then select the TXT files you want to copy and press CTRL+C.
Navigate to the folder on your PC where you want to place the files and press CTRL+V. You can now use Notepad or another text editor to access these files.
Once you have finished transferring files, press the APPLICATIONS key on your computer while focused on the USB drive, and choose Eject. Power the Focus off and back on and you will once again be able to use the Scratchpad as well as receive braille output from your screen reader over USB.
Press right shift + x to close current file if u make changes it will prompt you to save or discard so you can use cursor router button or dot 8 to navigate thru options
If you want to temporarily leave the scratchpad in the background and resume connection to computer do menu +B (space + dot 1,2)
Get out of file by pressing menu and it pops to file menu and rocker down to file, open, etc. and enter on choice
Rocker down to open or what you want
Select folder-I save most books in books so I open that with enter
Rocker down to file you want to open
To edit and type in the Scratchpad of a Focus Braille Display (like the Focus 40 Blue), you’ll be using its onboard notepad feature. This is a standalone function that lets you jot down notes directly on the device without needing a connected screen reader. Here’s how to navigate and use it:
Accessing and Using the Scratchpad
Enter Scratchpad Mode
Press Menu button (in center of dots 1 and 4) and rocker down until you reach Scratchpad or N+Menu for new file and enter for options-fastest but sometimes does not work so go Menu option rocker down
Press a cursor router button above the word “Scratchpad” to select it or enter to open.
Brailling and Editing
Use Braille input keys to type your content.
Use cursor router buttons to move the cursor to specific characters.
Use DOTS 7 + character to delete backward.
Use DOTS 8 to insert a new line or confirm actions.
Save Your Work
After brailling what you want just right shift + X and enter and it will prompt you to save.
Exit Scratchpad
Right Shift + X
Connect to computer will be B space to switch back and forth between your Notes folder with file to type in info and your computer. See video
Tips for Efficient Use
You can transfer Scratchpad files to a PC via USB or SD card in reader on your PC.
Scratchpad supports BRF and TXT formats, ensuring that the Focus Braille Display and SD card work harmoniously.
Tips & Limitations
Only plain text (.TXT) files are editable in NOTES folder
Files transferred from PC must be in UTF-8 or ASCII format which is .txt as it takes all format out