Microsoft Word MLA format for papers is essential for several reasons. Firstly, it ensures consistency and clarity in academic writing. This makes it easier for readers to follow and understand the content. MLA format provides a standardized way to cite sources. This helps prevent plagiarism by giving proper credit to original authors. This format also allows students to present their work in a professional manner, which is crucial for academic credibility. Additionally, adhering to MLA guidelines demonstrates attention to detail and a commitment to academic integrity. These attributes are highly valued in educational settings. Overall, MLA format helps maintain a high standard of scholarly communication and fosters a culture of respect for intellectual property. If WORD is not working properly-Rebuild it!
Set up an MLA format in Microsoft Word, follow these steps:
Set the Margins:
Press Alt + P to open the Layout tab.
Press M to open the Margins menu.
Select Normal to set 1-inch margins on all sides.
Set the Font and Font Size:
Press Ctrl + D to open the Font dialog box.
Select Times New Roman and set the font size to 12.
Set Double Line Spacing:
Press Ctrl + A to select all text.
Press Ctrl + 2 to set double-spacing.
Set the Header:
Alt V + H auto opens Header and down arrow to footer if needed
or Press Alt + N to open the Insert tab.
Press H to open the Header menu and select Blank.
Type your last name, press Space, then press Alt + Shift + P to insert the page number.
Include Key Information on the First Page:
Type your name, instructor’s name, course, and date on separate lines.
Center-align the title of your paper by pressing Ctrl + E.
Format the Works Cited Page:
Press Ctrl + Enter to insert a new page.
Type “Works Cited” and center-align it.
Use a hanging indent for each citation by pressing Ctrl + T.
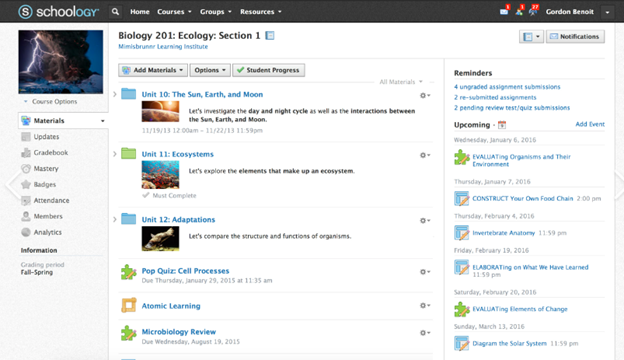
To Navigate Schoology with Jaws is easy using these useful keyboard commands for navigation. When you’re using a screen reader like JAWS or NVDA it is very accessible. Kim demonstrates her skills, showing how to navigate schoology with efficiency. She shares with others how this training has allowed her to access her education.
Use the arrow keys to navigate to the desired course and press Enter.
Access Course Materials:
Press H to navigate through headings until you reach the course materials section.
Use the arrow keys to select the material you want to access.
Navigate to Assignments:
Press Insert + F6 to bring up the headings list.
Use the arrow keys to find and select the “Assignments” heading.
Access Notifications:
Press Insert + F5 to bring up the form fields list.
Navigate to the notifications section and press Enter.
Navigate to Discussions:
Press H to move through headings until you reach the “Discussions” section.
Use the arrow keys to select and enter a discussion.
General Navigation:
Use Tab and Shift + Tab to move forward and backward through interactive elements.
Press G to navigate to graphics and L to navigate to lists.
One Trick to remember is when a PDF viewer of work opens, the download in WORD link is at the very bottom. Use your links list or ctrl end and up arrow to find it.
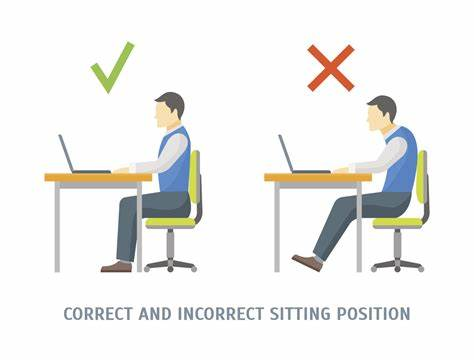
Proper touch typing methods and sitting positions are crucial for efficiency and preventing strain or injury.
Here are some key points to consider:
Proper touch typing methods and Techniques
Home Row Position:
Place your fingers on the home row keys: A, S, D, F for the left hand and J, K, L, ; for the right hand.
Your thumbs should rest on the spacebar.
Finger Placement:
Each finger is responsible for specific keys. For example, the left index finger covers F, G, R, T, V, and B, while the right index finger covers J, H, U, Y, N, and M.
Typing Without Looking:
Practice typing without looking at the keyboard. This helps build muscle memory and increases typing speed and accuracy.
Consistent Practice:
Regular practice is essential. Use typing software or online tools to improve your skills.
Proper Sitting Position
Chair and Desk Height:
Adjust your chair so that your feet are flat on the floor and your knees are at a 90-degree angle.
Your desk should be at a height where your elbows are also at a 90-degree angle when typing.
Back Support:
Sit up straight with your back supported by the chair. Avoid slouching to prevent back strain.
Monitor Position:
Place your monitor at eye level, about 20-30 inches away from your eyes. This helps reduce neck strain.
Keyboard and Mouse Placement:
Keep your keyboard and mouse close enough to avoid reaching. Your wrists should be straight and not resting on the desk while typing.
Breaks and Stretches:
Take regular breaks to stand, stretch, and move around. This helps prevent repetitive strain injuries (RSIs) and keeps you comfortable.
Jordan talks about the important aspects of why blind students need to learn a computer. She discusses the benefits of computers for the blind also. She touches on necessary skills and how this will advance them in their dreams and goals in life.
Jordan on learning Computer for the blind talks about its importance along with a screen reader and display. These are crucial for blind people for several reasons:
Independence and Confidence: Mastering these technologies fosters independence, allowing children to complete tasks on their own without relying on others. This independence boosts their confidence and self-esteem3. Computers for the blind provide this type of access and more.
Equal Opportunities: Proficiency in assistive technologies ensures that blind children have equal opportunities in education and future employment. It levels the playing field, allowing them to compete with their sighted peers.
By learning to use a computer screen reader and braille display, blind children gain essential skills that support their academic, social, and personal growth, paving the way for a more inclusive and empowered future.
It’s important for blind students to use sound transitions in PowerPoint because it helps them follow their presentations without needing to see the slides. Creating PPT sound transitions is essential as the sound cues let them know when a slide changes, making it easier to stay organized and understand the flow of the presentation. This not only builds their confidence in using technology but also helps make their presentations more accessible to everyone, whether they are blind or sighted.
Here are the keyboard commands to add sound transitions in PowerPoint:
Select the Slide:
Use the arrow keys to navigate to the slide you want to add a sound transition to.
Open Transitions Tab:
Press ALT + K to open the Transitions tab.
Choose a Transition:
Use the arrow keys to select a transition effect from the gallery.
Add Sound to Transition:
Press ALT + K, then U to open the Sound drop-down menu.
Use the arrow keys to select a built-in sound or press O to choose your own sound file.
Preview the Transition:
Press ALT + K, then V to preview the transition with the sound.
Apply to All Slides (if needed):
Press ALT + K, then A to apply the transition and sound to all slides.
Raveena shows how to fix basic computer and screen problems and then explains how to install the Perky Duck braille program. She starts by helping users solve common computer or display issues with easy steps. After that, Raveena Fixes Computer Issues by walking through downloading and setting up the Perky Duck program, which helps create and translate braille. Her simple instructions make it easier for students and teachers to use the program and keep their devices running smoothly.
To upload a file in the Perky Duck braille transcription program, you can follow these steps using keyboard commands. Raveena Fixes Computer Issues by providing clear steps to follow:
Open Perky Duck:
Press Windows Key, type “Perky Duck”, and press Enter to open the program.
Open File Dialog:
Press Alt + F to open the File menu.
Press O to select “Open”.
Navigate to Your File:
Use the arrow keys to navigate through your directories.
Press Enter to open folders.
Once you find your file, press Enter to upload it.
Perky Duck free braille translator
These commands should help you efficiently upload a file in Perky Duck. If you need more detailed instructions or have any other questions, feel free to ask! That’s how Raveena Fixes Computer Issues efficiently. Other ways to fix your computer
Becoming a fast Braille reader requires regular practice, strong finger sensitivity, and familiarity with Braille symbols. It is important to develop consistent reading habits, starting with simple texts and gradually increasing difficulty. Mastery of the Braille code, including contractions in Grade 2 Braille, helps increase reading speed by reducing the number of characters to recognize. Using both hands efficiently—one to read ahead and the other to track—can improve flow and speed. Building tactile sensitivity through exercises or activities that engage the fingers is also important for faster recognition of Braille patterns. To truly love fast Braille reading, it typically requires about 2.5 hours of daily practice for two months to reach up to 450+ words per minute. Then after achieving this speed, maintaining progress involves consistent reading each week to keep improving and retain fluency. This is true of sighted people reading print also.
Starting to read Braille at the age of 3 helps build a strong foundation for lifelong reading skills. Early exposure to Braille allows children to develop familiarity with the tactile symbols and patterns, making reading feel natural as they grow. As they explore stories and books, they often gain a love for reading, which motivates them to practice regularly. This consistent practice, combined with early learning, can significantly increase reading speed over time, even reaching over 450+ words per minute. The combination of early introduction and a passion for reading helps develop both fluency and speed in Braille. This is true of sighted people reading print also who love fast Braille reading.
JAWS screen reader offers a variety of cursors that allow blind users to navigate and interact with different types of content more effectively. Each cursor has its specific role, enabling users to access information, move between elements, and interact with applications in various ways. Understanding how to use these cursors—such as the PC cursor, JAWS cursor, Virtual PC cursor, and more—can greatly enhance navigation, making it easier to explore screens, web pages, and documents. Mastering these tools provides more independence and control over the user experience, ensuring smoother and more efficient interactions with digital environments.
JAWS screen reader provides several cursors to help blind users navigate and interact with content effectively. Each cursor serves a different purpose, and knowing how to use them can improve navigation. Here’s an overview of how to use the different JAWS cursors:
All Those JAWS Cursors: Enhancing Navigation
1. PC Cursor
Purpose: This is the default cursor and follows the system focus.
How to Use: Use the keyboard to navigate the screen as a sighted user would, moving between menus, forms, or buttons. This cursor interacts directly with the application.
2. JAWS Cursor
Purpose: It simulates mouse movement and allows you to navigate the screen freely without being tied to the system focus.
How to Use: Use the number pad to move the JAWS cursor. The “5” key on the number pad reads the item under the cursor. Use this cursor to explore screen elements or access parts of the screen that may not be reachable with the PC cursor.
3. Virtual PC Cursor
Purpose: Primarily used in web browsers and documents to read content as if it were in a virtual document.
How to Use: Navigate with standard keyboard commands, such as arrow keys, or use quick navigation keys (like “H” for heading or “F” for form fields). The Virtual PC Cursor treats the content as a text-based document, allowing easy access to web and document elements.
4. Invisible Cursor
Purpose: Works similarly to the JAWS cursor but remains invisible. It’s useful when you don’t want to disturb the system focus.
How to Use: Move this cursor with the number pad keys without affecting other cursors, such as the PC cursor. This is often helpful for reading content while leaving the active focus elsewhere.
5. Touch Cursor
Purpose: Designed for touch screens, it allows for navigating and interacting with touch gestures.
How to Use: Utilize touch gestures on a touch screen to control JAWS. This is ideal for tablets or laptops with touch screens, making the experience more interactive.
6. Routing and Review Cursor
Purpose: Used for reviewing content on a braille display and routing the cursor to specific points.
How to Use: On a braille display, you can move the review cursor to read through text or route the PC cursor to a specific point by pressing routing buttons on the display.
By mastering these cursors, a JAWS user can efficiently navigate various environments, whether it’s desktop applications, web pages, or documents, enhancing both productivity and accessibility. Using proper touch-typing methods on keyboard allows great freedom and ease.