Search results for: “typing”

  • JAWS Cursors: Enhancing Navigation and Control for Blind Users by Finn

    JAWS screen reader offers a variety of cursors that allow blind users to navigate and interact with different types of content more effectively. Each cursor has its specific role, enabling users to access information, move between elements, and interact with applications in various ways. Understanding how to use these cursors—such as the PC cursor, JAWS cursor, Virtual PC cursor, and more—can greatly enhance navigation, making it easier to explore screens, web pages, and documents. Mastering these tools provides more independence and control over the user experience, ensuring smoother and more efficient interactions with digital environments.

    JAWS screen reader provides several cursors to help blind users navigate and interact with content effectively. Each cursor serves a different purpose, and knowing how to use them can improve navigation. Here’s an overview of how to use the different JAWS cursors:

    All Those JAWS Cursors: Enhancing Navigation

    1. PC Cursor

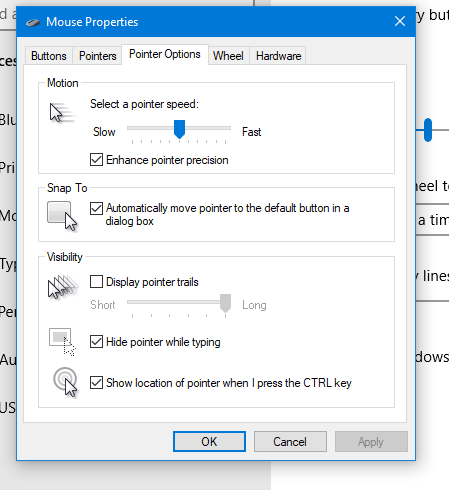
    • Purpose: This is the default cursor and follows the system focus.
    • How to Use: Use the keyboard to navigate the screen as a sighted user would, moving between menus, forms, or buttons. This cursor interacts directly with the application.

    2. JAWS Cursor

    • Purpose: It simulates mouse movement and allows you to navigate the screen freely without being tied to the system focus.
    • How to Use: Use the number pad to move the JAWS cursor. The “5” key on the number pad reads the item under the cursor. Use this cursor to explore screen elements or access parts of the screen that may not be reachable with the PC cursor.

    3. Virtual PC Cursor

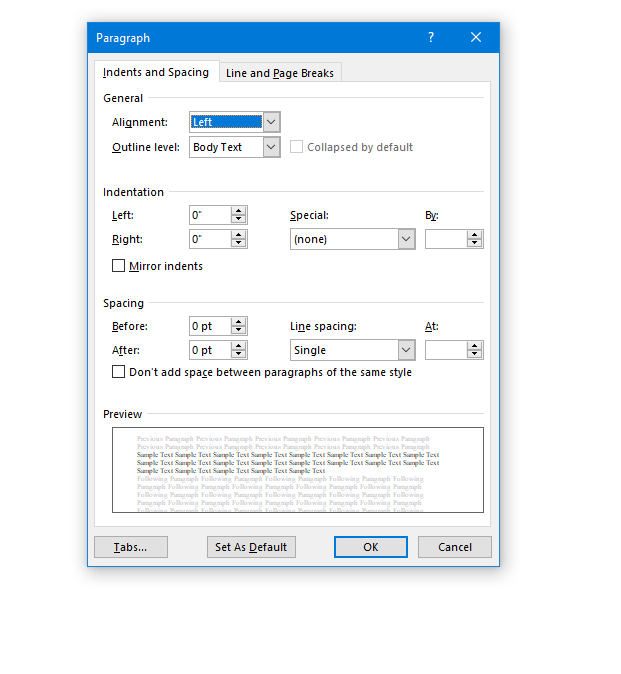
    • Purpose: Primarily used in web browsers and documents to read content as if it were in a virtual document.
    • How to Use: Navigate with standard keyboard commands, such as arrow keys, or use quick navigation keys (like “H” for heading or “F” for form fields). The Virtual PC Cursor treats the content as a text-based document, allowing easy access to web and document elements.

    4. Invisible Cursor

    • Purpose: Works similarly to the JAWS cursor but remains invisible. It’s useful when you don’t want to disturb the system focus.
    • How to Use: Move this cursor with the number pad keys without affecting other cursors, such as the PC cursor. This is often helpful for reading content while leaving the active focus elsewhere.

    5. Touch Cursor

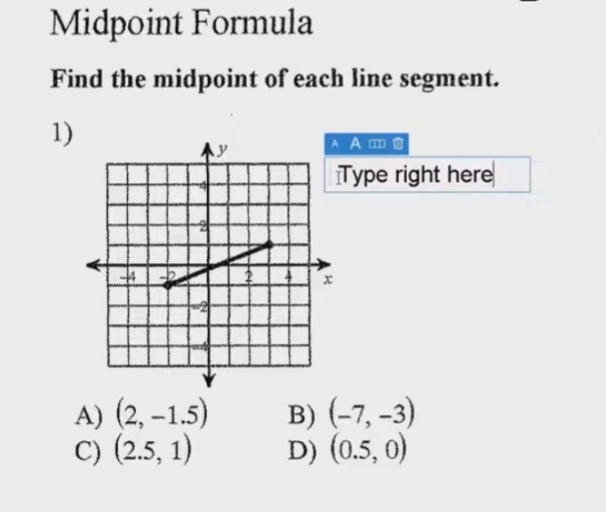
    • Purpose: Designed for touch screens, it allows for navigating and interacting with touch gestures.
    • How to Use: Utilize touch gestures on a touch screen to control JAWS. This is ideal for tablets or laptops with touch screens, making the experience more interactive.

    6. Routing and Review Cursor

    • Purpose: Used for reviewing content on a braille display and routing the cursor to specific points.
    • How to Use: On a braille display, you can move the review cursor to read through text or route the PC cursor to a specific point by pressing routing buttons on the display.

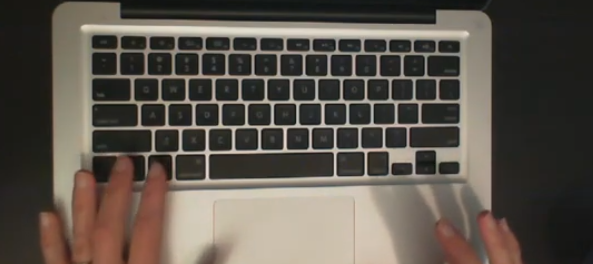
    By mastering these cursors, a JAWS user can efficiently navigate various environments, whether it’s desktop applications, web pages, or documents, enhancing both productivity and accessibility. Using proper touch-typing methods on keyboard allows great freedom and ease.

    Let us know how we can help you: Contact US: TechVisionTraining@yourtechvision.com

  • Google Dictation Using Speech — Tech Tip for the Day

    Google Dictation, also known as “Voice Typing,” enables users to write and edit text using their voice instead of a keyboard. By using simple voice commands, you can dictate text, add punctuation, and format documents hands-free, making the process faster and more accessible. Additionally, with a few keyboard shortcuts, you can easily start or stop dictation and manage the flow of your work. For a more comprehensive experience, mastering Google Dictation using Speech can be a game changer. This guide outlines essential keyboard shortcuts and voice commands to help you navigate and edit documents more efficiently using Google Dictate.

    Google Docs Dictation, also known as “Voice Typing,” allows users to dictate text using voice commands instead of typing. Here are the keyboard commands for using Google Dictate:

    Google doc Dictation mode
    Google Dictation using Speech in Docs

    1. Start Voice Typing

    • Windows & Chromebook: Press Ctrl + Shift + S. Also, under Tools Menu
    • Mac: Press Cmd + Shift + S. This command opens the Voice Typing tool in Google Docs.

    2. Pause/Resume Dictation

    • Once Voice Typing is active, click the microphone icon to pause or resume dictation. There is no direct keyboard shortcut for pausing or resuming dictation, but you can toggle it by pressing Ctrl + Shift + S (or Cmd + Shift + S on Mac) again.
    Google Slide dictation mode
    Google Slide Dictation mode

    3. Voice Commands for Editing (While Dictating):

    • New line: Say “New line” to move to the next line.
    • New paragraph: Say “New paragraph” to start a new paragraph.
    • Select text: Say “Select [word/phrase]” to highlight specific text.
    • Delete text: Say “Delete” or “Backspace” to remove the selected text or go back one character.
    • Bold text: Say “Bold” to bold the selected text.
    • Italicize text: Say “Italicize” to italicize the selected text.
    • Underline text: Say “Underline” to underline the selected text.
    • Go to the end of the document: Say “Go to end of document” to move the cursor to the end.
    • Go to the beginning of the document: Say “Go to beginning of document” to move the cursor to the start.

    4. Punctuation Commands

    • Period: Say “Period” to insert a period.
    • Comma: Say “Comma” to insert a comma.
    • Question mark: Say “Question mark” to add a question mark.
    • Exclamation mark: Say “Exclamation point” to add an exclamation mark.
    • Colon: Say “Colon” to add a colon.
    • Semicolon: Say “Semicolon” to insert a semicolon.

    5. Editing Commands (While Typing or Dictating)

    • Undo: Say “Undo” to undo your last action.
    • Redo: Say “Redo” to redo the last undone action.
    • Copy: Say “Copy” to copy selected text.
    • Paste: Say “Paste” to paste the copied text.

    These commands allow you to efficiently dictate and edit documents using Google Voice Typing, streamlining the process for those who prefer hands-free typing.

    More on YouTube

    Let us know how we can help you: Contact US: TechVisionTraining@yourtechvision.com

  • Connect Focus 40 braille display to Jaws

    Connecting a Focus Braille Display to a computer using JAWS screen reader enhances accessibility for blind and visually impaired users. The process of connecting a Connect Focus 40 Braille display allows users to interact with digital content through tactile feedback, improving independence and productivity. By following a few simple steps, you can seamlessly connect the Braille display via USB or Bluetooth and configure it in JAWS for optimal use. This guide provides an easy-to-follow approach for setting up your Focus Braille Display and ensuring smooth integration with JAWS.

    Here are the steps to connect a Focus Braille Display to your computer using JAWS screen reader:

    Connect Focus 40 Braille Display or other displays

    1. Power on the Focus Braille Display

    Ensure the Focus Braille Display is fully charged and powered on before connecting.

    1. Connect the Display to the Computer

    Use either USB or Bluetooth to connect the Focus Braille Display to your computer.

    For USB: Plug the USB cable into both the Braille display and the computer.

    For Bluetooth: Enable your computer’s Bluetooth and pair the Focus display in the Bluetooth settings.

    1. Enable Braille in JAWS

    Open JAWS by pressing Insert + J. Then, press Alt + O to open the Options menu.

    Press B to select Braille or use the arrow keys to navigate, then press Enter.

    1. Select the Braille Display

    In the Braille settings window, ensure the “Focus” display is selected under the Default Braille Display dropdown.

    If it’s not selected, use the arrow keys to choose “Focus” or manually type the model of the Braille display.

    1. Check Braille Display Connection

    After selecting the correct display, click OK or press Enter to confirm the connection.

    JAWS should now detect the Focus Braille Display. Braille output should appear, and the display keys will control JAWS.

    1. Configure Settings (Optional)

    To further customize settings like verbosity and Braille output, go to Braille options via Insert + J, Alt + O, and B.

    1. Test the Connection

    Use JAWS commands on your keyboard or the Focus Braille Display keys to navigate.

    If the connection works, the Braille display will respond to the text output from the computer.

    By following these steps, you should successfully connect your Focus Braille Display to a computer using JAWS.

    Braille Display and Other Lessons

    Quadratic Formulas with UEB Math or Nemeth and/or display with JAWS audio & MathCat

    Complete Advanced Math with LaTex to finish math fast using Mathkicker.AI, JAWS, NVDA and/or display

    Transcribe Math into Word documents for blind students using Math editor, Jaws and a Braille Display

    Track Changes with Commands-inserting comments and editing work

    Essential WORD keyboard commands for setting defaults

    Excel line plot graph-copy to Word for Math

    Complete an excel graph and copy into Word document with screen reader

    Basic WORD JAWS commands with Typing Trick

    Rebuild Microsoft Word Template when it is not working well

    Other Focus Display lessons

  • Desmos Graphing Calculator Solution for Blind and Low Vision

    In this Video lesson, Dr. Denise Robinson demonstrates the Desmos calculator, an online tool used in schools for graphing solution for even Geometry. She highlights its fun and accessible nature, noting that while she can’t cover all its features in 1 video, she will guide through the basics of using the Desmos.

    First, she instructs users to press Control + O for 1 option for a new graph. Using JAWS screen reader. But any screen reader will work. After pressing Control + O, users hit Enter to create a new blank graph. They can navigate through options using the down arrow also for many other types of graphs. Dr. Robinson then guides users to type in formulas to create parabolas and lines, making use of various functionalities in the Desmos Graphing Calculator Solution.

    Visual Calculator and PC Calculator for Desmos Graphing Calculator Solution

    A keyboard appears at the bottom of the screen, which is manageable for low vision children. For low vision children, she recommends using Control + Plus to zoom in, allowing them to adjust the size as needed. Control + Zero returns the display to normal size. Blind students will use the PC built in calculator for full access, ensuring the best use of the Desmos Graphing Calculator Solution.

    Desmos graphing solutions- picture of parabola and formulas
    Desmos Calculator Graphing Solutions- picture of parabola and formulas

    Next, Dr. Robinson explains how to open the field dialogues or share or export to emboss a graph by pressing Insert + F5. She mentions Desmos works well in Chrome, Edge and sometimes in Firefox based on updates. She advises users to label their graph. Insert + F5 also assists in many other JAWS screen reader functionalities, enhancing the use of the Desmos Graphing Calculator Solution.

    Dr. Robinson then demonstrates typing formulas, such as X superscript 2 minus 1/2. She shows how the graph forms visually and explains using Shift + 6 for superscript. Users can listen to the graph’s details by using H and the arrow keys, with the right arrow moving right and the left arrow moving left, providing detailed information about the graph’s points. Desmos Keyboard Shortcuts and other Math Lessons further elaborate on how to effectively use the Desmos Graphing Calculator Solution.

    Find more with Desmos:

    Desmos 3D graphing

    for Geometry in Desmos

    for STEM and Embossing in Desmos

    Desmos and inserting graphs into Math Work in WORD

    Creating shaded Parabolas in Desmos

    Games with Desmos with Drag and Drop

  • WORD Accessible Food Chain for Class Using Talking Software

    The current page provides instructions on creating a food chain for a class using talking software. It includes steps for saving a document in a specific format and navigating through menus using keyboard shortcuts. Additionally, it references the video below to help you each step of the way.

    F12 and save as 97-2023 so after you F12 you will have file and tab once and down arrow or up arrow to 97-2023 doc and enter, then the commands will work for you.

    • Alt + N then M and right arrow to Food Chain and enter
    • Listen to recording to add information as you need

    WORD accessible food chain and why we use them

    A food chain is a sequence that shows how energy and nutrients flow from one organism to another within an ecosystem. Here’s a simple breakdown:

    1. Producers: These are usually plants or algae that create their own food through photosynthesis. They form the base of the food chain.
    2. Primary Consumers: Herbivores that eat the producers. Examples include rabbits and deer.
    3. Secondary Consumers: Carnivores that eat the herbivores. For instance, a fox that eats rabbits.
    4. Tertiary Consumers: These are predators that eat secondary consumers. An example would be an eagle that eats foxes.
    5. Decomposers: Organisms like bacteria and fungi that break down dead plants and animals, returning nutrients to the soil.

    Each step in the food chain is called a trophic level. Energy is transferred from one level to the next, but with each transfer, some energy is lost as heat, making the chain less efficient as it goes up12.

    Food chains often interconnect to form a food web, which provides a more comprehensive picture of how energy flows through an ecosystem2.

    WORD accessible food chain
    WORD accessible food chain

    Other WORD Lessons

    Optimizing Windows 11 Efficiency for Screen Reader with Key Settings and Configurations

    WORD Efficient Text Navigation and Selection

    Basic WORD JAWS commands with Typing Trick

    Rebuild Microsoft Word Template when it is not working well

    Microsoft Word MLA format with Christopher Duffley

    WORD accessible food chain for class using talking software

    Commands to change mouse -access programs fast, basics in Word font & movement

    Excel line plot graph-copy to Word for Math

    Complete an excel graph and copy into Word document with screen reader

    Essential WORD keyboard commands for setting defaults

    Track changes in Word-How teachers make corrections in work

    Track Changes with Commands-inserting comments and editing work

    Other accessible IXL options for more learning

    Team Specialists and Access Trainers to deliver the instruction you need

  • Make an Electronic Signature — Then Insert It into a Document

    You can quickly create an electronic signature using keyboard commands on various platforms. In Microsoft Word or Adobe Acrobat, type, draw, or insert a signature image. Keyboard shortcuts simplify the process, making it easy to add signatures to digital documents. This guide provides step-by-step instructions on typing, drawing, or inserting a signature using shortcuts. You can apply this method across all versions of Word for creating electronic signatures efficiently and effectively.

    To create an electronic signature using keyboard commands, follow these steps:

    Make Electronic Signatures in WORD and Adobe

    1. In Microsoft Word:
    • Open a blank document. Press Alt + N, then P to insert a picture if you’re using a scanned image of your signature.
      • This means, hand write out a signature and scan it into computer and save as your signature. Then insert that into your documents and use any where to make an electronic signature process smoother
      • Use a mouse to crop out JUST the signature, application key when you are on the image and save as picture and name it the word signature after your name
    • For typed signatures, press Ctrl + Shift + K to enter text in a signature-like font (if available), then press Ctrl + B to bold the text if needed.
    • To save the signature, press Alt + F, then A to save as a PDF or document.
    Practice making an electronic signature using the name 'Jane Doe
    Practice making an electronic signature using the name ‘Jane Doe
    1. In Adobe Acrobat:
    • Open a PDF and press F6 to navigate the newest Adobe or Alt + T for the tools menu. Navigate with F6 or the arrow keys to “Fill & Sign” and press Enter. Follow prompts to either type, draw, or insert an image of your signature.

    Any issues in WORD, then just rebuild it

    Other access Lessons on YOUTUBE

  • Mac with VoiceOver and Key Commands

    Navigating a Mac with VoiceOver is essential for blind and low vision users. By using keyboard commands, you can efficiently manage tasks without relying on a mouse. VoiceOver provides auditory feedback, guiding users through menus, applications, and files. Key commands like Command + F5 to toggle VoiceOver, or Control + Option + D to access the Dock, streamline the process. This guide introduces basic navigation techniques, helping you quickly move between applications, windows, and other essential areas of your Mac with Voice Over.

    Finger gestures on a Mac track-pad allow for smooth navigation and interaction. With VoiceOver enabled, the following gestures are common on track pad on Mac with VoiceOver and Key Commands :

    1. One-Finger Swipe: Swipe left or right to move between items.
    2. Double-Tap: Activate or select an item.
    3. Three-Finger Swipe: Move the content, such as scrolling up or down.
    4. Two-Finger Rotate: Adjust the rotor to different navigation options.
    5. Three-Finger Tap: Brings up additional VoiceOver information about the item.
    Mac with Voice Over and VO keys
    Mac with Voice Over and VO keys

    Finger tap or swipe gestures on the Mac trackpad with VoiceOver and Key Commands provide an intuitive way to control navigation using VoiceOver. Here are some common gestures:

    1. Single Tap: Select an item under the cursor.
    2. Double Tap: Activate the selected item (like clicking a mouse).
    3. Swipe Left or Right with One Finger: Move to the next or previous item.
    4. Two-Finger Swipe Up/Down: Scroll through a document or webpage.
    5. Three-Finger Swipe Left/Right: Navigate between open applications or spaces.

    These gestures make interacting with your Mac faster and more efficient when using VoiceOver.

    Then continue to Practice those perfect Touch typing skills and learn more commands via YouTube

  • Commands to Change Mouse Settings, Access Programs Fast, and Use Basic Word Font & Movement

    Using keyboard commands to quickly access and adjust mouse settings allows for efficient changes to mouse size and behavior, such as “Snap To” functions. These options are accessible through the Mouse Properties window in Windows, which you can open by pressing Windows + R and typing main.cpl. Once inside, you can navigate tabs and options using Ctrl + Tab and arrow keys, adjusting the mouse size or enabling the “Snap To” feature. This provides an easier and faster way to customize your mouse for improved accessibility and functionality.

    To quickly change mouse settings in Windows, use keyboard commands to access Mouse Properties: Another way

    1. Open Mouse Properties: Press Windows and type Mouse then press Enter.
    2. Tab to additional mouse options and enter
    3. Ctrl + Tab to Pointers and Change Mouse Size: arrow to inverted large or extra large based on need
    4. Navigate to the Pointer Options using Ctrl + Tab, then press Tab to “Snap To” or ALT + U to check box
    5. Then press Alt + S to check “Show location of pointer when I press the CTRL key.”
    6. Apply Changes: Press Alt + A to apply the settings and enter to close the window.
    Commands to change mouse
    Commands to change mouse

    These steps streamline navigation without relying on the mouse.

    Lessons on How to SEE your computer better as well as other Tech Lessons

  • Essential Word Keyboard Commands for Setting Defaults

    Essential WORD keyboard commands to help teachers who teach blind with talking software or sighted who just want to move faster. These are some of the most essential commands everyone should know, especially those mastering the essential commands for WORD keyboard users.

    Here’s a summary of essential WORD keyboard commands for video users.


     Keyboard shortcuts for all WORD versions.

    1. Open Word: Press Windows + 5 to start Word from the taskbar.
    2. Zoom In: Use Alt + V + Z to zoom to 200%.
    3. Change Defaults:
      • Open Paragraph Spacing: Press Alt + O + P.
      • Set Spacing to Single: Press Alt + P and change to single spacing.
      • Set Default for All Documents: Press Alt + D followed by Alt + A and then Enter.

    Customize Document further

    1. Change Font:
      • Select All Text: Press Ctrl + A.
      • Open Font Dialog: Press Ctrl + D.
      • Change Font to Times New Roman: Type “Times New Roman” and set size to 12.
      • Set Default for All Documents: Press Alt + D followed by Alt + A and then Enter.
    2. Create Columns:
      • Open Page Layout: Press Alt + P.
      • Select Columns: Press J for columns.
      • Set Number of Columns: Press Alt + O + C and choose the number of columns.
    3. Change Page Color:
      • Open Page Layout: Press Alt + P.
      • Open Colors: Press PC.
      • Select Color: Use arrow keys to choose a color and press Enter.
    4. Add Border:
      • Open Borders: Press Alt + O + B.

    These commands will help you efficiently navigate and customize documents. See other Setup options 

    windows page setup for defaults
    Essential WORD keyboard commands for windows page setup for defaults

    Other WORD Lessons

    Optimizing Windows 11 Efficiency for Screen Reader with Key Settings and Configurations

    WORD Efficient Text Navigation and Selection

    Basic WORD JAWS commands with Typing Trick

    Rebuild Microsoft Word Template when it is not working well

    Microsoft Word MLA format with Christopher Duffley

    WORD accessible food chain for class using talking software

    Commands to change mouse -access programs fast, basics in Word font & movement

    Excel line plot graph-copy to Word for Math

    Complete an excel graph and copy into Word document with screen reader

    Essential WORD keyboard commands for setting defaults

    Track changes in Word-How teachers make corrections in work

    Track Changes with Commands-inserting comments and editing work

  • Type directly on PDF for Geometry with screen reader

    You can perform all these tasks using current PDF versions, even with inaccessible scanned images. First, demonstrate how to write text directly on scanned PDFs, then save the edited file. Next, show students how to type directly on PDF and email the completed PDF to their teacher for submission. Perfect touch typing is always preferred for ease.

    For low vision users, all math content with voice output offers additional support. Combine this tool with text manipulation in PDFs to make materials more accessible. This approach ensures students can interact with complex materials efficiently, despite any visual challenges.

    Here are some useful keyboard commands for working with PDFs in Adobe Acrobat, focusing on enlarging the screen and typing on the document:

    Type directly on PDF commands

    Enlarge Screen (Zoom In/Out)

    1. Zoom In:
      • Press Ctrl + + (Plus sign) on Windows.
      • Press Cmd + + (Plus sign) on Mac.
    2. Zoom Out:
      • Press Ctrl + - (Minus sign) on Windows.
      • Press Cmd + - (Minus sign) on Mac.
    3. Fit to Screen:
      • Press Ctrl + 0 (Zero) on Windows.
      • Press Cmd + 0 (Zero) on Mac.

    Typing on a PDF

    Typing on PDF
    Type Directly on PDF
    1. Add Text:
      • Select the Text Box Tool by pressing Ctrl + Shift + T on Windows.
      • On Mac, you might need to manually select the tool from the toolbar.
    2. Type in a Form Field:
      • Navigate to the form field using the Tab key.
      • Press Enter to start typing.
    3. Add a Comment:
      • Press Ctrl + 6 to open the comment tool on Windows.
      • Press Cmd + 6 on Mac.
    4. Save Changes:
      • Press Ctrl + S to save the document on Windows.
      • Press Cmd + S on Mac.

    More PDF Lessons:

    Math and taking inaccessible to accessible in WORD

    Type directly on a PDF

    Transcribe Math Images from PDF

    Take Large PDFs and Print to PDF for a few pages

    If you have any computer issues, fix it up yourself and get going on work.

    These commands should help you navigate and edit PDFs more efficiently.

    Video on How to SEE your computer better with Low vision is also very helpful.