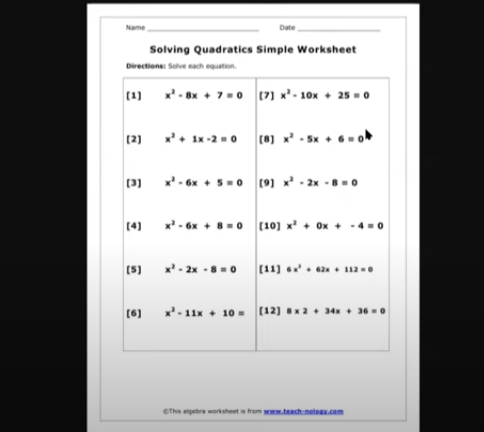
In this video, Dr. Robinson begins by demonstrating how to use MathKicker.ai with screen readers like JAWS or NVDA. She focuses on solving quadratic equations. First, she shows how to handle graphics that are not accessible to screen readers. By using the “Applications” key and selecting “Copy Image,” users can paste the image into MathKicker using “Alt + V.” The system converts the image into readable math, confirmed by two chimes.
Dr. Robinson then guides users to navigate and manipulate the quadratic equation in MathKicker.ai with screen reader. She demonstrates how to move constants to the other side of the equation using “Control + Right Arrow.” Next, she explains the process of completing the square by taking half the coefficient of x, squaring it, and applying it to both sides with “Alt + B” and entering the value.
She continues by rewriting the equation as a perfect square, using “Control + R” to replace terms in MathKicker.ai with screen reader. She shows how to take the square root of both sides with “Alt + B” and using “R” for radical. The process involves replacing the square root with the exact values, ensuring each step is clear and accurate.
Throughout the MathKicker.ai with screen reader tutorial, Dr. Robinson emphasizes using keyboard commands to navigate and solve the equation. She also highlights how users can submit their work to their teachers directly from MathKicker by using the “Applications” key and selecting “Submit Work to My Teacher.” See more lessons on Mathkicker.AI with Jaws or NVDA.
Kaleigh was born with very special hands. So, whether you have 10 fingers or 2 or 3, there is always an easy way to use a braille display to control your computer.
Math for all ages, Math Team, Dr. Robinson, along with Professor Betsey, Campbell Rutherford (teacher intern), led the session. Nate Kile (Access Tech Specialist) was the moderator. Math Team emphasized the importance of ensuring blind students can access their technology independently and efficiently. Nate Kile assisted by handling participant questions during the presentation, allowing attendees to type inquiries in the Zoom chat box. Mr Kile would ask the Math Team from the virtual attendees.
Each presenter built on the others’ lessons. Dr. Robinson began with elementary math training skills and how JAWS and other assistive technologies play crucial roles in blind students’ education. Teaching math for all ages, she typed out typically math problems in elementary school to show audience how easily math is completed in WORD. Nate provided opportunities for participants to unmute themselves using Alt + A or Alt + M to ask questions.
Math for all Ages: Dr Robinson
The Math Team turned off their videos to optimize bandwidth. When teaching virtually, turning off video offers better bandwidth for a flow of uninterrupted instruction. Dr. Robinson started the discussion by running JAWS, a screen reader. She explained how to troubleshoot JAWS issues, recommending minimizing programs and restarting the software for optimal performance.
The session highlighted key JAWS commands, such as Windows + D for quick access to the desktop. Dr. Robinson demonstrated how blind students could use Braille displays for math, including Nemeth code. She showed how blind students control their computers by personalizing settings like screen readers and Bluetooth. Customizing the setup is essential for supporting math learning at all ages.
Math for all ages math formulas in Word
Math for all Ages: Professor Betsey
Professor Betsey demonstrated how to effectively use Braille displays, including advanced setups for students. She went into MathType and LaTex and how to use advanced Math techniques to accomplish all math levels. She emphasized the importance of maintaining accessibility and autonomy for students through personalized settings. As a college-level math professor, she explains that using a PC for math enables full inclusion of blind students. Prof. Betsey emphasizes that this technology allows blind students to participate equally in all aspects of their education. This approach supports the goal of providing math for all ages.
Math for all Ages: Campbell
Campbell Rutherford, a teacher intern, demonstrated how to integrate graphing and mathematical functions using accessible technology for blind students. Campbell began by demonstrating how to write a function in Word using LaTeX. She then transitioned to graphing that function in Desmos, an online graphing calculator. Using her braille display and screen reader, she input and analyzed the graph. Campbell explained how blind students can explore mathematical properties like intercepts and undefined points. After reviewing the graph, she took a screenshot and pasted it into a Word document. This tied together the written mathematical properties and the visual representation. Throughout, Campbell stressed the importance of accessible math for students of all ages.
Throughout the session, the Math Team emphasized the importance of managing constant software updates. They explained how providing local admin rights empowers students to update their programs and devices independently. This in-turn prepares them for both academic success and future employment. The TechVision team’s approach ensures that students can fully access their education and maintain control of their technology. This ultimately sets them up for long-term success but especially the STEM field. More Math Lessons here:
To use MathType and LaTeX with screen readers like JAWS or NVDA, you can easily create and render math formulas directly in Word or Google Docs. Here’s how to get started with MathType in both platforms and some important points for using LaTeX commands.
MathType in Word:
Download MathType: First, download and install MathType as an add-on for Word. This will allow you to use LaTeX commands within your Word documents.
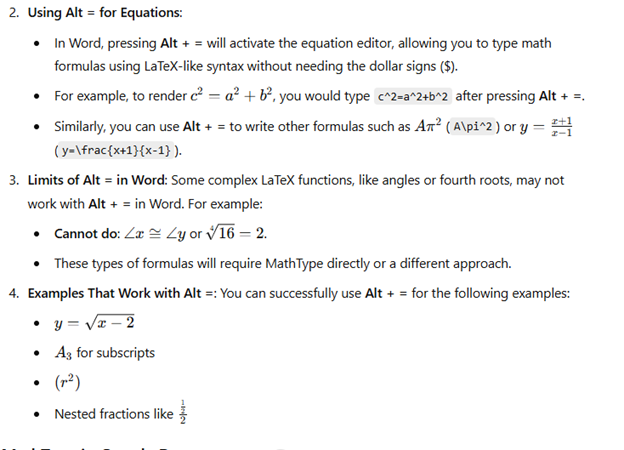
Using Alt = for Equations:
In Word, pressing Alt + = will activate the equation editor, allowing you to type math formulas using LaTeX-like syntax without needing the dollar signs ($).
For example, to render c2=a2+b2c^2 = a^2 + b^2c2=a2+b2, you would type c^2=a^2+b^2 after pressing Alt + =.
Similarly, you can use Alt + = to write other formulas such as Aπ2A\pi^2Aπ2 (A\pi^2) or y=x+1x−1y = \frac{x+1}{x-1}y=x−1x+1 (y=\frac{x+1}{x-1}).
Limits of Alt = in Word: Some complex LaTeX functions, like angles or fourth roots, may not work with Alt + = in Word. For example:
Cannot do: ∠x≅∠y\angle x \cong \angle y∠x≅∠y or 164=2\sqrt[4]{16} = 2416=2.
These types of formulas will require MathType directly or a different approach.
Examples That Work with Alt =: You can successfully use Alt + = for the following examples:
y=x−2y = \sqrt{x-2}y=x−2
A3A_3A3 for subscripts
(r2)(r^2)(r2)
Nested fractions like 122\frac{\frac{1}{2}}{2}221
Visual Rendering after you press enter in WORD for MathType with screen readers-LaTex
Latex is typed out and this is the visual rendering of the LaTex from Mathtype
MathType in Google Docs-though can give challenges based on technology:
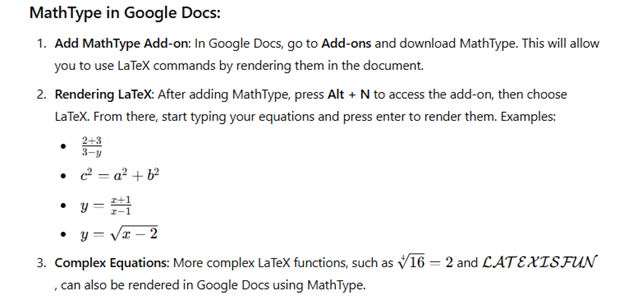
Add MathType Add-on: In Google Docs, go to Add-ons and download MathType. This will allow you to use LaTeX commands by rendering them in the document.
Rendering LaTeX: After adding MathType, press Alt + N to access the add-on, then choose LaTeX. From there, start typing your equations and press enter to render them. Examples:
2+33−y\frac{2+3}{3-y}3−y2+3
c2=a2+b2c^2 = a^2 + b^2c2=a2+b2
y=x+1x−1y = \frac{x+1}{x-1}y=x−1x+1
y=x−2y = \sqrt{x-2}y=x−2
Complex Equations: More complex LaTeX functions, such as 164=2\sqrt[4]{16} = 2416=2 and LATEXISFUN\mathcal{LATEX IS FUN}LATEXISFUN, can also be rendered in Google Docs using MathType.
Visual rendering of math after translation of LaTex in Docs using mathtype addon
By using Alt + = in Word and MathType in Google Docs (but be aware there may be issues in Docs), you can seamlessly render a variety of math formulas and equations with ease. Screen readers like JAWS and NVDA will effectively read these equations, enhancing accessibility for blind and visually impaired students.
MathType(LaTex) Alt = in WORD will render formulas to Math see below
Dr. Betsey Doane shared her experience teaching math for over 50 years and the importance of making math accessible to all students, including those with visual impairments. She began by introducing the software MathType, essential for creating accessible math content. The software integrates into Word and allows users to write math that is accessible to both screen readers and braille displays. Her efforts truly embody the concept of Advanced Math Made Accessible.
Dr. Doane explained the basics of LaTeX, a text-based language used for writing math. She demonstrated how to input and translate common math expressions such as fractions, square roots, and equations using LaTeX in Word. Her instructions included using the Focus 40 Braille Display and ensuring proper configurations for students to view math content in braille. This approach makes advanced math more accessible for everyone.
LaTex using Mathtype to insert perfect Advanced math made accessible
She emphasized the importance of understanding both the visual and non-visual ways of presenting math, highlighting that students need the right software and commands to work effectively. By using LaTeX and MathType, both sighted and blind students can access and solve math problems, ensuring inclusion in any classroom setting. This makes advanced math accessible and easier to understand.
She highlighted the use of MathType software, which integrates seamlessly with Microsoft Word, allowing users to create and present math content that is accessible through screen readers like JAWS and braille displays like the Focus 40. Dr. Doane explained how MathType enables students and educators to write complex equations, such as fractions, square roots, and exponents, in both visual and non-visual formats. This ensures that blind students can access the same content as their sighted peers, making advanced math more accessible.
Advanced Math Made Accessible with LaTex
Dr. Doane also provided an introduction to LaTeX, a powerful text-based language used for writing mathematical expressions. She demonstrated how to write math using LaTeX syntax, such as using backslashes for commands like fractions and square roots. By using LaTeX in Word with MathType, math content can be rendered correctly on both screen readers and braille displays, making it easier for blind students to follow along in class and complete assignments. This is another way to make advanced math accessible.
Furthermore, Dr. Doane stressed the importance of configuring braille displays correctly, ensuring that input is set to computer braille and output is set to grade 2. She provided step-by-step instructions for adjusting these settings on the Focus 40 Braille Display, ensuring that students can navigate math content effectively, contributing to the overall goal of making advanced math accessible.
In conclusion, Dr. Doane encouraged educators to adopt these tools and techniques to create an inclusive learning environment where both sighted and blind students can excel in mathematics. Her detailed instructions and practical advice offer a clear path toward accessible math education for all.
Dr. Robinson and Lucas began the session by navigating Canvas, focusing on essential screen reader commands for effective navigation. They highlighted the importance of commands like Insert + F5, F6, and F7 to explore the page layout before moving through various elements. When discussing the Canvas school platform navigation, Dr. Robinson highlighted the need to recognize interactive elements like radio buttons and check-boxes to ensure smooth navigation in Canvas. By understanding these features, students can efficiently move through the platform and complete tasks effectively. Understanding Canvas school platform navigation is key for accessibility.
To streamline their workflow, they used first-letter navigation, such as hitting “C” to quickly jump to courses. This method enables users to navigate faster without manually tabbing through multiple options. Lucas demonstrated how to access different sections of the Canvas interface, including courses and messages, using the appropriate keyboard commands. Mastering the navigation of the Canvas school platform efficiently requires knowing these shortcuts.
InBox Management in Canvas school Platform Navigation
For inbox management, Lucas efficiently used first-letter navigation to filter unread emails and compose a new message. Dr. Robinson guided him through composing an email, showing how typing the recipient’s name narrows down the list of available contacts. Lucas learned how to navigate, select recipients, and send messages within the Canvas interface. Canvas school platform navigation strategies significantly improved his inbox management skills.
After addressing the inbox, they moved on to class assignments. Using heading and link navigation commands, Lucas accessed assignments and checked due dates. Dr. Robinson stressed the importance of using key commands, such as Insert + F7, to bring up lists of assignments and quickly navigate to relevant tasks on the Canvas school platform.
Lastly, they tackled PDF accessibility. Dr. Robinson showed Lucas how to download and convert PDFs into Word documents for better accessibility and interaction. By converting documents, Lucas could add notes, adjust content, and work more effectively. These steps reinforced the power of screen reader commands, helping users stay organized and fully engaged in digital learning environments on the Canvas school platform.
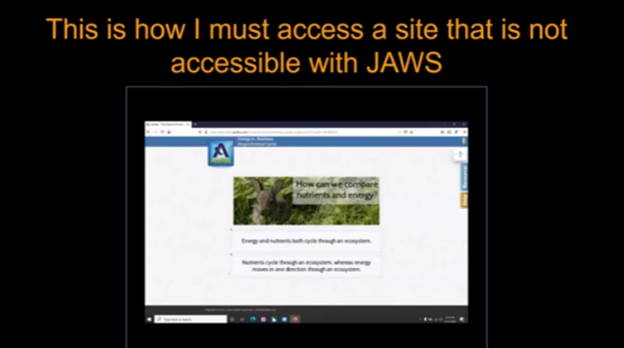
Emery, a blind ninth-grader at Kalaheo, introduces herself and shares her love for math and technology. She uses a computer with a screen reader and Braille display to access her education. Eme navigates her world with a cane and texts friends using her phone. During the pandemic, her computer became essential for schoolwork. She explains how she uses various tools to access her education, including JAWS screen reader and Braille Display and other access technology. Eme highlights the importance of accessible assignments and demonstrates navigating an online platform despite its challenges. Accessible work at school is critical for her success.
Emery uses tools like the JAWS screen reader and Braille display connected to her computer to navigate her studies. She emphasizes that accessible assignments are crucial because they allow her to engage with the same content as her peers. When assignments are not accessible, it creates significant barriers to her learning. It is evident that accessible work at school can make a big difference.
Eme Making Work accessible on an inaccessible site
By ensuring Teachers’ work is accessible, you empower students like Emery to succeed and participate fully in their education. Accessible materials foster a learning environment where all students can be included and thrive. Therefore, focusing on making work accessible at school helps all students.
She thanks teachers for their commitment to making education accessible for everyone. Providing accessible work at school shows dedication to inclusion and highlights the importance of accessibility.
Using Focus 40 Braille Display to do Math Work in Word with Jaws, Kim demonstrates commands in WORD using FOCUS 40 Braille display exclusively. She can control her computer and complete her math work in WORD with just the display.
Here are some essential commands for using the Focus 40 Braille Display to do math in Microsoft Word:
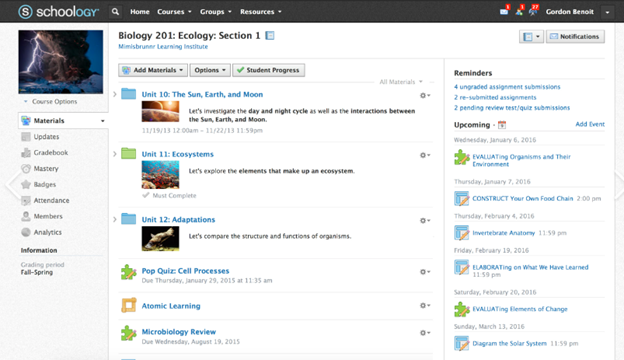
To Navigate Schoology with Jaws is easy using these useful keyboard commands for navigation. When you’re using a screen reader like JAWS or NVDA it is very accessible. Kim demonstrates her skills, showing how to navigate schoology with efficiency. She shares with others how this training has allowed her to access her education.
Use the arrow keys to navigate to the desired course and press Enter.
Access Course Materials:
Press H to navigate through headings until you reach the course materials section.
Use the arrow keys to select the material you want to access.
Navigate to Assignments:
Press Insert + F6 to bring up the headings list.
Use the arrow keys to find and select the “Assignments” heading.
Access Notifications:
Press Insert + F5 to bring up the form fields list.
Navigate to the notifications section and press Enter.
Navigate to Discussions:
Press H to move through headings until you reach the “Discussions” section.
Use the arrow keys to select and enter a discussion.
General Navigation:
Use Tab and Shift + Tab to move forward and backward through interactive elements.
Press G to navigate to graphics and L to navigate to lists.
One Trick to remember is when a PDF viewer of work opens, the download in WORD link is at the very bottom. Use your links list or ctrl end and up arrow to find it.
Turning images into text in Google Docs is a simple process that uses Optical Character Recognition (OCR) technology. This feature allows you to extract text from images, making it editable and searchable. Whether you have a photo of a document, a screenshot, or a PDF, Google Docs can quickly convert the image to text for further use. Changing inaccessible to accessible is an important step, and this post will show you how to upload an image, open it in Google Docs, and extract the text for easy editing.
To turn images into text in Google Docs, you can use a built-in feature that utilizes Optical Character Recognition (OCR). Here’s how you can do it:
1. Upload the Image to Google Drive
Open Google Drive.
Click New and select File Upload.
Upload the image containing the text (formats like JPG, PNG, and PDF work).
2. Open Image with Google Docs for Changing inaccessible to accessible
Once the image is uploaded, right-click the file in Google Drive.
Select Open with, then choose Google Docs.
Google Docs will open a new document with the image at the top and the recognized text below it.
3. Edit the Extracted Text
After Google Docs converts the image to text, review and edit the text as needed. OCR isn’t always perfect, so you may need to make corrections.
Another option from Gmail for Changing inaccessible content to accessible text
When you receive an attachment in Gmail (you cannot do this in Outlook or other email client), open it in the virtual viewer by pressing Enter on the attachment. It will automatically open in the virtual viewer. You can either tab to “Open with” or press Insert + F5, then down arrow to “Google Docs” and press Enter. Wait as Google Docs uses OCR to convert the image into text. Be patient during this process, as it may take a moment to complete.
By following these steps, you can easily extract text from images using Google Docs. This is especially useful for making printed documents or screenshots searchable and editable.