Search results for: “tiger”

  • Tiger 9 with Be My Eyes to “see” graphics for Math

    Dr. Robinson demonstrates the power of Tiger 9 with Be My Eyes. First demonstrating how to use Tiger 9 software from ViewPlus Technology, to translate math content and add graphics in WORD, emphasizing accessibility features for visually impaired users. She then explains the process of inserting and editing images, including the use of alt text and AI-powered tools for image description, using Be My Eyes APP. Finally, Dr. Robinson covers the steps for creating, editing, and embossing math with graphics, as well as translating and printing text for visually impaired individuals.

    Steps for Tiger 9 with Be My Eyes

    This tutorial on using Tiger 9 software with the Be My Eyes app guides users in to make math content accessible to visually impaired students.

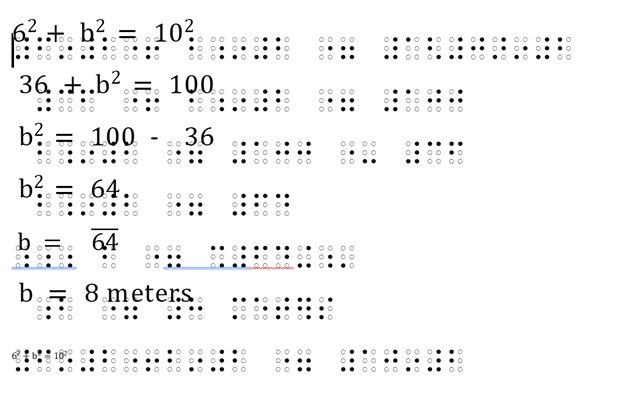
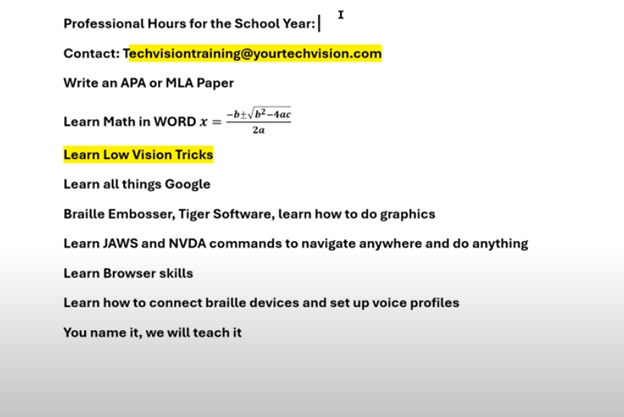
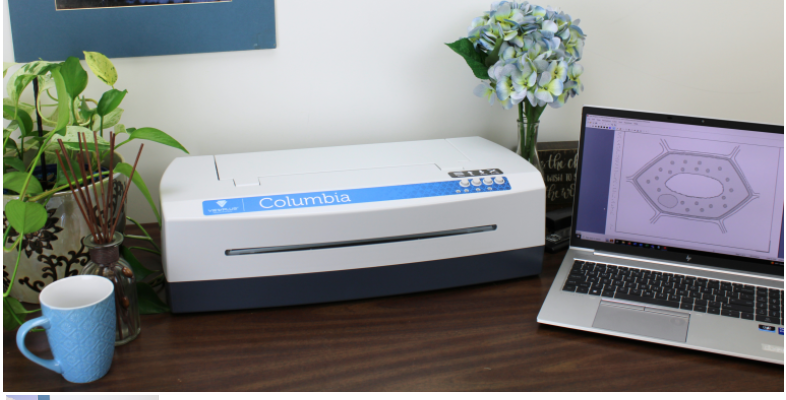
    1. Tiger 9 Software: Dr. Robinson first demonstrates how to use Tiger 9 from ViewPlus Technology. Tiger 9 will translate math content and emboss graphics in Microsoft Word. This software enhances accessibility for visually impaired users by converting text and graphics into formats that assistive technologies can read.
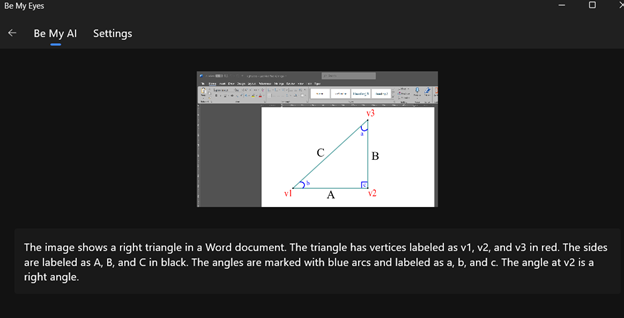
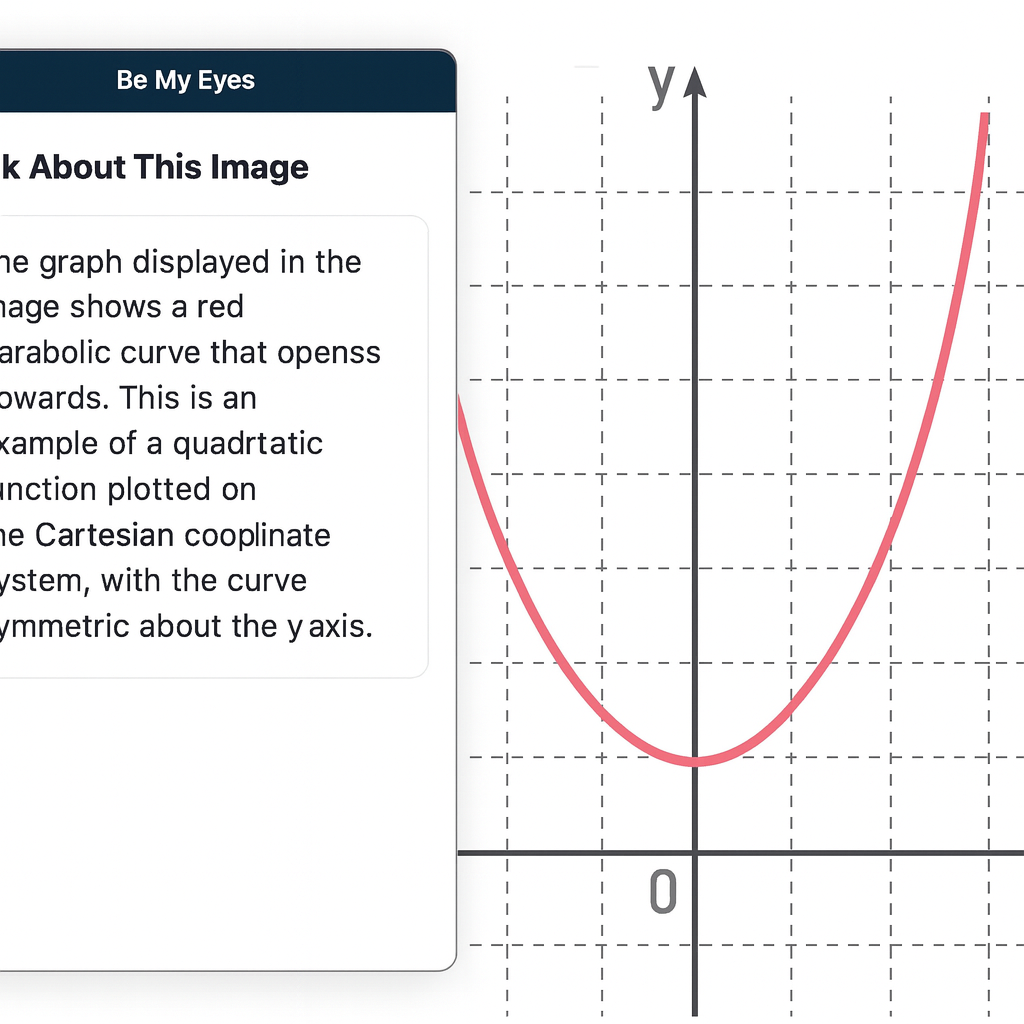
    2. Inserting and Editing Images: Next, she explains the process of inserting and editing images in Word. She includes the use of alt text and AI-powered tools for image description. The Be My Eyes app provides detailed descriptions of math diagrams and other visual content to visually impaired students.
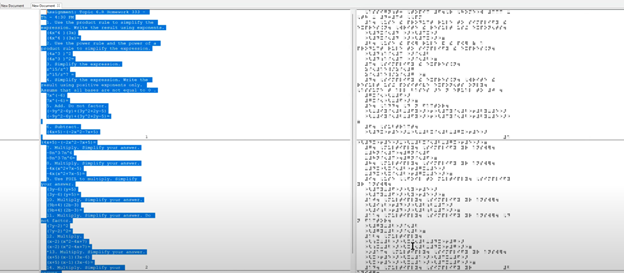
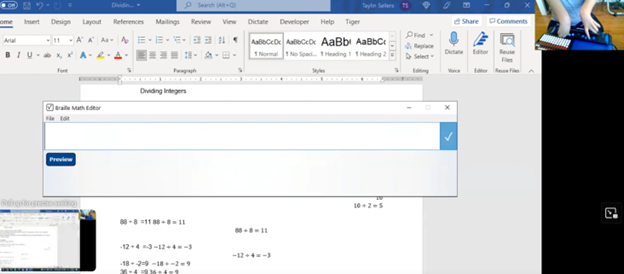
    3. Creating and Embossing Math with Graphics: Then, Dr. Robinson covers the steps for creating, editing, and embossing math content with graphics. This includes translating text into braille and printing it, ensuring that visually impaired individuals can access and understand the material.
    4. Practical Steps:
    • Practice using Tiger 9 software for math equations and graphics in Word.
    • Use the Be My Eyes app to describe math diagrams to visually impaired students.
    • Create profiles in Tiger software for efficient translation of math content to braille.
    • Complete math assignments in Word using audio, braille display, and embossing graphics and math work.

    You can watch the full tutorial on YouTube here.

    Be My Eyes Translation of math image
    Be My Eyes Translation of math image

    Access More Tiger Math Lessons

  • Emboss Math with Tiger 9 TSS in WORD

    This video takes you through setting up the Tiger 9 software from ViewPlus Technology for translating math equations into braille so you can emboss Math with Tiger. Dr. Robinson demonstrates how to access the Tiger ribbon, open her existing profile settings, and configure options like the braille type and math notation style. She also shows how to adjust ink settings if needed for embossing printed text alongside braille. Then she translates the math and gets it ready to emboss for student.

    Tiger 9 Math Translation and Editing


    Dr. Robinson demonstrates how to use Tiger 9, to translate math content in Word. She use a 40 cell FOCUS braille display but emphasizes the importance of using an 80-cell braille display if the student is going into math or STEM fields. Dr. Robinson also explains how to use the WORD math equation editor or Braille math editor on the Braille display to emboss Math with Tiger. She concludes by solving a right triangle problem using the math contents then embossing the math for hard copy if desired.

    Emboss Work with Tiger 9 in WORD
    Emboss Work with Tiger 9 in WORD

    Go onto learn how to emboss graphics in WORD using Tiger software also for students to feel all needed math symbols and pictures to learn on their own. Ideally, all students have embossers at home. ViewPlus embossers with software are fully accessible for all exclusive screen reader users.

  • Create and Emboss Graphics with Tiger Designer

    Embossing graphics for Blind Students: Dr. Robinson offers this video for families and transcribers needing to adapt images for blind students to “see.” This video offers a straightforward approach to creating accessible Venn diagrams using the technique to emboss graphics with Tiger.

    Dr. Robinson begins by explaining how to handle a Venn Diagram or any graphic. She demonstrates using a Venn diagram with two large, intertwined circles, where all parts are shaded. Such images blur when transferred into Tiger Designer, a common tool for producing tactile graphics. She recommends redrawing the diagram for clarity, ease, and speed. This approach is more effective than fixing the shaded areas when you emboss graphics with Tiger.

    How to Emboss the Tiger Graphic

    To show blur issues, she creates a new diagram, by opening Tiger Designer and pressing Control + N to start a new document. After ensuring the default settings are correct, pasting an image using Control + V will result in a blurry output due to the shading. In this case, Dr. Robinson suggests redrawing the Venn diagram. Ctrl + N for new again and Alt+O or click on Tools. Select a line width of 2.5 or 3, as thicker lines are easier for students to feel when you emboss graphics with Tiger.

    Dr. Robinson then demonstrates how to draw two circles from the tool’s menu, representing the basic structure of the Venn diagram. She emphasizes the importance of labeling the sections and typing in uncontracted Braille works fine. She notes that while parents may not be familiar with contractions, students are accustomed to reading uncontracted Braille. It’s crucial to use these steps to emboss graphics with Tiger accurately.

    Finally, Dr. Robinson shows how to emboss the Tiger graphic with Ctrl + P to emboss. Ensure the correct printer model and settings are applied. The final result will be a clear and accessible tactile diagram that the student can easily interpret.

    This and more lessons provide a simple and effective way for parents and transcribers to create accessible Venn diagrams for visually impaired students. Need Training?. Ask away. We are tech specialists in all areas.

    UEB Math to emboss also

    But first make sure that computer is working well.

  • Enhancing Access with a Graphic Embosser and Tiger Software for Tactile Graphics

    Dr. Robinson demonstrates how to use the PixBlaster graphic embosser, showing its ease of use and efficiency for blind students. The PixBlaster produces tactile graphics, which students can emboss in either contracted or uncontracted braille. Additionally, PixBlaster is well-known as a graphic embosser with Tiger integration.

    Using the Graphic Embosser with Tiger Software

    To begin, Dr. Robinson turns on the PixBlaster (also called the Columbia Embosser) by pressing the power button and explains that it can connect wirelessly or via USB. She uses a USB connection for convenience. Next, she opens Microsoft Word and navigates using Alt + N to insert an image. She selects P for pictures, then O for online pictures. Dr. Robinson recommends searching for an outlined image, such as a Christmas tree, to avoid clutter in tactile graphics using the graphic embosser with Tiger.

    Once the image is inserted, she accesses the picture settings with Alt + JP for picture format. To adjust the size, she presses SZ to open the size menu, locking the aspect ratio with Alt + A. She then adjusts the height and width using H for height and W for width. Dr. Robinson notes that students should always choose the largest dimension when resizing with their graphic embosser that uses Tiger software.

    VP Colombia graphic embosser with Tiger, also called the Pixblaster embosser from APH

    After inserting the graphic, Dr. Robinson types “Merry Christmas” and adds an exclamation mark using the Tiger software. She explains that it is critical to save the file before embossing. Once saved, she uses Ctrl + P to print the embossed graphic, ensuring the printer is set to the PixBlaster. Dr. Robinson advises tearing off the embossed paper by pulling it in a “V” shape to avoid damage created by the graphic embosser with integrated Tiger software.

    Finally, she shows the completed embossed graphic, noting how clear and easy it is to read. The PixBlaster (Columbia), in combination with Tiger software, offers blind students a simple way to produce both tactile graphics and braille, enhancing their learning experience with the help of a graphic embosser with Tiger technology. Other Graphic embosser with Tiger Lessons.

  • Be My Eyes for Computer: Describe Images, Graphs, and Screens Instantly

    Be My Eyes App on Computer
    Be My Eyes App on Computer

    Be My Eyes for Computer

    For students who are blind or legally blind, accessing visual information on a computer screen can be one of the biggest barriers to learning unless you have an APP like Be My Eyes on Computer. Whether it’s a graph in science class, a diagram in math, a picture in a digital textbook, or an unlabeled image on a website, visual content often goes unexplained — unless someone is available to describe it.

    Be My Eyes now solves this problem directly on your computer.

    What Be My Eyes Can Do on a Computer

    When installed on a PC or Mac, Be My Eyes can:

    • Describe graphs, charts, and diagrams
    • Explain pictures, illustrations, and maps
    • Identify objects or images in digital textbooks
    • Summarize visual layouts on websites
    • Clarify icons, buttons, or menus that are not labeled
    • Provide context for images that screen readers cannot interpret

    This is especially powerful for students who are legally blind and need immediate access to visual information without waiting for a teacher, aide, or parent.

    How It Works

    1. Open the Be My Eyes app on your computer.
    2. Take a screenshot or upload the image you want described.
    3. Use the “Ask About This Image” feature.
    4. Type your question — or simply ask:
      • “What is shown in this graph?”
      • “Describe the picture on the screen.”
      • “What does this diagram represent?”
      • “What is happening in this image?”

    The AI will give a clear, detailed description that students can use immediately for classwork, homework, or studying.

    Why This Matters for Blind and Low‑Vision Students

    Visual content is everywhere in school — especially in math, science, social studies, and digital learning platforms. Without access, students fall behind academically and lose independence.

    Be My Eyes gives students the ability to:

    • Access visual information instantly
    • Work independently without waiting for help
    • Understand graphs and diagrams in real time
    • Participate fully in class assignments
    • Build confidence and autonomy

    For students who are legally blind, this tool is not optional — it is essential.

    When to Use Be My Eyes vs. Other Tools

    • Be My Eyes: For describing images, graphs, diagrams, pictures, and anything visual.
    • Screen Readers (JAWS/NVDA): For reading text, navigating websites, writing, researching, and completing assignments.
    • CCTV: Only for viewing pictures or visual diagrams — not for reading.

    Together, these tools create a complete access system.

    Be My Eyes App on Computer using Tiger in WORD to complete Math work

  • Professional Development for Teachers

    FOR the Blind-VI, Transcribers, etc. learning to your needs

    Professional development for teachers and other personnel is generally designed for the broader teaching community. However, teachers of the blind and visually impaired can request specialized instruction on these days. TechVision offers tailored learning experiences for teaching and learning with screen readers, braille displays, and other access technology. With TechVision, educators can acquire the specific skills   needed to help their students learn and access education. This Professional Development for Teachers allows their students to be on the same level as their peers over time. It also helps teachers develop tech competencies for the year. Specialized professional development helps to guide and ensure that all students, regardless of their visual abilities, can compete on an equal footing with their sighted peers.

    It’s that time of year when everyone signs up for professional hours. You can join the Regular Pack, but if you need something specific for teachers of the blind, TechVision offers specialized instruction. Learn how to teach students and develop your own skills, including transcriber skills. Professional Development for Teachers often includes learning how to deal with specialized educational needs. Contact TechVision Training to learn like our students who use screen readers.

    Learn math, low vision tricks, and screen reader commands. Learn all things Google, braille embossers, and Tiger software. Master JAWS or NVDA commands, browser skills, and voice profiles. We teach everything, from box and whiskers in Excel or Google to formatting APA and MLA papers in Google Docs or Word. Learn PowerPoint or Google Slides, making them accessible and visually appealing. We offer professional development throughout the year, including one-on-one or group sessions. This ensures that during big professional development days, you are already well-prepared for exactly what you need to learn. TechVision provides another avenue to learn the skills necessary to teach your students effectively with Professional Development for Teachers. Let us know if we can help: TechVisiontraining@yourtechvision.com. In the meantime, improve the speed of your computer.

    Professional hours list and you add what you need
    Professional hours list and you add what you need

    Professional Development Opportunities for Teachers and More

    Digital Math in WORD and Braille Math Editor for Nemeth or UEB Input/Output via MathCat with JAWS or NVDA

    Teach or Learn UEB Math with JAWS and Braille Display

    UEB Math Lessons Galore with AI

    Desmos Graphing Calculator

    Creating Geometry Tables in Desmos from WORK

    Geometry in DESMOS graphing Calculator with screen reader

    STEM: Desmos with JAWS and Embossing

    Use Desmos graphing calculator to emboss graphs & insert Graphs into Math Work for teacher

    3D graphing calculator with screen reader commands in Desmos

    Desmos graphing calculator with shaded Parabolas, screen reader, braille display and embosser

    Drag and Drop with Desmos using graphing games with JAWS

    Desmos Graphing Calculator: Creating and Exporting Graphs

  • STEM: Desmos with JAWS and Embossing

    Desmos, JAWS, and Embossing: Enhancing STEM Learning for Visually Impaired Students

    Access graphing and digital tools with screen readers for Science, Technology, Engineering, and Mathematics. These tools provide graphing access, enabling students with blindness or low vision to excel in STEM fields. For instance, they can utilize graphing capabilities on the computer by employing DESMOS graphing calculator and other Desmos solutions, just as peers. Moreover, Blind students can access STEM. They can emboss graphs, feeling content in real time. By using screen readers like JAWS or NVDA, braille displays and embossers, they can emboss out a graph to “see” what it feels like to finish STEM work quickly and efficiently.

    Access to STEM begins with a PC equipped with screen readers like JAWS and refreshable braille displays. With these tools, you can explore integrated accessibility features and learn to configure JAWS and Fusion on the Desmos Accessibility page. Additionally, audio features, provided by Desmos, give spoken graph summaries, audible readings of points, coordinates, and more. Therefore, Desmos with JAWS and Embossing Techniques enables blind students to access STEM anytime.

    Furthermore, TechVision site offers more STEM options, expanding information for other lessons on Desmos, graphing and math in full details including AI programs to enable students to complete math to the most advanced levels using Mathkicker.AI to compete with sighted peers at any level.

    embosser connected to a laptop for embossing for Desmos and Jaws
Desmos graphing screen readers jaws STEM

    More Lessons:

    Creating Geometry Tables

    Desmos 3D graphing

    for Geometry in Desmos

    for STEM and Embossing in Desmos

    Desmos and inserting graphs into Math Work in WORD

    Creating shaded Parabolas in Desmos

    Games with Desmos with Drag and Drop

    Create and Emboss Graphs

    Practice math with IXL.com

  • Emboss Math from WORD Math editor through Braille Blaster and change to Nemeth fast

    To emboss math with braille blaster content from Microsoft Word, start by creating equations in the Math Editor. This tool helps you write complex mathematical expressions clearly. Once you finish, save the document in a .DOCX format, which is compatible with Braille Blaster and other embossing software.

    Next, open Braille Blaster and import your Word document. The software automatically converts your math content into Nemeth code, the Braille standard for mathematics. This conversion ensures visually impaired readers can understand the material. Moreover, Braille Blaster allows quick switching between Unified English Braille (UEB) and Nemeth codes, offering flexibility based on the user’s needs.

    After conversion, to emboss math with Braille Blaster, send the document directly to a Braille embosser. This machine prints the digital Braille content as physical Braille that can be read by touch. Transitioning from digital to physical Braille is quick and efficient with this process.

    picture of braille conversion in braille blaster changing it from ueb to nemeth

    Furthermore, this workflow supports various mathematical formats, making it versatile for different educational levels. For instance, whether you’re working on basic arithmetic or advanced calculus, the combination of Word and Braille Blaster handles it smoothly. This versatility is crucial in educational environments where diverse math content is necessary.

    Advanced Features

    Educators can also take advantage of Braille Blaster’s advanced features, such as the ability to preview the Braille output before embossing. This step allows for checking accuracy and making any necessary adjustments. It’s particularly useful when dealing with intricate math equations that require precise formatting. If you would like to combine this with a graph, Desmos is your key with Tiger software.

    Moreover, the ability to seamlessly switch between UEB and Nemeth within the same document saves time and ensures consistency across educational materials. This dual-mode capability is essential for creating comprehensive resources that cater to different learning needs.

    Using Word’s Math Editor, Braille Blaster, and a Braille embosser not only streamlines the creation of accessible math materials but also enhances the educational experience for visually impaired students. This efficient process ensures that high-quality Braille math content is readily available, supporting inclusive education and empowering students to succeed in their studies. By implementing this workflow, educators can deliver timely, accurate, and accessible learning materials that meet the diverse needs of all students. Here are options if you would like to use NVDA for Math. And to take any math 1 step further in creating graphics, Tiger and graphic embosser will take you there.

    Other Math Lessons:

    Transcribe Math Images

    Quadratic Math

    STEM with Embossing

    Perfect Digital Math

    JAWS and MathCat

    Unicode with UEB Math

    UEB Math with Jaws

    UEB LaTex math with Jaws

    Braille Math in WORD Editor-Multi-line

    Split Braille for Buffer Mode

    More lessons on our YouTube Channel.

  • Braille Math editor Contracted out, computer in mode with Tay–most efficient

    Braille Math Editor Mode on Display

    In this video, Dr. Denise Robinson guides Tay in proper Braille Math Editor Mode on her FOCUS Display. The session begins with Dr. Robinson reminding Tay how to change the computer’s mode to “contracted out/computer in.” This change ensures proper Braille math output, which simplifies the process and reduces errors.

    Dr. Robinson then encourages Tay to use the Braille Math Editor with confidence, using her 2 knuckles on her right hand and 1 pointer finger on her left hand. She goes onto explain that the chosen mode automatically handles many aspects of math input. This approach allows Tay to focus more effectively on solving problems.

    Next, Tay is guided through various math problems, including division and multiplication. Dr. Robinson carefully ensures that Tay understands how to input problems correctly into the Braille Math Editor. For division tasks, she provides clear instructions on entering Braille codes and following the correct sequences.

    Tay using proper Braille Math Editor Mode

    Furthermore, Dr. Robinson emphasizes the importance of memorizing math facts. She highlights how strong basic math skills can significantly improve accuracy and speed. Through consistent practice and repetition, Tay begins to reinforce these essential concepts.

    As the session continues, Tay receives positive reinforcement, which helps her gain confidence. With each task, Tay requires fewer prompts, showing her growing independence in handling math problems.

    Finally, Dr. Robinson concludes by praising Tay’s progress. She expresses confidence in Tay’s continued improvement and emphasizes that ongoing practice will help Tay master essential math skills. Dr. Robinson also reassures Tay that she will become more comfortable using the Braille Math Editor with time.

    Overall, this session reflects Dr. Robinson’s commitment to fostering independence and competence in her students using proper Braille Math Editor Mode. She ensures they have the necessary tools and confidence to succeed academically. This methodical approach helps students like Tay build a strong foundation for future learning and problem-solving. To further learning, Embossing math using Braille Blaster or graphics using Tiger will always increase understanding of math in general.

    If you need a UEB Math process, this lesson can guide you.

  • Desmos graphing calculator with shaded Parabolas, screen reader, braille display and embosser

    Dr. Robinson demonstrates how to create and manipulate a parabola using the Desmos shaded parabolas using the graphing calculator. This process is specifically designed for blind and low vision students. She begins by typing an equation. Desmos automatically adds sliders, allowing the adjustment of the graph’s shape in real-time.

    As Dr. Robinson runs the equation, the parabola expands, resembling the curve of a ball in motion. She explains the importance of embossing the graph so students can physically feel its structure on the XY plane. This tactile approach helps students understand mathematical concepts more concretely.

    To enhance accessibility, Dr. Robinson uses the “Alt + T” command to activate the audio trace. This feature provides valuable auditory information about the graph. She also slows down the narration using “Control + Shift + Page Down,” ensuring clarity and comprehension.

    Next, Dr. Robinson shares the graph with her students using the “Insert + F5” command. She exports the graph as a Braille-ready image, making it accessible for students who rely on tactile feedback. After downloading the image, she opens it in a photo editor to enhance contrast. This step ensures that the lines are clearly defined for the student.

    Tiger Designer

    Dr. Robinson then pastes the edited image of Desmos shaded parabolas into Tiger Designer, a software used to prepare tactile graphics for printing(emboss). Using “Control + P,” she embosses the graph on her ViewPlus embosser, allowing students to feel the parabola and compare it with what their sighted peers see.

    This hands-on approach for STEM, ensures that blind students can fully participate in graphing activities. Dr. Robinson’s method integrates technology and tactile feedback, making math accessible and engaging. Through these steps, she empowers students to understand and interact with complex mathematical concepts. This demonstration showcases the effective use of Desmos and related tools to enhance learning for visually impaired students.