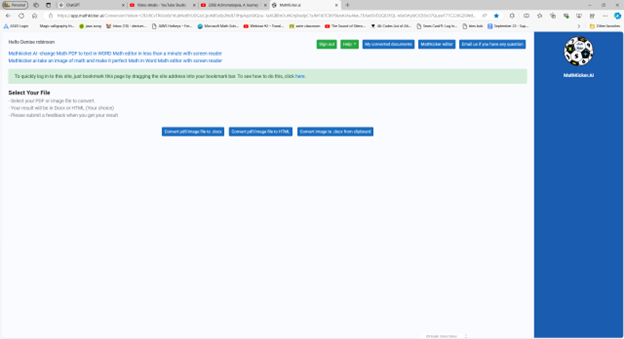
Dr. Robinson introduces Mathify, now called Mathkicker.AI, an AI program designed to convert inaccessible math content into accessible formats. This tool is especially beneficial for the blind community, providing a solution for one of the most challenging aspects of accessible education: converting math from inaccessible formats into usable, accessible ones.
In this tutorial, Dr. Robinson demonstrates how to use Mathify to convert a PDF image file into a DOCX file. She focuses on a table of math, one of the most problematic types of files to translate. Dr. Robinson opens the file, which prompts a save and loads in a private window. This process is typically faster in a standard window.
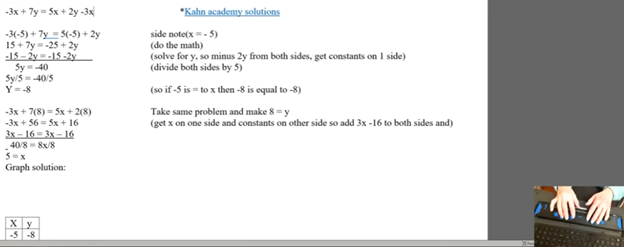
As the document loads, Mathkicker.AI effectively transforms the original images of X and Y tables into accessible tables. These tables allow students to later convert them into graphs, giving them the ability to independently create and emboss their graphs. Dr. Robinson scrolls through the document, highlighting the images now converted into accurate math tables. Small squares around each equation make them easily identifiable.
She explains that students can use the “Alt + Equals” command in Word’s math editor to navigate to the last cell in the table and type out their equations. This feature highlights how Mathify translates PDFs into accessible, editable text. The original PDF is titled “Equivalent Ratios Practice Number One.” It converts successfully into clear and accessible text.
Now a New Mathkicker Editor
Dr. Robinson emphasizes that Mathkicker AI continues to improve with user feedback. She notes her preference for left alignment and how the program adapts to these preferences. Despite being a new tool, Mathkicker excels at handling math and other content, making it a versatile resource. Dr. Robinson encourages viewers to use Mathkicker and look forward to more tutorials, as the program has continued to evolve and improve utilizing a Mathkicker editor now.
Using a Focus 40 Braille Display and JAWS, students can efficiently complete algebra assignments in Word, ensuring both speed and accuracy. They can navigate through documents, input mathematical symbols for their Algebra work, and graph equations using Desmos. The Braille Display provides tactile feedback while JAWS offers audio guidance, allowing students to efficiently edit, correct mistakes, and organize data into tables. With these tools, they can seamlessly complete algebraic tasks and submit their work via email, ensuring full participation in math activities.
To complete algebra problems in Word using a Focus 40 Braille Display and JAWS, students should follow these steps for effective Algebra with Focus Display:
FOCUS and JAWS Display Commands
Using the Focus 40 Braille Display, Dr. Robinson demonstrates how to efficiently braille out algebra problems in Word.
Set the Braille Display to Input Mode: Begin by pressing G.7 + Space to switch through the display modes. Set it to Input Mode for algebra.
Navigate the Document: Use 1 + Space to move to the top of the document. To navigate the document, students press the left-side buttons for backward movement. They then use the right-pan buttons to move forward, ensuring smooth progress while working on Algebra with the Focus Display.
Enter Algebraic Symbols: Students can easily type algebraic symbols, like Delta (Δ), by using the keyboard. After typing, copy the symbol using Shift + C to avoid repeating it manually later.
Work with Mathematical Formulas: To type formulas like “Rise over Run” (Δy/Δx), use the keyboard to input characters. Make sure to add spaces around operations for clarity, especially when sharing with sighted peers. For example, input the formula as “Δy = 2” and “Δx = 3” with a the Focus Display and JAWS.
Navigate Through Graphing: To access graph, students can use the rocker bars or 1 + Space for upward navigation and 4 + Space for downward movement.
Input Values into Desmos: After entering algebraic equations, students can switch to Desmos by pressing Shift + 4 + 5 (Alt + Tab equivalent). They can then input values and trace graphs using the Alt + T command for audio tracing.
Copy and Paste Graphs: Once the graph is complete in Desmos, use Alt + Print Screen to capture the graph. Paste it into Word with Shift + V for documentation.
Submit the Assignment: When the algebra problem is finished, the student can email the document by navigating to File using Alt + F and attaching it in Outlook. Then open Outlook, use F9 to quickly send the email once Outlook is open.
These steps help students efficiently solve algebra problems in Word while using their Braille Display for input. Additionally, students can smoothly navigate Desmos for graphing, enhancing their algebra skills with the Focus 40 Display
Enable Students to Efficiently complete Algebra with Focus Display
Using Tables for Data: If the algebra assignment involves creating tables, students can use Alt + N to insert a table. On the Braille Display, press 6 + 8 + Space to activate the Alt command and navigate to the Table option. Once a table is created, pressing Tab will move between cells, and 4 + 5 + Space adds more rows as needed, making tables part of their Algebra workflow using a Focus Display.
Auto-fitting Tables: To ensure tables fit content properly, use Alt + J + L to access the layout options. Select AutoFit Contents to adjust the table size automatically. This helps in organizing the data neatly for submission in Algebra with Focus Display assignments.
Editing and Correcting Mistakes: If a student makes an error, they can use 3 + Space on the Braille Display to move by character and correct the mistake. Use Shift + 6 + 7 + Space to select the incorrect portion and retype it. The Braille Display’s tactile feedback helps ensure precision when editing formulas.
Reviewing the Work: To review algebra problems, students can move back through the document using 1 + 4 + Space to navigate line by line. Press Insert + Up Arrow to have JAWS read back the current line, ensuring that everything is correct before submission.
Final Submission Process: Once the assignment is complete, the student can go to Alt + F to access the File menu. Choose Share. From there, they can attach the document directly in an email. Using F9 forces Outlook to send the email quickly. Make sure their work is submitted on time, thereby completing their Algebra with Focus Display workflow.
More Lessons for Math
By following this step-by-step guide, students can efficiently complete algebra problems using the Focus 40 Braille Display, JAWS, and Word. The tactile feedback from the display, combined with JAWS’ audio guidance, enhances both speed and accuracy. This combination helps students solve math problems, graph equations, and organize data effectively. When using the Focus Display, students experience seamless transitions between tasks, ensuring smooth navigation throughout their algebra assignments.
Dr. Robinson demonstrates how to navigate with the Focus 40 Braille Display, highlighting various commands and features for efficient use. She introduces the Focus 40 Braille Display, explains the importance of navigation commands, and demonstrates various navigation techniques. Additionally, she covers Focus Display Navigation Options to help users maximize their efficiency.
Focus Display Navigation Options Video Highlights
Introduction to navigation
Dr. Robinson introduces the Focus 40 Braille Display.
Explains the importance of navigation commands.
Prepares to demonstrate various navigation techniques.
Basic navigation commands
Shows how to move to the top and bottom of the display.
Uses specific key combinations for navigation:
Move to Bottom: Press dots 4-5-6 + Space.
Move to Top: Press dots 1-2-3 + Space.
Emphasizes the logic behind the commands.
Line and word navigation
Demonstrates moving one line at a time.
Uses key combinations for precise movement:
Move Down One Line: Press dot 4 + Space.
Move Up One Line: Press dot 1 + Space.
Explains how to navigate by words:
Move Forward One Word: Press dot 5 + Space.
Move Back One Word: Press dot 2 + Space.
Other Display Navigation
Focus Braille Display navigation options using router keys
Router keys and mode buttons
Highlights the use of router keys for quick cursor movement.
Introduces mode buttons for different navigation options:
Router Keys: Press the router key above the desired character.
Mode Buttons: Located on the left and right sides.
Shows how to navigate by paragraphs and sentences:
Move Forward One Paragraph: Press the right rocker switch down.
Move Back One Paragraph: Press the right rocker switch up.
Move Forward One Sentence: Press the left rocker switch down.
Move Back One Sentence: Press the left rocker switch up.
Panning and rocker switches
Explains the function of panning buttons:
Move Forward One Display Width: Press the right panning button.
Move Back One Display Width: Press the left panning button.
Demonstrates the use of rocker switches for line navigation:
Move Up One Line: Press the right rocker switch up.
Move Down One Line: Press the right rocker switch down.
Highlights the benefits for sighted individuals working with Braille learners.
Benefits of Focus Display
The Focus 40 Braille Display offers numerous benefits. Firstly, it enhances Braille literacy through intuitive navigation commands. Additionally, its versatile features support efficient reading and writing. Moreover, students can easily move through text, improving their skills. The Focus Display can be used exclusively to control the computer–that means, you DO NOT need to use the keyboard if you cannot or do not want to. This makes for VERY efficient math calculations. The device’s compatibility with various screen readers ensures accessibility. Furthermore, its portability allows seamless use in different environments. Overall, the Focus 40 empowers users, boosting their independence and confidence in learning.
The current page provides instructions on creating a food chain for a class using talking software. It includes steps for saving a document in a specific format and navigating through menus using keyboard shortcuts. Additionally, it references the video below to help you each step of the way.
F12 and save as 97-2023 so after you F12 you will have file and tab once and down arrow or up arrow to 97-2023 doc and enter, then the commands will work for you.
Alt + N then M and right arrow to Food Chain and enter
Listen to recording to add information as you need
WORD accessible food chain and why we use them
A food chain is a sequence that shows how energy and nutrients flow from one organism to another within an ecosystem. Here’s a simple breakdown:
Producers: These are usually plants or algae that create their own food through photosynthesis. They form the base of the food chain.
Primary Consumers: Herbivores that eat the producers. Examples include rabbits and deer.
Secondary Consumers: Carnivores that eat the herbivores. For instance, a fox that eats rabbits.
Tertiary Consumers: These are predators that eat secondary consumers. An example would be an eagle that eats foxes.
Decomposers: Organisms like bacteria and fungi that break down dead plants and animals, returning nutrients to the soil.
Using keyboard commands to quickly access and adjust mouse settings allows for efficient changes to mouse size and behavior, such as “Snap To” functions. These options are accessible through the Mouse Properties window in Windows, which you can open by pressing Windows + R and typing main.cpl. Once inside, you can navigate tabs and options using Ctrl + Tab and arrow keys, adjusting the mouse size or enabling the “Snap To” feature. This provides an easier and faster way to customize your mouse for improved accessibility and functionality.
To quickly change mouse settings in Windows, use keyboard commands to access Mouse Properties: Another way
Open Mouse Properties: Press Windows and type Mouse then press Enter.
Tab to additional mouse options and enter
Ctrl + Tab to Pointers and Change Mouse Size: arrow to inverted large or extra large based on need
Navigate to the Pointer Options using Ctrl + Tab, then press Tab to “Snap To” or ALT + U to check box
Then press Alt + S to check “Show location of pointer when I press the CTRL key.”
Apply Changes: Press Alt + A to apply the settings and enter to close the window.
Commands to change mouse
These steps streamline navigation without relying on the mouse.
To efficiently convert Braille files to text or HTML, you can change extensions as shown in the video or open the Braille file in software like Duxbury Braille Translator or Braille Blaster. Export the file as plain text. Use a text editor to manually add HTML tags or employ a conversion tool for HTML formatting. This method ensures the content is accessible in both text and web formats, making it easier to efficiently convert Braille files to HTML and Word.
Guidance on converting Braille files into HTML or text files from this video:
Efficiently converting Braille files to HTML and Word requires specific software and keyboard commands. Below is the method I used in the Video
Extract Files:
Applications Key: Press Applications Key, then Down Arrow to select “Extract”.
Rename Files:
Rename: Press Applications Key, then Up Arrow to “Rename”, and Enter.
Change Extension: Use Right Arrow to navigate, Backspace to delete .txt, and type .html, then Enter.
Open Files in Notepad:
Open File: Press Enter on the file to open it in Notepad.
Save As HTML:
Save As: Press Alt + F, then Down Arrow to “Save As”, and Enter.
Change File Type: Press Tab to navigate to the file type dropdown, select “All Files”, and Enter.
Rename Extension: Press Shift + Tab to navigate back, use Right Arrow to move to the extension, Backspace to delete .txt, type .html, and Enter.
Copy and Paste Text:
Select All: Press Ctrl + A.
Copy: Press Ctrl + C.
Paste in Word: Open Word, then press Ctrl + V.
Show File Extensions:
Open File Explorer: Press Alt + D.
Open Organize Menu: Press Tab to navigate to the “Organize” button, and Enter.
Folder Options: Press Down Arrow to “Folder and search options”, and Enter.
View Tab: Press Ctrl + Tab to switch to the “View” tab.
Show Extensions: Press Tab to navigate to “Hide extensions for known file types”, press Spacebar to uncheck, and Enter.
These commands should help you efficiently manage and convert your files.
Here is another way to convert files
Extract the Braille File: Use software like Duxbury (DBT) or Braille Blaster Translator to open BRF or BRL files. This software can convert Braille files into readable text.
Export to Text Format: After extraction, use the “Export” function in DBT or other Braille translation software to save the file as a plain text (.txt) file.
Convert to HTML: Use a text editor to open the .txt file. You can manually add HTML tags to structure it as an HTML file or use a basic converter tool to help automate the process.
The most modern way as of 2024 to adapt work for blind or low vision students is using programs like MathKicker.ai, WORD Immersive Reader and Google Docs, follow these steps to ensure full accessibility for both English, Math and other content:
Use MathKicker.ai for Math Content:
Upload or paste math equations into MathKicker.ai. This tool converts complex math problems into formats accessible for screen readers like JAWS or NVDA.
Once converted, paste the accessible math text into Google Docs or other word processing platforms for students to use with their screen readers.
Convert Images to Descriptive Text in Google Docs:
When images contain important information, use Google Docs’ built-in alt text feature. Right-click the image, select “Alt text,” and enter a detailed description of the image, focusing on its relevance to the content.
For math-specific images (e.g., graphs, equations), describe the visual elements and provide the corresponding math in text form or, if needed, through MathKicker.ai to ensure clarity for students using auditory or Braille output.
How to Adapt Work and Why
3. Leverage Google Docs Collaboration Features:
Share Google Docs with students, allowing them to access the document using their preferred screen reader.
Enable real-time collaboration by ensuring that students can work in the document with peers or teachers, making the experience inclusive.
4. Use Heading and Structure Tools:
Make sure to structure documents with proper headings and styles in Google Docs to aid screen readers in navigating the document efficiently.
By combining MathKicker.ai for math accessibility and using Google Docs to convert visual content into descriptive text, blind or low vision students can access both English and math content effectively.
There are many ways to adapt work for inclusion. Inaccessible work creates barriers—choose the right tools, because together we achieve more than apart.
Essential WORD keyboard commands to help teachers who teach blind with talking software or sighted who just want to move faster. These are some of the most essential commands everyone should know, especially those mastering the essential commands for WORD keyboard users.
Here’s a summary of essential WORD keyboard commands for video users.
Keyboard shortcuts for all WORD versions.
Open Word: Press Windows + 5 to start Word from the taskbar.
Zoom In: Use Alt + V + Z to zoom to 200%.
Change Defaults:
Open Paragraph Spacing: Press Alt + O + P.
Set Spacing to Single: Press Alt + P and change to single spacing.
Set Default for All Documents: Press Alt + D followed by Alt + A and then Enter.
Customize Document further
Change Font:
Select All Text: Press Ctrl + A.
Open Font Dialog: Press Ctrl + D.
Change Font to Times New Roman: Type “Times New Roman” and set size to 12.
Set Default for All Documents: Press Alt + D followed by Alt + A and then Enter.
Create Columns:
Open Page Layout: Press Alt + P.
Select Columns: Press J for columns.
Set Number of Columns: Press Alt + O + C and choose the number of columns.
Change Page Color:
Open Page Layout: Press Alt + P.
Open Colors: Press PC.
Select Color: Use arrow keys to choose a color and press Enter.
Add Border:
Open Borders: Press Alt + O + B.
These commands will help you efficiently navigate and customize documents. See other Setup options
Essential WORD keyboard commands for windows page setup for defaults
Office 365 online is fully accessible with screen readers, enhancing the user experience for visually impaired users. Through straightforward keyboard shortcuts, users can navigate and manage their documents efficiently. The interface supports major screen readers like JAWS, NVDA, and VoiceOver, ensuring users can access emails, calendars, and all Office apps without a mouse. This integration empowers users to perform complex tasks seamlessly, from editing documents to collaborating in real time, ensuring a barrier-free environment for all users.
These shortcuts are integral for quick editing and formatting within Office 365 online access for applications, streamlining the process of document creation and modification.
In Office 365 applications like Word, you can quickly apply or change text styles using the Styles pane. The shortcut to open the Styles pane is ALT + CTRL + Shift + S. This allows you to apply predefined styles to your text efficiently. Additionally, you can use CTRL + Shift + S to open the Apply Styles dialog box, where you can type and apply a style name directly to the selected text. These shortcuts help streamline formatting and ensure consistent document styling.
Other Online Office 365 online access commands
Here are some essential commands for using Office 365 online efficiently:
Save: Ctrl + S
Undo: Ctrl + Z
Redo: Ctrl + Y
Open: Ctrl + O
Print: Ctrl + P
Copy: Ctrl + C
Paste: Ctrl + V
Cut: Ctrl + X
Bold: Ctrl + B
Italic: Ctrl + I
Underline: Ctrl + U
Insert Hyperlink: Ctrl + K
Refresh the Document: F5
Find: Ctrl + F
Replace: Ctrl + H
These shortcuts are fundamental for navigating and managing documents in Office 365 online, making your workflow quicker and more efficient.
Here are more helpful tips for using Office 365 effectively:
Quick Access Toolbar Customization:
Customize your Quick Access Toolbar by adding frequently used commands. Right-click any command in the ribbon and select “Add to Quick Access Toolbar.”
Use “Tell Me” Feature:
Use the “Tell Me” feature (light bulb icon or ALT + Q) in the ribbon to quickly find features or help with commands you’re unsure about.
Keyboard Shortcut Customization:
Customize keyboard shortcuts through the Word Options dialog to tailor your workflow preferences.
Use Version History:
Use Version History to view and restore previous versions of your documents, especially useful in collaborative settings.
Collaborate in Real-Time:
Use the collaboration tools in Word, Excel, and PowerPoint to work with others in real-time, seeing changes as they happen.
How to Read, Write, and Learn with Low Vision: How vision loss can appear
2.2 Billion People Live With Vision Impairment
Vision loss is one of the most common disabilities on earth, and it’s growing fast. If you work in healthcare, tech, education, or policy, these numbers matter for accessibility, product design, and funding.
Over 51.9 million adults in the U.S. report some level of vision difficulty. About 6–7 million Americans have significant vision loss or blindness. Globally, 2.2 billion people have vision impairment.
But those top-line numbers hide urgent trends. Here’s the breakdown with the latest 2024-2026 data, what’s driving it, and what to do about it.
Tools + Techniques That Build Real Independence
Students and adults with vision challenges do not learn one way. They require the right tools, combined with direct, targeted training.
Success happens when tools match the vision need and instruction builds efficiency
Tools + Training by Vision Need
1. Dyslexia (Processing and Decoding)
Dyslexia affects how the brain processes text. It often overlaps with vision-related challenges.
Tools
Text-to-speech: JAWS, NVDA
Speech-to-text (dictation)
Immersive Reader
Audiobooks: Bookshare, Learning Ally
Training Focus
Pair listening with reading
Build strong keyboarding for writing
Navigate digital text efficiently
Goal Improve comprehension while reducing reading fatigue
2. Blurred or Reduced Vision (Low Vision)
Tools
Magnification: ZoomText, Windows Magnifier
High contrast and color filters
Enlarged text and screen scaling
Screen readers: JAWS, NVDA
Training Focus
Use magnification efficiently without losing place
Strengthen visual tracking
Transition smoothly to audio when needed
Master keyboard navigation
Goal Maximize usable vision while increasing speed and accuracy
3. Central Vision Loss
(Stargardt, macular degeneration)
Tools
Screen reader (primary): JAWS, NVDA
Refreshable braille display
Audio + braille combination
OCR tools for printed content
Training Focus
Full keyboard control
Braille literacy (UEB and Nemeth)
Strong auditory processing
Goal Achieve full independence through non-visual access