Search results for: “pdf”

  • Desmos Graphing Calculator: Creating and Exporting Graphs

    The Desmos Graphing Calculator using keyboard commands is a powerful and accessible tool for visualizing mathematical concepts and solving complex equations. With a range of keyboard commands, users can efficiently navigate the interface, manipulate graphs, and explore functions without relying on a mouse. Whether you’re zooming in on a graph, adjusting sliders, or using audio trace mode, these commands enhance the user experience, making it easier for everyone, including those with visual impairments, to engage with mathematics. This introduction will guide you through the essential keyboard shortcuts to maximize your productivity and understanding while using the Desmos Graphing Calculator.

    The Desmos Graphing Calculator is a powerful and accessible tool for visualizing mathematical concepts and solving complex equations. With a range of keyboard commands, users can efficiently navigate the interface, manipulate graphs, and explore functions without relying on a mouse. Whether you’re zooming in on a graph, adjusting sliders, or using audio trace mode, these commands enhance the user experience, making it easier for everyone, including those with visual impairments, to engage with mathematics.

    Essential Desmos Graphing Calculator

    General Navigation

    • Open Graphing Calculator: Alt + G
    • Focus on Expression List: Ctrl + E
    • Add New Expression: Enter

    Graph Manipulation

    • Zoom In: Ctrl + +
    • Zoom Out: Ctrl + -
    • Reset Zoom: Ctrl + 0

    Audio Trace Mode

    • Enable/Disable Audio Trace Mode: Alt + T
    • Summarize Selected Curve: Alt + S
    • Describe Graph Axes: Alt + G
    • Move to Next Point: Right Arrow or Down Arrow
    • Move to Previous Point: Left Arrow or Up Arrow

    Sliders

    • Decrease Value: Left Arrow
    • Increase Value: Right Arrow
    • Decrease Value by Larger Increment: Page Down
    • Increase Value by Larger Increment: Page Up

    Tables

    • Next Cell: Tab
    • Previous Cell: Shift + Tab
    • Next Row: Down Arrow
    • Previous Row: Up Arrow

    Exporting Graphs

    • Open Share Menu: Ctrl + Shift + S
    • Print Graph: Select “Print” to save as a PDF.
    • Export as Image: Select “Export Image” to save as PNG, SVG, or for a Braille embosser.
    • Copy Link: Select “Copy Link” to share the graph online.

    These commands should help you navigate, edit, and export your graphs efficiently.

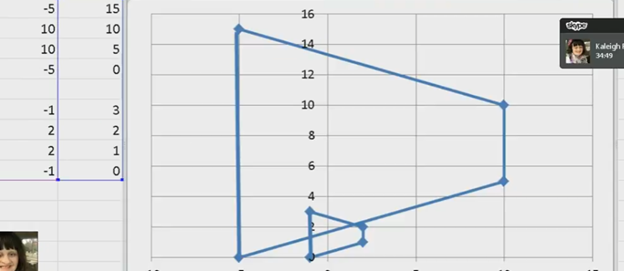
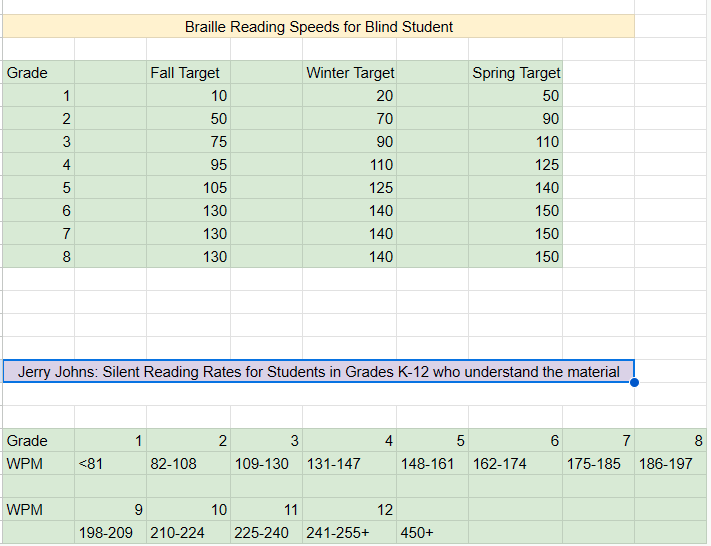
    Combine excel commands with Desmos for smooth integration

    You can also create Excel Graphs separately and so many more math lessons here

  • Cleaning the Focus Braille Display and Running Diagnostics

    Before you begin, remember when you are using your devices to maintain upright posture to protect your spine and neck. So, regularly cleaning the Focus 40 Braille Display and running diagnostics is crucial for maintaining its performance and longevity. Dust, dirt, and oils from your hands can accumulate on the Braille cells, potentially causing malfunctions or reducing the tactile quality of the display. By keeping the Braille cells clean, you ensure that the device remains responsive and accurate. Running diagnostics helps identify any issues early, allowing for timely repairs and preventing more significant problems down the line. This proactive maintenance not only extends the life of your device but also ensures a reliable and efficient user experience12.

    Here are the steps to clean the Focus 40 Braille Display and run diagnostics:

    Cleaning the Focus 40 Braille Display

    1. Turn Off the Device: Ensure the Focus 40 Braille Display is turned off and unplugged.
    2. Prepare Cleaning Materials: Use a soft, lint-free cloth dampened with water or isopropyl alcohol. Avoid using harsh chemicals.
    3. Clean the Braille Cells: Hold the device upside down or at a downward angle. Gently wipe the raised Braille dots with the dampened cloth, ensuring all dots are cleaned. Use as much of the cloth’s surface area as necessary to avoid spreading dirt1.
    4. Dry the Device: Allow the device to air dry completely before turning it back on.
    5. Try it out and if you need training on reading as fast as you can on the display, let us know.

    Running Diagnostics

    1. Turn On the Device: Power on the Focus 40 Braille Display.
    2. Enter Diagnostic Mode: Press and hold the Menu button while turning on the device. Continue holding the button until the device enters diagnostic mode.
    3. Run Tests: Use the navigation keys to select and run various diagnostic tests, such as checking the Braille cells, buttons, and connectivity.
    4. Review Results: Follow the on-screen instructions provided by the diagnostic mode to review the results and identify any issues2.
    Cleaning the Focus 40 Braille Display and running diagnostics
    Cleaning the Focus 40 Braille Display and running diagnostics

    Regular cleaning and diagnostics help maintain the performance and longevity of your Focus 40 Braille Display, ensuring it remains responsive and reliable.

    Here is a video to demonstrate braille reading speed

  • Make an Electronic Signature — Then Insert It into a Document

    You can quickly create an electronic signature using keyboard commands on various platforms. In Microsoft Word or Adobe Acrobat, type, draw, or insert a signature image. Keyboard shortcuts simplify the process, making it easy to add signatures to digital documents. This guide provides step-by-step instructions on typing, drawing, or inserting a signature using shortcuts. You can apply this method across all versions of Word for creating electronic signatures efficiently and effectively.

    To create an electronic signature using keyboard commands, follow these steps:

    Make Electronic Signatures in WORD and Adobe

    1. In Microsoft Word:
    • Open a blank document. Press Alt + N, then P to insert a picture if you’re using a scanned image of your signature.
      • This means, hand write out a signature and scan it into computer and save as your signature. Then insert that into your documents and use any where to make an electronic signature process smoother
      • Use a mouse to crop out JUST the signature, application key when you are on the image and save as picture and name it the word signature after your name
    • For typed signatures, press Ctrl + Shift + K to enter text in a signature-like font (if available), then press Ctrl + B to bold the text if needed.
    • To save the signature, press Alt + F, then A to save as a PDF or document.
    Practice making an electronic signature using the name 'Jane Doe
    Practice making an electronic signature using the name ‘Jane Doe
    1. In Adobe Acrobat:
    • Open a PDF and press F6 to navigate the newest Adobe or Alt + T for the tools menu. Navigate with F6 or the arrow keys to “Fill & Sign” and press Enter. Follow prompts to either type, draw, or insert an image of your signature.

    Any issues in WORD, then just rebuild it

    Other access Lessons on YOUTUBE

  • Save a Google Doc as Plain Text Using Keyboard Commands

    Google offers several tools to make inaccessible images of work accessible through translation and text extraction. Google Translate includes an image translation feature, where users can upload an image and the tool will detect and translate the text within it into another language. Additionally, Google Drive and Google Docs use Optical Character Recognition (OCR) to convert images, like scanned PDFs, into editable text. This makes visual content, such as images with embedded text, accessible for screen readers, helping blind or low vision users engage with the content more easily. Using Google Docs as plain text can further streamline this process.

    Here’s how to save a Google Doc as plain text using keyboard commands:

    1. Open your document.
    2. Press Alt + Shift + F to open the “File” menu. (Many times you can just use Alt+F)
    3. Press Down Arrow to navigate to Download.
    4. Press Right Arrow to expand the options, then press Down Arrow to select Plain Text (.txt).
    5. Press Enter to download the document as a plain text file.
    6. Open the .txt file, select with CTRL + A, Copy it with CTRL+C and paste into WORD with CTRL+ V

    These steps will extract text then download the document with no formatting, leaving only the raw text. Then transfer it into WORD for easy reading

    Google Doc as Plain Text Using Keyboard due to doc being side ways image
    Google Doc as Plain Text Using Keyboard due to doc being side ways image

    More Tech Lessons here and more on adapting work

  • Geometry Using Excel Shapes: Complete Complex Vertices for Math Graphs

    kaleigh takes images from a PDF and creates Geometry shapes such as vertices in Excel for perfect graphing.

    In Excel, you can create vertices (edit points on a line) when working with shapes or lines. Here are the keyboard commands to manipulate vertices:

    Always create a table with all pertinant numbers based on the math from your Work. Kaleigh took her work from a PDF and transported it into excel. If you make a space in excel leaving cells empty, you can create 2 intersecting graphs.

    Basic Overview of Geometry using Excel Shapes

    1. Insert a Shape:
      • Press ALT + N, SH to open the Shapes menu.
      • Use the arrow keys to select a line or shape and press Enter.
    2. Edit Vertices:
      • Select the shape.
      • Press Shift + F10 (context menu) and choose “Edit Points” by using the arrow keys and pressing Enter.
    3. Move Vertices:
      • Use arrow keys to move vertices around once in edit mode.

    These steps allow for creating and editing vertices in Excel. More Excel lessons.

    Geometry shapes in excel
    Geometry using Excel shapes

    More math Lesson on our YouTube Channel

  • How to Adapt Work for Blind or Low Vision Students — Many Options

    The most modern way as of 2024 to adapt work for blind or low vision students is using programs like MathKicker.ai, WORD Immersive Reader and Google Docs, follow these steps to ensure full accessibility for both English, Math and other content:

    1. Use MathKicker.ai for Math Content:
      • Upload or paste math equations into MathKicker.ai. This tool converts complex math problems into formats accessible for screen readers like JAWS or NVDA.
      • Once converted, paste the accessible math text into Google Docs or other word processing platforms for students to use with their screen readers.
    2. Convert Images to Descriptive Text in Google Docs:
      • When images contain important information, use Google Docs’ built-in alt text feature. Right-click the image, select “Alt text,” and enter a detailed description of the image, focusing on its relevance to the content.
      • For math-specific images (e.g., graphs, equations), describe the visual elements and provide the corresponding math in text form or, if needed, through MathKicker.ai to ensure clarity for students using auditory or Braille output.

    How to Adapt Work and Why

    3. Leverage Google Docs Collaboration Features:

    • Share Google Docs with students, allowing them to access the document using their preferred screen reader.
    • Enable real-time collaboration by ensuring that students can work in the document with peers or teachers, making the experience inclusive.

    4. Use Heading and Structure Tools:

    • Make sure to structure documents with proper headings and styles in Google Docs to aid screen readers in navigating the document efficiently.

    By combining MathKicker.ai for math accessibility and using Google Docs to convert visual content into descriptive text, blind or low vision students can access both English and math content effectively.

    There are many ways to adapt work for inclusion. Inaccessible work creates barriers—choose the right tools, because together we achieve more than apart.

     Here are a few ways to do just that.

    Adapting work using Jaws OCR-how to tell if work is image or text in PDF

    The fastest way to adapt inaccessible PDF with graphics when you run out of time

    How to adapt work for low vision–continue on with skills

    Adapt work for Low Vision using shapes for Math or Chemistry

    How to adapt work for blind/low vision students

    Access Technology for Low Vision-See your computer screen better

    Tricks for students to adapt last minute work fast –right in class

    How to adapt More work in general

    Let us know how we can help you!

  • Braille Reading Speed Standards

    So many people ask, “How fast should my child be reading?” When discussing Braille Reading Speed Standards, it’s essential to remember that blind children are just as intelligent as sighted children so standard reading speed should be used for all children. Braille Reading Fast.

    The Jerry Johns Basic Reading Inventory is a widely used tool for assessing reading speeds and comprehension levels in students. It helps educators determine a student’s instructional, independent, and frustration reading levels. This is done by evaluating their speed, accuracy, and comprehension. This inventory is particularly useful for identifying students’ reading capabilities and tailoring instruction to meet their needs. By measuring reading speeds, educators can see how students process text and find areas where they need more help to improve fluency and comprehension.

    Here are the national standards as presented by Jerry Johns, a leading reading specialist in the country. 

    Braille Reading Speeds for Blind Student 
             
    Grade Fall Target Winter Target Spring Target  
    1 10 20 50  
    2 50 70 90  
    3 75 90 110  
    4 95 110 125  
    5 105 125 140  
    6 130 140 150  
    7 130 140 150  
    8 130 140 150  


    Jerry Johns: Silent Reading Rates for Students in Grades K-12 who understand the material 
      
             
    Grade12345678
    WPM<8182-108109-130131-147148-161162-174175-185186-197
             
    WPM9101112    
     198-209210-224225-240241-255+450+   
    Braille Reading Standards Chart

    Use the SAME Braille Reading Speed Standards

    For another extensive list of information on Braille standards go to California Reading Standards

    The TechVision Team use these same standards for all blind and low vision students. To name just a couple, Batya reads both Hebrew and English Braille and Dani excels to the top of her class also. If you set high standards then children will meet those standards. We have taken on beginner students and told them how fast they would be reading braille in a couple months, even in middle and high school. Just remember the older you start the longer it will take for them to gain speed.  At the end of the 2 months, as their fingers would fly across the page reading braille, as they were timed with a fast speed, We would ask, “So did you really think you would be able to read that fast?” They would reply, “Of course, because you told me I would be able to.”

    So, tell them, they can, and they will. Our Mission and Purpose is to have students (especially with similar intelligence) at the highest levels they can be with hard work and instruction to get them there as their peers.

    Get to the Highest Levels

    Tricks to use
    Time them every week (sometime everyday), so they see their progress
    Have them reread the same material to get flow and fluency
    Have them braille the material first using contractions, then read what they wrote

    braille reading speed chart
    Visual braille reading speed chart as above accessible version

    Make sure you add in Computer skills with Perfect touch typing to truly allow students to be at the highest levels of learning.