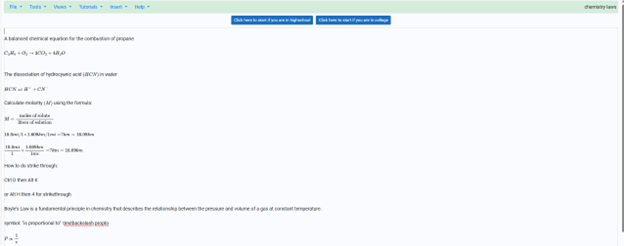
In today’s digital age, technology has transformed how we approach learning, especially in subjects like accessible math. More importantly, this transforms how all screen reader users can access math like their peers. MathKicker.AI math program provides access to AP classes and advanced math for high school and college students. This accessible tool caters to diverse learning needs, offering compatibility with various screen readers. This video features Advanced Math with LaTex and shows how it can enhance your mathematical skills, making complex equations easier to tackle.
Matrices
Dr. Robinson explains the basics of navigating MathKicker.AI. Matrices can easily create a Matrix with Alt = and type it in LaTex. This quickly provides accurate math and F9 will allow you to see and enter LaTex. You can also learn the LaTex from just typing the math into Mathkicker. The session showcases the ease of solving matrix equations, demonstrating how to find the matrix C resulting from matrices A and B.
Throughout the demonstration, Dr. Robinson shares tips for efficient navigation, including using the home key and arrow keys to read through equations. She highlights the functionality of the F9 key for processing inputs and emphasizes the need to verify details when working with complex equations.
As she works through a specific problem, Dr. Robinson illustrates how to structure equations and maintain clarity while performing calculations. Remember to double-check your work and she encourages people to utilize the program’s features for swift problem-solving.
By the end of the session, Dr. Robinson summarizes the output clearly, showcasing the successful application of Math Kicker. She encourages students to explore this tool for enhancing their math skills, particularly in higher education and advanced high school courses.
This tutorial not only highlights the software’s capabilities but also empowers screen reader users and all students to embrace technology in their learning to keep up with their peers.
Mathkicker editor with Jaws or NVDA and display for math access for advanced math
Other Math Lessons from Basic Math to Advance Skills
Learning how to teach or learn Nemeth math using assistive technology can seem challenging, but with the right tools and approach, it becomes manageable and effective. Whether you’re a parent helping your child, an educator supporting students, or an independent learner, using a Focus 40 Braille Display and JAWS screen reader provides an accessible way to master Nemeth code. In this guide, I will walk you through setting up your technology and using the Braille Math Editor to confidently teach and learn math concepts from basic arithmetic to advanced algebra. Let’s simplify the process and enhance your skills.
Setup Nemeth with JAWS
Start by setting JAWS to the proper Nemeth settings. Access the JAWS Settings Center with Insert + 6 then Control+Shift+D to set default: type “Braille m” in the search box. Navigate to “Braille Mode” and make sure you hear “Structured” mode, ensuring that both the active cursor and Braille cursor follow each other. This will allow you to track what the student is doing on their display.
Alt + F to language profiles, and alt + D to details. Once open Alt + M to math options and up arrow to Nemeth if it is not selected. This will ensure that math expressions are correctly read and displayed in Nemeth Braille. Enter to close, Alt + A to apply and enter to close.
Teach or learn Nemeth JAWS, braille display and BME
Using the Braille Math Editor is key to teaching and learning math effectively. Type out equations like “1+2=3” or more complex algebraic expressions, and feel the Braille output directly on your Braille display. Correct mistakes quickly using the Braille display and JAWS auditory feedback, making it easy to follow along. Use the Braille Viewer to see it visually and compare with the Braille Display by opening JAWS context menu, go to Utilities and Braille Viewer to turn it on.
This step-by-step approach works for basic arithmetic to complex math such as algebra, Trigonometry, calculus and beyond. Both the Braille Math Editor and Word Math Editor can help you visualize and interact with Nemeth code to easily learn it and/or teach others. Practice consistently to improve your tactile reading skills and build confidence in math.
By following this guide, you’ll gain the tools to teach and learn Nemeth math efficiently, whether for yourself or for your students.
In this lesson, you’ll learn how to teach and practice Unified English Braille (UEB) math using a Focus or Brailliant Braille display with JAWS. Start by setting up the correct Braille settings in JAWS, ensuring your Braille display and cursor follow each other for accurate feedback. Adjust your language profiles and choose UEB Grade 2 for output and input. Navigate through basic arithmetic and algebra problems using JAWS’ Braille Math Editor, making corrections easily. This step-by-step method will help both new and experienced teachers guide students in learning UEB math effectively.
First, set up JAWS properly by accessing the JAWS Settings Center Insert + 6 followed by (Ctrl+Shift+D) to set default. Type out and Navigate to “Braille mode” and ensure your display is set to “Structured” mode. Enable the settings that allow the active cursor to follow the Braille display and vice versa. This ensures that wherever your student is on the screen, you can follow along on your display. Turn on the Braille Viewer also to see the braille at the top of your monitor if you have sight.
Next, Alt + F to Language profiles then Alt + D to details and open and confirm UEB Grade 2 and Unicode by default. You can continue to Tab or Alt + M for math and select the UEB Math option in JAWS settings. Enter to close then Alt A to apply and enter to close. You are ready to go.
Practice using the Braille Math Editor
For practicing, you’ll use JAWS Braille Math Editor to create and edit math expressions as 1 option. Other options are WORD Math editor and LaTex as another as you become more advanced. Start with basic arithmetic, typing out equations such as “1+2=3,” and use the Braille display to feel the corresponding Braille output. This method works for both teaching and self-learning. As you advance to algebra, geometry, Trigonometry and calculus, use the WORD Math editor or Braille Math Editor to navigate complex equations. The editor allows easy error correction, reinforcing concepts as students work through problems.
Teach Math with Jaws and braille display-Basic to advanced math formulas
This method also helps auditory learners who can listen to JAWS while simultaneously feeling the Braille on the display. Practicing consistently with both the Braille Math Editor and JAWS will solidify UEB math skills and improve teaching efficacy.
Keith Bundy, a blind baseball announcer, shared his journey of overcoming obstacles to live his dream as a sports announcer. Mr. Bundy, blind since childhood, longed to play sports but lacked opportunities in Southern Indiana. Listening to baseball broadcasts fueled his dream. In 2001, he received an invitation to announce an American Legion Baseball game. With family support and a refreshable braille display, Bundy began announcing for teams semi-professionally.
On August 29th and 30th, significant events took place in Madison, South Dakota. The Dakota State University Trojans and the Madison Bulldogs both won their first games in their new stadiums. However, a less noticed but equally significant event occurred on August 29th. Keith Bundy, who grew up blind in Southern Indiana, fulfilled a lifelong dream by becoming an announcer in stadiums. It was a monumental day for Blind Baseball Announcer Keith Bundy.
Growing up, Keith was passionate about sports but couldn’t participate due to his blindness. He spent many nights listening to baseball broadcasts and dreaming of being part of a team. In 2001, a chance opportunity to announce an American Legion Baseball game changed his life. With the support of his family and the use of assistive technology like a refreshable braille display, Keith began announcing baseball games. Over the years, he announced for various teams, including Dakota State University and the Madison Broncos.
Blind baseball announcer Keith reading stats from braille display
Keith is FIRST person to in new stadium
On August 29th, Keith became the first person to announce an event in the new stadium, a moment he described as humbling and significant. He emphasized that blindness is not an insurmountable obstacle and credited his success to the right circumstances, a strong work ethic, and the support of many people, including his wife Peggy and his friend Tom Frel. Blind Baseball Announcer Keith Bundy has shown that anything is possible with the right support.
Keith’s story is a testament to perseverance and proper education. Most of all, the power of community support in achieving one’s dreams.
Blind individuals, with the right instruction and tools, can achieve their dreams just like anyone else. By learning essential skills, such as using assistive technology, braille, or orientation and mobility training, they can overcome obstacles that once seemed insurmountable. With guidance tailored to their needs, they gain confidence, independence, and the ability to pursue passions, whether in academics, sports, or careers. By embracing the right resources and support, blind people can turn their dreams into reality and thrive in any field they choose.
To enter college, you need a foundation in Algebra and Geometry. For STEM fields, add Calculus and Trigonometry. Trigonometry studies the relationships between angles and sides of triangles. With tools like Trigonometry with Math Editor, Braille Math Editor and screen readers, you can easily explore these relationships. It uses sine, cosine, and tangent functions to relate angles to side lengths. These functions are essential in physics, engineering, and astronomy. They help solve problems involving distances and angles. For example, trigonometry determines the height of a building or the distance across a river without direct measurement.
Trigonometry provides tools to model and solve problems involving angles and distances. It is fundamental to mathematics and its applications.
Going to College
If you go into STEM field IN college, you need advanced classes in but not limited to college algebra, trigonometry and calculus. When you are a screen reader and Braille user, these skills will allow you the options and opportunities to complete work as sighted peers.
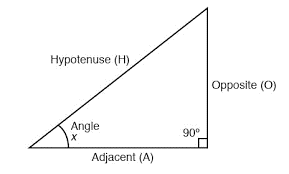
Let’s talk about: Trigonometry which is a branch of mathematics that studies the relationships between the angles and sides of triangles
Right triangle for Trigonometry with math editor
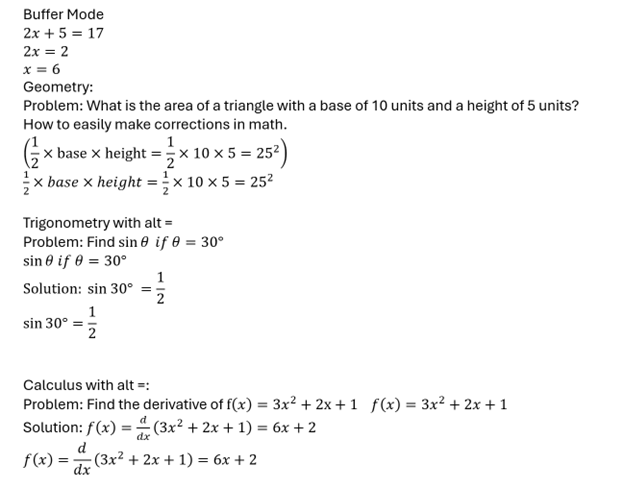
You can copy this content and paste into WORD OFFICE 365. Make sure you select Math 1 at a time and alt = to turn into true math. Then you can Ctrl = to change to professional or keep the LaTex then enter and braille it in again using Nemeth or UEB Math or practice LaTex.
Problem 1: Finding the Length of a Side
Given: A right triangle with one angle of 30° and the hypotenuse of 10 units. Find: The length of the side opposite the 30° angle.
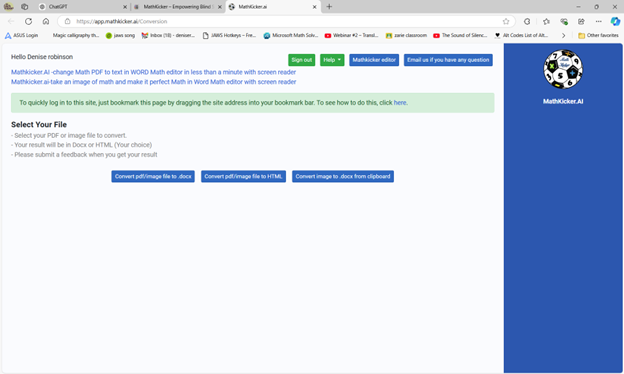
More options for JUST auditory learners or braille learners and taking totally inaccessible images of WORD and making them accessible using Mathkicker.AI.
Creating Geometry tables in Desmos provides a structured way to input and explore data, especially for users who rely on screen readers or keyboard navigation. Desmos is designed to be accessible, allowing blind and visually impaired users to create tables and input values using simple keyboard commands. By using the table function, users can input x- and y-values and navigate through cells seamlessly. This accessibility enables full participation in mathematical exploration and data visualization, making Desmos a valuable tool for both students and professionals. Through keyboard shortcuts and screen reader compatibility, creating and managing tables in Desmos becomes an intuitive and efficient process: even creating 2 or more shapes.
To create a table in Desmos, follow these steps, especially if you’re using a screen reader or keyboard navigation:
Creating Geometry Tables in Desmos Using Keyboard:
Open Desmos Graphing Calculator:
Go to the Desmos website and open the graphing calculator interface.
Activate the Add Expression Button:
If you’re using a screen reader, navigate to the “Add Expression” field by pressing Tab until you hear the option.
Enter the Table Command:
Type table() and hit Enter. This will create an empty table. The screen reader will announce that a table has been created, and it will move you into the table input fields.
Fill in Table Values:
To fill in the values for your table, use the arrow keys to navigate between cells.
Input the x-values in the left column and the y-values in the right column.
After typing each value, press Enter to move to the next cell. The screen reader will confirm each input.
Navigation Commands (for Screen Readers):
Move to the Next Cell: Press the Right Arrow or Down Arrow to move between cells.
Move Back: Press the Left Arrow or Up Arrow to go back to previous cells.
Delete an Entry: Use Backspace to delete the contents of a cell.
Add More Rows: Navigate to the last row and press Enter. This will automatically add a new row for more data points.
Keyboard Shortcuts in Desmos:
Navigate between expressions/tables: Use the Up and Down Arrow keys.
Create a new table: Type table() in the expression line.
Results
By typing table() into the Desmos expression field, users can create tables and populate them with x- and y-values. Or just create a Table from menu. Screen readers will provide auditory feedback, helping users navigate through the cells and input values. Desmos’ intuitive keyboard commands make this process efficient for users relying on screen readers or those who prefer keyboard navigation.
The DESMOS Graphing Calculator offers a powerful and accessible tool for blind and visually impaired students to explore geometry and all mathematics. By integrating seamlessly with screen readers like JAWS and NVDA, DESMOS provides real-time audio feedback and tactile support, enabling students to plot points, create shapes, and analyze graphs. With features like Audio Trace and braille compatibility, this innovative tool ensures that all learners can engage meaningfully with geometric concepts, fostering independence and confidence in STEM learning. Combine with embossing what is created gives the whole picture to a student under their fingers.
Using the DESMOS Graphing Calculator with a screen reader, such as JAWS or NVDA, gives blind and visually impaired students accessible tools to engage with geometry and other mathematical concepts.
Key Features of Geometry in DESMOS graphing Calculator with screen reader
Screen Reader Compatibility: First, DESMOS integrates with screen readers, offering spoken feedback for graph creation, interaction, and navigation. It reads inputs aloud.
Graphing and Plotting Points: Next, students plot points, lines, or shapes using equations or coordinates. The screen reader then reads back the corresponding inputs and outputs.
Geometric Shapes: Additionally, DESMOS supports various geometric figures like circles and triangles. Students define these shapes, and the screen reader provides immediate feedback.
Accessibility Features: Moreover, the “Audio Trace” feature converts visual graphs into sound. Pitch and tone changes represent graph shifts, offering an auditory experience.
Tactile Representation: For tactile interaction, emboss the graph or use refreshable braille displays which allow students to access the calculator’s output, further enhancing their understanding of graphs.
Exploration of Graphs: Meanwhile, users navigate graphs with arrow keys, and the screen reader offers real-time feedback on points, intersections, and key areas.
Labeling and Describing: Finally, DESMOS allows labeling of points and graphs. The screen reader reads these labels aloud, improving organization and understanding of complex graphs.
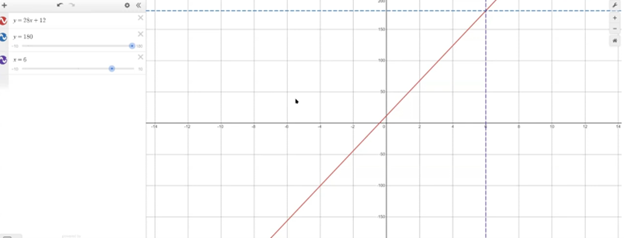
Desmos Geometry shape with dotted line solutions
By leveraging these features, blind or visually impaired students can effectively learn and apply geometric concepts, making DESMOS a valuable tool for STEM education. If Desmos is not an option Excel works well also with shapes. Continue learning anything you need and if you cannot find it, just ask.
Optimizing Windows 11 Efficiency for Screen Reader with Key Settings and Configurations takes an hour most often 2 or so to complete. Longer if you are new to screen reader and how Windows 11 works. It is different than other OS systems so give yourself grace as you learn all there is to know about this system. As you move through your keyboard and discover you would like a particular key somewhere, like the applications key, you can remap a key to create that yourself. AND, you MUST have Local Admin on School Computers.
How to setup Computer for Optimizing Windows 11 Efficiency
Change Taskbar Settings
Update Computer every day
Go to task manager and disable anything you do not need at start up
Go to Power Options and change from Sleep to Shut Down when you press Shut down button
take off sleep options in general unless you are advanced user
Keep in mind that your screen reader cannot reset or the RAM clear if you computer is in sleep mode or hibernate mode
Turn off Touch pad- if you do not your palm will touch the mouse pad and auto activate items or move your cursor on your computer. This equals huge frustration to a screen reader user.
Windows T and clear that taskbar–this is million dollar real-estate to access programs fast
Setup WORD
Go to control panel and setup Sound card options
Windows and adjust other sound options using sndvol.exe
Setup Gmail and Drive and learn new commands
Setup Outlook
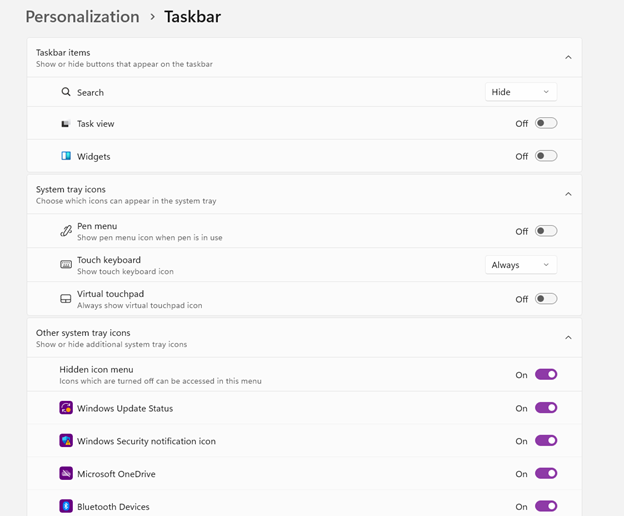
Taskbar setting for Windows 11 setup
Efficiency for Screen Readers and other Setup Skills
Proper Set up Windows 11 to work with screen readers and braille displays is crucial for visually impaired users. This configuration ensures smooth interaction with the system, giving users full access to information and applications such as Gmail for optimizing access..
1. Accessibility and Independence
Configuring Windows 11 for screen readers like JAWS, NVDA, or Narrator, and integrating braille displays, provides full independence. Without proper setup, tasks such as reading documents, browsing, or using software become challenging. A well-configured system ensures all functions are accessible.
2. Productivity and Efficiency
Screen readers and braille displays let users interact quickly with the system. Setting up Windows 11 for compatibility speeds up responses to commands. It also ensures smoother transitions between applications, making multitasking more efficient. Proper configuration prevents lag or software conflicts, which increases productivity in school and work settings.
3. Customization for Personalized Needs
Each user has different needs. Windows 11 allows users to customize screen reader settings (e.g., speech rate, verbosity, and key commands) and braille displays (e.g., output type and formatting). These adjustments create a personalized experience, improving comfort and reducing frustration.
4. Enhanced Braille Support
Windows 11 offers enhanced braille support when paired with leading screen readers. Proper setup lets users access seamless braille input and output for text and math. It also allows advanced navigation of documents. Correct braille display configuration ensures accurate reading and editing of both simple text and more complex content.
5. Compatibility with Updates
As Windows 11 updates, keeping screen readers and braille displays integrated is essential. A well-maintained setup ensures new features or security updates don’t disrupt accessibility tools. This is vital for maintaining ongoing access such as the new Google Commands for navigation.
Key Setup Steps for Optimizing Windows 11 for Accessibility:
Ensure Compatibility: Install the latest versions of screen readers and braille display drivers compatible with Windows 11.
Enable and Configure Narrator: Windows 11 includes Narrator, which can be set up for basic tasks if needed.
Customize Keyboard Shortcuts: Set up shortcuts for easier navigation and quicker interaction.
Adjust Accessibility Settings: Go to “Accessibility” in the Settings app to adjust visual and audio cues like contrast and text size.
Test with Braille Displays: Pair and calibrate braille displays for reading and input in UEB or Nemeth, depending on preferences.
With proper set up, Windows 11 for screen readers and braille displays furthers accessibility. This setup enhances independence, productivity, and ease of use in the digital world.
TechVision Access Instruction is the TechVision Difference. Dr. Robinson and her Tech Vision team provide one-on-one and school team remote instruction for visually impaired individuals in real time. They enhance technology skills for students, adults, and groups by teaching them to use assistive technologies like PC computers, screen readers (JAWS, NVDA, Narrator), and Braille displays. This approach ensures students complete their work alongside peers without needing extra time
TechVision Access Instruction aims to transform education for the blind and visually impaired. They combine the right technology with effective instruction. They offer teaching internships to advanced students, providing hands-on job skills that enhance resumes for future employment or college applications. Their goal is to empower visually impaired individuals to achieve their full potential and navigate the world confidently.
TechVision Website
Our Mission and Purpose is enable blind and visually impaired students the ability to access and complete work as their sighted peers. This requires, screen readers, braille displays and other access technology.
Technology that gives you VISION with Access Instruction
The TechVision mission and purpose, led by Dr. Robinson and her highly skilled TechVision Specialists, are to change lives via instruction in access technology, enabling inclusion and educational equality.
The TechVision Specialists are uniquely skilled in teaching blind and low vision students. They focus on direct instruction on all technology like computers(requires Local Admin Access), screen readers, Braille displays, and smartphones. This approach has revolutionized the educational experience for blind and low vision students and clientele. Their expertise and global reach have significantly impacted students. They empower students to access information and navigate the world on an equal footing with sighted peers.
Additionally, TechVision collaborates with school districts and private entities to address the evolving needs of education. This collaboration promotes independence and inclusion in both classrooms and the job market. By equipping students with essential skills, TechVision creates an environment of true equality. As a result, opportunities become accessible to everyone, regardless of visual impairment.
TechVision specializes in teaching all subjects, especially advanced mathematics, to blind and visually impaired students. This enables them to succeed academically. Many of these students pursue majors in Applied Mathematics at prestigious institutions, including Harvard University. They use innovative methods to ensure blind and low vision students perform at the same high level as their sighted peers.
Integration
Additionally, TechVision integrates tools like Artificial Intelligence (AI), word processors, screen readers, and Braille displays to support student success. These tools allow visually impaired students to produce work comparable to their classmates. Consequently, this promotes integration and equal opportunities in academic environments: Even to the point that you can Make an Electronic Signature -Then insert it into a Document.