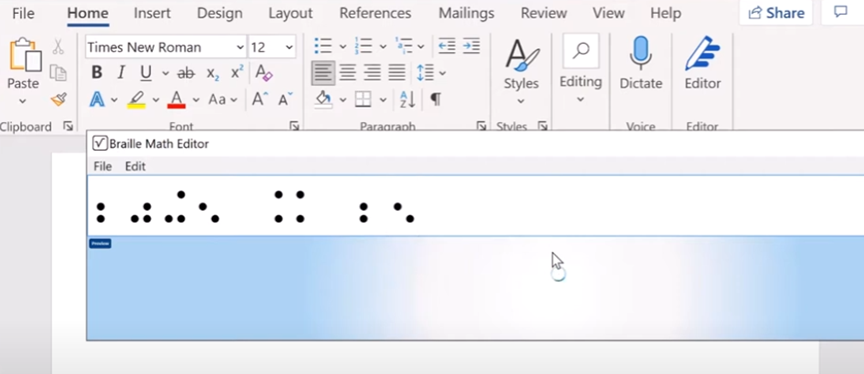
Dr. Robinson demonstrates how to use the Jaws Braille Math Editor for solving basic math problems. She begins by explaining the process of opening the editor using 3-7-4-6 space on the braille display. This command quickly opens the Jaws Braille Math Editor for users.
Once in the editor, she types “10 + 5 = 15” to show how math expressions are entered. The math editor automatically adds number signs before each number, ensuring the correct format. To hear the result, Dr. Robinson uses Insert + F1 for help and demonstrates how to navigate through the equation.
Next, she solves “20 + 5 = 25” and reminds students to carefully check for the number signs before each number. Dr. Robinson encourages the use of both hands when reading math, emphasizing the importance of tactile practice with the right hand and left hand.
Braille Math Editor Solution
She continues by solving additional problems, such as “30 + 6 = 36” and “40 + 7 = 47.” Each time, she reinforces the process of reading and checking the work with both hands. For every problem, Dr. Robinson ensures that students follow the correct commands to enter the math expression, then press Enter to insert the answer into Microsoft Word. The session effectively shows the benefits of using the Jaws Braille Math Editor.
Throughout the session, Dr. Robinson emphasizes the value of continuous practice and careful attention to the tactile input. She concludes the lesson with a final problem, “50 + 8 = 58,” guiding students through the steps of reading, checking, and inserting the equation. The Braille Math Editor, combined with the commands in JAWS, offers blind students a seamless way to solve and verify math problems independently.
Dr. Robinson introduces a lesson on using Microsoft Excel to solve math work, specifically focusing on inequalities and graphs. She begins by guiding students on how to put Excel in focus to tackle various math problems in Excel. This helps students to optimize their math work in Excel effectively. Next, she instructs them to create a template using a number line. To insert symbols like less than or greater than signs, students use the Alt + N and then U commands to insert bullets or symbols.
For students with a numpad, Alt + 7 and Alt + 9 quickly insert a hollow or solid bullet, respectively. For those without a numpad, they can use the Insert + Symbols option. Students then align their number line by inserting a bullet in the middle, ensuring four dashes on each side for perfect centering when solving math work in Excel.
To center content, students use the Applications key and press F. They adjust the horizontal and vertical alignment to ensure everything is perfectly centered. This is a useful step when handling math problems in Excel. After completing their problems, students select the content using Shift + Right Arrow and copy it using Ctrl + C. This entire process enhances their skills in doing math work in Excel.
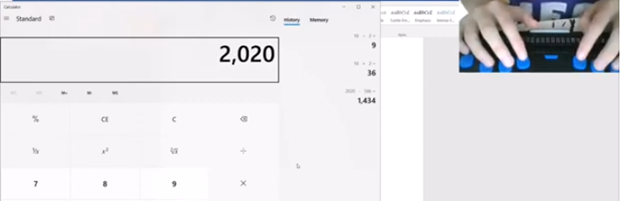
When pasting into Microsoft Word with Ctrl + V, students have various formatting options. By pressing the Control key and right arrow, they can select different formatting options for their pasted content. They can also Alt H to home and V to paste and right arrow through options. This flexibility allows blind students to format and customize their graphs just like their sighted peers when solving math problems in Excel. After the student pastes an image, they press the Applications key and up arrow to select Alt Text and type the description. Once they finish typing, they press Ctrl + Space and C to close the navigation pane and return to the document.
Dr. Robinson concludes by showing examples of completed math problems in Excel and graphs, demonstrating how well-formatted the number lines and inequalities look. Blind students can confidently create hollow and solid bullets, as well as inequalities, just like other students, thanks to the accessible features in Excel. This process ensures they stay engaged in their learning, achieving the same results as their peers when doing math work in Excel. Make sure your display is working well.
JEFFERSON COUNTY, Tenn. As school resumed, a Jefferson County student waited weeks for an important textbook to arrive from out of state. This doesn’t seem like a big deal, except it’s a calculus book for Math for blind students and it’s written in Braille. Campbell Rutherford is a home school student in Jefferson County.
She started homeschooling with a teacher for the visually impaired because math for blind students was no longer available in the local school district. Campbell was born blind and has been reading braille since she was 3 years old. “I rely completely on braille and screen readers to access the printed word,” she said. Campbell, accustomed to reading Braille, competes in state Braille reading competitions yearly and has even reached nationals. So naturally, she’d like to be able to read her textbooks in Braille.
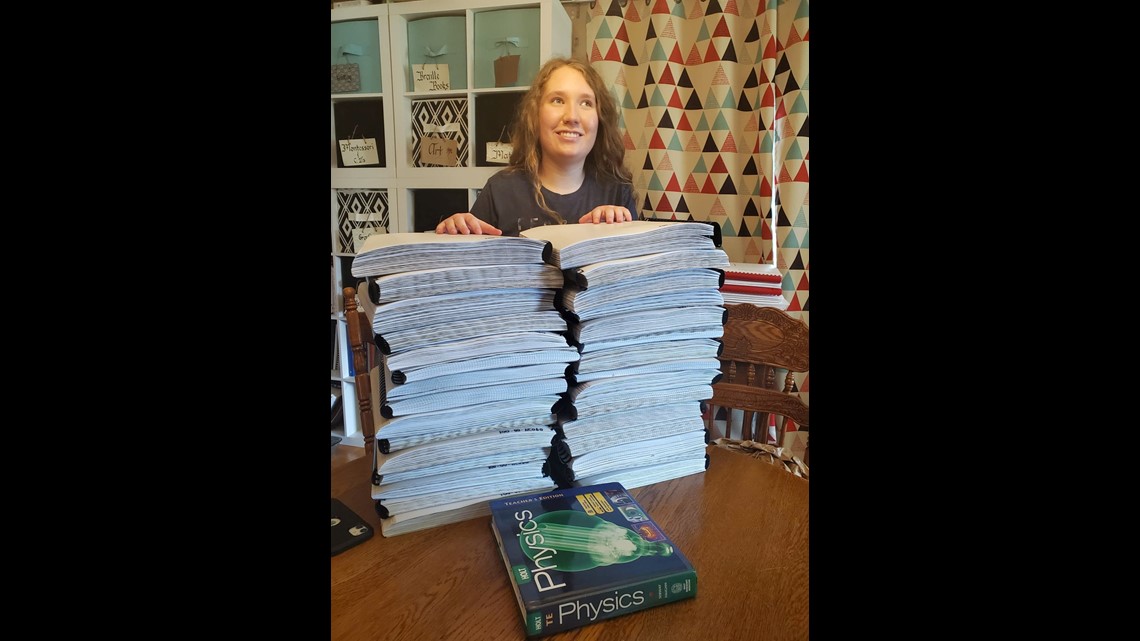
Because each page has to be embossed with the Braille indentations, Campbell’s textbooks are huge. Here’s her AP physics book. All these binders are one book for Math for blind students, containing everything in the print book next to it, just in Braille.
Credit: Liza Rutherford: Campbell Rutherford stands with her AP Physics book in Braille of 25 volumes of 11 x11.5 size, next to the book in print of 2 inches thick.
“I used to have to borrow a truck to go get her books,” said her mom, Liza Rutherford. Braille books are larger because the text must be big enough for readers to feel with their fingertips. A standard physics book may have four graphs on one page, but in Braille, each graph requires its own page. The National Braille Press reported about 12 percent of blind school-age students can read Braille, limiting access to advanced textbooks.
NO AP Math Books
There were no Braille AP calculus books in the state of Tennessee. The Rutherford’s worked with the Tennessee School for the Blind to find this 20-year-old edition from Maryland. Campbell said schools often discourage visually impaired students from taking challenging courses. “I have friends that, when they’re struggling with Math, they’ve been told, ‘it’s okay that blind people aren’t good at math typically,’” said Campbell.
Credit: Liza Rutherford-Campbell Rutherford’s calculus book in Braille of 32 volumes of 11 x11.5 size, by to the book in print of 2 inches thick..
Campbell plans to major in math in college and go into epidemiology. She said it’s those low expectations that hinder her and others the most, not her lack of vision. “We even had an administrator at one point come to me and say, ‘does Campbell really need a high school diploma for her adult life?’” said her mom Liza Rutherford. “That’s probably the one that’s infuriated me the most over the years,” said Campbell.
Lack of Advanced Placement (AP) Math for blind students Books
The National Federation for the Blind reported only 31.6 percent of blind individuals hold a high school diploma or GED. The Rutherford’s believe a shortage of teachers for the visually impaired adds to this problem.
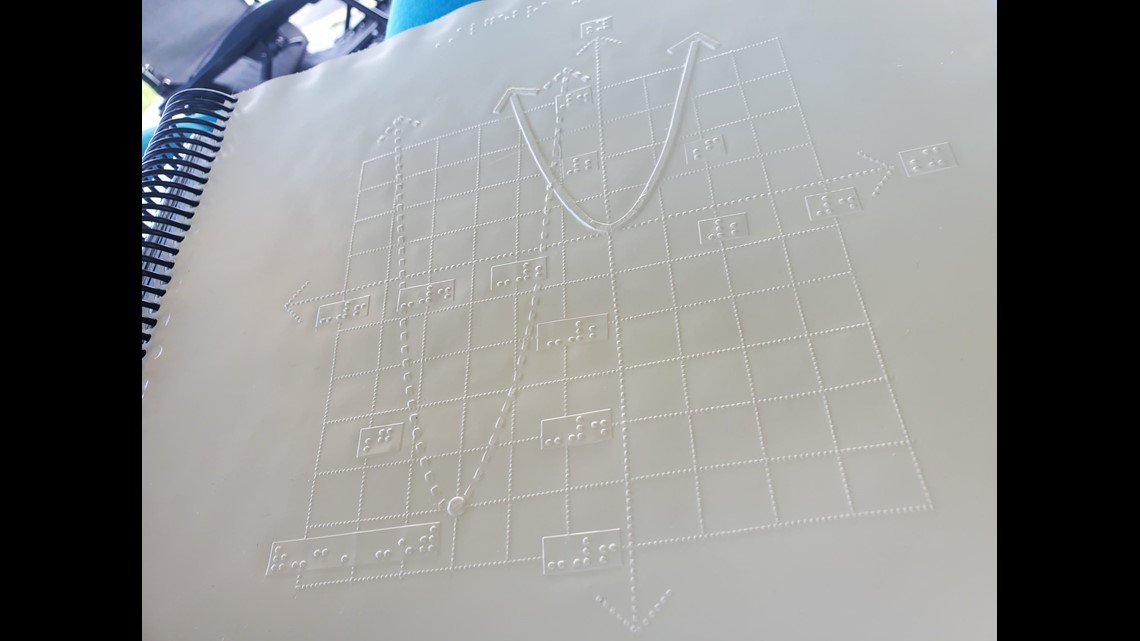
Credit: Liza Rutherford: A mathematical graph transcribed in Braille.
They are hopeful that as technology spreads, more blind students will have the educational access they need. “There are other ways of doing things besides the sighted way or the able way,” said Campbell. Campbell connected with a blind math professor from Connecticut who assists her with any course-related questions. She took AP physics and AP calculus with a proctor who will describe the graphs and record her multiple-choice answers.
Math for all ages, Math Team, Dr. Robinson, along with Professor Betsey, Campbell Rutherford (teacher intern), led the session. Nate Kile (Access Tech Specialist) was the moderator. Math Team emphasized the importance of ensuring blind students can access their technology independently and efficiently. Nate Kile assisted by handling participant questions during the presentation, allowing attendees to type inquiries in the Zoom chat box. Mr Kile would ask the Math Team from the virtual attendees.
Each presenter built on the others’ lessons. Dr. Robinson began with elementary math training skills and how JAWS and other assistive technologies play crucial roles in blind students’ education. Teaching math for all ages, she typed out typically math problems in elementary school to show audience how easily math is completed in WORD. Nate provided opportunities for participants to unmute themselves using Alt + A or Alt + M to ask questions.
Math for all Ages: Dr Robinson
The Math Team turned off their videos to optimize bandwidth. When teaching virtually, turning off video offers better bandwidth for a flow of uninterrupted instruction. Dr. Robinson started the discussion by running JAWS, a screen reader. She explained how to troubleshoot JAWS issues, recommending minimizing programs and restarting the software for optimal performance.
The session highlighted key JAWS commands, such as Windows + D for quick access to the desktop. Dr. Robinson demonstrated how blind students could use Braille displays for math, including Nemeth code. She showed how blind students control their computers by personalizing settings like screen readers and Bluetooth. Customizing the setup is essential for supporting math learning at all ages.
Math for all ages math formulas in Word
Math for all Ages: Professor Betsey
Professor Betsey demonstrated how to effectively use Braille displays, including advanced setups for students. She went into MathType and LaTex and how to use advanced Math techniques to accomplish all math levels. She emphasized the importance of maintaining accessibility and autonomy for students through personalized settings. As a college-level math professor, she explains that using a PC for math enables full inclusion of blind students. Prof. Betsey emphasizes that this technology allows blind students to participate equally in all aspects of their education. This approach supports the goal of providing math for all ages.
Math for all Ages: Campbell
Campbell Rutherford, a teacher intern, demonstrated how to integrate graphing and mathematical functions using accessible technology for blind students. Campbell began by demonstrating how to write a function in Word using LaTeX. She then transitioned to graphing that function in Desmos, an online graphing calculator. Using her braille display and screen reader, she input and analyzed the graph. Campbell explained how blind students can explore mathematical properties like intercepts and undefined points. After reviewing the graph, she took a screenshot and pasted it into a Word document. This tied together the written mathematical properties and the visual representation. Throughout, Campbell stressed the importance of accessible math for students of all ages.
Throughout the session, the Math Team emphasized the importance of managing constant software updates. They explained how providing local admin rights empowers students to update their programs and devices independently. This in-turn prepares them for both academic success and future employment. The TechVision team’s approach ensures that students can fully access their education and maintain control of their technology. This ultimately sets them up for long-term success but especially the STEM field. More Math Lessons here:
To use MathType and LaTeX with screen readers like JAWS or NVDA, you can easily create and render math formulas directly in Word or Google Docs. Here’s how to get started with MathType in both platforms and some important points for using LaTeX commands.
MathType in Word:
Download MathType: First, download and install MathType as an add-on for Word. This will allow you to use LaTeX commands within your Word documents.
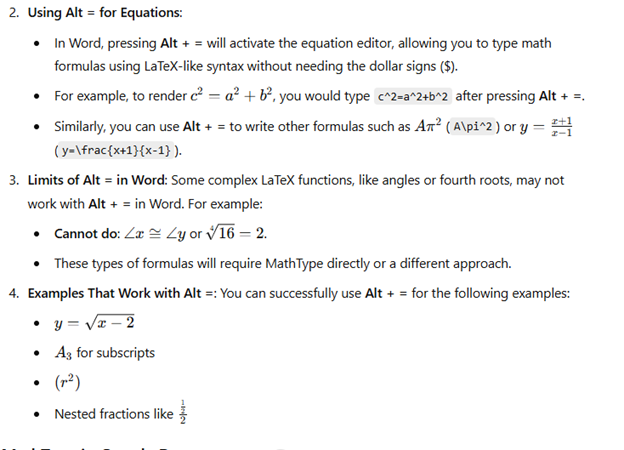
Using Alt = for Equations:
In Word, pressing Alt + = will activate the equation editor, allowing you to type math formulas using LaTeX-like syntax without needing the dollar signs ($).
For example, to render c2=a2+b2c^2 = a^2 + b^2c2=a2+b2, you would type c^2=a^2+b^2 after pressing Alt + =.
Similarly, you can use Alt + = to write other formulas such as Aπ2A\pi^2Aπ2 (A\pi^2) or y=x+1x−1y = \frac{x+1}{x-1}y=x−1x+1 (y=\frac{x+1}{x-1}).
Limits of Alt = in Word: Some complex LaTeX functions, like angles or fourth roots, may not work with Alt + = in Word. For example:
Cannot do: ∠x≅∠y\angle x \cong \angle y∠x≅∠y or 164=2\sqrt[4]{16} = 2416=2.
These types of formulas will require MathType directly or a different approach.
Examples That Work with Alt =: You can successfully use Alt + = for the following examples:
y=x−2y = \sqrt{x-2}y=x−2
A3A_3A3 for subscripts
(r2)(r^2)(r2)
Nested fractions like 122\frac{\frac{1}{2}}{2}221
Visual Rendering after you press enter in WORD for MathType with screen readers-LaTex
Latex is typed out and this is the visual rendering of the LaTex from Mathtype
MathType in Google Docs-though can give challenges based on technology:
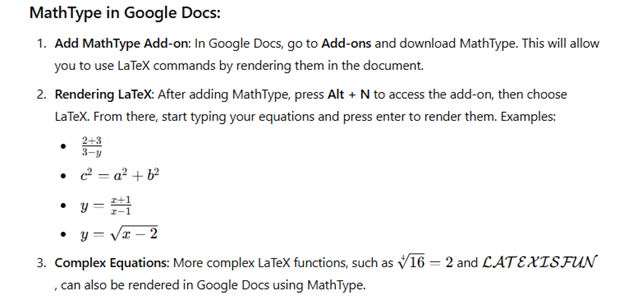
Add MathType Add-on: In Google Docs, go to Add-ons and download MathType. This will allow you to use LaTeX commands by rendering them in the document.
Rendering LaTeX: After adding MathType, press Alt + N to access the add-on, then choose LaTeX. From there, start typing your equations and press enter to render them. Examples:
2+33−y\frac{2+3}{3-y}3−y2+3
c2=a2+b2c^2 = a^2 + b^2c2=a2+b2
y=x+1x−1y = \frac{x+1}{x-1}y=x−1x+1
y=x−2y = \sqrt{x-2}y=x−2
Complex Equations: More complex LaTeX functions, such as 164=2\sqrt[4]{16} = 2416=2 and LATEXISFUN\mathcal{LATEX IS FUN}LATEXISFUN, can also be rendered in Google Docs using MathType.
Visual rendering of math after translation of LaTex in Docs using mathtype addon
By using Alt + = in Word and MathType in Google Docs (but be aware there may be issues in Docs), you can seamlessly render a variety of math formulas and equations with ease. Screen readers like JAWS and NVDA will effectively read these equations, enhancing accessibility for blind and visually impaired students.
MathType(LaTex) Alt = in WORD will render formulas to Math see below
Navigating IXL with a screen reader like JAWS allows blind students to access educational content easily. Using specific keyboard commands enables quick access to various elements on the page. For example, pressing H moves between headings, helping students locate sections in lessons or practice activities. When working on subtraction exercises in Focus 40 IXL, pressing B navigates to buttons like “Submit” or “Check Answer,” allowing students to interact with controls smoothly.
Another helpful command is Insert + F7, which opens a list of links on the page. This makes moving between sections, such as practice questions and feedback, more efficient. Students can also use F to quickly jump to answer boxes or search fields. To read questions or instructions, pressing Insert + Up Arrow reads the current line, while Ctrl + Down Arrow skips ahead to the next section when working on Focus 40 IXL subtraction.
JAWS Navigation Commands
By using these commands, students navigate IXL independently, completing exercises and reviewing answers efficiently. The screen reader provides real-time feedback, guiding students as they interact with IXL’s educational content related to subtraction problems. This empowers students to fully engage in their learning experience.
Essential IXL keyboard commands for navigating with JAWS:
Navigate headings: Press H to jump between headings, allowing you to quickly move through sections of the page during subtraction practice.
Navigate links: Use Insert + F7 to bring up a list of all links, and then use the arrow keys to select the desired one.
Move to next button: Press B to navigate through buttons on the screen, such as “Submit” or “Check Answer” while working on subtraction in Focus 40 IXL.
Move to form fields: Use F to jump between input fields, such as answer boxes or search fields.
Navigate by list: Press L to move through lists of questions or answer choices, ensuring efficient navigation during subtraction lessons.
Read the current line: Press Insert + Up Arrow to read the current line, useful for verifying questions or feedback.
Repeat the last spoken phrase: Use Insert + 5 on the numpad to repeat the last spoken message.
Skip to the next section: Press Ctrl + Down Arrow to quickly skip paragraphs and reach the next section of text, which can be especially useful in Focus 40 IXL subtraction lessons.
Focus Display Commands
Navigating IXL subtraction math using the Focus 40 Braille Display and JAWS enhances accessibility for blind students. By combining keyboard commands and tactile feedback, students can efficiently work through subtraction problems. Solving subtraction on a display is also easier than just audio feedback. Pressing H on the keyboard or using the Router Keys on the Focus 40 allows them to jump between headings, locating sections like instructions or problem sets quickly.
Taylin using Focus 40 Display with 1 finger on left hand and 2 knuckles on right hand
For Focus 40 IXL subtraction problems, students can use E for edit or the Cursor Routing Buttons to jump directly to the answer input fields. As they enter their responses, the Braille display provides real-time feedback, ensuring accuracy. Pressing Insert + Up Arrow or using the Braille Display’s Line Reading feature reads the current subtraction problem, helping students verify their work. To check answers or move to the next problem, they can press B to navigate to buttons like “Submit,” or use the Panning Buttons to scroll through the page.
Focus 40 Braille Display with JAWS
The Focus 40 Braille Display, paired with JAWS, offers students the tactile and auditory support they need to complete all math problems independently in IXL. This combination enhances their confidence and accuracy in solving subtraction problems.
Dr. Betsey Doane shared her experience teaching math for over 50 years and the importance of making math accessible to all students, including those with visual impairments. She began by introducing the software MathType, essential for creating accessible math content. The software integrates into Word and allows users to write math that is accessible to both screen readers and braille displays. Her efforts truly embody the concept of Advanced Math Made Accessible.
Dr. Doane explained the basics of LaTeX, a text-based language used for writing math. She demonstrated how to input and translate common math expressions such as fractions, square roots, and equations using LaTeX in Word. Her instructions included using the Focus 40 Braille Display and ensuring proper configurations for students to view math content in braille. This approach makes advanced math more accessible for everyone.
LaTex using Mathtype to insert perfect Advanced math made accessible
She emphasized the importance of understanding both the visual and non-visual ways of presenting math, highlighting that students need the right software and commands to work effectively. By using LaTeX and MathType, both sighted and blind students can access and solve math problems, ensuring inclusion in any classroom setting. This makes advanced math accessible and easier to understand.
She highlighted the use of MathType software, which integrates seamlessly with Microsoft Word, allowing users to create and present math content that is accessible through screen readers like JAWS and braille displays like the Focus 40. Dr. Doane explained how MathType enables students and educators to write complex equations, such as fractions, square roots, and exponents, in both visual and non-visual formats. This ensures that blind students can access the same content as their sighted peers, making advanced math more accessible.
Advanced Math Made Accessible with LaTex
Dr. Doane also provided an introduction to LaTeX, a powerful text-based language used for writing mathematical expressions. She demonstrated how to write math using LaTeX syntax, such as using backslashes for commands like fractions and square roots. By using LaTeX in Word with MathType, math content can be rendered correctly on both screen readers and braille displays, making it easier for blind students to follow along in class and complete assignments. This is another way to make advanced math accessible.
Furthermore, Dr. Doane stressed the importance of configuring braille displays correctly, ensuring that input is set to computer braille and output is set to grade 2. She provided step-by-step instructions for adjusting these settings on the Focus 40 Braille Display, ensuring that students can navigate math content effectively, contributing to the overall goal of making advanced math accessible.
In conclusion, Dr. Doane encouraged educators to adopt these tools and techniques to create an inclusive learning environment where both sighted and blind students can excel in mathematics. Her detailed instructions and practical advice offer a clear path toward accessible math education for all.
Using Focus 40 Braille Display to do Math Work in Word with Jaws, Kim demonstrates commands in WORD using FOCUS 40 Braille display exclusively. She can control her computer and complete her math work in WORD with just the display.
Here are some essential commands for using the Focus 40 Braille Display to do math in Microsoft Word:
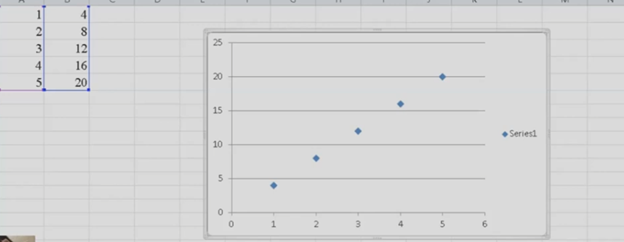
To create a line plot graph in Excel with keyboard commands, first select your data using Shift + Arrow keys. Next, press ALT + N, L to insert a line chart. After the chart appears, press CTRL + 1 to format it. Use ALT + J, T to add a chart title and ALT + J, A, I to add axis titles. This process efficiently creates a line plot graph while using only keyboard commands for input and formatting.
Here is a list of all the commands used in the lesson on how to create a graph and other charts:
Copy and Paste Data: This is fundamental in creating Excel line plot graphs.
Select columns A and B.
CTRL + C: Copy data.
CTRL + V: Paste data into Excel.
Insert an Excel Scatter Plot Graph: Often used before converting to a line plot graph.
ALT + N, D: Insert Scatter Plot (Insert tab and Scatter option).
Add Titles to the Graph: Important for any graph to be understood.
ALT + J, T: Adds a chart title. Type the title and press Enter.
ALT + J, A, I: Adds axis titles. Type the title for the X-axis or Y-axis and press Enter.
Chart Tools for Excel line plot graph
ALT + J: Open Chart Tools Layout tab.
T: Add a chart title.
Choose Above Chart (Arrow keys, Enter).
ALT + J, A, I: Add Axis Titles, essential for creating your graph.
Right Arrow: Select primary horizontal (for X-axis title).
W: Write the title (Enter title).
Repeat ALT + J, A, I for vertical axis title (Y-axis).
Down Arrow: Rotate title, then Enter and type title.
Remove Legend from Excel Line Plot graph to simplify the presentation.
ALT + J, A, L: Remove the Legend.
None: Select “None” to remove the legend.
Copy and Paste Graph to include in your documents.
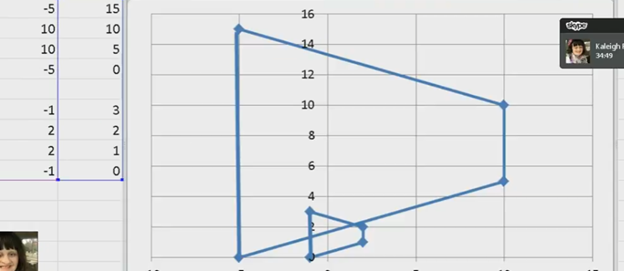
kaleigh takes images from a PDF and creates Geometry shapes such as vertices in Excel for perfect graphing.
In Excel, you can create vertices (edit points on a line) when working with shapes or lines. Here are the keyboard commands to manipulate vertices:
Always create a table with all pertinant numbers based on the math from your Work. Kaleigh took her work from a PDF and transported it into excel. If you make a space in excel leaving cells empty, you can create 2 intersecting graphs.
Basic Overview of Geometry using Excel Shapes
Insert a Shape:
Press ALT + N, SH to open the Shapes menu.
Use the arrow keys to select a line or shape and press Enter.
Edit Vertices:
Select the shape.
Press Shift + F10 (context menu) and choose “Edit Points” by using the arrow keys and pressing Enter.
Move Vertices:
Use arrow keys to move vertices around once in edit mode.
These steps allow for creating and editing vertices in Excel. More Excel lessons.