Access Technology Training Lessons provide detailed instruction to enhance your skills.
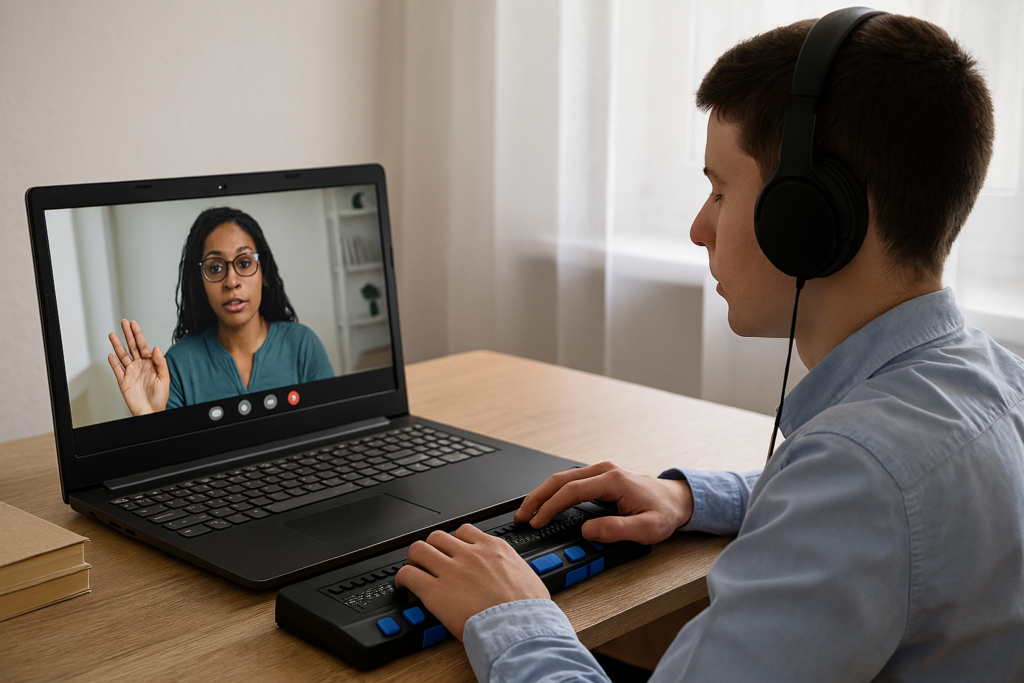
TechVision provides direct, remote training to students and clients around the world. We teach exactly what each learner needs so they can access the same work as their peers. Additionally, we focus on real assignments, real deadlines, and real expectations from school, work, or rehabilitation programs.
We tailor every lesson to the student’s current tasks and long‑term goals. This individualized approach builds confidence, independence, and strong academic performance. Furthermore, we write IEP goals directly related to each student’s needs, ensuring progress, and school expectations align per grade level and skill.
Students learn to use screen readers, braille displays, and other access technologies to complete the same documents, graphs, tests, and projects as their classmates. This targeted training prepares students for success in school, work, and daily life. Additionally, many TechVision Specialists are blind themselves and provide authentic guidance that strengthens student independence. In addition to being incredible mentors.
Remote teaching with Access Training Teacher
In addition to live remote lessons, learners, families, and educators can continue building skills through yourtechvision.com and our YouTube Channel. These videos demonstrate access technology in action and allow people to review, practice, and learn at their own pace. Moreover, districts, rehab centers, and private clients often combine direct training with these resources for ongoing support.
TechVision Access Training Instruction Model
TechVision’s model blends real‑time, one‑on‑one teaching with on‑demand video lessons. This combination ensures students can meet immediate expectations and continue growing independently over time. Ultimately, our goal is equal access to education, work, and life through practical, powerful training using access technology.
TechVision’s empowers lifelong learning and independence.Additionally, our YouTube Channel and website offer ongoing access to essential skills and demonstrations.
Learning Spanish Braille involves understanding the unique characteristics of the Braille system used for the Spanish language. Then build on the foundational skills of Braille reading and writing. Here’s how to approach it:
1. Understand the Braille Alphabet in Spanish
Spanish Braille follows the same 6-dot system as English Braille.
Extra characters are included to represent letters with accents and special characters used in Spanish.
Key additions include:
Ñ: Represented by a unique Braille symbol.
Accented vowels: Á, É, Í, Ó, Ú have distinct Braille symbols.
Punctuation: Spanish uses inverted question marks (¿) and exclamation marks (¡), and these have their own symbols in Spanish Braille.
2. Start with the Basics
– Begin by learning the standard Braille alphabet for unaccented letters, numbers, and common punctuation marks.
– Practice reading and writing these basic symbols to build fluency.
3. Familiarize Yourself with the Extra Characters
– Learn the Braille symbols for accented vowels (á, é, í, ó, ú) and ñ.
– Read and practice with materials specifically written in Spanish Braille to develop fluency.
– You can find books, articles, or educational materials written in Spanish Braille to improve your reading skills online.
5. Engage with Digital Tools
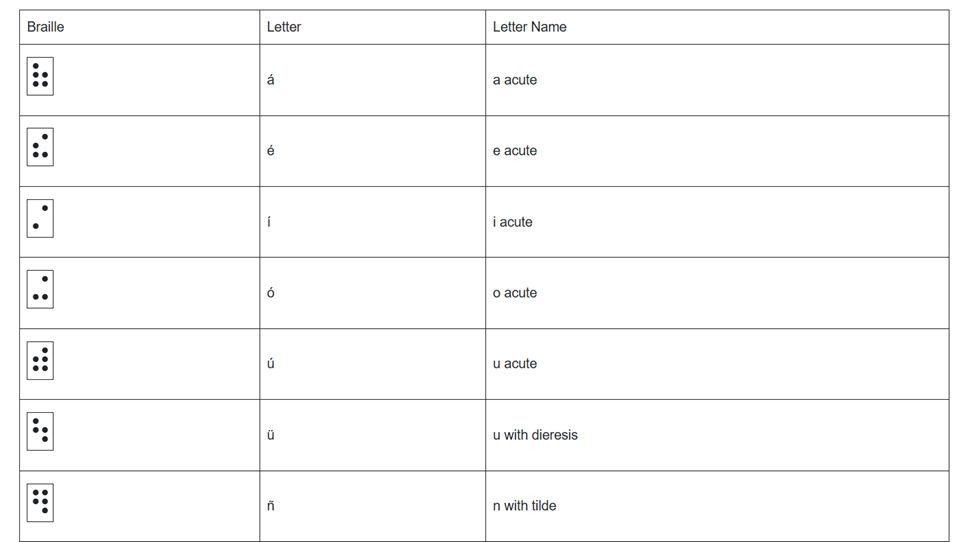
– Tools like Braille displays and screen readers can be set to Spanish to help reinforce learning. See below list of all Spanish symbols
– Software like JAWS or NVDA can be configured to support Braille output in Spanish. This allows for real-time practice with written content.
6. Practice Writing Spanish Braille
– Use a Braille writer to practice writing in Spanish Braille. Focus on mastering punctuation and special characters.
– The fastest and easiest to edit option will be to practice typing or brailling on a display. The FOCUS 40 Braille Display or Brailliant Braille Display to write out Spanish words and sentences.
7. Learn through Immersive Activities
– Reinforce learning, engage in practical activities like labeling objects in Spanish Braille. Work with bilingual Braille texts (Spanish and English).
8. Find a Teacher or Tutor
– If possible, work with an instructor who is fluent in Spanish Braille and the language. They can guide you through the nuances of the language and provide feedback on your progress.
– Organizations specializing in Braille education, like TechVision, can help offer resources or tutors for Spanish Braille.
8. Go to a Spanish Speaking Country
-Totally immerse yourself within a culture that will speak the language you want to learn well.
Spanish-Española Symbols
Spanish-Española 1. Jaws settings: Set up braille profile – insert 6 (ctrl shift D) for default. After completing the steps, open settings again to ensure they apply only to Word settings. Next, type “braille mode” twice, press F6, and use Alt+G to access languages and set your preferences. For those requiring a Spanish Braille display or keyboard, ensure your device is compatible with your software settings. More Video lessons can help.
This lesson is Spain (international) Input and Output are Spanish Grade 1
2. Tab to profile languages and set those up and enter to close Jaws settings
3. Alt 8 to make sure dots 7,8 show on display-accept and close settings
1. Set up Voice profile in Jaws-open context menu, options, voices, add a profile
1. In Word-change voice quickly: 2 options: on keyboard- ctrl shift window L to change profile or on Focus -2,3,4,5,7, space to change languages)
2. Insert+ctrl+S to change to Spanish profile or to other language
3. G+7+space on Focus to computer braille (which will output Spanish grade 1)– capital is dot 7 under capital letter on display
For Braille with Braille Display on Computer
Práctica:
á 1,2,3,5,6
é 2,3,4,6
í 3,4
ó 3,4,6
ú 2,3,4,5,6
ü 1,2,5,6,8
ñ 1,2,4,5,6, 8
Punctuation for Spanish Braille using Braille Display
! 2,3,5, 7 is exclamation mark
inverted ! is 2,3,5, 7, 8 is upside down exclamation mark
Period is . is dot 3
Comma is , is dot 2 for comma
question mark is ? is dot 2, 6
upside down question mark or inverted ? is 2,6,7
Spanish Braille for Keyboard and JAWS
Lower Case Letters
á (lower case a, acute accent) = Press Ctrl + ‘ (apostrophe), then the letter a é (lower case e, acute accent) = Press Ctrl + ‘ (apostrophe), then the letter e í (lower case i, acute accent) = Press Ctrl + ‘ (apostrophe), then the letter i ó (lower case o, acute accent) = Press Ctrl + ‘ (apostrophe), then the letter o ú (lower case u, acute accent) = Press Ctrl + ‘ (apostrophe), then the letter u ñ (lower case n, tilde accent) = Press Ctrl + Shift + ~ (tilde), then the letter n ü (lower case u, diaeresis accent) = Press Ctrl + Shift + : (colon), then the letter u
Upper Case Letters
Á (upper case A, acute accent) = Press Ctrl + ‘ (apostrophe), then Shift + a É (upper case E, acute accent) = Press Ctrl + ‘ (apostrophe), then Shift + e Í (upper case I, acute accent) = Press Ctrl + ‘ (apostrophe), then Shift + i Ó (upper case O, acute accent) = Press Ctrl + ‘ (apostrophe), then Shift + o Ú (upper case U, acute accent) = Press Ctrl + ‘ (apostrophe), then Shift + u Ñ (upper case N, tilde accent) = Press Ctrl + Shift + ~ (tilde), then Shift + n Ü (upper case U, diaeresis accent) = Press Ctrl + Shift + : (colon), then Shift + u
Hasta la vista / Hasta luego. See you / See you later.
Hasta pronto. See you soon.
Hasta mañana. See you tomorrow.
(Muchas) Gracias.
Thank you (very much).
De nada. You’re welcome.
Bienvenidos Welcome
Lo siento I’m sorry
Con permiso / Perdón / Disculpe Excuse me / Pardon me
¡Vamos! Let’s go!
¿Cómo está usted? How are you? (formal)
¿Cómo estás? How are you? (informal)
Insert+4 for eacute in
¿Qué tal? How’s it going?
Bien / Muy bien Good / Very good
Insert+4 for acute in Más below
Mal / Muy mal / Más o menos Bad / Very bad / OK
Sí / No Yes / No
¿Cómo?
¿Cómo se llama usted? What is your name? (formal)
¿Cómo te llamas? What is your name? (informal)
Me llamo… / Mi nombre es… My name is…
Mucho gusto. / Encantado. Nice to meet you.
Immersion in Language
Here is the sequence of learning in order to learn any language well:
The time it takes to learn a new language, like Spanish, while living in a country where it is the only language spoken, depends on several factors. However, here are general timelines and considerations:
1. Immersion Benefits
Living in a Spanish-speaking country accelerates learning because you’re constantly exposed to the language in real-life situations like:
Listening: Conversations, TV, radio, and announcements.
Speaking: Daily interactions with locals, from shopping to asking for directions.
Reading and Writing: Street signs, menus, newspapers, and more.
2. Language Learning Proficiency Levels
The Common European Framework of Reference for Languages (CEFR) breaks language learning into six levels:
A1 (Beginner): Basic phrases and conversations (3–6 months).
A2 (Elementary): Can understand simple texts and conversations (6–12 months).
B1 (Intermediate): Hold conversations on familiar topics and function in everyday life (12–18 months).
B2 (Upper Intermediate): Fluent in most situations, including work and travel (18 months–2 years).
C1 (Advanced): Understand complex topics and engage in nuanced conversation (2–3 years).
C2 (Proficient): Full mastery of the language, similar to a native speaker (3+ years).
Factors that will Determine Speed
3. Factors That Affect Learning Speed
Motivation and Attitude: Strong motivation and a positive mindset can accelerate your progress.
Practice Consistency: Daily practice, speaking, listening, and reading in Spanish speeds up learning.
Prior Language Experience: If you’re already familiar with Romance languages (e.g., Italian or French), learning Spanish might be faster due to similarities in vocabulary and grammar.
Formal Education: Taking classes, whether in person or online, and using language apps like Duolingo or Babbel can help structure your learning and improve your skills more quickly.
Social Interaction: Making friends who are native speakers or joining local groups can enhance your conversational abilities.
4. Realistic Expectations
– For basic conversational fluency (A2-B1), expect about 6 months to 1 year of immersion if you’re dedicated and practicing regularly.
– To reach an advanced level (C1), you might need 2 to 3 years of living and interacting in the language full-time.
5. Cultural Immersion
Your understanding of Spanish will deepen faster if you immerse yourself in the local culture, customs, and idiomatic expressions. Engaging in local activities, reading newspapers, and watching TV shows will all help you learn the language more organically.
Summary:
On average, 6 months to 1 year of immersion in a Spanish-speaking country should allow you to gain conversational fluency, with full mastery taking about 2–3 years, depending on your dedication and resources.
Adult Learning Speed
Sequence of learning for an adult
For adults, learning a new language like Spanish while living in a country where it’s the only language spoken can still be highly effective, but several factors can influence the timeline. Here’s what an adult learner can expect:
1. General Time frames for Adult Learners
Conversational fluency (A2-B1 level): Typically achievable in 6 months to 1 year of immersion.
Advanced proficiency (B2-C1 level): May take 1.5 to 2.5 years of consistent use and practice.
Full fluency (C2 level): Can take 3 years or more, depending on factors like exposure, practice, and language complexity.
2. Factors Affecting Adult Learning Speed
Cognitive Flexibility: Adults tend to be more methodical learners than children, but they can sometimes struggle with retaining new vocabulary and adapting to different grammar structures.
Prior Experience: If the adult already speaks a Romance language (like Italian or French), they will likely learn Spanish more quickly because of the structural similarities.
Learning Environment: The more opportunities for immersion—such as interacting with native speakers, engaging in cultural activities, and using Spanish in daily tasks—the faster the progress.
Language Learning Methods: Adults often benefit from a combination of formal learning (e.g., classes, tutors) and informal learning (e.g., conversations, media consumption).
Motivation and Consistency: Adults with clear goals and regular practice (even just 30 minutes a day) tend to progress faster. Maintaining consistent practice is key to long-term retention.
Challenges for Adult Learners
3. Challenges for Adult Learners
Accent and Pronunciation: Adults might find it harder to develop a native-like accent, though this doesn’t prevent them from becoming highly fluent.
Work and Life Responsibilities: Adults often juggle work and personal responsibilities, which can limit the time available for focused language learning.
Grammar: Grasping grammatical structures, verb conjugations, and nuances may take longer for adults compared to younger learners, who tend to absorb new patterns more intuitively.
4. Accelerating Adult Learning
Use Daily Immersion: Engage in conversations, read signs, watch TV shows, and use apps like Duolingo or Babbel to reinforce lessons in real-life situations.
Structured Learning: Enroll in Spanish classes or hire a tutor to build a strong foundation in vocabulary and grammar.
Use Technology: Utilize language-learning apps, podcasts, or online lessons. Watching Spanish media with subtitles can help you pick up common phrases and pronunciation.
– Join Social Circles: Engage with locals, participate in group activities, and use Spanish in daily interactions. This practical experience will help reinforce what you’ve learned.
– Set Realistic Goals: Adults benefit from having clear, incremental goals (e.g., mastering a certain level of vocabulary or holding a 10-minute conversation) to track progress and stay motivated.
Adult Experience
5. Common Experiences for Adults
After 3-6 months, most adults can hold basic conversations, ask for directions, and manage daily interactions in Spanish.
By 1 year, many can discuss familiar topics, navigate most social situations, and understand much of what they hear or read.
Within 2 years, a dedicated adult learner can likely achieve strong conversational fluency and understand complex topics, though nuances and slang may still be challenging.
Summary
For an adult, achieving conversational fluency in Spanish typically takes 6 months to 1 year with immersion and regular practice. Advanced proficiency may take 1.5 to 2.5 years, while full fluency could require 3 years or more, depending on the learner’s background, motivation, and exposure to the language.
Dr. Robinson and her Team at TechVision have made a significant global impact via their Team Mission and Purpose. TechVision specializes in 1:1 remote instruction in education for the blind and visually impaired, serving individuals of all ages. We also train School Teams: transcribers, Teachers of the Blind and other School Personal and work with parents. Their expertise is delivered through personalized, real-time 1:1 remote instruction. This approach empowers students and clients to compete equally with their sighted peers in both education and work.
In this tutorial, Dr. Denise M. Robinson shows how to use JAWS with Braille Math and Word Math Editors. This video on UEB Math with JAWS empowers blind and visually impaired students and professionals. It provides tools and techniques to excel in mathematics. Set up WORD properly first, then continue.
UEB Math in Braille Math Editor
First, the tutorial introduces essential software and hardware. This includes JAWS, a Focus Braille Display, or NVDA and the necessary math editors. Dr. Robinson guides viewers through the setup process. She ensures all components are correctly configured for optimal performance.
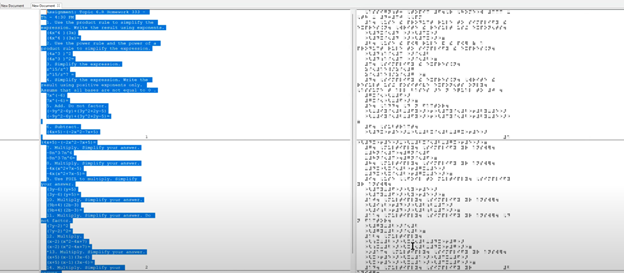
Next, the video explores the practical application of these tools. Viewers learn to input mathematical expressions using the Braille Math Editor. They navigate complex equations and use the split-braille-for-buffer mode to enhance workflow. Dr. Robinson offers clear, step-by-step instructions. This makes it easy for users to follow along and practice.
By the end of this tutorial, UEB math in braille math editor viewers understand how to use JAWS and Braille Math Editors efficiently. They can create, edit, and review UEB math content. This video is an invaluable resource. It helps enhance digital math literacy and achieve greater independence in academic or professional pursuits.
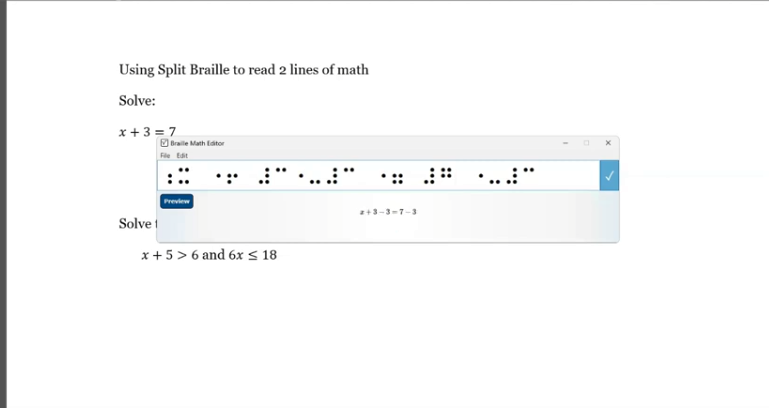
The new Split Braille™ for Buffer Mode in WORD for math is a feature in JAWS 2024. It offers powerful functionality for Braille display users. So, it allows viewing content from different locations on the same Braille line and a longer display is more advantageous to use. Complete Proper Word setup First, then continue.
Now let’s Enable Split Braille View-To enable a Split Braille view, press ALT+INSERT+V (or ALT+CAPS LOCK+V in Laptop layout) to open the Select Braille View dialog box. Focus Braille display users can press LEFT SHIFT+DOTS 1-2-7. In the dialog box, select your desired view and click OK. The active view remains for the current JAWS session and resets upon restarting JAWS.
Using Split Braille for Buffer Mode View in WORD for Math
By default, your current location appears in the left region, and the active view results appear in the right region. So, to swap these regions, reopen the Select Braille View dialog box and select the Swap split button mode. You can also change braille modes with a simple command
Navigating and Selecting Text
In most views, you can navigate and select text independently in the split region. Use the Right NAV rocker to pan and the Right Rocker bar to move by line. To select text for copying and pasting, press SHIFT button with a Cursor Router at the start and end of the selection. Dots 7 and 8 indicate the selection, which is automatically copied to the clipboard.
Commands for HumanWare Displays
For the Brailliant BI 40 series and Mantis Q40 displays:
Open Select Braille View dialog: Fourth Thumb Key+C1+C2+C3+C6 (or ALT+CAPS LOCK+V on Mantis Q40).
Toggle Buffered Text mode: C1+C2+C3 (not on Mantis Q40).
Pan split view region: Third and Fourth Thumb Keys.
Navigate by line: C6+Third and Fourth Thumb Keys (not on Mantis Q40).
Select text: First Thumb Key + Cursor Router.
For newer HumanWare displays:
Open Select Braille View dialog: K1 + pan Easy Access Bar right.
Swap regions: K1 + pan Easy Access Bar left.
Pan split view region: K4 + pan Easy Access Bar right/left.
Navigate by line: K4 + pan Easy Access Bar up/down.
Available Views
No Split View Mode: Uses the full display length for the current line (default).
Buffered Text: Captures text at your current location and displays it in the right half.
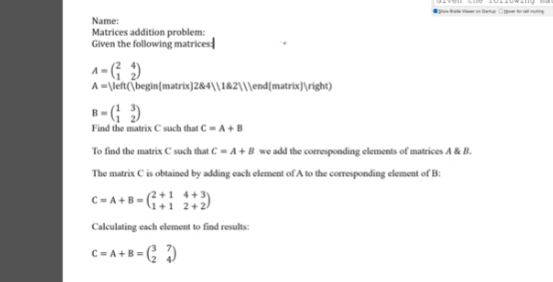
In this video, Dr. Denise M. Robinson demonstrates how to use the WORD Math Editor and Braille Math Editor with JAWS using LaTeX or Braille. This tutorial is designed for screen reader users, with or without braille displays, who want to improve their math skills.
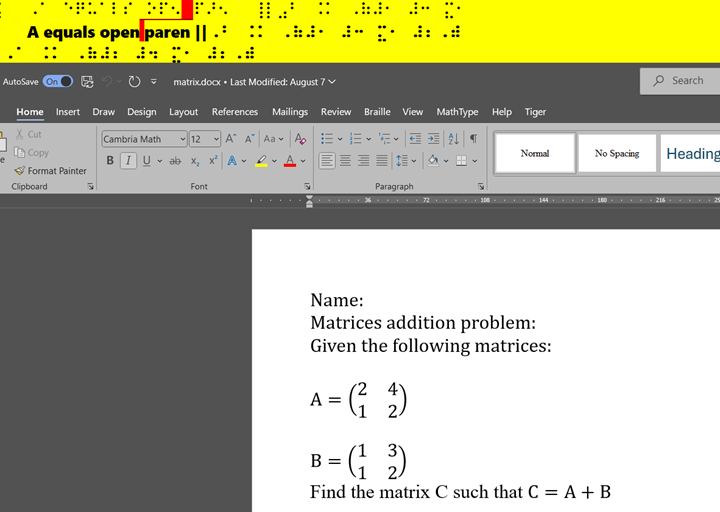
First, Dr. Robinson introduces the essential tools for using matrices in WORD, including JAWS, a Braille display (if desired), and the WORD Math Editor. She explains how to set up each tool to work together smoothly, which is crucial for creating and editing math content.
Next, the video focuses on creating matrices. Dr. Robinson uses LaTeX to input mathematical expressions. She explains each step clearly, making it easy to follow along. Viewers will learn how to enter rows and columns in a matrix, helping them understand matrix structure.
Then, Dr. Robinson demonstrates how to use auditory feedback, which allows users to hear the math content they are working on. This feature helps ensure accuracy and makes it easier to catch mistakes. Additionally, she shows how to switch between auditory and Braille feedback, providing flexibility for different learning styles.
The video also covers using the Braille display with the math editors. Dr. Robinson explains how to navigate through the matrix using Braille and provides tips on reading and editing the content efficiently. This section is particularly helpful for users who rely on Braille for their work.
Finally, the tutorial concludes with a review of the key points. Dr. Robinson summarizes the steps for creating and editing matrices. She encourages viewers to practice using the tools and techniques demonstrated in the video. By the end of the tutorial, users will feel more confident in their ability to work with math content.
In this video, Dr. Denise M. Robinson demonstrates how to use the WORD Math Editor and Braille Math Editor with UEB and NVDA. The tutorial, focused on Digital Math with UEB, is specifically designed for screen reader users, with or without braille displays, who want to improve their math skills.
First, Dr. Robinson introduces the essential tools needed for using matrices in WORD using UEB Math. These include NVDA though Jaws can be used, a Braille display (if desired), and the WORD Math Editor. She carefully explains how to set up each tool to work seamlessly together. This setup is crucial for creating and editing math content efficiently.
Next, Dr. Robinson focuses on creating matrices using LaTeX. She walks viewers through each step, making it easy to follow along. The video shows how to enter rows and columns in a matrix, helping users understand the structure of matrices. Dr. Robinson’s clear explanations ensure that even complex steps are understandable.
The video then demonstrates how to use auditory feedback with the math editors. Dr. Robinson shows how users can hear the math content they are working on. This feature helps in catching mistakes and ensuring accuracy. Additionally, she explains how to switch between auditory and Braille feedback. This flexibility is particularly useful for different learning styles and preferences.
Dr. Robinson also covers how to navigate through the matrix using a Braille display if desired. She offers practical tips on reading and editing the content efficiently. This section is especially beneficial for those who rely on Braille for their work.
Finally, the video concludes with a summary of the key points of working in WORD using UEB Math. Dr. Robinson encourages viewers to practice the tools and techniques demonstrated in the video. By the end, users will feel more confident in their ability to create and edit math content using JAWS and the WORD Math Editor
Access the table and links with screen reader with navigation commands
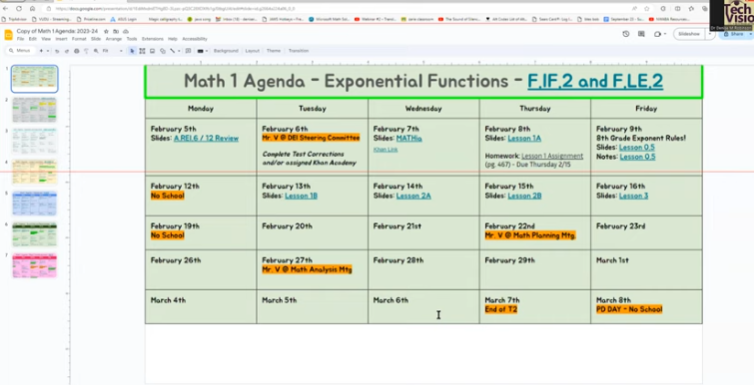
Accessing tables and links in Google Slides with a screen reader is straightforward though at times seems inaccessible. First, ensure screen reader support is enabled. To do this, press Ctrl + Alt + Z. This command activates screen reader support in Google Slides and for more google videos, open link.
Next, to access the table and links with screen reader with navigation commands, navigate to the table. Use the arrow keys to move through the slides. When you reach the desired slide, press Alt + / to open the search menu. Type “insert table” and press Enter. This action inserts a table into your slide, making use of Google Slides navigation commands.
Table in Google Docs
To navigate the table:
Use the arrow keys. Each cell is read aloud by the screen reader. To move to the next cell, press the Right Arrow key. To move to the previous cell, press the Left Arrow key. Similarly, use the Up and Down Arrow keys to navigate vertically.
Also, accessing links in the table and links with screen reader with navigation commands is also simple. Navigate to the slide containing the link. Press Tab to move through the interactive elements. When the screen reader announces the link, press Enter to activate it. Ensure you are familiar with Google Slides navigation commands to make this process easier.
For more efficient navigation, use the screen reader’s navigation commands. For example, press Ctrl + F to search for specific text. This command helps locate links or table elements quickly. Understanding Google Slides navigation commands can significantly enhance your experience.
Additionally, you can use headings to organize your slides. Press Ctrl + Alt + 1 to apply a heading. This action helps the screen reader identify sections, making navigation easier.
Using a screen reader with Google Slides enhances accessibility. Make sure you learn the new commands for Google. By following these steps, visually impaired users can efficiently access tables and links. This integration ensures an inclusive and productive experience. For more: Access Videos Here. Utilizing Google Slides navigation commands enhances accessibility and productivity.
To emboss math with braille blaster content from Microsoft Word, start by creating equations in the Math Editor. This tool helps you write complex mathematical expressions clearly. Once you finish, save the document in a .DOCX format, which is compatible with Braille Blaster and other embossing software.
Next, open Braille Blaster and import your Word document. The software automatically converts your math content into Nemeth code, the Braille standard for mathematics. This conversion ensures visually impaired readers can understand the material. Moreover, Braille Blaster allows quick switching between Unified English Braille (UEB) and Nemeth codes, offering flexibility based on the user’s needs.
After conversion, to emboss math with Braille Blaster, send the document directly to a Braille embosser. This machine prints the digital Braille content as physical Braille that can be read by touch. Transitioning from digital to physical Braille is quick and efficient with this process.
Furthermore, this workflow supports various mathematical formats, making it versatile for different educational levels. For instance, whether you’re working on basic arithmetic or advanced calculus, the combination of Word and Braille Blaster handles it smoothly. This versatility is crucial in educational environments where diverse math content is necessary.
Advanced Features
Educators can also take advantage of Braille Blaster’s advanced features, such as the ability to preview the Braille output before embossing. This step allows for checking accuracy and making any necessary adjustments. It’s particularly useful when dealing with intricate math equations that require precise formatting. If you would like to combine this with a graph, Desmos is your key with Tiger software.
Moreover, the ability to seamlessly switch between UEB and Nemeth within the same document saves time and ensures consistency across educational materials. This dual-mode capability is essential for creating comprehensive resources that cater to different learning needs.
Using Word’s Math Editor, Braille Blaster, and a Braille embosser not only streamlines the creation of accessible math materials but also enhances the educational experience for visually impaired students. This efficient process ensures that high-quality Braille math content is readily available, supporting inclusive education and empowering students to succeed in their studies. By implementing this workflow, educators can deliver timely, accurate, and accessible learning materials that meet the diverse needs of all students. Here are options if you would like to use NVDA for Math. And to take any math 1 step further in creating graphics, Tiger and graphic embosser will take you there.
To emboss graphs and insert them into math work, start by using the Desmos graphing calculator. Desmos offers an intuitive platform for creating precise graphs, making it ideal for educational settings. Begin by plotting the necessary mathematical functions or data points on Desmos. The calculator’s user-friendly interface allows for easy manipulation and customization of graphs, ensuring they meet your exact needs.
After creating the graph, export it as an image. Desmos provides options to download the graph in various formats, such as PNG. Once downloaded, you can insert this image into your math document. Whether you’re using Microsoft Word, Google Docs, or another word processor, simply embed the graph as an image. This step integrates the visual data directly into your math work, making it more comprehensive for both teachers and students.
Next, prepare the document for embossing. If you’re working with visually impaired students, use software like Braille Blaster to convert the document into Braille. While the text content will convert directly, the graph requires special handling. This is where embossing comes in. By using an embosser, you can transform the visual graph into a tactile format that students can feel and understand.
Furthermore, this workflow ensures that math assignments are accessible to all students, regardless of visual ability. Teachers can also annotate the graphs before embossing, adding labels or descriptions to enhance understanding. This process not only aids in teaching but also reinforces the student’s learning experience.
The combination of Desmos for graph creation and embossing for tactile output makes for a powerful educational tool. It bridges the gap between visual and tactile learning, providing an inclusive approach to math education. By following these steps, educators can effectively integrate graphs into math work, ensuring that all students have the tools they need to succeed.
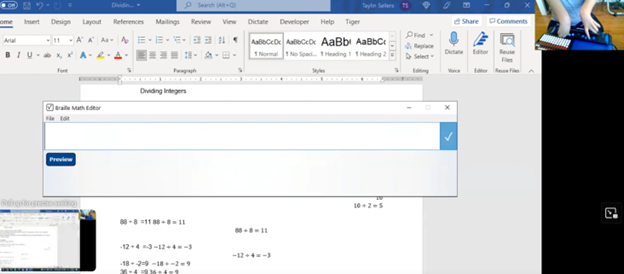
In this video, Dr. Denise Robinson guides Tay in proper Braille Math Editor Mode on her FOCUS Display. The session begins with Dr. Robinson reminding Tay how to change the computer’s mode to “contracted out/computer in.” This change ensures proper Braille math output, which simplifies the process and reduces errors.
Dr. Robinson then encourages Tay to use the Braille Math Editor with confidence, using her 2 knuckles on her right hand and 1 pointer finger on her left hand. She goes onto explain that the chosen mode automatically handles many aspects of math input. This approach allows Tay to focus more effectively on solving problems.
Next, Tay is guided through various math problems, including division and multiplication. Dr. Robinson carefully ensures that Tay understands how to input problems correctly into the Braille Math Editor. For division tasks, she provides clear instructions on entering Braille codes and following the correct sequences.
Furthermore, Dr. Robinson emphasizes the importance of memorizing math facts. She highlights how strong basic math skills can significantly improve accuracy and speed. Through consistent practice and repetition, Tay begins to reinforce these essential concepts.
As the session continues, Tay receives positive reinforcement, which helps her gain confidence. With each task, Tay requires fewer prompts, showing her growing independence in handling math problems.
Finally, Dr. Robinson concludes by praising Tay’s progress. She expresses confidence in Tay’s continued improvement and emphasizes that ongoing practice will help Tay master essential math skills. Dr. Robinson also reassures Tay that she will become more comfortable using the Braille Math Editor with time.
Overall, this session reflects Dr. Robinson’s commitment to fostering independence and competence in her students using proper Braille Math Editor Mode. She ensures they have the necessary tools and confidence to succeed academically. This methodical approach helps students like Tay build a strong foundation for future learning and problem-solving. To further learning, Embossing math using Braille Blaster or graphics using Tiger will always increase understanding of math in general.