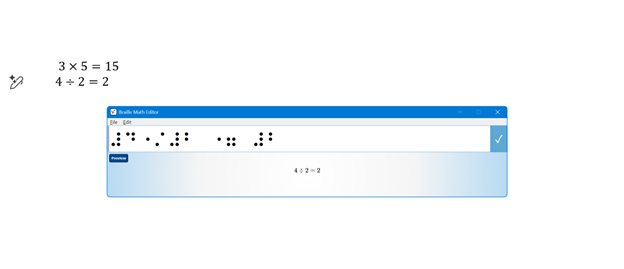
JAWS UEB MATHS/Nemeth Settings-Word and Braille Math Editor
If you’ve ever struggled to get JAWS to read math correctly on your computer, this walk-through will make your life much easier. In this video, I demonstrate how to set JAWS for either UEB Maths or Nemeth math using the JAWS UEB/Nemeth Settings, then show you how to create accessible math using Word’s Math Editor and the Braille Math Editor. Whether you’re a TVI (Teacher of the Blind), a student, or an AT (Access Technology) specialist, these steps will help you produce clear, accurate, and accessible math every time.
WORD MATH EDITOR Setup
1. Open the Math Editor
Alt + =
2. Open the Equation Tools tab
Alt + J, E
3. Open Math Options (Settings)
T, 1 (This opens the Math Options dialog.)
4. Set Alignment to Left Inside the Math Options dialog:
Alt + J → moves to Justification
L → Left alignment
Alt + D → Set as Default
Tab, Tab → to OK
Enter
When asked to save as default, choose Yes (This saves the settings to the Normal template.)
5. Check Conversion (if math looks wrong)
While inside a math zone:
Alt + =
Alt + J, E
C → Convert
Make sure it is set to Professional
WORD MATH EDITOR — Command Sequence (JAWS + Keyboard)
Open the Math Editor
Press Alt + = This inserts a new math zone and opens the Word Math Editor.
Move in and out of the math zone
Right Arrow → move into the math zone
Right Arrow again → move through elements
Left Arrow → move backward
Esc → exit the math zone and return to normal text
Insert common structures
Fraction → Ctrl + /
Exponent → Ctrl + Shift + =
Subscript → Ctrl + =
Square root → type \sqrt then press Space
Matrix → type \matrix then press Space
Parentheses → type ( then ) (Word auto‑sizes them)
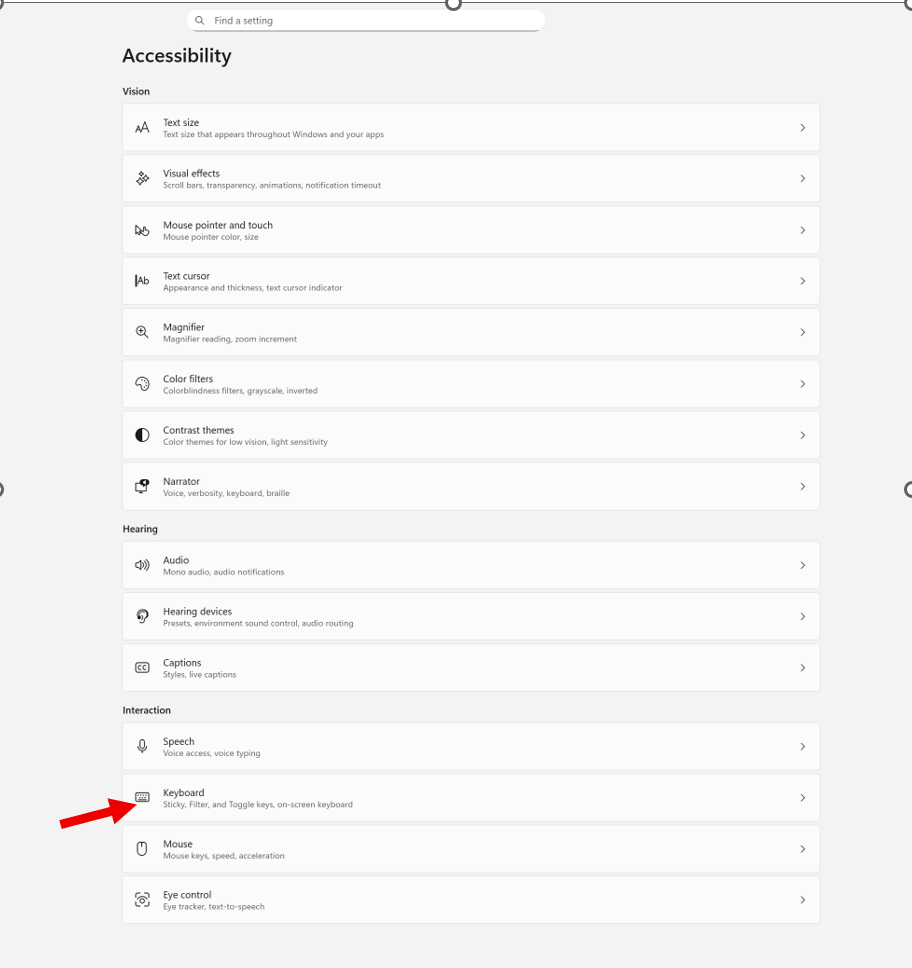
Windows + I to settings and find Accessibility on the far left column and open then open keyboard. If you want to stop annoying ding sounds on Windows, the following steps will help you do that.
If your computer keeps chiming, dinging, or beeping at the worst possible moments, or when you press a particular key, you can silence or customize every system sound in just a few steps.
How to check whether Filter Keys or Toggle Keys are turned on
How to turn them off if you don’t need them
How to adjust them properly if you do use them
How to prevent Windows from enabling them by mistake
How to silence or customize the sounds they make
Commands & Navigation Steps
Open Windows Accessibility Settings (Keyboard Section)
Windows + I → opens Settings
down arrow to Accessibility, press Enter, then tab down to Keyboard
or press windows (start menu) or using keyboard type Accessibility in the search box
Check all these Features
Turn Sticky Keys, Filter Keys, or Toggle Keys On/Off
Tab to the setting you want
Press Space bar to toggle it on or off
Hear What Toggle Keys Sounds Like
Turn on Toggle Keys → Windows plays a beep when pressing Caps Lock, Num Lock, or Scroll Lock
Turn it off again → sound stops immediately
Notification Preferences for Accessibility Keys
Windows will play a sound when:
Sticky Keys is turned on
Filter Keys is turned on
Toggle Keys is turned on
This helps you know when you’ve activated something by accident.
On‑Screen Keyboard (for mouse users or one‑handed typing)
Turn on On‑screen keyboard in the Keyboard settings
Click keys with your mouse if typing is difficult
Underline Access Keys
Turn on Underline access keys
This shows keyboard shortcuts even when you’re not holding Alt
Print Screen Behavior (Updated in Windows 11)
While you are here adjust Print Screen
Arrow to Print Screen and enter → opens the Snipping Tool options at the top of the screen
Screen reader users:
Tab through options
Go to the last one
Press Spacebar, then Down Arrow to choose screenshot type-then you have options
When you cannot do something: Take a Screenshot & Send It to your help person
Take screenshot- which literally is copy
Press Ctrl + V to paste into an email
Send to your tech instructor or support person
Whether you’re troubleshooting your own device or helping someone else, this quick fix will bring instant peace and quiet — and give you full control over your keyboard behavior.
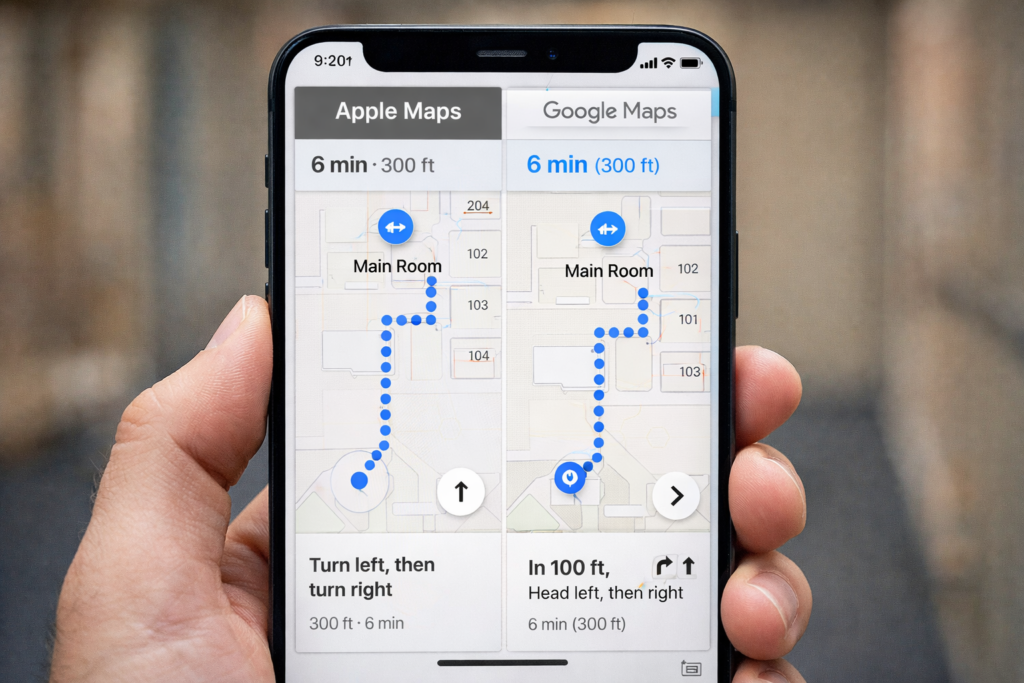
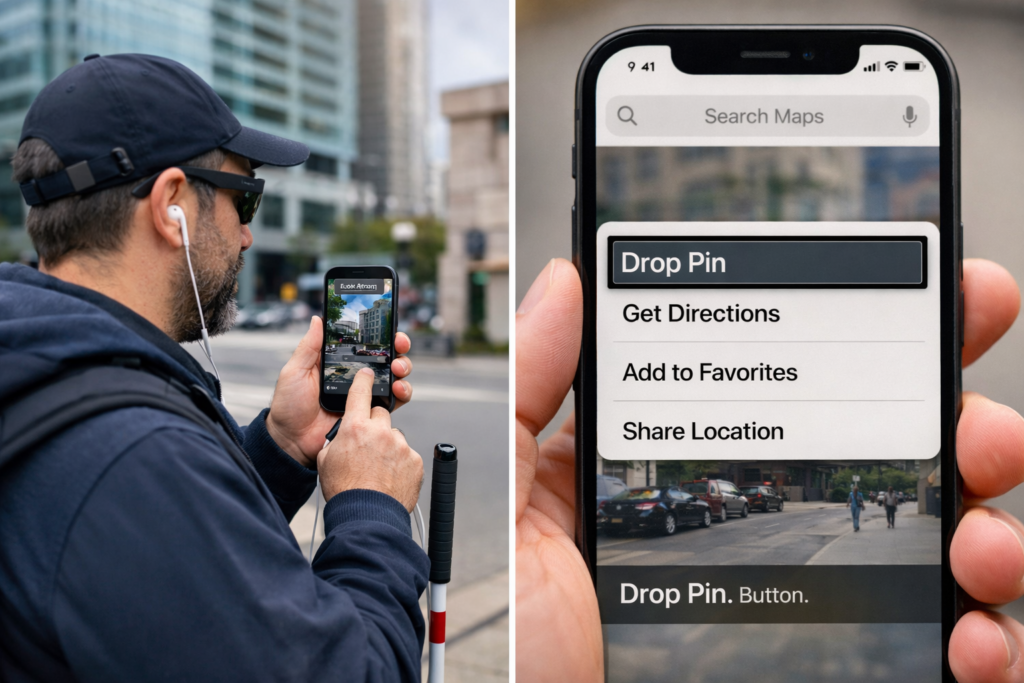
Drop a Pin with iPhone using Google Maps and Voice Over to share location with someone to come pick you up
Blind travelers build custom indoor and outdoor routes using Siri, Apple Maps, Google Maps, VoiceOver gestures, and the Compass app. These tools work together and create a reliable navigation system. Each step supports confidence and helps travelers move safely through any building or surrounding area.
Google Maps remains helpful outdoors. Apple Maps remains best for dropping labeled pins and using Siri for fast navigation.
Part 1 — Drop a Pin Using Siri and VoiceOver (Apple Maps)
Dropping labeled pins works best in Apple Maps, because Siri supports pin creation and VoiceOver announces label options clearly.
A. Drop a Pin at the Starting Location
Say, “Hey Siri, open Apple Maps.”
Wait until VoiceOver announces “Current Location.”
Flick right until you hear “Drop Pin.”
Perform a double-tap and hold to drop the pin.
Flick right to “Add Label.”
Double-tap.
Dictate a label such as “Main Room.”
Flick right to “Done.”
Double-tap to save.
B. Drop a Pin at the Next Location
Repeat the process at any hallway, office, bathroom, or exit.
Say, “Hey Siri, open Apple Maps.”
Flick to “Drop Pin.”
Double-tap and hold.
Flick to “Add Label.”
Double-tap.
Dictate “Bathroom.”
Flick to “Done.”
Double-tap.
Part 2 — Navigate Between Custom Pins (Apple Maps + Google Maps)
Siri provides indoor headings and distance even when indoor maps do not exist. Google Maps adds strong outdoor accuracy when needed.
A. Navigate to the Main Room (Apple Maps)
Say, “Siri, walking directions to Main Room.”
VoiceOver reads distance and direction.
B. Navigate to the Bathroom (Apple Maps)
Say, “Siri, walking directions to Bathroom.”
Follow hall cues and maintain alignment.
C. Use Google Maps When Outdoors
Say: “Hey Siri, open Google Maps.”
Use VoiceOver to choose Walking.
Follow turn-by-turn directions with outdoor accuracy.
Google Maps excels outdoors. Apple Maps excels for labeled pins indoors.
Part 3 — Teach Compass Skills for Indoor Orientation
A. Open Compass
Say, “Hey Siri, open Compass.”
VoiceOver reads the heading.
B. Teach Basic Directions
North equals 0 degrees.
East equals 90 degrees.
South equals 180 degrees.
West equals 270 degrees.
C. Practice Turning
Face forward.
Listen to the heading.
Turn left or right.
Listen as VoiceOver updates the heading.
D. Connect Compass to Pins
Say, “Siri, walking directions to Bathroom.”
Listen for cues like “Head west.”
Match the heading in Compass.
Walk in that direction.
Part 4 — Build Route Memory Using O&M Skills
A. Notice Landmarks
Teach the traveler to notice:
Floor textures
Temperature changes
Echo patterns
Doorframes
Rails
Open spaces
B. Teach Step Counting
Start at the first labeled pin.
Count steps to the next point.
Stop at each turn.
Record distances.
C. Teach Repetition
Practice with guidance.
Practice with shadowing.
Practice with verbal prompts.
D. Teach Reverse Routing
Walk the route backward using opposite turns.
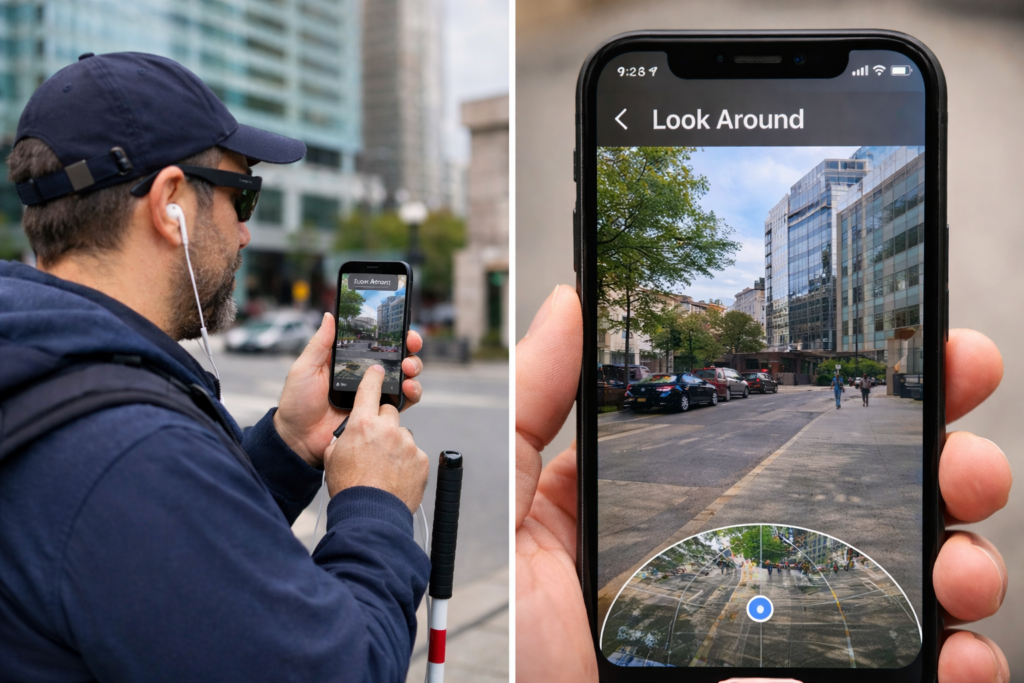
Using Look around app on iPhone to “see” what is around the traveler
Part 5 — Use Look Around with Apple Maps
Look Around helps travelers understand the outside of a building.
A. When Look Around Works
On public streets
At building entrances
Around sidewalks and driveways
B. Open Look Around
Say, “Hey Siri, open Apple Maps.”
Search for the building.
Flick until VoiceOver says “Look Around available.”
Double-tap to open it.
C. What Look Around Teaches
Street layout
Sidewalk positions
Entrance locations
D. What Look Around Cannot Do
No hallways
No interior rooms
No indoor turn-by-turn directions
Create Custom Routes
Part 6 — A Complete Custom Route Routine
Use Look Around outside to understand the area.
Drop labeled pins at important indoor locations.
Use Siri for walking directions to any saved pin.
Use Compass to match the required heading.
Use Google Maps for outdoor paths when needed.
Build step counts and turns for each route.
Use landmarks for confirmation.
Practice until the traveler moves independently.
Share Location, Get Directions, Add to Favorites and more using Google Maps, Voice Over and Siri
Part 7 — Share Your Location Quickly for Pickup or Safety
Blind people often need to share their exact location so family, friends, or rides can find them. Siri and VoiceOver make this process fast and hands-free.
This skill works indoors and outdoors. It also works when someone feels unsafe, confused, or needs help immediately.
A. Share Your Location with Siri (Fastest Method)
Say: “Hey Siri, share my location with Mom.” (Replace “Mom” with any trusted contact.)
Siri sends your exact GPS location.
VoiceOver confirms: “Sent your current location.”
This method works even when you cannot identify where you are.
B. Share Your Location in Messages (Manual Method)
Say: “Hey Siri, open Messages.”
Touch the center of the screen.
Flick right until you hear the contact’s name.
Double-tap to open the conversation.
Flick right until you hear “Send My Current Location.”
Double-tap to send it.
VoiceOver confirms the message.
This method helps when someone prefers not to dictate aloud.
C. Share Your Location Permanently With a Trusted Contact
This helps a helper monitor travel when needed.
Say: “Hey Siri, open Messages.”
Open the trusted contact’s conversation.
Flick to “Details” or “Info.”
Double-tap.
Flick to “Share My Location.”
Double-tap.
Flick to “Share Indefinitely.”
Double-tap to activate.
The trusted person can now find your location anytime you share it.
D. When Lost
Stop walking.
Hold the phone in both hands.
Face a quiet direction.
Say: “Hey Siri, share my location with Mom,” or person.
Wait for VoiceOver to confirm.
Stay in place until person arrives.
E. Combine Location Sharing With Dropped Pins
You can do both:
Drop a pin at the pickup point.
Label it with VoiceOver.
Share their location with Siri so the pickup person receives the exact spot.
Use Compass to stay oriented until they arrive.
This gives the safest and most accurate pickup routine.
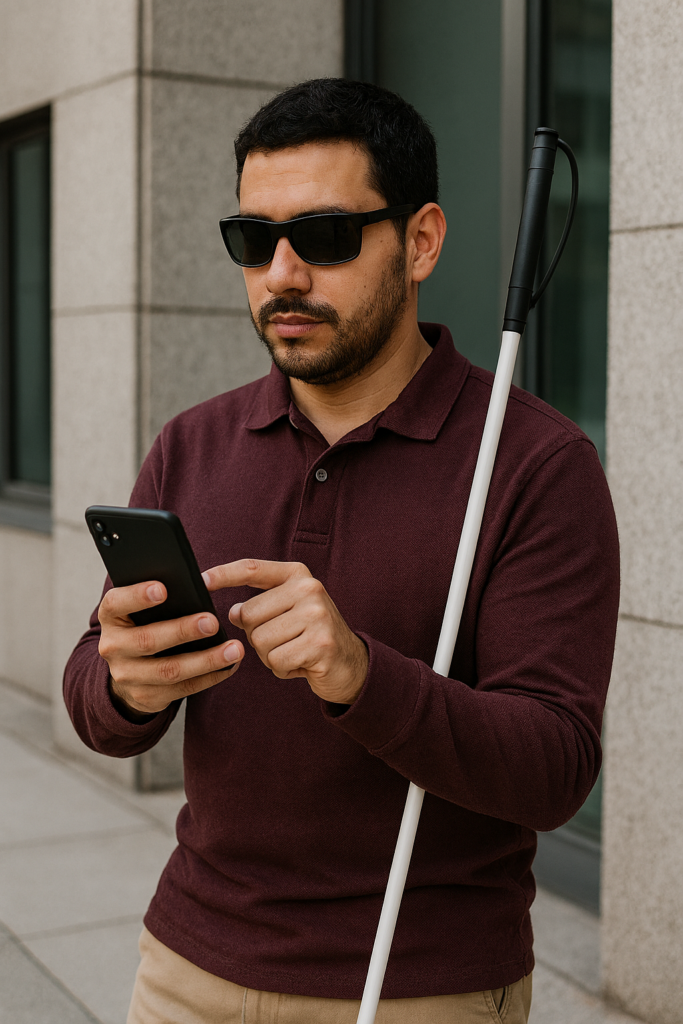
How Blind People Drop a Pin to Share: A blind man waits outside a building with his long white cane leaning against his shoulder while he taps his phone to share his location.
Share Your Location Using Siri and VoiceOver
Blind people can stay safer and more independent by learning how to share their location quickly using Siri and VoiceOver. If you want to know how blind people drop a pin to share location, the iPhone offers simple tools that allow blind users to contact trusted people, send their exact location, and request help with only a few commands. These steps explain how to set up location sharing, how to flick and navigate with VoiceOver, and how to share your location anytime support is needed.
Step 1: Add a Trusted Contact
A trusted contact can be a parent, partner, caregiver, or friend.
Open Contacts
Say, “Hey Siri, open Contacts.”
Add the contact
Touch the middle of the screen to find the list.
Flick right until VoiceOver says “Add Contact.”
Double-tap to open it.
Enter the person’s name.
Flick right to the phone number field.
Double-tap and enter the number.
Flick right until you hear “Done.”
Double-tap to save.
This contact becomes the person you can share your location with anytime.
Step 2: How Blind People Drop a Pin to Share and Turn On ‘Share My Location’
Location sharing must be activated before Siri can send your location.
Open Settings
Say, “Hey Siri, open Settings.”
Open your Apple ID
Touch the top of the screen.
VoiceOver speaks the user’s name.
Double-tap.
Open Find My
Flick right slowly until you hear “Find My.”
Double-tap to open it.
Enable location sharing
Flick right until you hear “Share My Location.”
Double-tap to turn it on.
Your iPhone can now send your live location when requested.
Step 3: How blind peopleShare Location With a Trusted Person Permanently
Open Messages
Say, “Hey Siri, open Messages.”
Open the trusted person’s conversation
Touch the center of the screen.
Flick right until you hear their name.
Double-tap.
Open contact details
Touch the upper right corner.
Flick right until VoiceOver says “Info” or “Details.”
Double-tap.
Share permanently
Flick right until you hear “Share My Location.”
Double-tap.
Flick right to “Share Indefinitely.”
Double-tap.
Your trusted person now sees your location anytime you choose to share it.
Step 4: How Blind People Drop a Pin toShare Your Location Quickly Using Siri
This is the fastest and safest method.
Say: “Hey Siri, share my location with Mom.” (or the name of your trusted contact)
Siri sends your exact GPS location through Messages. VoiceOver confirms the action.
This works indoors and outdoors.
Step 5: Share Your Location Manually in Messages
Open Messages
Say, “Open Messages.”
Send location
Open the trusted person’s conversation.
Flick right until you hear “Send My Current Location.”
Double-tap.
VoiceOver confirms the message.
This is helpful when you prefer not to dictate aloud.
Step 6: When Blind People Should Share Their Location
Location sharing helps when you:
Feel lost
Feel unsafe
Need help quickly
Need a ride
Experience a sudden change in plans
Want a trusted person to monitor your travel safely
This step protects blind travelers and supports independence in public places.
Step 7: A Simple Safety Script to Teach
Blind users can use this script anytime they need help:
Stop walking.
Hold your phone securely.
Face a quiet direction.
Say, “Hey Siri, share my location with Mom.”
Wait for VoiceOver to confirm.
Stay where you are until help arrives.
This gives blind travelers control during stressful or uncertain situations.
Why This Skill Matter
Location sharing supports blind people in daily travel. It strengthens communication and confidence. – helps families and caregivers respond quickly in emergencies. It enhances safety without reducing independence. – empowers blind users to manage real-world travel with greater security.
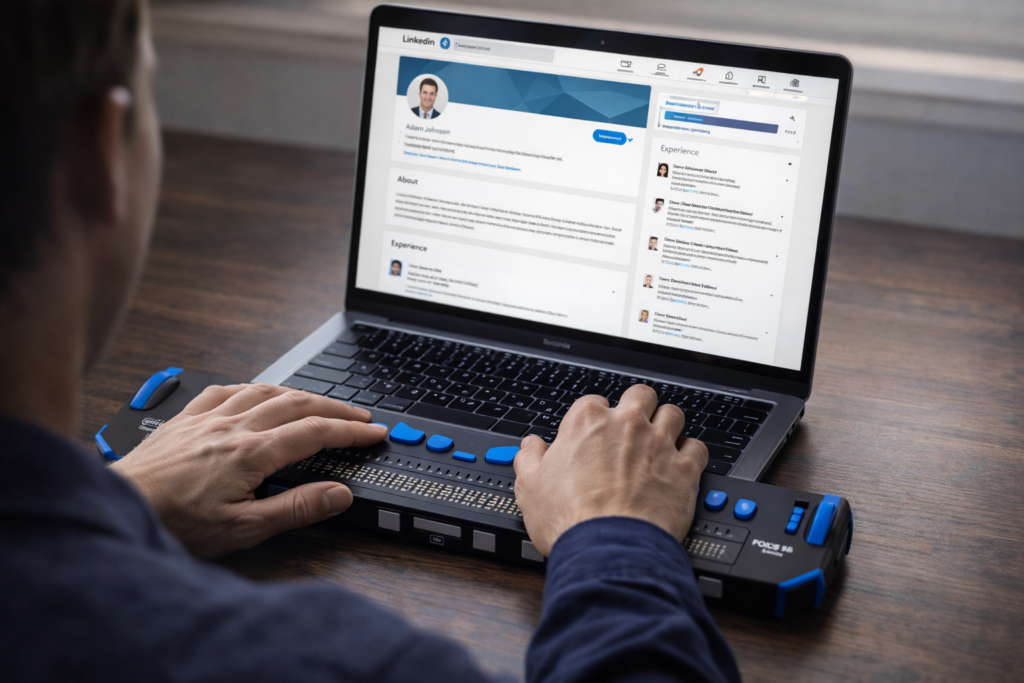
Person navigating LinkedIn with JAWS commands using braille display and screen reader
Navigating LinkedIn with JAWS commands or any screen reader doesn’t have to be overwhelming. With the right JAWS commands, blind and visually impaired professionals can confidently connect, network, apply for jobs, and build a strong online presence. This guide walks you through the essential JAWS shortcuts and navigation strategies that make LinkedIn fully accessible — whether you’re a student preparing for your first job search, a professional expanding your network, or an educator supporting blind learners. TechVision is committed to empowering every user with the tools they need for independence, confidence, and success online.
Keyboard shortcuts for LinkedIn with Jaws
Use LinkedIn with JAWS commands to move quickly through the interface. Press Ctrl+Home, then Tab through the first three items until you reach the options you want. Press Enter to open the shortcut menu and enable quick‑navigation features on the page. These are essential LinkedIn with JAWS commands for efficient navigation
Change your cursor insert z on or off based on what you need to do
To read every line insert z on and insert ; on then down arrow
Can’t Log in, forgot password: Computer showing errors
Forgotten Passwords & Login Problems
When you can’t log in — whether you forgot your password, never received the code, or your computer refuses to move past the first screen — everything stops. The frustration hits instantly, and it happens to everyone. The good news is that most login problems have simple, safe fixes. This guide walks you through the most effective steps to get back into your accounts, clean up the issues that cause login failures, and set up your devices so you don’t get locked out again — or at least know exactly what to do when a computer update suddenly changes your options. Keep that in mind: the problem may not be you. Sometimes an update quietly shifts the settings behind the scenes, and you just need to adjust to the new way your computer handles logins.
Forgotten Passwords & Login Problems: A Clear, Safe Guide to Getting Back In
People search for this more than almost any other tech issue. You are in Good company. Here’s a simple, accessible guide to help you get back into your accounts — and prevent future lockouts.
Start Easy: Hard Refresh the Page (Ctrl + Shift + R) on a PC and Command + Shift+ R on a Mac
1️.Locked Out of an Account? Start Here
Common symptoms
Password suddenly not working
Reset link not arriving
Multi‑factor authentication (MFA) asking for a code you can’t access
Endless login loops
These problems usually come from:
Browser cache issues
Old passwords stored in auto-fill
Conflicting authentication methods
Out‑of‑date recovery information
2️. Clear Your Browser Cache (This Fixes 50% of Login Problems)
Chrome
Press Ctrl + Shift + Delete
Choose Cached images and files
Click Clear data
Edge
Press Ctrl + Shift + Delete
Select Cached images and files
Click Clear now
Firefox
Press Ctrl + Shift + Delete
Select Cache
Click Clear
This removes corrupted login data and forces the site to load fresh.
Also Check Your Saved Passwords (Old Ones Cause Login Failures Too-delete them!)
After you clear your cache, take one more quick step: open your browser’s saved passwords and delete the outdated ones. Old passwords often override the new ones you type, which creates endless login loops.
Chrome
Press Alt + E to open the menu
Press S to jump to Settings
Select Auto-fill and Passwords
Open Google Password Manager
Search for the site you’re trying to log into
Delete any old or duplicate passwords
Edge
Press Alt + F to open the menu
Press S for Settings
Select Profiles
Choose Passwords
Search for the website
Delete outdated or incorrect entries
Firefox
Select Settings
Choose Privacy & Security
Scroll to Logins and Passwords
Open Saved Logins
Remove old or incorrect passwords
Why this matters
Browsers love to “help” by auto-filling passwords — even when they’re wrong. When you delete the old ones:
Your new password works correctly
The login screen stops looping
The reset process finally sticks
You avoid the “I know I typed it right!” frustration
3️. When You Set Up a Password — ALWAYS Connect It to Your Phone
This is the single most important step for preventing lockouts.
Set up the same password manager on your computer to pair with phone
Why?
Your phone becomes your identity key. If you forget your password, the system can verify you instantly.
You can also quickly go into your password manager and look up the password you need for any site on your computer.
Set Up the Same Password Manager on Your Phone and Computer
Using the same password manager on both devices keeps everything synced. When you update a password on your phone, it instantly updates on your computer — and that prevents almost every future lockout. And remember, you don’t have to use the password manager every time you log in. As you create accounts, save your usernames and passwords in your browser so you can keep logging in the same easy way you always have. The password manager simply becomes your reliable backup when something goes wrong.
Below are simple, universal steps that work for any major password manager (Microsoft Authenticator, Bitwarden, 1Password, etc.).
Step 1: Install the Password Manager on Your Phone
Open the App Store (iPhone) or Google Play Store (Android).
Search for your chosen password manager.
Tap Install.
Open the app and sign in or create an account.
Turn on sync if the app asks (most do automatically).
Your phone now becomes your secure “master key.”
Step 2: Install the Same Password Manager on Your Computer
Open your browser
Go to the password manager’s official website.
Download the desktop app or browser extension.
Sign in with the same account you used on your phone.
This pairs your computer and phone instantly.
Step 3: Turn On Sync Between Device
Most password managers sync automatically, but here’s how to confirm:
Open the password manager on your phone.
Go to Settings.
Look for Sync, Cloud Sync, or Account Sync.
Make sure it’s turned ON.
Now every password you save on one device appears on the other.
Step 4: Import or Save Your Password
You can now:
Save new passwords directly into the manager
Import passwords from your browser
Update old passwords and let the manager store them–This ensures you never rely on outdated browser auto-fill again.
Step 5: Choose How you want to Log in: Password Manager or From Browser
Option A: Keep using your browser’s saved passwords
This is the fastest way to log in day‑to‑day. Your browser auto-fills your username and password, and you move on with your work.
Option B: Use the password manager when needed
If something breaks —
a password doesn’t work
a browser update wipes your autofill
a site forces a reset — you can open your password manager and instantly look up the correct username and password.
This is the key detail: Your password manager acts as your backup vault, so you never lose access even if your browser forgets or changes something.
Why This Matters
When your phone and computer share the same password manager:
You always have the correct password stored somewhere safe
You can keep using your browser for fast logins
You avoid lockouts caused by old autofill entries
You stay in control even when updates change things
It’s the perfect balance of speed and security.
4️.Choose ONE Authentication Method (Not All of Them)
Using multiple authenticators confuses systems and causes login loops.
Here are the three main types, with simple visuals you can describe to your audience:
🔵 Option 1: Text Message (SMS)
Visual: A phone with a speech bubble containing a 6‑digit code. Best for: Beginners Pros: Easy, no app needed Cons: Not as secure as app‑based codes
🟢 Option 2: Authenticator App (Microsoft Authenticator, Google Authenticator, Duo)
Visual: A shield icon with a rotating 6‑digit code. Best for: Most users Pros: Fast, secure, works offline Cons: Must be installed on your phone
🟣 Option 3: Email Verification
Visual: An envelope with a key inside. Best for: People who check email constantly Pros: Simple Cons: Slow, sometimes goes to spam
5️. Windows Login Problems: Safe Steps You Can Do
Sometimes Windows won’t let you log in because of:
A stuck update
A corrupted profile
A password mismatch
A login option that’s blocking access (PIN, fingerprint, picture password)
Use SHIFT + RESTART to Access Windows Recovery Options
This is the only safe, built‑in way to reach troubleshooting tools.
Steps
On the login screen, click the Power icon (bottom right).
Hold SHIFT on your keyboard.
While holding SHIFT, click Restart.
Windows will open the Advanced Startup Menu.
From here, you can safely access:
✔ Startup Repair
Fixes boot issues.
✔ Safe Mode
Lets you log in with minimal drivers.
✔ Command Prompt
For advanced repairs (not needed for most users).
✔ Reset Password (Microsoft Account)
If you use a Microsoft account, you can reset it from here.
6️. Prevent Future Lockouts: Use a Password Manager on Your Phone
This is the long‑term solution that saves people from ever being locked out again.
Recommended password managers:
Microsoft Authenticator (has password storage built in)
Bitwarden (free, secure, cross‑platform)
1Password (paid, excellent for families)
Google Password App
LastPass (popular, but had past breaches — use with caution)
Why store passwords on your phone?
Your phone is always with you
You can look up usernames and passwords instantly
Syncs with your computer
Works even if your computer won’t turn on
You’re not alone — login problems happen to everyone. With these steps in place, you’ll stay in control and avoid the frustration of being locked out again.
Computer acting up, freezing up, slowing down, moving like a snail so you have to walk away (before you do something you will regret to it)? Browser freezing? Apps slowing down or refusing to open?
Network working like a snail?
These issues affect every Windows user — teachers, professionals, students, and anyone trying to get work done. The good news is that many of the most common problems can be fixed quickly with a few simple steps.
Here are essential Windows fixes every user should know:
1️. When your browser freezes
Press Ctrl + R or F5 to refresh the page.
If a site should be loading but isn’t, use a force refresh: Ctrl + Shift + R. This clears cached elements and forces the browser to reload everything.
2️. Speed up your computer by managing startup apps
Open Task Manager instantly with Ctrl + Windows + Escape.
Press Ctrl + Tab to move to Startup Apps.
Right‑click any program you don’t need at startup and choose Disable.
This doesn’t remove or break anything — it simply gives you control over what opens and when. Most computers are slowed down by unnecessary bloatware launching automatically. If you do not disable what you do not need it is slow to start up and remains slow because those programs are ALWAYS running in the background whether you know or not. Most do not hence the slow speed of your computer.
3️. Uninstall programs you don’t use
Press Windows and type in remove a which will take you to add remove programs
Arrow down through all programs and uninstall what you do not need or use. Picture yourself weighing 500 pounds and you are taking off 50 pounds at a time with each remove. You get lighter, you move faster.
With commands, Find programs you no longer need, press Tab once to reach the three dots, then select Uninstall.
Check each device (input and output) and adjust as needed.
Go through all options and adjust it to fit your needs.
This solves many audio problems without needing a full restart.
5️. Clear your Temp folder daily to improve speed
Press Windows + R to open the Run box.
Type %temp% and press Enter.
Press Ctrl + A to select everything.
Press Shift + Delete to permanently remove the files.
When prompted, enter on Yes, and another box opens, check the box that says do this for all (or ctrl A) , and press Alt + S to skip files currently in use.
Clearing this folder removes clutter and can even improve your internet speed by eliminating old cached data.
Clean Out System Garbage with Disk Cleanup
Next, press your Windows key and type disk. You’ll see Disk Cleanup populate — press Enter to open it.
Once it opens, press Enter again to scan your system. This reveals all the garbage that’s quietly collected on your computer.
Now Tab to or click on“Clean up system files.” Press Enter — and be patient. If you’ve never done this before, it may take a while to populate.
When the box opens, select everything you can see. You’ll notice gigabytes of waste clogging your system — old logs, temp files, update leftovers, and more.
Delete it all. One caveat: don’t delete your Downloads folder from here. Instead, go to Downloads manually and clean it out one item at a time. You may still need backups or haven’t saved things to proper folders yet.
These steps help all users, and they’re especially important for blind and visually impaired individuals who rely on consistent system behavior with JAWS or NVDA.
A few quick fixes can save time, reduce frustration, and keep your computer running the way it should.
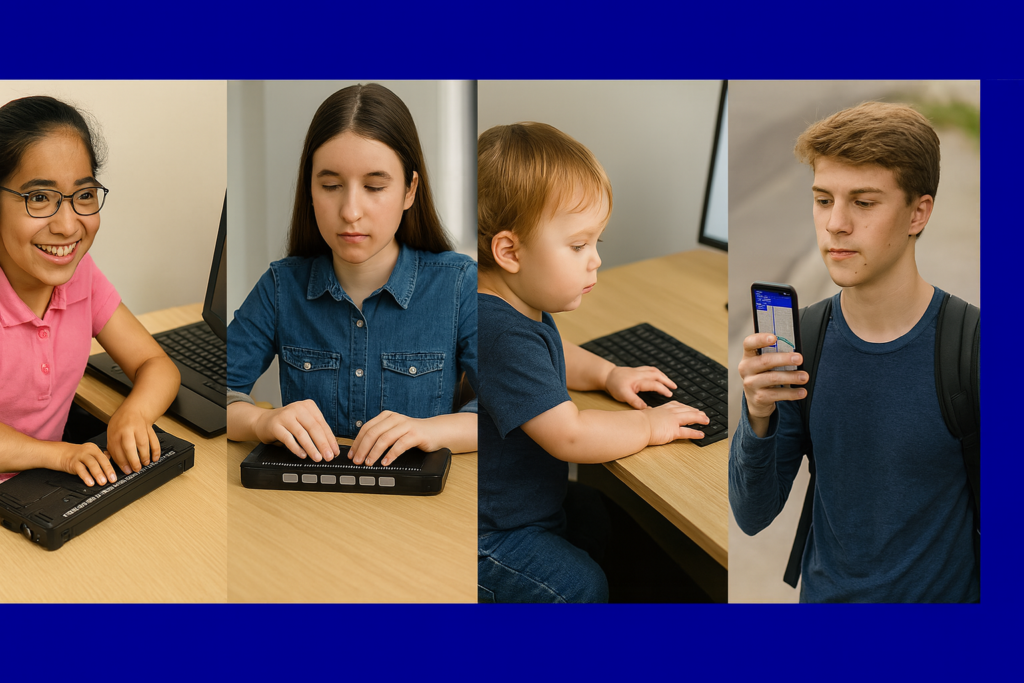
Accessibility opens the world for blind and low-vision people. Access Tech Lessons can help users get the most out of these tools by offering step-by-step guides and support. It removes limits, builds confidence, and gives you real control of your daily life. With the right tools, navigation becomes possible, learning becomes smoother, and work becomes fully accessible.
This page brings together practical lessons that teach you how to use the technology that matters most. Each lesson stays simple, direct, and hands-on so you can learn with confidence. You will explore screen readers, braille displays, iPhone navigation, accessible math tools, and the skills needed to work, study, and travel independently.
As you move through each lesson, your skills will grow, and your world will open. Access becomes freedom. Freedom becomes opportunity. And opportunity builds a future filled with purpose and vision.
A remarkable transformation unfolded in 2000 when a blind teenage girl arrived from the Ukraine–Russia border region. Her journey would soon be defined by the inspiring story of how a Blind Teen Masters JAWS. She had lost her sight due to a brain tumor and survived medical hardship. In addition, she entered the United States without knowing a single word of English. She faced dozens of surgeries to remove the tumor. She was brave, brilliant, and determined — but she faced a world that she feared. Her first English words to me were: “I want to die cause blind can’t do anything!”
When she first sat down at the computer, the only screen reader available to her was English JAWS. To bridge the gap, I sought out someone who became friend in Russian to get Jaws scripts for Russian JAWS. This allowed her to switch seamlessly between Russian and English. This simple act opened a doorway. She could hear her native language, type in English, and move back and forth between the two as she learned. Within 3 months she was interpreting the language for her family. She could speak smoothly and understandably to her peers and teachers. The next crucial skill skill was connecting her to friends in Ukraine via email. THAT was the secret. The journey was possible because this blind teen truly mastered JAWS and pushed through the barriers.
And she learned fast. Within that 3 months, she told me: I do not want to die anymore because the technology has changed everything for me and shows me my future. I can do what I want and need.
Every day she practiced navigating the keyboard, reading with JAWS, writing, and communicating. She used the bilingual setup to teach herself English while mastering the technology that would give her independence. Her confidence grew with every keystroke.
Three months later, the young teen who once arrived frightened and silent was now speaking fluent English. She was using JAWS like she had been doing it for years. In the video below, she demonstrates her skills entirely in English: reading email, writing messages, attaching files, and navigating her computer with flawless precision. Her success is a striking example of what happens when a blind teen sets out to master JAWS. She is breaking new ground for herself and others.
Her journey is a powerful reminder that access changes everything. When students receive the right tools, the right training, and unwavering belief, they rise. They thrive. They discover who they were always meant to be.