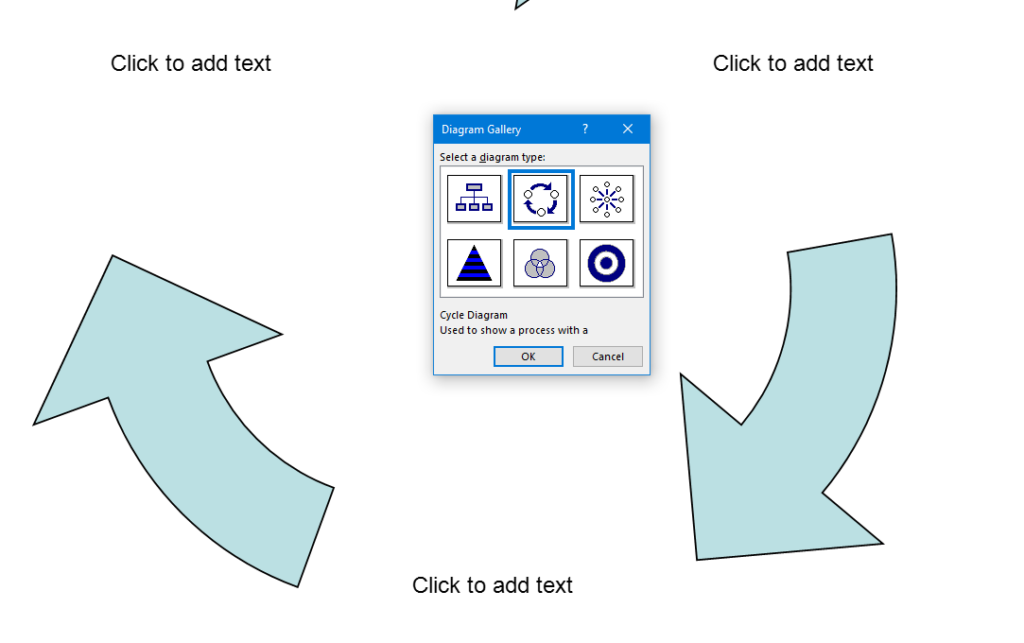
In this lesson, you will learn Efficient Text Navigation and Selection in WORD. You will also learn how to effectively select words and sentences and navigate through a page using talking software. The tutorial provides step-by-step instructions, ensuring that users can confidently move around the page and make precise selections. By mastering these skills, you will enhance your efficiency and accuracy when using assistive technology, making your digital interactions smoother and more productive. This lesson is particularly beneficial for individuals who rely on screen readers and other accessibility tools.
Dr. Robinson’s video covers basic JAWS screen reader commands for Office Word, no matter what version of WORD you use. First, she opens a new document using “Ctrl + N” and teaches key formatting skills, such as right-aligning text with “Ctrl + R” and inserting the date using old and new Office commands. She emphasizes the importance of listening to the software to ensure accuracy. Dr. Robinson guides through bold, underline, and italics commands before typing and spell-checking with keyboard shortcuts. These are all Basic WORD JAWS commands you need to know.
Adjusting speech speed helps beginners better understand software. Learning commands ensures efficient and accurate work, especially Basic WORD JAWS commands.
Gain Typing Speed in WORD
To practice typing skills use a phrase like: “The quick brown fox jumps over the lazy dog.” Type it repeatedly in a Word document by starting slow to gain speed. Use the keyboard shortcuts taught in the video, such as “Ctrl + Left Arrow” and “Ctrl + Right Arrow” to move between words, and “End” to check if you’re at the end of the line. Regular practice, at least 10-15 minutes daily or more, helps build speed. Turn off autocorrect options to avoid automatic changes that may confuse the student and disrupt learning. Focus on accuracy before increasing typing speed. Mastering JAWS commands for WORD is essential for efficient practice.
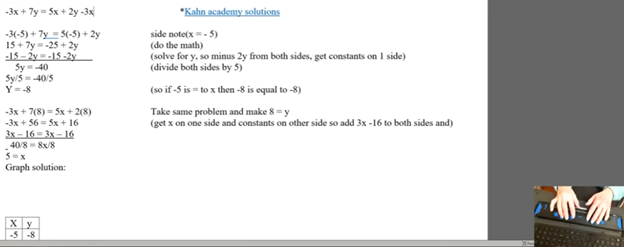
Using a Focus 40 Braille Display and JAWS, students can efficiently complete algebra assignments in Word, ensuring both speed and accuracy. They can navigate through documents, input mathematical symbols for their Algebra work, and graph equations using Desmos. The Braille Display provides tactile feedback while JAWS offers audio guidance, allowing students to efficiently edit, correct mistakes, and organize data into tables. With these tools, they can seamlessly complete algebraic tasks and submit their work via email, ensuring full participation in math activities.
To complete algebra problems in Word using a Focus 40 Braille Display and JAWS, students should follow these steps for effective Algebra with Focus Display:
FOCUS and JAWS Display Commands
Using the Focus 40 Braille Display, Dr. Robinson demonstrates how to efficiently braille out algebra problems in Word.
Set the Braille Display to Input Mode: Begin by pressing G.7 + Space to switch through the display modes. Set it to Input Mode for algebra.
Navigate the Document: Use 1 + Space to move to the top of the document. To navigate the document, students press the left-side buttons for backward movement. They then use the right-pan buttons to move forward, ensuring smooth progress while working on Algebra with the Focus Display.
Enter Algebraic Symbols: Students can easily type algebraic symbols, like Delta (Δ), by using the keyboard. After typing, copy the symbol using Shift + C to avoid repeating it manually later.
Work with Mathematical Formulas: To type formulas like “Rise over Run” (Δy/Δx), use the keyboard to input characters. Make sure to add spaces around operations for clarity, especially when sharing with sighted peers. For example, input the formula as “Δy = 2” and “Δx = 3” with a the Focus Display and JAWS.
Navigate Through Graphing: To access graph, students can use the rocker bars or 1 + Space for upward navigation and 4 + Space for downward movement.
Input Values into Desmos: After entering algebraic equations, students can switch to Desmos by pressing Shift + 4 + 5 (Alt + Tab equivalent). They can then input values and trace graphs using the Alt + T command for audio tracing.
Copy and Paste Graphs: Once the graph is complete in Desmos, use Alt + Print Screen to capture the graph. Paste it into Word with Shift + V for documentation.
Submit the Assignment: When the algebra problem is finished, the student can email the document by navigating to File using Alt + F and attaching it in Outlook. Then open Outlook, use F9 to quickly send the email once Outlook is open.
These steps help students efficiently solve algebra problems in Word while using their Braille Display for input. Additionally, students can smoothly navigate Desmos for graphing, enhancing their algebra skills with the Focus 40 Display
Enable Students to Efficiently complete Algebra with Focus Display
Using Tables for Data: If the algebra assignment involves creating tables, students can use Alt + N to insert a table. On the Braille Display, press 6 + 8 + Space to activate the Alt command and navigate to the Table option. Once a table is created, pressing Tab will move between cells, and 4 + 5 + Space adds more rows as needed, making tables part of their Algebra workflow using a Focus Display.
Auto-fitting Tables: To ensure tables fit content properly, use Alt + J + L to access the layout options. Select AutoFit Contents to adjust the table size automatically. This helps in organizing the data neatly for submission in Algebra with Focus Display assignments.
Editing and Correcting Mistakes: If a student makes an error, they can use 3 + Space on the Braille Display to move by character and correct the mistake. Use Shift + 6 + 7 + Space to select the incorrect portion and retype it. The Braille Display’s tactile feedback helps ensure precision when editing formulas.
Reviewing the Work: To review algebra problems, students can move back through the document using 1 + 4 + Space to navigate line by line. Press Insert + Up Arrow to have JAWS read back the current line, ensuring that everything is correct before submission.
Final Submission Process: Once the assignment is complete, the student can go to Alt + F to access the File menu. Choose Share. From there, they can attach the document directly in an email. Using F9 forces Outlook to send the email quickly. Make sure their work is submitted on time, thereby completing their Algebra with Focus Display workflow.
More Lessons for Math
By following this step-by-step guide, students can efficiently complete algebra problems using the Focus 40 Braille Display, JAWS, and Word. The tactile feedback from the display, combined with JAWS’ audio guidance, enhances both speed and accuracy. This combination helps students solve math problems, graph equations, and organize data effectively. When using the Focus Display, students experience seamless transitions between tasks, ensuring smooth navigation throughout their algebra assignments.
Dr. Betsey Doane shared her experience teaching math for over 50 years and the importance of making math accessible to all students, including those with visual impairments. She began by introducing the software MathType, essential for creating accessible math content. The software integrates into Word and allows users to write math that is accessible to both screen readers and braille displays. Her efforts truly embody the concept of Advanced Math Made Accessible.
Dr. Doane explained the basics of LaTeX, a text-based language used for writing math. She demonstrated how to input and translate common math expressions such as fractions, square roots, and equations using LaTeX in Word. Her instructions included using the Focus 40 Braille Display and ensuring proper configurations for students to view math content in braille. This approach makes advanced math more accessible for everyone.
LaTex using Mathtype to insert perfect Advanced math made accessible
She emphasized the importance of understanding both the visual and non-visual ways of presenting math, highlighting that students need the right software and commands to work effectively. By using LaTeX and MathType, both sighted and blind students can access and solve math problems, ensuring inclusion in any classroom setting. This makes advanced math accessible and easier to understand.
She highlighted the use of MathType software, which integrates seamlessly with Microsoft Word, allowing users to create and present math content that is accessible through screen readers like JAWS and braille displays like the Focus 40. Dr. Doane explained how MathType enables students and educators to write complex equations, such as fractions, square roots, and exponents, in both visual and non-visual formats. This ensures that blind students can access the same content as their sighted peers, making advanced math more accessible.
Advanced Math Made Accessible with LaTex
Dr. Doane also provided an introduction to LaTeX, a powerful text-based language used for writing mathematical expressions. She demonstrated how to write math using LaTeX syntax, such as using backslashes for commands like fractions and square roots. By using LaTeX in Word with MathType, math content can be rendered correctly on both screen readers and braille displays, making it easier for blind students to follow along in class and complete assignments. This is another way to make advanced math accessible.
Furthermore, Dr. Doane stressed the importance of configuring braille displays correctly, ensuring that input is set to computer braille and output is set to grade 2. She provided step-by-step instructions for adjusting these settings on the Focus 40 Braille Display, ensuring that students can navigate math content effectively, contributing to the overall goal of making advanced math accessible.
In conclusion, Dr. Doane encouraged educators to adopt these tools and techniques to create an inclusive learning environment where both sighted and blind students can excel in mathematics. Her detailed instructions and practical advice offer a clear path toward accessible math education for all.
Using Focus 40 Braille Display to do Math Work in Word with Jaws, Kim demonstrates commands in WORD using FOCUS 40 Braille display exclusively. She can control her computer and complete her math work in WORD with just the display.
Here are some essential commands for using the Focus 40 Braille Display to do math in Microsoft Word:
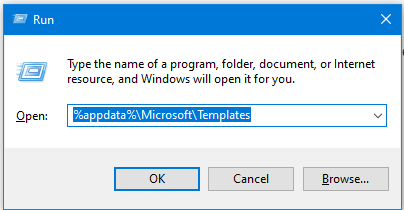
You want to Rebuild Microsoft Word Template when you close WORD and it starts to ask: There are changes to the Normal Template, “Do you want to save the normal template?” You always want to say “NO” because if you do not it will start opening with the last work you did in it. If you want WORD to STOP asking that question or fix your goof, here is how to rebuild that Normal Template
Commands to rebuild Word template when it gets messed up and constantly asks if you want to save it.Other Lessons to fix Tech
Rebuild Microsoft Word Template with RUN
Open the Run Dialog Box:
Press Windows + R.
Type %appdata%\Microsoft\Templates and press Enter.
Delete the Normal Template:
In the opened folder, find normal.dotm (or the equivalent for your Office version).
Select it and press Delete.
Reopen Word:
This action will rebuild the normal template automatically.
Reconfigure Your Settings:
Fonts:
Press Ctrl + D to open the Font dialog box.
Set your desired font (e.g., Times New Roman, 12 pt).
Press Alt + D to set as default for all documents.
Paragraph Spacing:
Press Alt + O, then P to open the Paragraph dialog box.
Adjust spacing settings (e.g., single spacing).
Press Alt + D to set as default for all documents.
This process ensures your Word template is reset and configured to your preferences. Here are some more fixes you can do
Microsoft Word MLA format for papers is essential for several reasons. Firstly, it ensures consistency and clarity in academic writing. This makes it easier for readers to follow and understand the content. MLA format provides a standardized way to cite sources. This helps prevent plagiarism by giving proper credit to original authors. This format also allows students to present their work in a professional manner, which is crucial for academic credibility. Additionally, adhering to MLA guidelines demonstrates attention to detail and a commitment to academic integrity. These attributes are highly valued in educational settings. Overall, MLA format helps maintain a high standard of scholarly communication and fosters a culture of respect for intellectual property. If WORD is not working properly-Rebuild it!
Set up an MLA format in Microsoft Word, follow these steps:
Set the Margins:
Press Alt + P to open the Layout tab.
Press M to open the Margins menu.
Select Normal to set 1-inch margins on all sides.
Set the Font and Font Size:
Press Ctrl + D to open the Font dialog box.
Select Times New Roman and set the font size to 12.
Set Double Line Spacing:
Press Ctrl + A to select all text.
Press Ctrl + 2 to set double-spacing.
Set the Header:
Alt V + H auto opens Header and down arrow to footer if needed
or Press Alt + N to open the Insert tab.
Press H to open the Header menu and select Blank.
Type your last name, press Space, then press Alt + Shift + P to insert the page number.
Include Key Information on the First Page:
Type your name, instructor’s name, course, and date on separate lines.
Center-align the title of your paper by pressing Ctrl + E.
Format the Works Cited Page:
Press Ctrl + Enter to insert a new page.
Type “Works Cited” and center-align it.
Use a hanging indent for each citation by pressing Ctrl + T.
The current page provides instructions on creating a food chain for a class using talking software. It includes steps for saving a document in a specific format and navigating through menus using keyboard shortcuts. Additionally, it references the video below to help you each step of the way.
F12 and save as 97-2023 so after you F12 you will have file and tab once and down arrow or up arrow to 97-2023 doc and enter, then the commands will work for you.
Alt + N then M and right arrow to Food Chain and enter
Listen to recording to add information as you need
WORD accessible food chain and why we use them
A food chain is a sequence that shows how energy and nutrients flow from one organism to another within an ecosystem. Here’s a simple breakdown:
Producers: These are usually plants or algae that create their own food through photosynthesis. They form the base of the food chain.
Primary Consumers: Herbivores that eat the producers. Examples include rabbits and deer.
Secondary Consumers: Carnivores that eat the herbivores. For instance, a fox that eats rabbits.
Tertiary Consumers: These are predators that eat secondary consumers. An example would be an eagle that eats foxes.
Decomposers: Organisms like bacteria and fungi that break down dead plants and animals, returning nutrients to the soil.
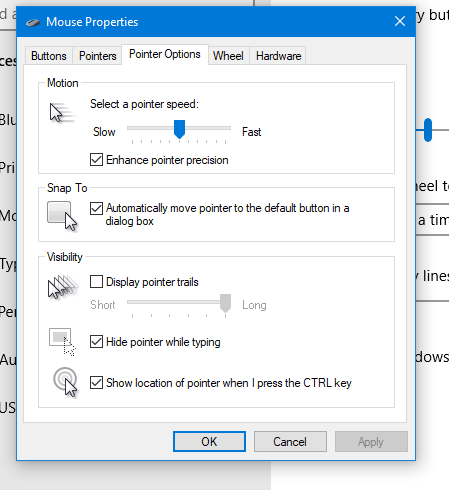
Using keyboard commands to quickly access and adjust mouse settings allows for efficient changes to mouse size and behavior, such as “Snap To” functions. These options are accessible through the Mouse Properties window in Windows, which you can open by pressing Windows + R and typing main.cpl. Once inside, you can navigate tabs and options using Ctrl + Tab and arrow keys, adjusting the mouse size or enabling the “Snap To” feature. This provides an easier and faster way to customize your mouse for improved accessibility and functionality.
To quickly change mouse settings in Windows, use keyboard commands to access Mouse Properties: Another way
Open Mouse Properties: Press Windows and type Mouse then press Enter.
Tab to additional mouse options and enter
Ctrl + Tab to Pointers and Change Mouse Size: arrow to inverted large or extra large based on need
Navigate to the Pointer Options using Ctrl + Tab, then press Tab to “Snap To” or ALT + U to check box
Then press Alt + S to check “Show location of pointer when I press the CTRL key.”
Apply Changes: Press Alt + A to apply the settings and enter to close the window.
Commands to change mouse
These steps streamline navigation without relying on the mouse.
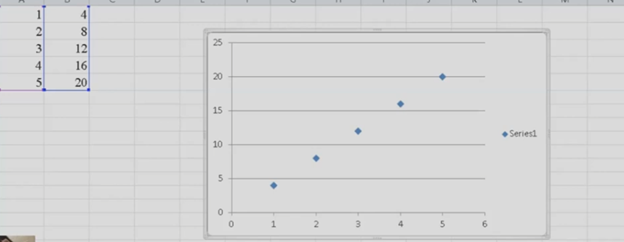
To create a line plot graph in Excel with keyboard commands, first select your data using Shift + Arrow keys. Next, press ALT + N, L to insert a line chart. After the chart appears, press CTRL + 1 to format it. Use ALT + J, T to add a chart title and ALT + J, A, I to add axis titles. This process efficiently creates a line plot graph while using only keyboard commands for input and formatting.
Here is a list of all the commands used in the lesson on how to create a graph and other charts:
Copy and Paste Data: This is fundamental in creating Excel line plot graphs.
Select columns A and B.
CTRL + C: Copy data.
CTRL + V: Paste data into Excel.
Insert an Excel Scatter Plot Graph: Often used before converting to a line plot graph.
ALT + N, D: Insert Scatter Plot (Insert tab and Scatter option).
Add Titles to the Graph: Important for any graph to be understood.
ALT + J, T: Adds a chart title. Type the title and press Enter.
ALT + J, A, I: Adds axis titles. Type the title for the X-axis or Y-axis and press Enter.
Chart Tools for Excel line plot graph
ALT + J: Open Chart Tools Layout tab.
T: Add a chart title.
Choose Above Chart (Arrow keys, Enter).
ALT + J, A, I: Add Axis Titles, essential for creating your graph.
Right Arrow: Select primary horizontal (for X-axis title).
W: Write the title (Enter title).
Repeat ALT + J, A, I for vertical axis title (Y-axis).
Down Arrow: Rotate title, then Enter and type title.
Remove Legend from Excel Line Plot graph to simplify the presentation.
ALT + J, A, L: Remove the Legend.
None: Select “None” to remove the legend.
Copy and Paste Graph to include in your documents.