Search results for: “word options”

  • Low Vision Driving Aids: Bioptics,Prism Glasses, Adaptive Devices, and Safe Driving Options Explained

    Many driving with Low Vision aid Biopitic glasses
    Low Vision Driving Aids: Man driving with Bioptic glasses

    Many students with low vision can increase independence through safe and well-designed optical tools. Low Vision Driving Aids such as bioptic telescopes, prism glasses, and adaptive driving technology help students identify road signs, lane markings, and distant objects with greater clarity. These devices do not replace safe driving skills, but they support eligible students who meet vision requirements and receive proper training. Teachers and parents play a central role by learning these options early, guiding students toward evaluations, and helping them build strong visual skills long before driving becomes possible.


    Bioptic Telescopic Lenses

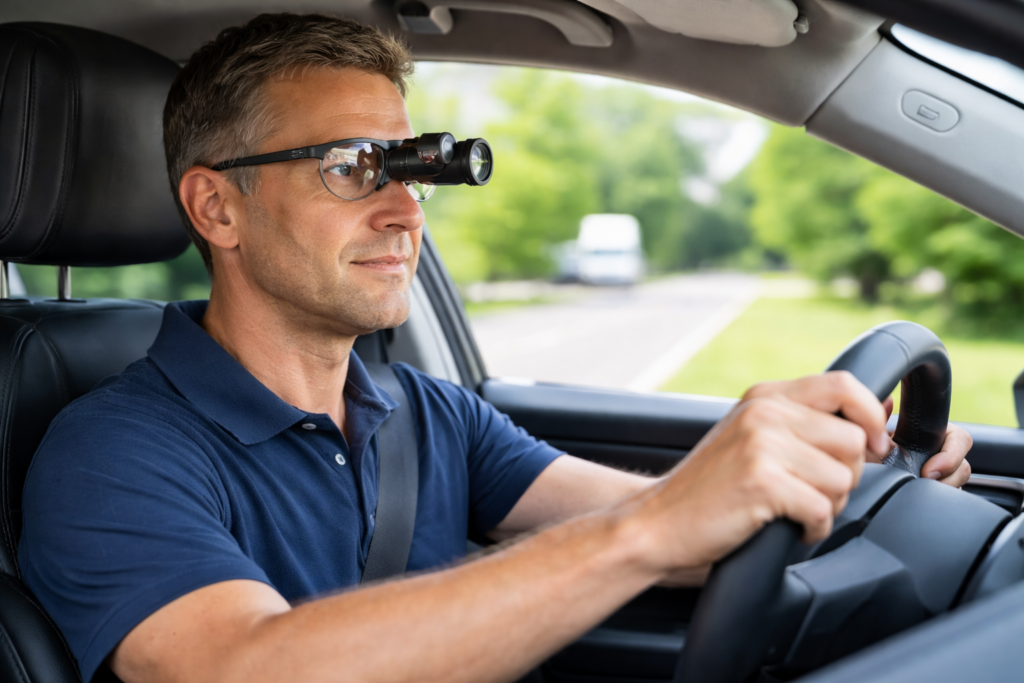
    Bioptic telescopes are small telescopes mounted on glasses. They magnify distant objects such as road signs and traffic signals. The driver uses normal vision for steering but briefly glances through the telescope for critical details.

    How bioptics work:
    A small telescope at the top of the lenses increases clarity for distant targets.

    How drivers use them:
    Drivers use natural vision for general driving and glance through the telescope to read signs or detect details.

    Safety:
    Research shows bioptic drivers succeed with training. Proper instruction remains essential for safety and confidence.


    Adaptive Driving Technology (ADAS)

    Many students benefit from modern vehicle safety systems such as:

    • Lane-keeping assist
    • Blind-spot detection
    • Adaptive cruise control
    • Automatic emergency braking

    These systems improve awareness and support safe driving decisions. They do not replace skill, but they strengthen safety for drivers with visual limitations.


    Vision Enhancement Devices

    Some students use electronic eyewear or enhanced optical devices to support mobility. Tools like eSight improve clarity for reading street names, viewing dashboards, or spotting road markers. These devices help with general visual access rather than driving tasks themselves.


    Prism Glasses for Low Vision

    What Prism Glasses Do

    Prism glasses bend light to move an image into a student’s stronger visual field. They help the student locate print and objects more quickly. They do not change the eye, but they make vision tasks easier and less tiring.

    Who Benefits

    Prism glasses help students who:

    • Miss objects on one side
    • Lose their place when reading
    • Experience double vision
    • Have trouble tracking words
    • Struggle with visual focus
    • Have CVI or field loss

    Prisms reduce searching and help the brain find information faster.

    How Prism Glasses Help in School

    Prisms can:

    • Improve tracking
    • Reduce eye strain
    • Support board-to-desk copying
    • Increase reading stamina
    • Strengthen early print recognition

    Teachers often see smoother reading, fewer errors, and better endurance.

    Types of Prism Glasses

    Students may use:

    • Reading prisms for near work
    • Field-shifting prisms to move images into better visual fields
    • Yoked prisms to shift the entire image
    • Non-yoked prisms for specific alignment issues

    A low vision optometrist chooses the correct type.


    Legal and Clinical Requirements

    State Laws and Bioptics

    Thirty-seven states permit some form of bioptic driving. Each state sets different rules about visual acuity, visual field, telescope power, and required training. Some states allow drivers to meet acuity standards through the bioptic if they reach a level such as 20/40 through the telescope.

    DMV -Department of Motor Vehicles- Vision Standards

    Most state DMVs require:

    • Minimum acuity (often 20/40 for unrestricted licenses)
    • A certain visual field range
    • Medical reports from a low-vision specialist

    Where to Go for Evaluations and Training

    Low Vision Optometrists

    Families should begin with a low vision optometrist who can:

    • Test remaining vision
    • Evaluate driving potential
    • Determine whether bioptics or prism glasses will help
    • Prescribe optical devices

    Search using IALVS or regional low vision centers.

    Certified Driving Rehabilitation Specialists (CDRS)

    If bioptics are appropriate, a CDRS provides:

    • Behind-the-wheel training
    • Scanning and hazard-detection practice
    • Safe bioptic use techniques
    • Pre-licensure assessments

    This step is required in many states.

    DMV Vision Evaluation Services

    Families should contact the DMV to:

    • Review state vision rules
    • Obtain medical vision forms
    • Schedule low-vision driving tests
    • Determine if bioptic training is necessary

    How Families and Schools Should Start

    1. Schedule a low-vision evaluation with a trained optometrist.
    2. Discuss bioptics, prism glasses, and vision enhancement devices.
    3. Ask about training with a Certified Driving Rehabilitation Specialist.
    4. Review state DMV laws for low vision and bioptic drivers.
    5. Build visual efficiency long before students reach driving age.

  • JAWS UEB/Nemeth Settings + Accessible Math in Word & Braille Editor

    JAWS UEB/Nemeth Settings-Word and Braille Math Editor
    JAWS UEB MATHS/Nemeth Settings-Word and Braille Math Editor

    If you’ve ever struggled to get JAWS to read math correctly on your computer, this walk-through will make your life much easier. In this video, I demonstrate how to set JAWS for either UEB Maths or Nemeth math using the JAWS UEB/Nemeth Settings, then show you how to create accessible math using Word’s Math Editor and the Braille Math Editor. Whether you’re a TVI (Teacher of the Blind), a student, or an AT (Access Technology) specialist, these steps will help you produce clear, accurate, and accessible math every time.


    WORD MATH EDITOR Setup

    1. Open the Math Editor

    • Alt + =

    2. Open the Equation Tools tab

    • Alt + J, E

    3. Open Math Options (Settings)

    • T, 1
      (This opens the Math Options dialog.)

    4. Set Alignment to Left
    Inside the Math Options dialog:

    • Alt + J → moves to Justification
    • L → Left alignment
    • Alt + D → Set as Default
    • Tab, Tab → to OK
    • Enter
    • When asked to save as default, choose Yes
      (This saves the settings to the Normal template.)

    5. Check Conversion (if math looks wrong)

    While inside a math zone:

    • Alt + =
    • Alt + J, E
    • C → Convert
    • Make sure it is set to Professional

    WORD MATH EDITOR — Command Sequence (JAWS + Keyboard)

    Open the Math Editor

    • Press Alt + =
      This inserts a new math zone and opens the Word Math Editor.

    Move in and out of the math zone

    • Right Arrow → move into the math zone
    • Right Arrow again → move through elements
    • Left Arrow → move backward
    • Esc → exit the math zone and return to normal text

    Insert common structures

    • FractionCtrl + /
    • ExponentCtrl + Shift + =
    • SubscriptCtrl + =
    • Square root → type \sqrt then press Space
    • Matrix → type \matrix then press Space
    • Parentheses → type ( then ) (Word auto‑sizes them)

    Insert math symbols using LaTeX shortcuts

    • \pi + Space → π
    • \alpha + Space → α
    • \neq + Space → ≠
    • \le + Space → ≤
    • \ge + Space → ≥
    • \div for divide
    • \times for times
    • \sqrt for square root

    (Word’s Math Editor accepts most LaTeX commands-check out list in link.)

    Navigate inside structures

    • Right Arrow → move to next placeholder
    • Left Arrow → move back
    • Ctrl + Right Arrow → jump out of a structure
    • Ctrl + Left Arrow → jump into previous structure
    • To read the braille the easiest–OPEN BME

    BRAILLE MATH EDITOR (BME) — Command Sequence (JAWS + Keyboard)

    Open the Braille Math Editor

    • Press Alt + Shift + =
      (This opens the BME window for UEB contracted math input.)

    Choose UEB or Nemeth

    Inside BME:

    • Press Alt + M → opens Math Code menu
    • Press U → UEB Math
    • Press N → Nemeth Math

    (You can teach students to confirm the code before typing.)

    Enter math using braille input

    • Type using six‑key entry on the braille display or keyboard
    • Use Space to confirm symbols
    • Use Backspace to correct braille cells

    Navigate inside the math expression

    • Left Arrow → move left
    • Right Arrow → move right
    • Ctrl + Left Arrow → jump to previous element
    • Ctrl + Right Arrow → jump to next element

    Insert common structures

    • Fraction → dots 3‑4 then 3‑4 (opening and closing fraction indicators)
    • Superscript → dot 5
    • Subscript → dot 2
    • Square root → dots 1‑2‑3‑5
    • Parentheses → dots 1‑2‑6 and 3‑5‑6

    (These follow UEB math rules; Nemeth uses different indicators.)

    Send math back to Word

    • Press Alt + S → Save and return to Word
    • The math appears in the document as a fully formatted math object

    Exit without saving

    • Press Alt + F4
    • Choose No if you don’t want to insert the math

  • Emboss Math with Tiger 9 TSS in WORD

    This video takes you through setting up the Tiger 9 software from ViewPlus Technology for translating math equations into braille so you can emboss Math with Tiger. Dr. Robinson demonstrates how to access the Tiger ribbon, open her existing profile settings, and configure options like the braille type and math notation style. She also shows how to adjust ink settings if needed for embossing printed text alongside braille. Then she translates the math and gets it ready to emboss for student.

    Tiger 9 Math Translation and Editing


    Dr. Robinson demonstrates how to use Tiger 9, to translate math content in Word. She use a 40 cell FOCUS braille display but emphasizes the importance of using an 80-cell braille display if the student is going into math or STEM fields. Dr. Robinson also explains how to use the WORD math equation editor or Braille math editor on the Braille display to emboss Math with Tiger. She concludes by solving a right triangle problem using the math contents then embossing the math for hard copy if desired.

    Emboss Work with Tiger 9 in WORD
    Emboss Work with Tiger 9 in WORD

    Go onto learn how to emboss graphics in WORD using Tiger software also for students to feel all needed math symbols and pictures to learn on their own. Ideally, all students have embossers at home. ViewPlus embossers with software are fully accessible for all exclusive screen reader users.

  • Nemeth or UEB via MathCat: Math Access in WORD and Braille Math Editor with JAWS or NVDA

    Dr. Denise M. Robinson, PhD, CTVI, AT, and CEO of TechVision, LLC, leads worldwide remote teaching for blind and low vision students. Her YouTube channel, @DrDeniseMRobinsontech and this website, showcases making digital math accessible with MathCat with JAWS, or NVDA. This video provides 8 different ways to complete digital math with several options using the Braille Math Editor in WORD for UEB or Nemeth math, highlighting the advantages of Nemeth or UEB via MathCat. Links with full video lessons from this video follow. She also demonstrates reading math on a Braille display and creating or making complex formulas accessible. AI tools like MathKicker.AI enhance efficiency. The series includes geometry and graphing with Desmos. Dr. Robinson emphasizes that digital access is crucial for competitive education and inclusion with peers. Learn how to teach or Learn UEB Math Code.

    Nemeth or UEB via MathCat: 8 videos on Math Access in WORD and Braille Math Editor with JAWS or NVDA

    Video Lessons from this Post:

    Optimizing Windows 11 Efficiency for Screen Reader with Key Settings and Configurations

    UEB (or Nemeth) Math with Braille Math Editor -You can read 2 lines of math on a Braille Display using Nemeth or UEB via MathCat

    Making Inaccessible Accessible WITH Quadratic Math Formulas

    Matrices in WORD with NVDA or Jaws-LaTex or Braille on Display

    Life IS a competition and Digital access is key with Instruction

    Life is a competition, and digital access is essential. It levels the playing field, enabling equal opportunities for everyone. Digital tools enhance skills and productivity. They open doors to education and employment. Having a qualified access technology instructor is crucial for teaching students Nemeth and UEB math codes to access everything their peers do. Embracing technology is vital for success and inclusion in today’s world.

    MathKicker. AI for Matrices with NVDA or JAWS
    -Speed in completing Work

    Geometry and Graphing in Desmos

    Geometry-” Drawing” shapes in Desmos

    Digital Math in WORD and Braille Math Editor for Nemeth or UEB Input/Output via MathCat with JAWS or NVDA with pictures of a calculus problem
    Digital Math in WORD and Braille Math Editor for Nemeth or UEB Input/Output via MathCat with JAWS or NVDA with a picture of a calculus problem

    Other Digital access Math Lesson

    Digital Math with UEB, NVDA completing Matrices in WORD

    UEB Math with NVDA in WORD using unicode-LaTex or Braille 

    UEB Math Lessons Galore with AI

  • Emboss Math from WORD Math editor through Braille Blaster and change to Nemeth fast

    To emboss math with braille blaster content from Microsoft Word, start by creating equations in the Math Editor. This tool helps you write complex mathematical expressions clearly. Once you finish, save the document in a .DOCX format, which is compatible with Braille Blaster and other embossing software.

    Next, open Braille Blaster and import your Word document. The software automatically converts your math content into Nemeth code, the Braille standard for mathematics. This conversion ensures visually impaired readers can understand the material. Moreover, Braille Blaster allows quick switching between Unified English Braille (UEB) and Nemeth codes, offering flexibility based on the user’s needs.

    After conversion, to emboss math with Braille Blaster, send the document directly to a Braille embosser. This machine prints the digital Braille content as physical Braille that can be read by touch. Transitioning from digital to physical Braille is quick and efficient with this process.

    picture of braille conversion in braille blaster changing it from ueb to nemeth

    Furthermore, this workflow supports various mathematical formats, making it versatile for different educational levels. For instance, whether you’re working on basic arithmetic or advanced calculus, the combination of Word and Braille Blaster handles it smoothly. This versatility is crucial in educational environments where diverse math content is necessary.

    Advanced Features

    Educators can also take advantage of Braille Blaster’s advanced features, such as the ability to preview the Braille output before embossing. This step allows for checking accuracy and making any necessary adjustments. It’s particularly useful when dealing with intricate math equations that require precise formatting. If you would like to combine this with a graph, Desmos is your key with Tiger software.

    Moreover, the ability to seamlessly switch between UEB and Nemeth within the same document saves time and ensures consistency across educational materials. This dual-mode capability is essential for creating comprehensive resources that cater to different learning needs.

    Using Word’s Math Editor, Braille Blaster, and a Braille embosser not only streamlines the creation of accessible math materials but also enhances the educational experience for visually impaired students. This efficient process ensures that high-quality Braille math content is readily available, supporting inclusive education and empowering students to succeed in their studies. By implementing this workflow, educators can deliver timely, accurate, and accessible learning materials that meet the diverse needs of all students. Here are options if you would like to use NVDA for Math. And to take any math 1 step further in creating graphics, Tiger and graphic embosser will take you there.

    Other Math Lessons:

    Transcribe Math Images

    Quadratic Math

    STEM with Embossing

    Perfect Digital Math

    JAWS and MathCat

    Unicode with UEB Math

    UEB Math with Jaws

    UEB LaTex math with Jaws

    Braille Math in WORD Editor-Multi-line

    Split Braille for Buffer Mode

    More lessons on our YouTube Channel.

  • Transcribe math images into text in WORD math editor with mathkicker and transcriber tricks

    Dr. Robinson guides transcribers through the process of math image conversion for accessibility, specifically focusing on converting math images into accessible Word documents using MathKicker.AI. She begins by highlighting that transcribers will easily recognize an image when it turns blue upon clicking it when opened in PDFs. These images, often blurry due to repeated copying by teachers, require careful description for students who cannot feel the number lines. Dr. Robinson emphasizes the importance of adjusting the level of detail based on the student’s age and familiarity with number lines during the math image conversion access process.

    To begin the process to learn how to convert math images into accessible Word documents for students with accessibility needs, Dr. Robinson gives step-by-step video instruction using “Windows + Shift + S” to capture the image and then select “Convert Image to Doc” using the clipboard in Mathkicker.AI. This method is particularly useful for large documents. Once converted, the image opens in Word, where it is important to enable editing with F6. She advises saving the document with a simple name, like “Line Work,” and placing it in the downloads folder from Mathkicker.AI.

    Dr. Robinson demonstrates how to work side-by-side with the original image and the converted document. By adjusting the zoom to 200%, transcribers can compare the math accurately. She notes that sometimes images may contain extra elements, like a punched hole, which the software might misinterpret. These should be corrected during math image conversion for access.

    mathkicker on left side of screen and image of math on right for transcribe to acquire Word text

    Accuracy for Math image conversion access

    For further accuracy, Dr. Robinson recommends using alternative text (alt text) for the graphic line. This helps students and sighted individuals, such as teachers or parents, understand the content. She explains that leaving the graphic in the document with added alt text is beneficial. A user can add the braille Math editor into use in WORD also for more options or even using EXCEL.

    Moving to more complex math for math image conversion access, she instructs on using the Desmos graphing calculator. Students can use “Alt + Print Screen” to capture and paste graphs into the Word document. Describing shaded areas or specific graph features is crucial for clarity. Finally, Dr. Robinson shows how Math Kicker efficiently converts math into text, creating clean, accessible documents. This method, combining math image conversion access and alt text descriptions, significantly speeds up the transcription process while ensuring students receive accurate, accessible math content. Dr. Robinson concludes by encouraging transcribers to reach out with any further questions. At times, you need to adjust Margins, etc.

    When you are ready progress to advanced Math and more ways to convert inaccessible PDF math into actual text in WORD.

    Be My Eyes for Computer: Describe Images, Graphs, and Screens Instantly

  • UEB Math with NVDA in WORD using unicode-LaTex or Braille -easy to advanced math

    Mathcat UEB in WORD
    Mathcat UEB in WORD

    Dr. Robinson demonstrates how to complete UEB math in Microsoft Word using NVDA and MathCAT in this video. She begins by showing how to download MathCAT, an essential add-on for NVDA. To do this, she presses “Insert + N” to open the NVDA menu, navigates to “Preferences,” then “Tools,” and selects the “Add-ons Store.” From there, she types “MathCAT” to find it and install it.

    After installing MathCAT, Dr. Robinson begins demonstrating basic math commands in Word. She starts by pressing “Alt + Equals” to insert an equation, then types a simple addition problem, such as “1 + 2 = 3.” She checks the Braille viewer to confirm that the equation displays correctly in UEB math. Using the arrow keys, she navigates through the equation, ensuring each character is correctly interpreted.

    Next, she demonstrates more complex equations. For example, she types “2x + 3 = 11” and highlights how NVDA reads the equation character by character. She emphasizes the importance of using arrow keys to review the entire equation, especially for those who rely solely on auditory feedback.

    LaTex and more Advanced MathCat NVDA in WORD Options

    Dr. Robinson also shows how to input advanced math symbols like the times sign and division symbol using backslash commands, such as “\times” and “\div.” She explains how these symbols are visually represented and confirms their accuracy in the Braille viewer.

    To demonstrate radicals, she uses the “\sqrt” command to insert a square root symbol, followed by an expression like “\sqrt{x+1} = 3.” She guides users through the process of checking and navigating through the equation using the arrow keys.

    Finally, Dr. Robinson addresses potential issues with inserting equations, such as when “Alt + Equals” doesn’t work correctly. She advises using “Alt + N” and navigating through the ribbon to insert equations manually if needed.

    This tutorial provides a guide for performing UEB math in Word using NVDA, ensuring accurate and accessible math solutions for users with visual impairments.

  • UEB Math with JAWS in Word: Using Unicode, LaTeX, and Braille for Easy to Advanced Math

    Dr. Robinson introduces the latest Vispero update for JAWS, focusing on reading UEB math. To get started, she demonstrates how to configure JAWS settings for optimal performance with UEB math. She begins by pressing “Insert + 6” to access the JAWS settings. Then use “Control + Shift + D” to set the default profile.

    Setup MathCat for UEB Math with Jaws

    Dr. Robinson guides users through setting up Braille mode via Default profile by typing it in the edit box. She types “Braille Mode” in the search box, and F6 to access different settings. She uses “F6” to navigate to the desired options, then “Alt + F” to select language profiles. To access MathCat option via alt D to details then tab to Nemeth and change to MathCat then OK.

    Dr. Robinson explains how to select the correct Braille code, such as UEB math with JAWS or Nemeth code. She walks through the process of applying these settings and closing the settings dialog.

    Once set up, Dr. Robinson demonstrates how to solve math problems using JAWS in Word. Dr Robinson explains the process of entering equations using “Alt + Equals” to open the math editor. She highlights how to type out equations, like “X squared plus 3 equals 11.” Then how to navigate through the math content using keyboard commands.

    She also explains complex math using UEB Math with Jaws, such as using square roots and other mathematical symbols, by using Unicode and LaTeX commands. Dr. Robinson shows the equation tools in Word by pressing “Alt + J” E to equation menu. Then explains how to convert equations between professional and linear formats using “Alt + JE + C.”

    Throughout the tutorial, Dr. Robinson ensures users understand the commands necessary for navigating and editing math content effectively. She also provides troubleshooting tips, such as using the Math Viewer with insert space + = . This gives more detailed navigation of hearing each symbol, particularly useful for more complex equations.

    Dr. Robinson concludes by encouraging users to explore more advanced math problems and settings. This ensures that they can confidently use JAWS for UEB math in various applications. If you experience computer issues in general, set it up to work the most efficiently with screen readers.

    Other Math Lessons:

    Transcribe Math Images

    Quadratic Math

    STEM with Embossing

    Perfect Digital Math

    JAWS and MathCat

  • Hayes Learns Proper Word Setup for Accessible Math Using a Brailliant Braille Display

    Student Hayes has issues completing math in WORD as her label number do not read. Dr. Robinson demonstrates how to resolve issues with auto-numbering in Word. She first identifies that automatic numbering is causing issues for the student using dot 2 and space in the Brailliant Braille display, especially when numbers appear incorrectly on the Braille display. To address this, she instructs to press “Alt + F” to open the File menu, followed by “T” for options, then “P” for proofing, and finally “Alt + A” to access AutoCorrect options.

    She guides users through unchecking five specific boxes that affect text formatting, ensuring the correct settings are applied. Dr. Robinson emphasizes the importance of turning off automatic numbered lists, which often causes unexpected changes in documents.

    After confirming the settings, she instructs on how to apply these changes by pressing “Enter” to save them. This step ensures the document is correctly formatted and ready for the student to use in MathKicker.AI.

    Braille Viewer to accurately solve math problems

    Next, Dr. Robinson advises turning on the Braille viewer. Using the Jaws context menu and U, to navigate to the utilities to access the Braille viewer. Braille viewer allows the teacher to view the math problems correctly on student screen in Braille. While student uses fingers to read display.

    Then Dr. Robinson explains how to use the Math Viewer by pressing “Insert + Space + Equals.” This enables the student to navigate through the math content character by character. This command helps ensure accuracy in reading and solving math problems, especially when using Braille displays.

    Finally, she explains how to open the Braille Math Editor now that auto numbering issues are resolved. Eventually, she will learn how to use split braille on her display. Student can braille equations in Nemeth code, and ensure that each step of the problem is correct to accurately solve math problems. Dr. Robinson highlights how the Math Editor will not accept incomplete or incorrect inputs. The student cannot close the editor without fixing errors. This method reinforces correct equation formatting. It ensures students accurately solve math problems using auditory and Braille math tools.

    Other Math Lessons

    Other Math Lessons:

    Transcribe Math Images

    Quadratic Math

    STEM with Embossing

    Perfect Digital Math

    JAWS and MathCat

    Unicode with UEB Math

    UEB Math with Jaws

    UEB LaTex math with Jaws

    Braille Math in WORD Editor-Multi-line

    Split Braille for Buffer Mode

    Braille Blaster

    More Desmos Lessons:

    Desmos 3D graphing

    for Geometry in Desmos

    for STEM and Embossing in Desmos

    Desmos and inserting graphs into Math Work in WORD

    Creating shaded Parabolas in Desmos

    Games with Desmos with Drag and Drop

    Drag n Drop in Macmillan Learning

    Creating Geometry Table

    Venn Diagram

    Solving inequalities

    Create Histogram

    Excel Trend line with Scatter Plot

    Other Excel Lessons that you can do in Sheets

    Flashcard Study

    Here is a younger student using the Braille Math Editor also.