Kaleigh, one of my (Dr Robinson) students since 2007, learned to Complete an excel graph in this lesson. She began with in-person lessons before transitioning to remote instruction. My husband and I moved 3,000 miles away to care for his parents, and we continued lessons via Skype, later advancing to Zoom. Over time, Kaleigh progressed from basic lessons to more sophisticated ones, covering her educational needs from third grade through graduation. By the time she finished, she was fully prepared for college and capable of completing all the work necessary to succeed in her future academic endeavors.
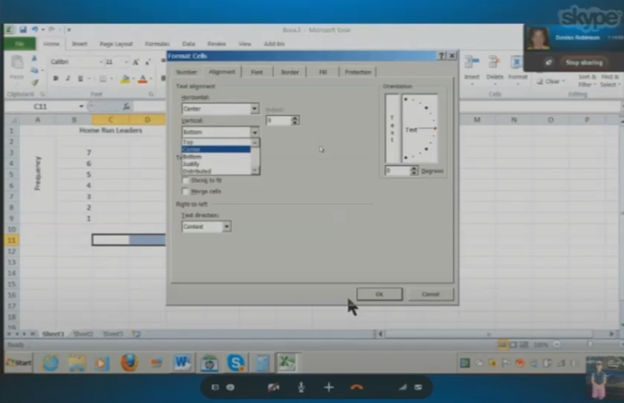
In this lesson, I teach her to navigate Excel using keyboard commands. She starts by creating a new document with CTRL + N and merges cells using ALT + H, M to set up graph labels. She inputs data from her Braille Display, with Excel’s talking software aiding her understanding. As she works on the histogram, she ensure she selects the correct cells and counts for the X and Y axes. She then adds and formats axis titles using ALT + J, A, I, adjusting the text orientation as needed.
Encouragement is Key
I consistently encourage her to check her data, ensuring she relies on assistive technology for accuracy. For formatting, she uses CTRL + C and CTRL + V to copy and paste sections, speeding up the process. We also cover coloring the graph, where I allow her to choose colors freely. I advise her to use consistent formats for simplicity. She shades sections of the histogram based on her data, using keyboard commands to control her workflow efficiently. This reinforces her independence and accuracy throughout the lesson.
Complete an excel graph Settings Option
After finishing the graph, she reviews her work using CTRL + Home to ensure all elements are correct. Satisfied, she copies the graph into Word and prepares to email it. This exercise demonstrates her effective use of keyboard shortcuts and assistive technology. Her growing independence in mastering Excel for academic tasks shows through her efficient and accurate work. The lesson highlights how the student combines guidance and technology to complete a detailed graph with confidence.
To efficiently convert Braille files to text or HTML, you can change extensions as shown in the video or open the Braille file in software like Duxbury Braille Translator or Braille Blaster. Export the file as plain text. Use a text editor to manually add HTML tags or employ a conversion tool for HTML formatting. This method ensures the content is accessible in both text and web formats, making it easier to efficiently convert Braille files to HTML and Word.
Guidance on converting Braille files into HTML or text files from this video:
Efficiently converting Braille files to HTML and Word requires specific software and keyboard commands. Below is the method I used in the Video
Extract Files:
Applications Key: Press Applications Key, then Down Arrow to select “Extract”.
Rename Files:
Rename: Press Applications Key, then Up Arrow to “Rename”, and Enter.
Change Extension: Use Right Arrow to navigate, Backspace to delete .txt, and type .html, then Enter.
Open Files in Notepad:
Open File: Press Enter on the file to open it in Notepad.
Save As HTML:
Save As: Press Alt + F, then Down Arrow to “Save As”, and Enter.
Change File Type: Press Tab to navigate to the file type dropdown, select “All Files”, and Enter.
Rename Extension: Press Shift + Tab to navigate back, use Right Arrow to move to the extension, Backspace to delete .txt, type .html, and Enter.
Copy and Paste Text:
Select All: Press Ctrl + A.
Copy: Press Ctrl + C.
Paste in Word: Open Word, then press Ctrl + V.
Show File Extensions:
Open File Explorer: Press Alt + D.
Open Organize Menu: Press Tab to navigate to the “Organize” button, and Enter.
Folder Options: Press Down Arrow to “Folder and search options”, and Enter.
View Tab: Press Ctrl + Tab to switch to the “View” tab.
Show Extensions: Press Tab to navigate to “Hide extensions for known file types”, press Spacebar to uncheck, and Enter.
These commands should help you efficiently manage and convert your files.
Here is another way to convert files
Extract the Braille File: Use software like Duxbury (DBT) or Braille Blaster Translator to open BRF or BRL files. This software can convert Braille files into readable text.
Export to Text Format: After extraction, use the “Export” function in DBT or other Braille translation software to save the file as a plain text (.txt) file.
Convert to HTML: Use a text editor to open the .txt file. You can manually add HTML tags to structure it as an HTML file or use a basic converter tool to help automate the process.
Essential WORD keyboard commands to help teachers who teach blind with talking software or sighted who just want to move faster. These are some of the most essential commands everyone should know, especially those mastering the essential commands for WORD keyboard users.
Here’s a summary of essential WORD keyboard commands for video users.
Keyboard shortcuts for all WORD versions.
Open Word: Press Windows + 5 to start Word from the taskbar.
Zoom In: Use Alt + V + Z to zoom to 200%.
Change Defaults:
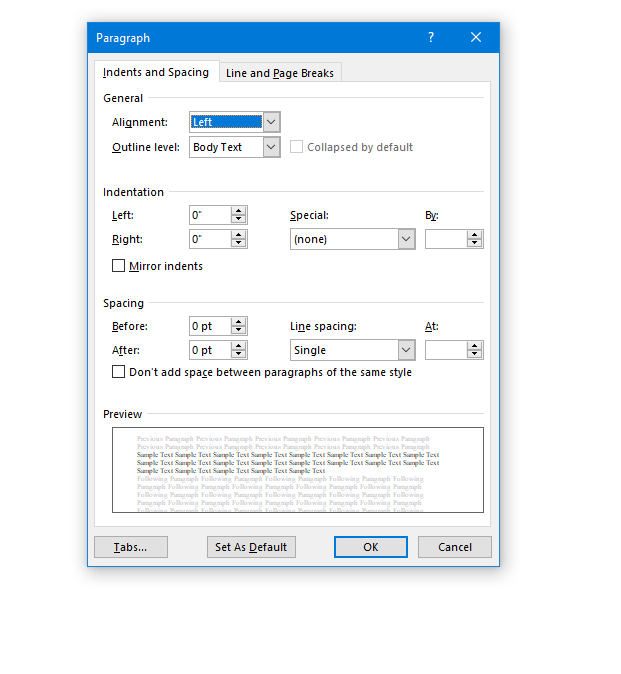
Open Paragraph Spacing: Press Alt + O + P.
Set Spacing to Single: Press Alt + P and change to single spacing.
Set Default for All Documents: Press Alt + D followed by Alt + A and then Enter.
Customize Document further
Change Font:
Select All Text: Press Ctrl + A.
Open Font Dialog: Press Ctrl + D.
Change Font to Times New Roman: Type “Times New Roman” and set size to 12.
Set Default for All Documents: Press Alt + D followed by Alt + A and then Enter.
Create Columns:
Open Page Layout: Press Alt + P.
Select Columns: Press J for columns.
Set Number of Columns: Press Alt + O + C and choose the number of columns.
Change Page Color:
Open Page Layout: Press Alt + P.
Open Colors: Press PC.
Select Color: Use arrow keys to choose a color and press Enter.
Add Border:
Open Borders: Press Alt + O + B.
These commands will help you efficiently navigate and customize documents. See other Setup options
Essential WORD keyboard commands for windows page setup for defaults
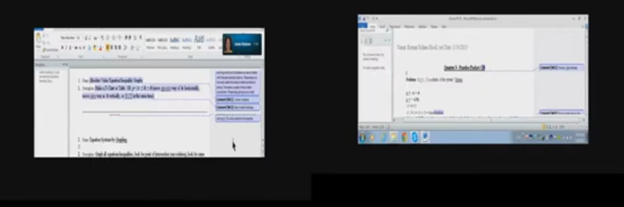
Track changes in Word for a 9th grade. This student was only using a brailler to braille out all work….a very slow process to get it transcribed, then to the teacher, then back to the student. Now, in 2 months the student has moved to completing all work on a computer, emailing to teacher, teacher corrects and sends back.
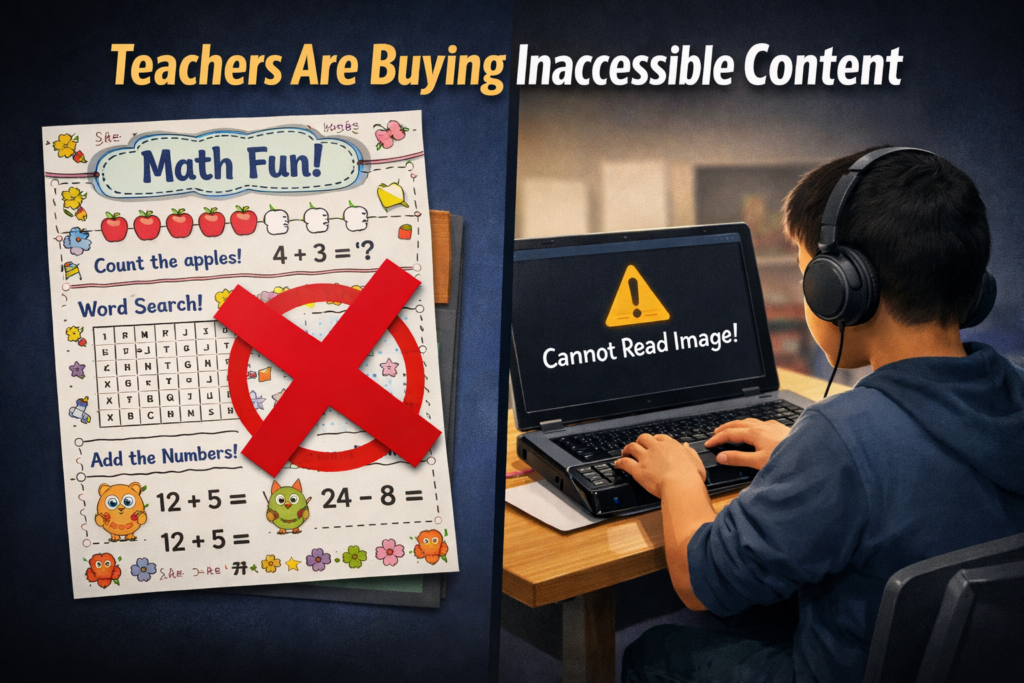
Fix Digital Accessibility Before Title II Enforcement-No access to work
Schools and colleges face serious gaps in digital access. These gaps harm blind and deaf students the most, and they also affect every learner who needs clear, structured content. Title II now requires full WCAG 2.1 AA compliance. Schools must shift from crisis responses to real systems. The good news is that this work is fixable when they follow a clear plan.
1. Start With an Accessibility Audit: Blind and Deaf Students Face the Sharpest Access Gaps
Every school should begin with a full digital audit. This audit must involve experts who use screen readers and braille displays every day on the platforms used in education. Without these specialists, audits miss the barriers that blind students face. Any image-based video must include described content throughout. Schools can find strong examples and guidance at Described and Captioned Media Program (DCMP).
Schools should also check whether interactive elements, buttons, and menus work with keyboard-only navigation. Many blind students rely on keyboard access, and inaccessible controls often block them before the lesson even begins.
The audit should include websites, LMS content, Google Classroom, PDFs, worksheets, videos, vendor platforms, parent portals, and staff materials. Real blind access testers expose problems that automated tools never find. Audits reveal the true accessibility debt. Schools need this view before anything else.
Most deaf learners use ASL as their primary language. They often need an actual signer on digital content as well as written text. Captions alone rarely provide full access, because captions do not follow ASL structure. Find out full details from DCMP.org also.
Schools should start with embedded text on all visual content first. This step creates a basic access layer while teams prepare for ASL. Once content stabilizes, schools can add ASL signers during development.
Schools must include ASL interpretation on videos, lessons, and major digital materials. An ASL signer keeps the message clear, complete, and culturally accurate.
This work must also be audited by a deaf professional who signs. Without that review, digital content remains incomplete and inaccessible.
2. Fix PDFs and Scanned Worksheets First
Most access failures start with inaccessible PDFs-which are actually images of work. Schools can convert scanned worksheets to readable text, add proper heading structure, insert alt text, tag tables, and ensure text reflows on mobile. These steps give blind students access at the same time as their peers. For easy full access, Just put everything into Microsoft WORD and if you can move a mouse cursor through the content, it will be accessible to a screen reader. make sure you add proper headings throughout.
3. Enforce Accessible Google Docs, Slides, and Assignments
Teachers create inaccessible content daily by pasting images of work into what was accessible if typed out properly in google. Schools should require headings, proper contrast, real alt text, logical reading order, described images, and accessible math. This one shift removes thousands of barriers. Currently Math is only fully accessible in Microsoft WORD using the Math editor. Google does not have all the appropriate tools in place to recreate what OFFICE 365 has already done.
Typically, only images of words appear in products from Google, which makes the content completely inaccessible to blind students. Embedded videos also stay inaccessible for deaf learners, because images never give enough detail or language to explain the lesson. Math remains inaccessible across Google products, and blind students cannot access equations without proper structure.
4. Make All Video Content Accessible
Videos must serve blind and deaf students. Schools should ensure accurate captions, audio descriptions, clear narration, and safe visual design. This protects access and reduces legal risk.
5. Replace Inaccessible Vendor Platforms
Many learning apps and platforms still fail WCAG standards. Schools must request VPATs, require WCAG 2.1 AA, demand remediation timelines, and remove non-compliant tools. Title II holds the school responsible, not the vendor. When schools stop buying inaccessible products, vendors will change their design or leave the market.
6. Train Staff in Real Accessibility Skills
Accessibility training must move beyond awareness. Staff need training in screen reader testing, accessible document workflows, caption skills, alt text guidelines, accessible math support, and LMS accessibility checks. Blind and deaf students rely on technology, not sight or hearing. Staff must understand these tools, so they must receive direct instruction from experts who use these tools daily. These specialists can walk staff through the fine details needed to make content fully accessible quickly and easily (relative to what content they already have).
7. Provide Blind and Deaf Students With Real-Time Access
Access cannot arrive days later. Schools should deliver materials at the same time as sighted peers, provide braille or screen-reader-ready files, use CART or interpreters, and ensure accessible assessments. This reduces OCR complaints and supports equal learning.
8. Build an Accessibility Governance Team
Districts need structure to stay compliant. This team sets policy, provides training, monitors compliance, reviews content, approves vendors, and reports progress. Governance turns accessibility from a reaction into a system.
9. Bring in Specialists When Needed
Most schools lack internal expertise. They can partner with certified blindness professionals, deaf education specialists, accessibility technologists, braille experts, and WCAG consultants. Title II allows districts to use outside experts when staff lack training.
10. Address a Damaging Message Still Circulating in Schools
Many professors and teachers still hear, “Check your materials, but don’t worry about them.” This message shows how long schools have ignored accessibility laws. Title II removes the option to delay. Schools must fix inaccessible content, not simply acknowledge it.
11. The Word “Accommodation” Must Go
The word “accommodation” was not removed from Title II, but the new DOJ rule shifts the focus toward accessibility from the start, especially for digital content.
Schools must stop relying on the word accommodation. The term assumes students start with barriers and then wait for fixes. Blind and deaf students lose time every day when access comes after instruction. They fall behind because the content was inaccessible from the start.
Title II requires full access at the moment instruction begins. Students must receive materials in the same format, at the same time, as their peers. This shift removes delay, reduces frustration, and ends the cycle of constant catch-up. True access begins when schools design content correctly, not when they repair barriers later.
12. Make Accessibility Part of School Culture
Accessibility becomes sustainable when it becomes normal. Schools can add accessibility checks to grading policies, include accessibility in evaluations, require captions, post accessible templates, and adopt accessible curriculum materials. Small habits prevent massive remediation later.
13. Remove and Archive All Inaccessible Content by April 23
Schools must remove inaccessible digital content by April 23. They must secure this content so only the original creator can access it. If old materials stay public, anyone can use them to file an accessibility complaint. This creates immediate legal risk for the educational institutions.
Most schools will find it easier to build fully accessible content from the start. Rebuilding old, image-based, untagged, or uncaptioned materials often takes far more time than creating new accessible versions. Schools protect themselves and their students when they remove inaccessible work, archive it safely, and rebuild content using WCAG 2.1 AA standards now so they can be fully uploaded on April 24, 2026.
Closing Note: Access Protects Everyone
Blind and deaf students face the hardest barriers, yet accessible design lifts all learners. Clear content improves structure, readability, quality, and learning across every classroom. Schools that begin this work now protect their students, their staff, and their programs.
Dates to Follow
What this means for schools and colleges
Larger districts and colleges (≥ 50,000 population)
Deadline: April 24, 2026
Standard: WCAG 2.1 AA
Scope: Websites, web content, mobile apps, PDFs, forms, LMS content, videos, social media, and anything accessed through a browser
Smaller districts and colleges (<50,000 population): April 26, 2027
In April 2024, the U.S. Department of Justice published its final rule updating Title II of the ADA to require that state and local governments make their websites and mobile apps accessible by conforming to WCAG 2.1 Level AA. (WCAG 2.1 AA) or face the consequences.
This is the first time the DOJ has formally adopted a specific technical standard for digital accessibility under Title II.
All state and local government entities, including:
State agencies
Counties, cities, municipalities
Independent school districts
Special district governments
Contractors or vendors providing public‑facing digital services on behalf of these entities
This includes any third‑party platform used to deliver services (payment portals, scheduling systems, learning platforms, etc.).
Compliance deadlines
The DOJ set two compliance timelines:
April 24, 2026 → Entities with 50,000+ population
April 26, 2027 → Entities with <50,000 population and special districts
These dates apply to full conformance with WCAG 2.1 AA for all covered digital content.
What WCAG 2.1 AA requires
WCAG 2.1 AA addresses barriers affecting people with:
Blindness or low vision
Deafness or hearing loss
Cognitive or learning disabilities
Mobility or dexterity impairments
Key requirements include:
Text alternatives for images
Captioning and audio description for video
Keyboard accessibility for all functions
Sufficient color contrast
Logical heading structure
Resizable text and responsive layouts
Avoiding motion‑based inputs (e.g., shaking a device)
Touch target size and spacing for mobile apps
What content is covered?
The rule applies to all web content and mobile apps a public entity provides or makes available. This includes:
Websites
Mobile apps
Online forms
PDFs and digital documents
Portals and dashboards
Learning platforms
Third‑party tools used to deliver public services
What content is not required to comply?
The rule includes limited exceptions:
Archived web content
Preexisting traditional electronic documents (e.g., old PDFs)
Content posted by non‑affiliated third parties
Password‑protected individual documents
Preexisting social media posts
These exceptions are narrow—most active, public‑facing content must meet WCAG 2.1 AA.
Why the DOJ adopted WCAG 2.1 AA
The DOJ emphasized that inaccessible digital services create real barriers—for example:
Blind users unable to access images without alt text
Inaccessible forms blocking access to voting, tax info, or school services
Barriers to participating in civic events
The rule aims to ensure equal access to essential public services.
What this means schools, colleges and any educational institution
For blind/low‑vision students and families receive real‑time, nonvisual access to digital content. WCAG 2.1 AA now gives legal backbone for the accessibility standards people advocate for—especially around:
Alt text
Keyboard access
Logical structure
Screen‑reader compatibility
Accessible PDFs
Mobile app access ease with braille display or Voice Over
Captioning and audio description
This is a powerful tool for your advocacy with districts, IEP teams, and state agencies.
You’re not imagining it — public colleges and universities really are scrambling, and the panic is coming from several very real, structural reasons that the higher‑ed sector has been avoiding for years. Here’s what the current reporting and expert analysis show, grounded in the sources we just pulled.
Why colleges and Schools are panicking about the new Title II WCAG 2.1 rule
1. The rule is no longer “guidance” — it’s enforceable law
Public colleges and universities are now legally required to meet WCAG 2.1 AA across all digital services. This is a major shift from the old “best practice” era.
For higher ed, which has thousands of pages, PDFs, videos, portals, and legacy systems, this is a massive lift.
2. The deadlines are tight — especially for large institutions
Public institutions serving populations of 50,000+ must comply by April 24, 2026. Smaller ones have until April 26, 2027.
Most colleges are nowhere near WCAG 2.1 AA compliance today.
3. Higher ed has huge accessibility debt
Experts note that colleges have:
Decentralized web teams
Fragmented domains
Thousands of legacy PDFs
Inaccessible videos
Third‑party tools that aren’t compliant
This means they’re not starting from zero — they’re starting from negative.
4. Colleges have been relying on “accommodations,” not accessible design
For years, many institutions leaned on disability services offices to “fix” inaccessible content after the fact. The new rule requires proactive accessibility, not reactive accommodations.
This is a cultural shift higher ed has resisted for decades.
5. The exceptions are narrow — and colleges hoped they’d be broader
The DOJ’s exceptions (archived content, pre‑existing social media posts, third‑party content, etc.) are very limited.
Most active content must be fully accessible.
6. Colleges and schools fear litigation and OCR complaints
Higher ed is already a top target for ADA and Section 504 complaints. Now that WCAG 2.1 AA is the explicit legal standard, colleges know enforcement will increase.
7. They know they can’t fix this with a one‑time project
Experts warn that accessibility must become a digital operating model, not a “compliance project.”
That means governance, training, workflows, and accountability — areas where higher ed is historically weak.
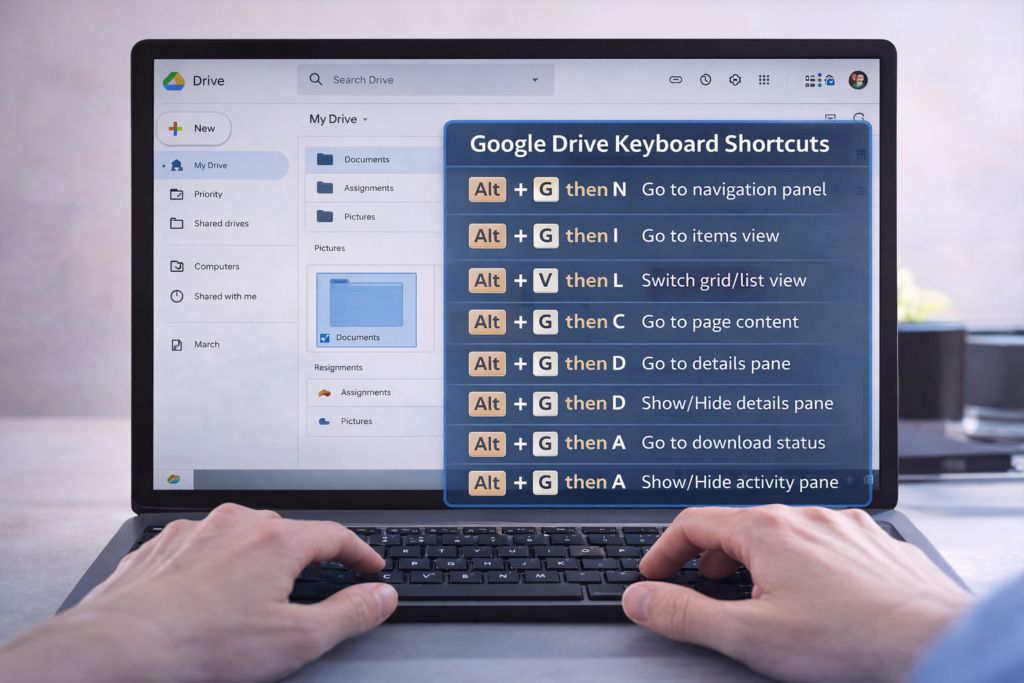
Google Drive Keyboard shortcuts become much easier — and faster — when you know the right screen reader keyboard commands. In this TechVision tutorial, I walk you through how JAWS and NVDA users can move through folders, open files, switch views, and manage Drive content without ever touching a mouse.
These skills build confidence, speed, and independence for blind and low‑vision users, students learning digital literacy, and anyone who prefers keyboard‑based navigation. You’ll learn how to open menus, jump between items, select files, search your Drive, and access settings with predictable, repeatable commands.
Whether you’re organizing schoolwork, managing shared folders, or teaching students how to work in the cloud, these shortcuts make Google Drive more accessible and efficient for everyone.
TechVision: Empowering real‑life tech skills with clarity, accessibility, and confidence.
Is your computer running slow, freezing, or taking forever to start up? Speed Up a Slow Computer with a few simple maintenance steps can make a huge difference. This is especially true for beginners and blind/low‑vision users who rely on consistent performance with JAWS or NVDA.
In this TechVision tutorial, I walk you through practical, real‑life steps to speed up your PC and keep it running smoothly:
✔ Update your .NET Framework Having the latest .NET installed in your Control Panel helps programs run correctly. It also reduces system errors.
✔ Manage your startup programs Too many apps launching at boot can slow everything down. Turning off unnecessary startup items gives you a faster, cleaner start.
Keep Windows and Office updated
Regular updates improve performance, stability, and security — and prevent many common slow‑computer issues.
✔ Declutter your system Uninstall programs you don’t use and delete temporary files to free up space. This also reduces background load.
✔ Run a full antivirus scan Malware can dramatically slow down your system. A full scan helps identify and remove hidden threats.
✔ Perform regular maintenance Disk Cleanup, defrag (for HDDs), or optimize for SSD and clearing temp files all help your computer run more efficiently.
These steps are simple, effective, and perfect for anyone building independence and confidence with their technology.
TechVision: Empowering real‑life tech skills with clarity, accessibility, and confidence.Video with steps here
Struggling to find your drives or open File Explorer quickly? Adding the This PC icon to your desktop is one of the fastest ways to navigate Windows — especially for beginners, blind/low‑vision users, and anyone building confidence with their computer.
In this quick TechVision tutorial, I show you how to turn on desktop icons, place This PC right where you need it, and get instant access to your drives, folders, and storage. A simple change that makes a big difference in independence and efficiency.
Whether you’re teaching students, supporting a family member, or learning for yourself, this step gives you a clean, predictable starting point every time you sit down at the computer.
TechVision: Building real‑life tech skills with clarity, confidence, and accessibility at the center.
The Hidden Setting Causing the Problem of Microsoft Edge Switching Accounts
Microsoft Edge includes a feature called Automatic Profile Switching. It’s designed to “help” by choosing the profile it thinks matches the website you’re visiting.
In reality, it often does the opposite—forcing you back into the first account ever used on the device.
To quickly change profiles: Ctrl+Shift+M
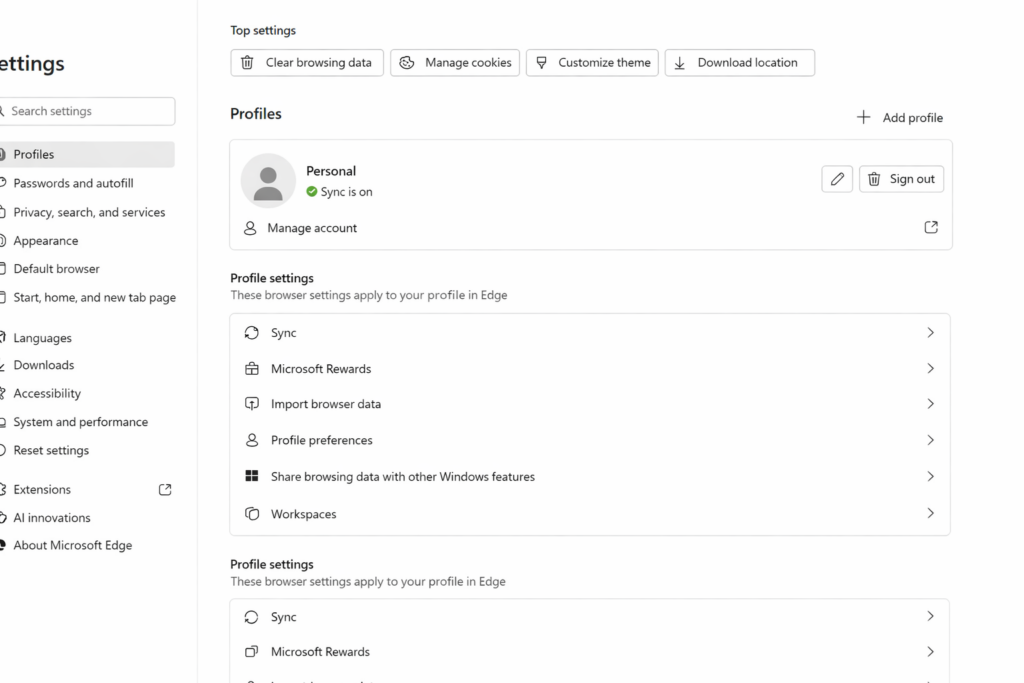
How to turn it off
Open Microsoft Edge
Go to Settings
Select Profiles
Click or Tab to profile preferences
Turn OFF: Automatic sign in on Edge and Tab and turn off Allow single sign-on..
Once this is off, Edge will finally stop overriding your login and let you choose the account you actually want.
What If You Want Both Accounts to Share the Same Information?
This is the part that confuses most persons.
Turning off automatic switching stops Edge from forcing the wrong account, but it does not merge or sync data between accounts. Microsoft does not allow two accounts to share:
bookmarks
passwords
OneDrive files
emails
sync history
app licenses
school‑managed content
So the person must decide what they actually want:
Option 1 — Keep the Accounts Separate (Recommended for Most Persons)
This is the cleanest, safest setup.
Do this if the person wants:
A school or work account and a personal account
No mixing of data
No login conflicts
A simple way to choose which account to use
How to set it up:
Create two separate Edge profiles
Turn OFF automatic profile switching
Turn ON sync only for the primary profile they use daily
Keep both profiles visible in the top‑right corner: Ctrl+Shift+M allows for fast switching so tab to other profile and enter
This keeps everything organized and prevents school-work restrictions from spilling into personal life.
Option 2 — Move Data From One Account Into the Other
If the person wants “everything in one place,” they must choose a primary account and manually move what’s movable.
What can be moved:
Bookmarks → export from one profile, import into the other
Passwords → export/import through Edge Password Manager
Files → manually move from OneDrive A to OneDrive B
Emails → forward or export/import
What cannot be merged:
Sync history
School‑managed settings
Microsoft Store purchases
Xbox/Game Pass data
Anything tied to an organizational account
This is more work and not always advisable for persons on school or work‑managed devices.
How to Help a Person Decide
Here’s the exact question to ask:
“Do you want your accounts to stay separate, or do you want everything from your school-work account to move into your personal account?” Typically you do not.
Once they answer, the path is clear.
TechVision Bottom Line
If Edge keeps logging you into the wrong account, it’s not you—it’s the browser. Turn off Automatic Profile Switching, and the problem disappears instantly.
If you use two accounts, keep them separate with two profiles. If you want everything in one place, choose a primary account and migrate what you can.